Getting Started#
Installing cuQuantum#
From conda-forge#
cuQuantum#
Using conda, you can install cuQuantum with the following command:
conda install -c conda-forge cuquantum
Note
To enable automatic MPI parallelism for cuTensorNet and cuDensityMat, install cuquantum with Open MPI
from conda-forge: conda install -c conda-forge cuquantum openmpi. For more information,
please refer to cuTensorNet MPI Installation Notes.
Warning
The mpich package on conda-forge is not CUDA-aware. For a workaround, see our
notes on passing an external package to conda.
cuQuantum Python#
To install cuQuantum Python, use this command:
conda install -c conda-forge cuquantum-python
Specifying CUDA version#
If you need to specify version of CUDA, use the cuda-version package.
For cuquantum:
conda install -c conda-forge cuquantum cuda-version=12
For cuquantum-python:
conda install -c conda-forge cuquantum-python cuda-version=12
The conda solver will install all required dependencies for you.
Individual components#
cuStateVec#
To install only cuStateVec from conda, use this command:
conda install -c conda-forge custatevec
cuTensorNet#
To install only cuTensorNet from conda, use this command:
conda install -c conda-forge cutensornet
cuDensityMat#
To install only cuDensityMat from conda, use this command:
conda install -c conda-forge cudensitymat
MPI installation notes#
Both cuTensorNet and cuDensityMat natively support MPI. To encapsulate MPI-related features, we provide and distribute a separate library alongside cuTensorNet and cuDensityMat.
The libraries are called libcutensornet_distributed_interface_mpi.so and libcudensitymat_distributed_interface_mpi.so respectively.
When you install cuTensorNet or cuDensityMat with Open MPI, an environment variable is set by conda. The variable is
called CUTENSORNET_COMM_LIB/CUDENSITYMAT_COMM_LIB, and it tells libcutensornet.so or libcudensitymat.so which distributed interface library to use.
If this variable is not set while MPI support is enabled, the C library will error at runtime.
Note
The mpich package on conda-forge is not CUDA-aware. To work around this, you can provide your system’s MPI implementation to
conda as an external package. To do this, use conda install -c conda-forge cutensornet "mpich=*=external_*". As long as the
system-provided MPI implementation is discoverable by conda, it should function as a regular conda package. For more information,
see conda-forge’s documentation.
Warning
If you have enabled the distributed interface of cuTensorNet or cuDensityMat, you must set the corresponding environment variable. If you do not, an internal MPI initialization attempt within the C library will result in errors.
Setting CUQUANTUM_ROOT#
Words of caution#
With conda, packages are installed in the current ${CONDA_PREFIX}. If your use of
cuQuantum involves building libraries or packages that use cuTensorNet or cuStateVec,
you may be required to provide or define CUQUANTUM_ROOT. One way to set this is to use the
${CONDA_PREFIX} as follows:
export CUQUANTUM_ROOT=${CONDA_PREFIX}
This will work, and is safe to use alongside the conda environment where cuQuantum is installed.
If you change conda environments while this variable is set, it will result in unexpected behavior.
Warning
Setting environment variables referring to specific conda environments is not recommended.
Using CUQUANTUM_ROOT=${CONDA_PREFIX} should be done with caution. For similar reasons, it is
not advisable to use ${CONDA_PREFIX} in your LD_LIBRARY_PATH when using conda-build
or similar. For more detail, see this section of conda-build’s
documentation.
Our recommendation#
When setting CUQUANTUM_ROOT, you should use conda env config vars set to create an environment variable attached to
the conda environment where cuQuantum is installed:
conda env config vars set CUQUANTUM_ROOT=${CONDA_PREFIX}
Confirm that the environment variable is set correctly by reactivating the conda environment:
conda activate my_conda_env && \
echo ${CUQUANTUM_ROOT}
From PyPI#
cuQuantum and cuQuantum Python are available on PyPI, with package names that vary depending on the CUDA Toolkit version.
While we also provide meta-packages that automatically determine the appropriate CUDA version during installation,
we strongly recommend explicitly installing the versioned wheels (with the -cuXX suffix) instead of using the meta-packages.
Version-specific wheels#
To ensure compatibility, install the cuQuantum wheels corresponding to your CUDA version. Take CUDA 12 as an example, use:
pip install cuquantum-cu12
Similarly, to install cuQuantum Python for CUDA 12:
pip install cuquantum-python-cu12
Using meta-packages#
Users may also install cuQuantum and cuQuantum Python without specifying the CUDA version. However, this approach relies on runtime CUDA detection, which may not always work as expected. To install the meta-package for cuQuantum, use:
pip install --no-cache-dir cuquantum
Note
The argument --no-cache-dir is strongly recommended for pip 23.1+ to force pip to execute the CUDA version detection logic.
The PyPI package for cuQuantum is available under the cuquantum project. The PyPI package for cuQuantum Python is available under the cuquantum-python project.
From source#
In addition to PyPI and conda installation, users can also compile and install cuQuantum Python from the cuQuantum source repository, please follow the steps below:
Clone the cuQuantum source repository:
git clone https://github.com/NVIDIA/cuQuantumSet
CUDA_PATHto point to your CUDA installation[optional] Make sure cuQuantum C libraries and cuTENSOR are visible in your
LD_LIBRARY_PATHSwitch to the directory containing the Python implementation:
cd cuQuantum/pythonBuild and install: - Run
pip install .if you skip Step 3 above - Runpip install -v --no-deps --no-build-isolation .otherwise (advanced)
Note
The build-time and runtime dependencies can be found in cuQuantum python dependencies
For Step 5, if you are building from source for testing/developing purposes you’d likely want to insert a
-eflag before the last period (sopip ... .becomespip ... -e .):-e: use the “editable” (in-place) mode-v: enable more verbose output--no-deps: avoid installing the run-time dependencies--no-build-isolation: reuse the current Python environment instead of creating a new one for building the package (this avoids installing any build-time dependencies)
Please ensure that you use consistent binaries and packages for either CUDA 12 or 13. Mixing-and-matching will result in undefined behavior.
From NVIDIA DevZone#
Using archive#
The cuQuantum archive can be downloaded from the NVIDIA’s developer website at https://developer.nvidia.com/cuQuantum-downloads Please note that both cuTensorNet and cuDensityMat depend on cuTENSOR. Documentation and download instructions are available under the NVIDIA cuTENSOR Developer website.
The cuQuantum archive name takes the following form:
cuquantum-linux-${ARCH}-${CUQUANTUM_VERSION}.${BUILD_NUMBER}_cuda${CUDA_VERSION}-archive.tar.xz
For example, to download the x86_64 archive with CUDA version 12, use:
wget https://developer.download.nvidia.com/compute/cuquantum/redist/cuquantum/linux-x86_64/cuquantum-linux-x86_64-24.08.0.5_cuda12-archive.tar.xz
To expand the archive, use:
tar -xvf cuquantum-linux-x86_64-24.08.0.5_cuda12-archive.tar.xz
And finally, update your .bashrc (or similar) so that CUQUANTUM_ROOT is defined:
export CUQUANTUM_ROOT=/path/to/cuquantum-linux-x86_64-24.08.0.5_cuda12-archive
Note
To enable native MPI support for cuTensorNet or cuDensityMat, please see the associated MPI installation notes.
MPI installation notes#
To enable native MPI support for cuTensorNet or cuDensityMat when using the archive from the NVIDIA DevZone, follow this procedure:
Navigate to the root directory of
cutensornet_distributed_interface_mpi.corcudensitymat_distributed_interface_mpi.c.Run the activation script and compile the library providing MPI support.
Set the environment variable called
CUTENSORNET_COMM_LIBorCUDENSITYMAT_COMM_LIB.
Run the activation script#
Taking cuTensorNet as an example, the script, activate_mpi.sh (or activate_mpi_cutn.sh starting cuTensorNet v2.6.0), will compile cuTensorNet’s distributed interface by calling gcc:
cat activate_mpi.sh
...
gcc -shared -std=c99 -fPIC \
  -I${CUDA_PATH}/include -I../include -I${MPI_PATH}/include \
  cutensornet_distributed_interface_mpi.c \
  -L${MPI_PATH}/lib64 -L${MPI_PATH}/lib -lmpi \
  -o libcutensornet_distributed_interface_mpi.so
export CUTENSORNET_COMM_LIB=${PWD}/libcutensornet_distributed_interface_mpi.so
The compilation command requires the following variables to be defined:
CUDA_PATH… the path to your CUDA installation (e.g.)/usr/local/cudaMPI_PATH… the path to your MPI installation
We expect to find mpi.h under ${MPI_PATH}/include. This activation script will also export a definition
for CUTENSORNET_COMM_LIB=${CUQUANTUM_ROOT}/distributed_interfaces/libcutensornet_distributed_mpi.so.
You should add this to your .bashrc or similar.
Using system package managers#
To use your system’s package manager to install cuQuantum, use NVIDIA’s selection tool for cuQuantum.
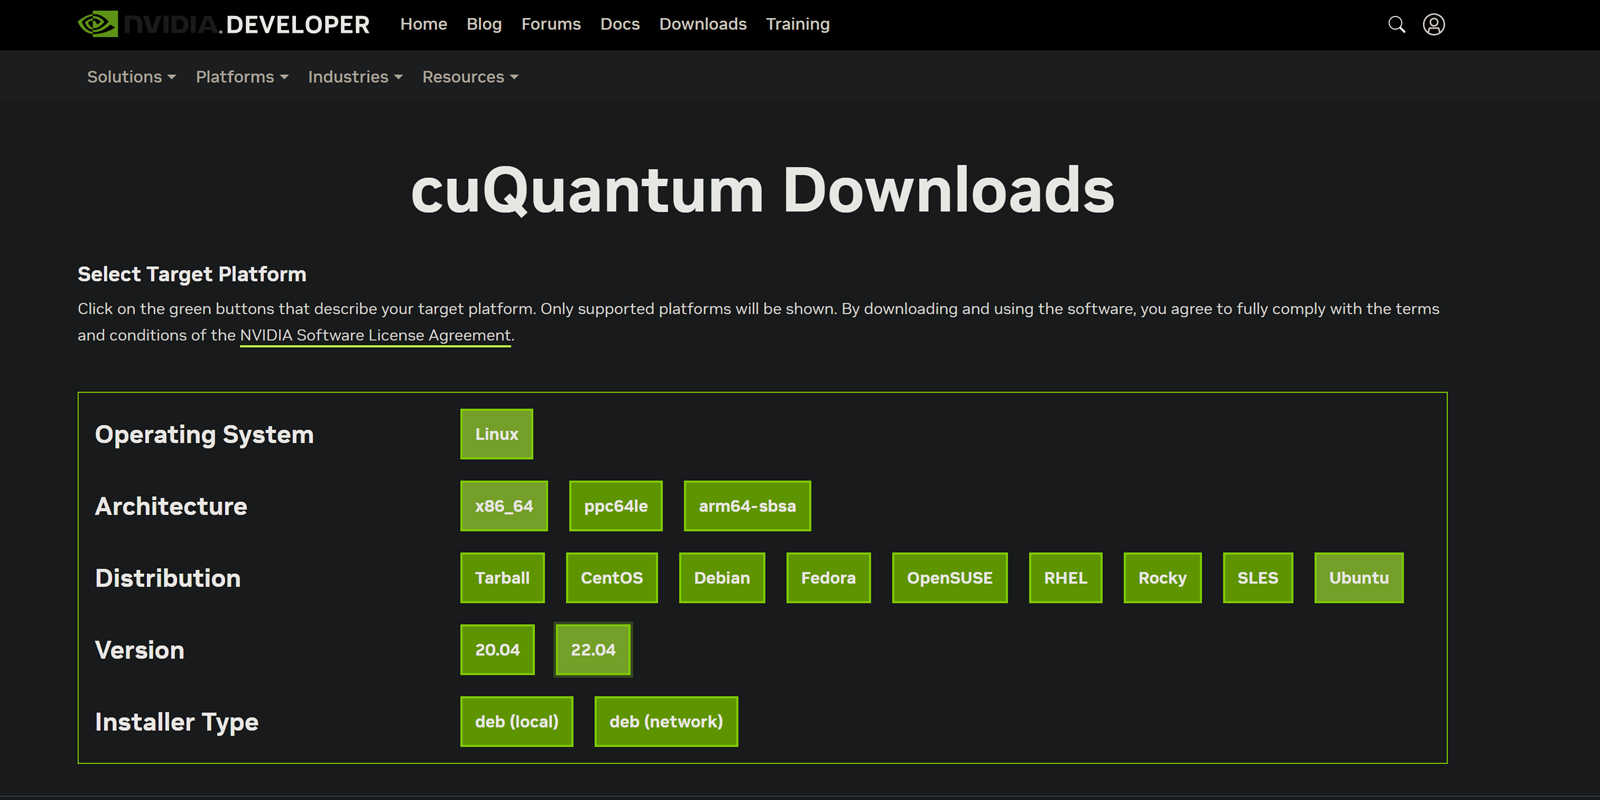
As an illustrative example, the commands for deb (network) installation under Ubuntu 22.04 x86_64
are outlined in the following sections. We also describe how update-alternatives can be used to manage your
installation. See this list for quick navigation:
Keyring installation#
The commands to download the keyring, install it, and update the packaging tool are as follows:
wget https://developer.download.nvidia.com/compute/cuda/repos/ubuntu2204/x86_64/cuda-keyring_1.1-1_all.deb
sudo dpkg --install cuda-keyring_1.1-1_all.deb
sudo apt-get update
Generic installation#
To install cuquantum, use this command:
sudo apt-get --yes install cuquantum
Note
A generic installation of cuQuantum will download and configure cuQuantum for all currently supported CUDA major versions. For details on managing your installation of cuQuantum review our section on using update-alternatives.
Specifying CUDA version#
The command to install cuquantum with a specific version of CUDA looks like this:
sudo apt-get --yes install cuquantum-cuda-XY
Where XY indicates the major version of CUDA. For example, the following command will
install cuquantum with support for a major version of CUDA equal to 12:
sudo apt-get --yes install cuquantum-cuda-12
Valid major versions of CUDA
Show supported versions and commands
CUDA 12 → sudo apt-get --yes install cuquantum-cuda-12CUDA 13 → sudo apt-get --yes install cuquantum-cuda-13Using update-alternatives#
update-alternatives can be used to view and update the provider for /usr/src/libcuquantum/distributed_interfaces.
To view the system’s installation of cuQuantum, you can use this command:
sudo update-alternatives --display cuquantum
cuquantum - auto mode
  link best version is /usr/src/libcuquantum/12/distributed_interfaces
  link currently points to /usr/src/libcuquantum/12/distributed_interfaces
  link cuquantum is /usr/src/libcuquantum/distributed_interfaces
  slave custatevec.h is /usr/include/custatevec.h
  slave cutensornet is /usr/include/cutensornet
  slave cutensornet.h is /usr/include/cutensornet.h
  slave libcustatevec.so is /usr/lib/x86_64-linux-gnu/libcustatevec.so
  slave libcustatevec.so.1 is /usr/lib/x86_64-linux-gnu/libcustatevec.so.1
  slave libcustatevec_static.a is /usr/lib/x86_64-linux-gnu/libcustatevec_static.a
  slave libcutensornet.so is /usr/lib/x86_64-linux-gnu/libcutensornet.so
  slave libcutensornet.so.2 is /usr/lib/x86_64-linux-gnu/libcutensornet.so.2
  slave libcutensornet_static.a is /usr/lib/x86_64-linux-gnu/libcutensornet_static.a
/usr/src/libcuquantum/11/distributed_interfaces - priority 110
  slave custatevec.h: /usr/include/libcuquantum/11/custatevec.h
  slave cutensornet: /usr/include/libcuquantum/11/cutensornet
  slave cutensornet.h: /usr/include/libcuquantum/11/cutensornet.h
  slave libcustatevec.so: /usr/lib/x86_64-linux-gnu/libcuquantum/11/libcustatevec.so
  slave libcustatevec.so.1: /usr/lib/x86_64-linux-gnu/libcuquantum/11/libcustatevec.so.1
  slave libcustatevec_static.a: /usr/lib/x86_64-linux-gnu/libcuquantum/11/libcustatevec_static.a
  slave libcutensornet.so: /usr/lib/x86_64-linux-gnu/libcuquantum/11/libcutensornet.so
  slave libcutensornet.so.2: /usr/lib/x86_64-linux-gnu/libcuquantum/11/libcutensornet.so.2
  slave libcutensornet_static.a: /usr/lib/x86_64-linux-gnu/libcuquantum/11/libcutensornet_static.a
/usr/src/libcuquantum/12/distributed_interfaces - priority 120
  slave custatevec.h: /usr/include/libcuquantum/12/custatevec.h
  slave cutensornet: /usr/include/libcuquantum/12/cutensornet
  slave cutensornet.h: /usr/include/libcuquantum/12/cutensornet.h
  slave libcustatevec.so: /usr/lib/x86_64-linux-gnu/libcuquantum/12/libcustatevec.so
  slave libcustatevec.so.1: /usr/lib/x86_64-linux-gnu/libcuquantum/12/libcustatevec.so.1
  slave libcustatevec_static.a: /usr/lib/x86_64-linux-gnu/libcuquantum/12/libcustatevec_static.a
  slave libcutensornet.so: /usr/lib/x86_64-linux-gnu/libcuquantum/12/libcutensornet.so
  slave libcutensornet.so.2: /usr/lib/x86_64-linux-gnu/libcuquantum/12/libcutensornet.so.2
  slave libcutensornet_static.a: /usr/lib/x86_64-linux-gnu/libcuquantum/12/libcutensornet_static.a
To manage your installation of cuQuantum with update-alternatives, use this command to select the provider for
/usr/src/libcuquantum/distributed_interfaces:
sudo update-alternatives --config cuquantum
...
There are 2 choices for the alternative cuquantum (providing /usr/src/libcuquantum/distributed_interfaces).

  Selection    Path                                             Priority   Status
------------------------------------------------------------
* 0            /usr/src/libcuquantum/12/distributed_interfaces   120       auto mode
  1            /usr/src/libcuquantum/11/distributed_interfaces   110       manual mode
  2            /usr/src/libcuquantum/12/distributed_interfaces   120       manual mode

Press <enter> to keep the current choice[*], or type selection number: ...
You must specify a Selection number, and refer to the major version of CUDA you wish to use.
Installing cuQuantum with Frameworks#
CUDA Quantum#
cuQuantum is the default simulator for systems where NVIDIA GPUs are available. For more information, see CUDA Quantum’s documentation. To install CUDA Quantum, use the following command:
pip install cuda-quantum
If you plan to use CUDA Quantum with a conda environment, please follow the instructions on CUDA Quantum’s PyPI project page, here:
https://pypi.org/project/cuda-quantum.
Qiskit#
cuQuantum is distributed with qiskit-aer-gpu as an available backend.
Different APIs in Qiskit will enable or rely on functionality provided by cuQuantum differently.
For example, if you are using the AerSimulator,
leveraging cuStateVec is possible with the keyword argument: cuStateVec_enable=True.
For GPU accelerated tensor-network based simulation, cuTensorNet is the default.
conda-forge#
To install a GPU-enabled version of Qiskit, use the following command:
conda install -c conda-forge qiskit-aer
Note
To install with a specific version of CUDA, use the cuda-version package:
conda install -c conda-forge qiskit-aer cuda-version=XY
where XY is the CUDA major version.
Show supported versions and commands.
CUDA 12 → conda install -c conda-forge qiskit-aer cuda-version=12CUDA 13 → conda install -c conda-forge qiskit-aer cuda-version=13PyPI#
To install a GPU-enabled version of Qiskit, use the following command:
pip install -v --no-cache-dir qiskit-aer-gpu
Cirq#
To use cuQuantum with Cirq, you’ll can compile qsim or
install the qsimcirq package from conda-forge. We’ll assume you’ve installed cuQuantum with conda.
Upon completion you can use the cuStateVec backend by setting gpu_mode=1 in the
QSimOptions object
passed to various qsimcirq simulator components.
with the cuQuantum Appliance
QSimOptions has a different API signature in the cuQuantum Appliance:
class QSimOptions:
    ...
    gpu_mode: Union[int, Sequence[int]] = (0,)
    gpu_network: int = 0
    ...
These options are described in the cuQuantum Appliance section for Cirq. Here’s an excerpt from that section:
|
The GPU simulator backend to use. If |
|
Topology of inter-GPU data transfer network. This option is effective when multi-GPU support is enabled. Supported network topologies are switch network and full mesh network. If 0 is specified, network topology is automatically detected. If 1 or 2 is specified, switch or full mesh network is selected, respectively. Switch network is aiming at supporting GPU data transfer network in DGX A100 and DGX-2 in which all GPUs are connected to NVSwitch via NVLink. GPUs connected via PCIe switches are also considered as the switch network. Full mesh network is aiming at supporting GPU data transfer networks seen in DGX Station A100/V100 in which all devices are directly connected via NVLink. |
conda-forge#
If you prefer to install qsim from conda, use the following command:
conda install -c conda-forge qsimcirq
Note
To install with a specific version of CUDA, use the cuda-version package:
conda install -c conda-forge qsimcirq cuda-version=XY
where XY is the CUDA major version.
Show supported versions and commands.
CUDA 12 → conda install -c conda-forge qsimcirq cuda-version=12CUDA 13 → conda install -c conda-forge qsimcirq cuda-version=13exporting CUQUANTUM_ROOT
While we include export CUQUANTUM_ROOT=${CONDA_PREFIX} in the commands for this section, they are superfluous if you followed our
best practices recommendations. Specifically,
you should not export CUQUANTUM_ROOT=... as it defines the environment variable globally for your current shell session. We include the export
command to guarantee that the commands will execute successfully when copied and pasted.
Source#
export CUQUANTUM_ROOT=${CONDA_PREFIX}
git clone https://github.com/quantumlib/qsim.git && \
    pip install -v --no-cache-dir .
Please note that the above command compiles qsim + qsimcirq from source and installs them into your local environment.
This requires that a valid CUDA compiler toolchain is detectable by cmake. During the build, you should see status messages
regarding a qsim_custatevec target. Given you’re building from source, you can use the editable mode in pip:
export CUQUANTUM_ROOT=${CONDA_PREFIX}
git clone https://github.com/quantumlib/qsim.git && \
    pip install -v --no-cache-dir --editable .
While intended for developers, it can also make it easier to pull updates from the source repository.
Note
Follow our recommendation for setting environment variables attached to a conda environment.
For more details, see the section on setting cuQuantum’s root directory.
PennyLane#
cuQuantum is a dependency of pennylane-lightning[gpu]. To install PennyLane with GPU acceleration, please refer to
PennyLane’s installation instructions
under their lightning-gpu project.
conda-forge#
If you prefer to install PennyLane from conda, use the following command:
conda install -c conda-forge pennylane-lightning-gpu
Note
To install with a specific version of CUDA, use the cuda-version package:
conda install -c conda-forge pennylane-lightning-gpu cuda-version=XY
where XY is the CUDA major version.
Show supported versions and commands.
CUDA 12 → conda install -c conda-forge pennylane-lightning-gpu cuda-version=12CUDA 13 → conda install -c conda-forge pennylane-lightning-gpu cuda-version=13PyPI#
The cuQuantum SDK must be in your LD_LIBRARY_PATH. Installation is done with this command:
pip install pennylane-lightning[gpu]
Running the cuQuantum Appliance#
The cuQuantum Appliance is available on NGC: https://catalog.ngc.nvidia.com/orgs/nvidia/containers/cuquantum-appliance
Regardless of how you use the cuQuantum Appliance, you must pull the container:
docker pull nvcr.io/nvidia/cuquantum-appliance:24.03-x86_64
In the 24.03 release, it is necessary to change tag names for ARM64-based machines:
docker pull nvcr.io/nvidia/cuquantum-appliance:24.03-arm64
Note
Running the container will pull it if it is not available to the current Docker engine.
At the command-line#
The commands in the following subsections were drawn from the cuQuantum Appliance Overview page on NGC: https://catalog.ngc.nvidia.com/orgs/nvidia/containers/cuquantum-appliance
You can run the cuQuantum Appliance at the command-line in a number of ways:
With an interactive session.
With a noninteractive session.
With specific GPUs.
With an interactive session#
To provision a pseudo-terminal session and attach to STDIN, use the following command:
docker run --gpus all -it --rm \
    nvcr.io/nvidia/cuquantum-appliance:24.03-x86_64
With a noninteractive session#
To noninteractively issue a single command to the container runtime, and exit, use the following command:
docker run --gpus all --rm \
    nvcr.io/nvidia/cuquantum-appliance:24.03-x86_64 \
        python /home/cuquantum/examples/{example_name}.py
With specific GPUs#
To specify which GPUs to use in the container, use the following command:
# with specific GPUs
docker run --gpus '"device=0,3"' -it --rm \
    nvcr.io/nvidia/cuquantum-appliance:24.03-x86_64
Using remote hosts#
Under many circumstances, using remote computational resources is both more effective and more efficient (and often necessary). With appropriate configuration, remote resources extend the capability of our local development environments, making us more productive and permitting stronger application design and deployment.
We make a few assumptions throughout the following sections:
You have configured
~/.ssh/configwith useful, concise aliases.You have a valid installation of OpenSSH on your machine.
For all remote hosts you wish to use, you’ve configured key-based authentication.
Clarifying our assumptions#
Useful + concise alias#
A useful, concise alias will have a form consistent with the following:
cat ~/.ssh/config
...
Host my_concise_alias
  User my_username
  HostName my_remote_host
  Port my_remote_port
  IdentityFile /path/to/identity/file
Valid installation of OpenSSH#
Confirming a valid installation of OpenSSH on your machine can be done with the following commands:
OpenSSH version#
Open a terminal, and issue the following commands:
ssh -V
typical output version on Linux
OpenSSH_8.2p1 Ubuntu-4ubuntu0.5, OpenSSL 1.1.1f 31 Mar 2020
typical output version on Windows
OpenSSH_for_Windows_8.6p1, LibreSSL 3.4.3
Key-based authentication example#
To check that key-based authentication is set up and in use, type the following commands in your terminal:
ssh -v my_concise_alias
...
debug1: Authentication succeeded (publickey).
...
With DOCKER_HOST#
A simple way of orchestrating a remote host is by using DOCKER_HOST. Once set, the environment variable assignment
instructs the local Docker CLI to use the Docker engine provided by the remote defined in DOCKER_HOST.
on Linux
export DOCKER_HOST=ssh://my_concise_alias
on Windows
$env:DOCKER_HOST='ssh://my_concise_alias'
Confirming Docker CLI + remote Docker engine#
These commands instruct your local Docker CLI to connect to the Docker engine available at my_concise_alias
over SSH, and use that Docker engine for all locally-executed CLI commands in the current command-line session.
For example, running the following command in a linux terminal will print all running Docker containers on my_concise_alias.
Because we’re using the Docker CLI, the commands are independent of operating system.
docker run --name cuquantum-appliance \
    --gpus all \
    --network host \
    -itd nvcr.io/nvidia/cuquantum-appliance:24.03-x86_64
...
CONTAINER ID   IMAGE                                            COMMAND                 CREATED        STATUS        PORTS  NAMES
...            nvcr.io/nvidia/cuquantum-appliance:24.03-x86_64  "/usr/local/bin/entr…"  5 seconds ago  Up 4 seconds         cuquantum-appliance
...            ...                                       ...                     ...            ...           ...    ...
To confirm your local Docker CLI is using the remote, you can try a couple commands:
Using
nvidia-smi.Comparing
hostnameoutput.
Check nvidia-smi#
Executing nvidia-smi on the remote is done with the following command:
docker exec cuquantum-appliance nvidia-smi
+---------------------------------------------------------------------------------------+
| NVIDIA-SMI 530.36                 Driver Version: 530.36       CUDA Version: 12.1     |
|-----------------------------------------+----------------------+----------------------+
| GPU  Name                  Persistence-M| Bus-Id        Disp.A | Volatile Uncorr. ECC |
| Fan  Temp  Perf            Pwr:Usage/Cap|         Memory-Usage | GPU-Util  Compute M. |
|                                         |                      |               MIG M. |
|=========================================+======================+======================|
|   0  NVIDIA A100-SXM4-80GB           On | 00000000:01:00.0 Off |                    0 |
| N/A   38C    P0               63W / 275W|     17MiB / 81920MiB |      0%      Default |
|                                         |                      |             Disabled |
+-----------------------------------------+----------------------+----------------------+

+---------------------------------------------------------------------------------------+
| Processes:                                                                            |
|  GPU   GI   CI        PID   Type   Process name                            GPU Memory |
|        ID   ID                                                             Usage      |
|=======================================================================================|
|  No running processes found                                                           |
+---------------------------------------------------------------------------------------+
Comparing hostnames#
Likewise, you can get all (long) hostnames from the remote Docker engine, and compare them with the same command executed in the local terminal.
First, get the hostname output from the remote host’s Docker engine:
docker exec cuquantum-appliance hostname --all-fqdns
Next, use this command to get your local hostname output on Linux:
hostname --all-fqdns
Or if you’re using Windows, use this command to GetHostByName:
[System.Net.Dns]::GetHostByName(($env:computerName)).HostName
Running commands with remote Docker engine#
Now, we can try running an example from the cuQuantum Appliance
docker exec cuquantum-appliance python /home/cuquantum/examples/qiskit_ghz.py --help
...
usage: qiskit_ghz.py [-h] [--nbits NBITS] [--precision {single,double}]
                     [--disable-cusvaer]

Qiskit ghz.

options:
  -h, --help            show this help message and exit
  --nbits NBITS         the number of qubits
  --precision {single,double}
                          numerical precision
  --disable-cusvaer       disable cusvaer
docker exec cuquantum-appliance python /home/cuquantum/examples/qiskit_ghz.py
...
{'00000000000000000000': 533, '11111111111111111111': 491}
...
With Docker contexts#
While useful, setting DOCKER_HOST=ssh://my_concise_alias every time a new terminal session is created
is tedious. Likewise, we wouldn’t recommend setting DOCKER_HOST globally.
Thankfully, Docker provides infrastructure for managing multi-container orchestration schemes.
By using docker context, we can create distinct groups of remote Docker engines, and manage them with our local
Docker CLI.
DOCKER ENDPOINT relies on various URI schemes. Importantly, it supports the same SSH URI scheme we used
with DOCKER_HOST. This means the same SSH URI (ssh://my_concise_alias) that we used to connect our local Docker CLI to
a single remote Docker engine can be used to create a Docker context.
Here’s the command schema for docker context:
docker context --help
...
Manage contexts

Usage:
  docker context [command]

Available Commands:
  create      Create new context
  export      Export a context to a tar or kubeconfig file
  import      Import a context from a tar or zip file
  inspect     Display detailed information on one or more contexts
  list        List available contexts
  rm          Remove one or more contexts
  show        Print the current context
  update      Update a context
  use         Set the default context

Flags:
  -h, --help   Help for context

Use "docker context [command] --help" for more information about a command.
List Docker contexts#
We can list the available contexts with the following commands. Thanks to the Docker CLI, the commands are the same on Linux and Windows, but the expected output content is slightly different.
docker context ls
On Linux
...
NAME       DESCRIPTION                              DOCKER ENDPOINT              KUBERNETES ENDPOINT  ORCHESTRATOR
default *  Current DOCKER_HOST based configuration  unix:///var/run/docker.sock                       swarm
On Windows
...
NAME           TYPE  DESCRIPTION                              DOCKER ENDPOINT                            KUBERNETES ENDPOINT  ORCHESTRATOR
default *      moby  Current DOCKER_HOST based configuration  npipe:////./pipe/docker_engine
desktop-linux  moby  Docker Desktop                           npipe:////./pipe/dockerDesktopLinuxEngine
Context creation#
We can create a new context using our SSH alias as follows:
docker context create my_context --docker "host=ssh://my_concise_alias"
...
my_context
Successfully created context "my_context"
And rerunning docker context ls produces:
docker context ls
...
NAME         TYPE   DESCRIPTION   DOCKER ENDPOINT                 KUBERNETES ENDPOINT   ORCHESTRATOR
...          ...    ...           ...                             ...                   ...
my_context   moby                 ssh://my_concise_alias
Using contexts#
To use the newly created context, run this command:
docker context use my_context
And local commands using the Docker CLI will be forwarded to the Docker endpoints provided by my_context.
Running the cuQuantum Appliance is done, as before, with the following command:
docker run --name cuquantum-appliance \
    --gpus all --network host \
    -itd nvcr.io/nvidia/cuquantum-appliance:24.03-x86_64
And running examples is likewise identical:
docker exec cuquantum-appliance python /home/cuquantum/examples/qiskit_ghz.py
Note
The use contexts allows us to manage persistent configuration, and to group multiple endpoints by some feature (for example: architecture, number of GPUs, GPU type, etc.).
Interacting with the remote container#
It can be useful to connect to (and interact with) the remote container for the following tasks:
Designing workflows for asynchronous execution.
Debugging workload components.
Circuit analysis.
There are many ways to connect to the remote container. One method is to attach the running remote container to a locally provisioned IDE. We’ll show you two methods that rely on different technologies:
Using the SSH and Dev Container extensions in Visual Studio Code.
Using a running Jupyter Lab server in the remote containter.
Visual Studio Code#
To use Visual Studio Code to attach to a running remote container, you’ll need two extensions:
Remote - SSH#
To install the Remote - SSH extension at the command-line, use the following:
code --install-extension ms-vscode-remote.remote-ssh
Otherwise, you can install it from the marketplace listing: https://marketplace.visualstudio.com/items?itemName=ms-vscode-remote.remote-ssh
Dev containers#
To install the Dev Containers extension at the command-line, use the following:
code --install-extension ms-vscode-remote.remote-containers
Otherwise, you can install it from the marketplace listing: https://marketplace.visualstudio.com/items?itemName=ms-vscode-remote.remote-containers
Attaching to the running container#
The procedure is as follows:
Run the container on the remote host.
Connect to the remote host using the Remote - SSH extension.
Attach to the running container using the Dev Containers extension
Run the container#
Using the methods described in connecting to a remote docker engine, we can start a detached container with the following commands:
docker context use my_context && \
docker run --name cuquantum-appliance \
    --gpus all \
    --network host \
    -itd nvcr.io/nvidia/cuquantum-appliance:24.03-x86_64
Or if you prefer not to use docker context, you can use DOCKER_HOST.
First, set the environment variable as illustrated in associated section.
Then issue the docker run command:
docker run --name cuquantum-appliance --gpus all --network host -it -d nvcr.io/nvidia/cuquantum-appliance:24.03-x86_64
If you’d rather not use the remote Docker engine infrastructure at all, please skip to the section below on Connecting with the Remote - SSH extension.
As an illustrative demonstration, we include animations showing you what all of this looks like:
Using Docker Contexts
Executing docker run with an active Docker context
show animation

Using DOCKER_HOST
Executing docker run with the DOCKER_HOST environment variable defined
… on Linux
show animation
… on Windows
show animation
Connecting with remote - SSH#
There are two ways to connect to the remote host using the Remote - SSH extension:
Using a graphical user interface (GUI) button in the lower-left corner of the Visual Studio Code window.
Using Visual Studio Code’s command palette.
Remote - SSH Using GUI Button
show animation
Remote - SSH Using Command Palette
To use the command palette to connect with a remote host using the Remote - SSH extension, you should follow this procedure:
With Visual Studio Code open, type this key-sequence:
ctrl+shift+p… This opens the command palette.While focused on the command palette, type
connect to host… This should bring up the Remote - SSH commandRemote-SSH: Connect to Host....Select the appropriate host by either using the arrow keys or by using your cursor and clicking.
Note
Press enter (or similar) to select a highlighted command. To navigate highlighted commands, use the arrow keys on your keyboard.
show animation
Attaching with dev containers#
Using the command palette as illustrated in Connecting with the Remote - SSH extension, we can attach to the container.
Dev Containers with the Command Pallette
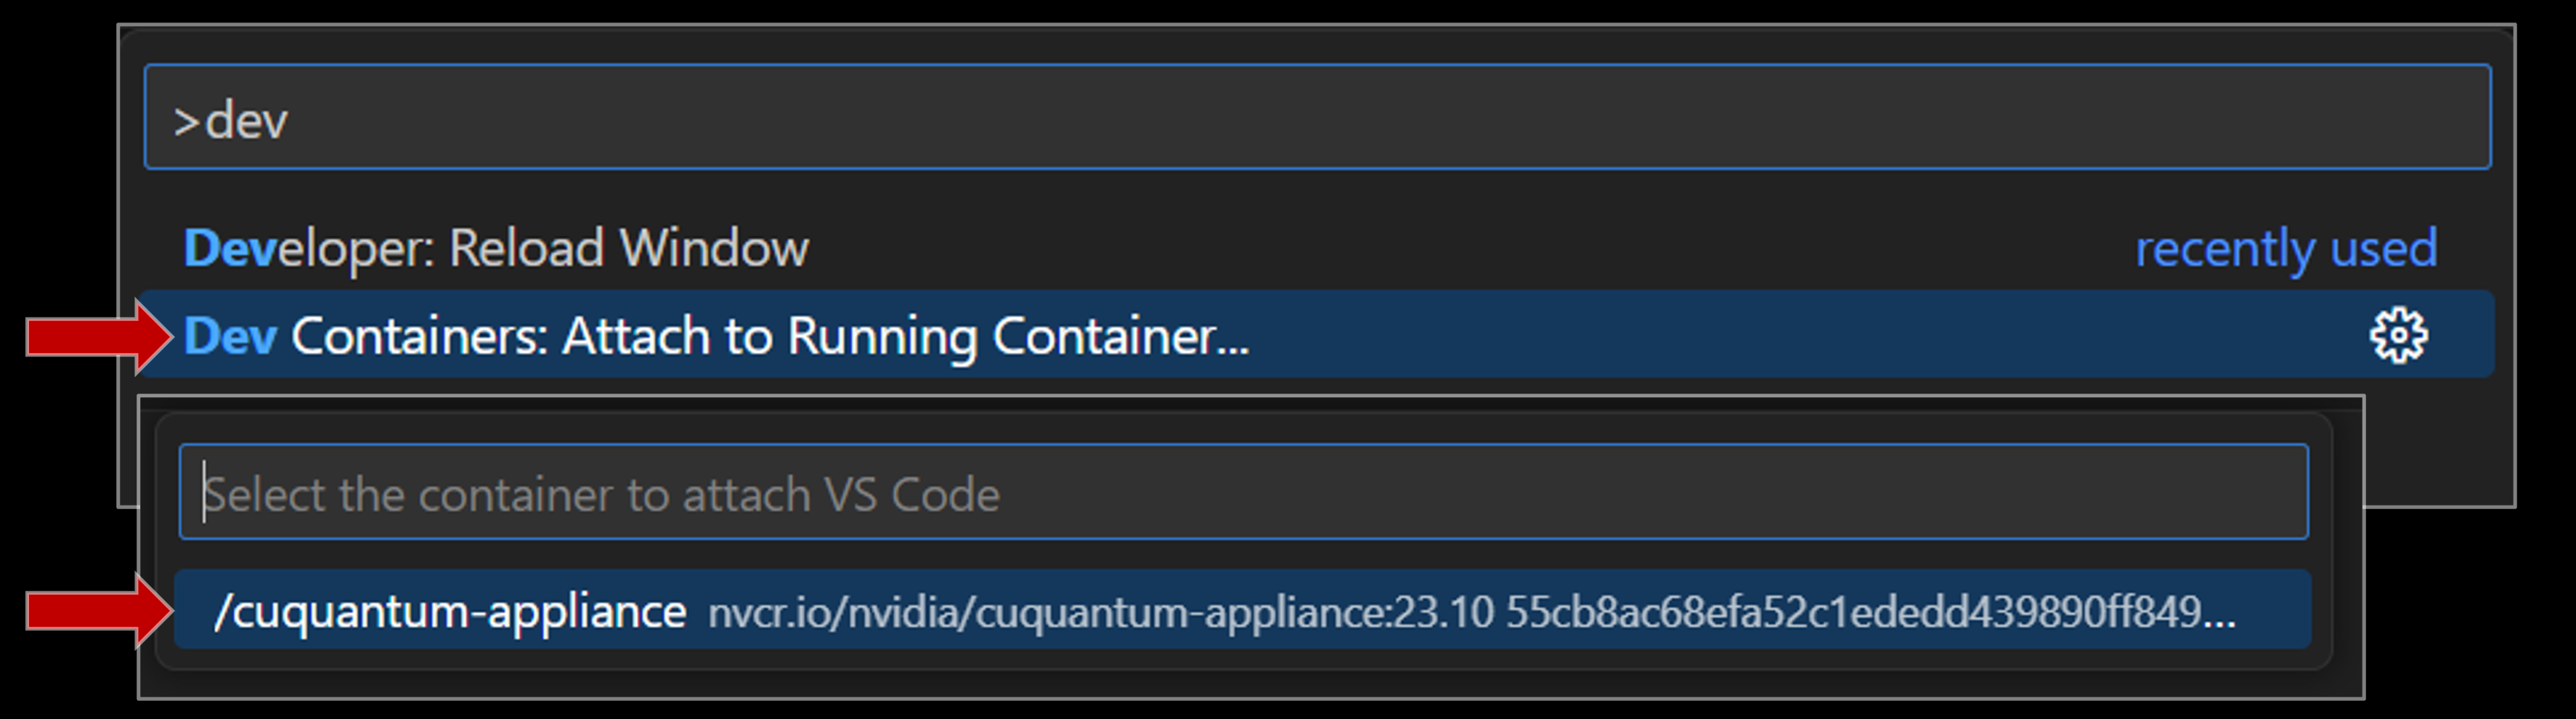
To use the command palette to attach to a running container on the remote host using the Dev Containers extension, you should follow this procedure:
With Visual Studio Code open, type this key-sequence:
ctrl+shift+p… This opens the command palette.While focused on the command palette, type
Dev Containers… This should bring up the Dev Containers commandDev Containers: Attach to Running Container ....Select the appropriate container by either using the arrow keys or by using your cursor and clicking.
show image
Running the NVIDIA Quantum Benchmarks#
Available on GitHub: nvidia/cuquantum under benchmarks.
The direct link is nvidia/cuquantum.
The NVIDIA Quantum Benchmarks is an installable Python package whose purpose is easing the performance evaluation and utility the cuQuantum offering provides. It enables the user to test cuQuantum under different integration scenarios. The NVIDIA Quantum Benchmarks package is installable on bare-metal systems and in the cuQuantum Appliance. To acquire the package, use
git clone https://github.com/NVIDIA/cuQuantum.git
For detailed installation instructions, see the corresponding section below on installing benchmarks.
Usage#
We provide --help documentation for the NVIDIA Quantum Benchmarks CLI.
You can query it with
nv-quantum-benchmarks --help
...
usage: nv-quantum-benchmarks [-h] {circuit,api} ...
...
positional arguments:
{circuit,api}
    circuit      benchmark different classes of quantum circuits
    api          benchmark different APIs from cuQuantum's libraries
optional arguments:
-h, --help     show this help message and exit
For example, you can run multi-node multi-GPU benchmarks in the cuQuantum Appliance with
mpirun -n ${NUM_GPUS} nv-quantum-benchmarks \
    circuit --frontend qiskit --backend cusvaer \
        --benchmark ${BENCHMARK_NAME} \
        --nqubits ${NUM_QUBITS} --ngpus 1 \
        --cusvaer-global-index-bits ${LOG2_NUM_NODES_PER_GROUP},${LOG2_NUM_NODE_GROUPS} \
        --cusvaer-p2p-device-bits ${LOG2_NUM_PEERED_GPUS}
In this case, --ngpus 1 indicates that a single rank/process must be associated with a single GPU.
The use of --cusvaer-global-index-bits and --cusvaer-p2p-device-bits specifies the network topology
of the multi-GPU multi-node cluster:
Argument Name |
Input Form |
Description |
|---|---|---|
|
a list of |
the network topology represented by state-vector load-balanced node group log2-sizes |
|
|
state-vector load-balanced peer-accessible group log2-size |
Note
By state-vector load-balanced node group, we refer to a group of GPUs whereby each GPU is given a state-vector partition of equal size. To uniformly distribute a quantum state consisting of only qubits to a group of GPUs, the size of the group must be a power of 2. To enforce this, we require the input network topology be expressed in terms of the number of qubits.
With the --cusvaer-global-index-bits option, you can define a networking topology with an arbitrary number of distinct layers.
For more detailed information, please see the related documentation on defining network structure.
Installation#
Bare-metal#
To install NVIDIA Quantum Benchmarks on your system, you can use the following command:
Benchmarks suite only
cd cuQuantum/benchmarks && \
   pip install .
Benchmarks and all optional dependencies
cd cuQuantum/benchmarks && \
   pip install .[all]
Please note that this doesn’t guarantee all dependencies are installed with GPU support. Some frameworks have nonstandard build requirements to enable GPU support.
Appliance#
To avoid inadvertently overwriting software in the cuQuantum Appliance, install the NVIDIA Quantum Benchmarks with this command:
cd cuQuantum/benchmarks && \
    pip install .
Dependencies#
cuStateVec#
GPU Architectures |
Turing, Ampere, Ada, Hopper, Blackwell |
NVIDIA GPU with Compute Capability |
7.5+ |
CUDA |
12.x, 13.x |
CPU architectures |
x86_64, ARM64 |
Operating System |
Linux |
Driver |
525.60.13+ (Linux) for CUDA 12.x
580.65.06+ (Linux) for CUDA 13.x
|
cuTensorNet#
GPU Architectures |
Turing, Ampere, Ada, Hopper, Blackwell |
NVIDIA GPU with Compute Capability |
7.5+ |
CUDA |
12.x or 13.x |
CPU architectures |
x86_64, ARM64 |
Operating System |
Linux |
Driver |
525.60.13+ (Linux) for CUDA 12.x
580.65.06+ (Linux) for CUDA 13.x
|
cuTENSOR |
v2.5.0+ |
cuDensityMat#
GPU Architectures |
Turing, Ampere, Ada, Hopper, Blackwell |
NVIDIA GPU with Compute Capability |
7.5+ |
CUDA |
12.x or 13.x |
CPU architectures |
x86_64, ARM64 |
Operating System |
Linux |
Driver |
525.60.13+ for CUDA 12.x
580.65.06+ for CUDA 13.x
|
cuTENSOR |
v2.5.0+ |
cuTensorNet |
v2.9.1+ |
cuPauliProp#
GPU Architectures |
Turing, Ampere, Ada, Hopper, Blackwell |
NVIDIA GPU with Compute Capability |
7.5+ |
CUDA |
12.x or 13.x |
CPU architectures |
x86_64, ARM64 |
Operating System |
Linux |
Driver |
525.60.13+ for CUDA 12.x
580.65.06+ for CUDA 13.x
|
cuStabilizer#
GPU Architectures |
Turing, Ampere, Ada, Hopper, Blackwell |
NVIDIA GPU with Compute Capability |
7.5+ |
CUDA |
12.x or 13.x |
CPU architectures |
x86_64, ARM64 |
Operating System |
Linux |
Driver |
525.60.13+ for CUDA 12.x
580.65.06+ for CUDA 13.x
|
cuQuantum Python#
When Building |
When Running |
|
|---|---|---|
Python |
3.11+ |
3.11+ |
pip |
22.3.1+ |
N/A |
setuptools |
>=77.0.3 |
N/A |
wheel |
>=0.34.0 |
N/A |
Cython |
>=3.0.4,!=3.1.0,!=3.1.1 |
N/A |
cuStateVec |
N/A |
>=1.13.1, <2 |
cuTensorNet |
N/A |
~=2.12 |
cuDensityMat |
N/A |
>=0.5.0, <0.6.0 |
cuPauliProp |
N/A |
>=0.3.0, <0.4.0 |
cuStabilizer |
N/A |
>=0.3.0, <0.4.0 |
NumPy |
N/A |
v1.21+ |
nvmath-python |
N/A |
>=0.7.0, <1.0.0 |
cuda-bindings |
N/A |
~=12.9.4 for CUDA 12 and ~=13.0.3 for CUDA 13 |
CuPy (see CuPy installation guide) |
N/A |
v13.0.0+ |
PyTorch (optional, see PyTorch installation guide) |
N/A |
v1.10+ |
Qiskit (optional, see Qiskit installation guide) |
N/A |
v1.4.2+ |
Cirq (optional, see Cirq installation guide) |
N/A |
v0.6.0+ |
mpi4py (optional, see mpi4py installation guide) |
N/A |
v3.1.0+ |
Note
Starting with cuQuantum Python v25.06, cuQuantum C libraries including cuDensityMat, cuStateVec, and cuTensorNet are no longer build-time dependencies. However, they are still required at runtime.
cuQuantum Appliance#
CUDA |
12.x |
13.x |
Driver |
525.60.13+ (Linux) |
580.65.06+ (Linux) |