Create a Variant of the UR10e Robot With the 2F-140 Gripper#
Just like a real robot can have its tools changed for different tasks, simulated robots benefit from the same capability.
We’ll use a USD capability called a variant, to allow the robot to be changed from a gripper or non-gripper configuration. This feature allows us to encapsulate several robot configurations in one USD asset.
The Isaac Sim Robot Assembler is a tool built to automate this process of assembling two robots together, such as a gripper and an arm.
Open the UR10e we converted into USD during the import process. It should be on the Desktop.
Checkpoint
If you need a checkpoint asset, load the course asset robotiq_2f_140_final/robotiq_2f_140.usd.
Drag and drop the
robotiq_2f_140.usdfile we created earlier into the Stage panel.Open the robot assembler by going to Tools > Robotics > Asset Editors > Robot Assembler.
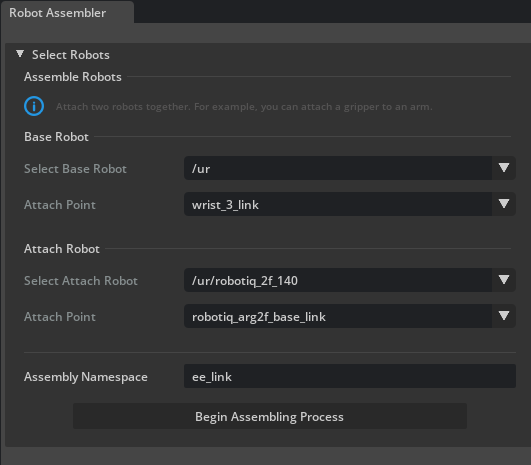
In this dialog, we’ll tell the assembler which prims represent both the base robot, and the “attach” robot, and at which points they should be attached.Under Base Robot
Set Select Base Robot to
/urSet Attach Point to
wrist_3_link.
Under Attach Robot
Set Select Attach Robot to
/ur/robotiq_2f_140,Set Attach Point to
robotiq_arg2f_base_link.
Set Assembly Namespace to
ee_link.
Click Begin Assembling Process to start the process.
Adjust the attachment point orientation to make sure the end effector is attached to the gripper correctly. Rotate the gripper 90 degrees around the z-axis by clicking Z +90.

Click Assemble and Simulate to test the configuration. If the gripper stays in place, you’re good to go.
Click End Simulation And Finish to complete the process.
Great, let’s try it out!
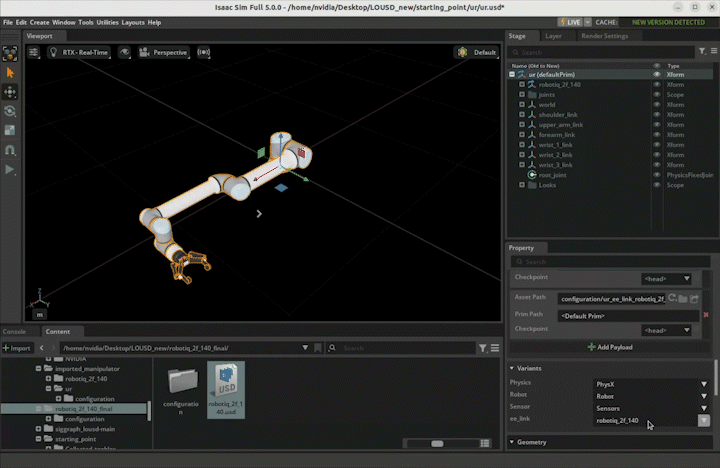
Set the Variant#
In the Stage panel, select the
urprim.In the Property Editor at the bottom right, find the Variant section.
Select the ee_link variant None, gripper is gone. It may need to be done twice.
Select the ee_link variant robotiq_2f_140, gripper appears again.
Go to File > Save or press Ctrl+S to save your work.
Checkpoint
If you had any troubles with these steps, a USD file of the completed robot up to this point is located in the course assets under imported_manipulator/ur/ur.usd