Create Simulation Environment and Clock Publisher#
Now that the robot is set up, let’s add it into a larger simulation scenario. We’ll reference the robot, a warehouse scene, configure physics settings, and publish a ROS clock.
Tip
If you need to relaunch Isaac Sim at any point, open a new terminal and run these same commands from earlier:
# Source the local ROS workspace
`source ~/IsaacSim-ros_workspaces/build_ws/humble/humble_ws/install/local_setup.bash`
# Source the Isaac Sim ROS workspace
`source ~/IsaacSim-ros_workspaces/build_ws/humble/isaac_sim_ros_ws/install/local_setup.bash`
# Launch Isaac Sim
`~/isaacsim/_build/linux-x86_64/release/isaac-sim.sh --reset-user`
Setup Simulation Scenario#
Add Warehouse as Reference#
Create a new file by going to File > New.
Go to File > Add Reference
Navigate to the course asset folder
/empty_warehouseand locate thewarehouse.usdfile.Click the Add Reference button.
Add Humanoid as Reference#
Go to File > Add Reference again.
Locate the h1 USD file you’ve been using, or use the checkpoint h1_ROS asset.
Click the Add Reference button.
Select the
h1prim in the Stage panel.In the Property Panel under Set the Z transform to 1.0 so it is above the ground.
Add and Configure Physics Scene#
Create a Physics Scene by right clicking on the Stage Panel and selecting Create > Physics > Physics Scene.
Select the Physics Scene in the Stage Panel.
In the Property panel:
Uncheck Enable GPU Dynamics.
Set the Broadphase Type to MBP.
Set Time Steps Per Second to 200.
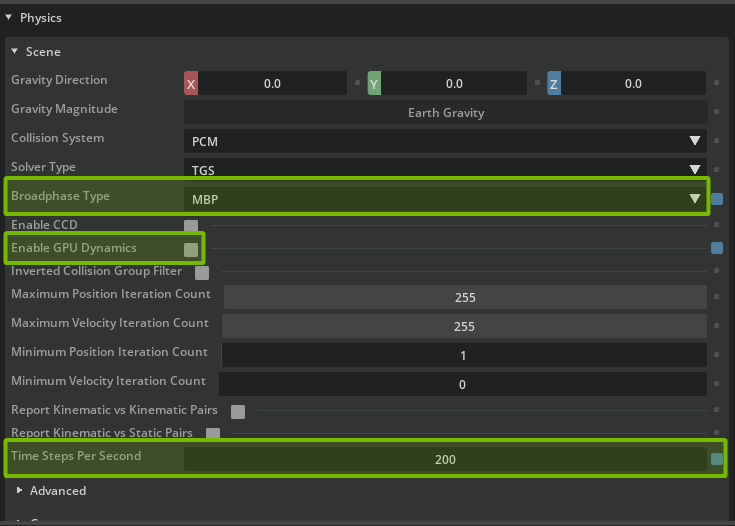
Go to File > Save or press Ctrl+S.
Tip
When we are simulating very few robots, CPU physics is faster because it avoids the memory copy between CPU and GPU memory.
However when we are simulating many robots in a complex scene, GPU physics becomes significantly faster than CPU.
Set up ROS 2 Clock Publisher#
Create ROS clock#
Go to Tools > Robotics > ROS 2 OmniGraphs > Clock.
Set the Graph Path to
/World/Graph/ROS_Clock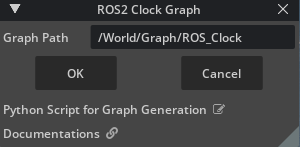
Select the ROS_Clock graph in the Stage panel.
In the Property panel under Raw USD Properties, set the pipelineStage to pipelineStageOnDemand.
Right click on ROS_Clock in the Stage panel and choose Open Graph.
Select and delete the On Playback Tick node
In the left side of the Action Graph UI, search for On Physics Step and drag this node onto the graph.
Attach the Exec output of On Physics Step to the Exec input of the ROS2 Publish Clock node.
Select the Isaac Read Simulation Time node
Check the Reset on Stop input of Read Simulation Time node to reset the simulation time when the simulation stops.
In the left side of the Action Graph UI, search for ROS2 QoS Profile and drag this node onto the graph.
Connect the QoS Profile output to both the ROS2 Publish Clock node’s QoS Profile input.
Go to File > Save or press Ctrl+S.
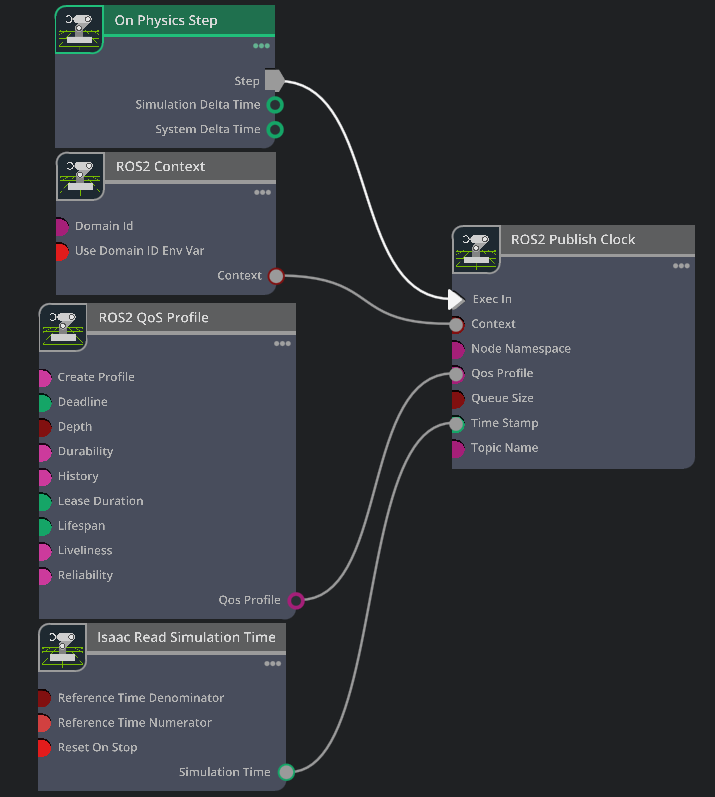
Inspecting the graph#
On Physics Step: This node is triggered when the Isaac Sim physics steps, and runs the entire graph.
ROS2 Context: This node creates a context for the ROS2 node.
ROS2 QoS Profile: This node sets the QoS profile for the ROS2 node.
ROS2 Publish Clock: This node publishes the ROS2 clock to ROS2.
Isaac Read Simulation Time: This node reads the simulation time from Isaac Sim.
Checkpoint
If you had any troubles with these steps, load the completed environment checkpoint file from the course assets:
h1_ros_locomotion_warehouse/h1_ros_locomotion_policy_tutorial.usd