Installing Mellanox WinOF Driver
This section provides instructions for two types of installation procedures:
Attended Installation – An installation procedure that requires frequent user intervention.
Unattended Installation – An automated installation procedure that requires no user intervention.
Both Attended and Unattended installations require administrator privileges.
WinOF supports ConnectX-3 and ConnectX-3 Pro adapter cards. In case you have ConnectX-4 adapter card on your server, you will need to install WinOF-2 driver. For details on how to install WinOF-2 driver, please refer to the WinOF-2 User Manual.
The following is an example of a MLNX_WinOF_win2016 x64 installation session.
Step 1. Double click the .exe and follow the GUI instructions to install MLNX_WinOF.
As of MLNX WinOF v4.55, the log option is enabled automatically.
The default path of the log is: %LOCALAPPDATA%\MLNX_WinOF.log0
Step 2. [Optional] Manually configure your setup to contain the logs option.
MLNX_VPI_WinOF-<version>_All_win2016_x64.exe /v"/l*vx [LogFile]"
Step 3. [Optional] If you do not want to upgrade your firmware version. (MT_SKIPFWUPGRD default value is False.)
MLNX_VPI_WinOF-<version>_All_win2016_x64.exe /v" MT_SKIPFWUPGRD=1"
Step 4. [Optional] If you want to control the installation of the WMI/CIM provider. (MT_WMI default value is True.)
MLNX_VPI_WinOF-<version>_All_win2016_x64.exe /v" MT_WMI=1"
Step 5. [Optional] If you want to control whether to restore network configuration or not. (MT_RESTORECONF default value is True.)
MLNX_VPI_WinOF-<version>_All_win2016_x64.exe /v" MT_RESTORECONF=1"
For further help, please run:
MLNX_VPI_WinOF-<version>_All_win2016_x64.exe /v" /h"
Step 6. [Optional] If you want to control the driver’s loading timeout value before burning the firmware, run:
MLNX_VPI_WinOF-<version>_All_win2016_x64.exe /v" /MMT_DRIVER_LOAD_TIMEOUT=30"
Note: Timeout value is in seconds, and the default value is 120.
Step 7. Click Next in the Welcome screen.
Step 8. Read then accept the license agreement and click Next.

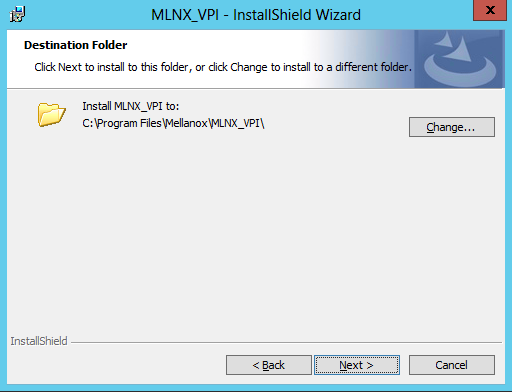
Step 9. Select the target folder for the installation.
Step 10. The firmware upgrade screen will be displayed in the following cases:
If the user has an OEM card, in this case the firmware will not be updated.
If the user has a standard Mellanox card with an older firmware version, the firmware will be updated accordingly. However, if the user has both OEM card and Mellanox card, only Mellanox card will be updated.

Step 11. Configure your system for maximum performance by checking the maximum performance box.

This step requires rebooting your machine at the end of the installation.
Step 12. In order to complete the installation, select Complete installation.
If you wish to customize the features you want installed, follow Step a and on below.

a. Select the desired feature to install:
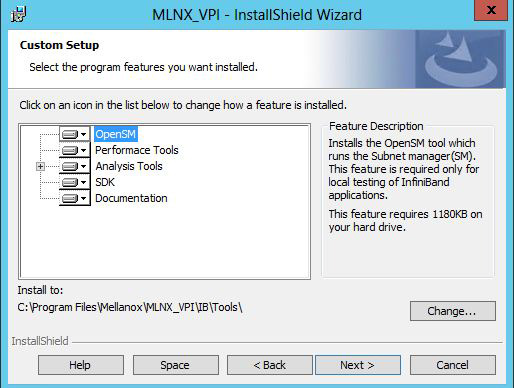
OpenSM - installs Windows OpenSM that is required to manage the subnet from a host. OpenSM is part of the driver and installed automatically.
Performances tools - install the performance tools that are used to measure the InfiniBand performance in user environment.
Analyze tools - install the tools that can be used either to diagnosed or analyzed the InfiniBand environment.
SDK - contains the libraries and DLLs for developing InfiniBand application over IBAL.
Documentation - contains the User Manual and Installation Guide.
b. Click Install to start the installation.

Step 13. Click Finish to complete the installation.

If the firmware upgrade and the restore of the network configuration fails, the following message will be displayed.

The following is an example of a MLNX_WinOF_win2016 x64 unattended installation session.
If no reboot options are specified, the installer restarts the computer whenever necessary without displaying any prompt or warning to the user. Use the /norestart or /forcerestart standard command-line options to control reboots.
Step 1. Open a CMD console. [Windows Server 2012 / 2012 R2/ 2016]:
Click Start → Task Manager → File → Run new task → and enter CMD.
Step 2. Install the driver. Run:
MLNX_VPI_WinOF-<version>_All_win2016_x64.exe /S /v/qn
Step 3. [Optional] Manually configure your setup to contain the logs option:
> MLNX_VPI_WinOF-<version>_All_win2016_x64.exe /S /v”/qn” /v"/l*vx [LogFile]"
Starting from MLNX WinOF v4.55, the log option is enabled automatically. The default path of the log is: %LOCALAPPDATA%\MLNX_WinOF.log0
Step 4. [Optional] If you do not wish to upgrade your firmware version. (MT_SKIPFWUPGRD default value is False.)
MLNX_VPI_WinOF-<version>_All_win2016_x64.exe /v" MT_SKIPFWUPGRD=1"
Step 5. [Optional] If you wish to control the installation of the WMI/CIM provider. (MT_WMI default value is True.)
> MLNX_VPI_WinOF-<version>_All_win2016_x64.exe /v" /MT_WMI=1"
Step 6. [Optional] If you wish to control whether to restore network configuration or not. (MT_RESTORECONF default value is True.)
> MLNX_VPI_WinOF-<version>_All_win2016_x64.exe /v" MT_RESTORECONF=1"
For further help, please run:
> MLNX_VPI_WinOF-<version>_All_win2016_x64.exe /v" /h"
Step 7. [Optional] If you want to control the driver’s loading timeout value before burning the firmware, run:
MLNX_VPI_WinOF-<version>_All_win2016_x64.exe /v" /MMT_DRIVER_LOAD_TIMEOUT=30"
Note: Timeout value is in seconds, and the default value is 120.
Step 8. [Optional] If you wish to control whether to execute performance tuning or not. (PERFCHECK default value is True.)
> MLNX_VPI_WinOF_<version>_All_win2016_x64.exe /vPERFCHECK=0 /vPERFCHECK=0
Step 9. [Optional] If you wish to control whether to install ND provider or not. (MT_NDPROPERTY default value is True.)
MLNX_VPI_WinOF_<version>_All_win2016_x64.exe /vMT_NDPROPERTY=1
Applications that hold the driver files (such as ND applications) will be closed during the unattended installation.
When using the unattended installation option, user should check for the setup return codes and react to them accordingly. See Setup Return Codes in the Troubleshooting section.