Setup Guide#
This guide walks you through deploying Tokkio Workflow on AWS. You can deploy Tokkio in multiple ways on AWS. This guide focuses on using Tokkio’s deployment scripts. These scripts automatically set up Tokkio Workflow and all required infrastructure components.
Prerequisites#
AWS Prerequisites#
Create an IAM user with administrator access and obtain the Access Key ID and Secret Access Key.
Create an S3 bucket for storing deployment state
Create a DynamoDB table for managing concurrent access to the deployment state
Set up a domain and Route53 hosted zone for HTTPS support
In case you need help in setting these up, you can refer to the AWS documentation. Also, see Environment Variables and Prerequisites Setup section for more information on getting this setup.
Hardware#
Controller Instance#
Ubuntu 22.04 Operating system
Note
Instructions to set up some of these prerequisites, such as setting up an SSH key pair and passwordless sudo access, can be found at Common Setup Procedures.
Access#
Access to all the artifacts used during the bringing up of Tokkio Pipeline Application. For example, Tokkio Application Helm chart on NGC. For instructions on how to generate a personal API key, refer to Generating a Personal API Key.
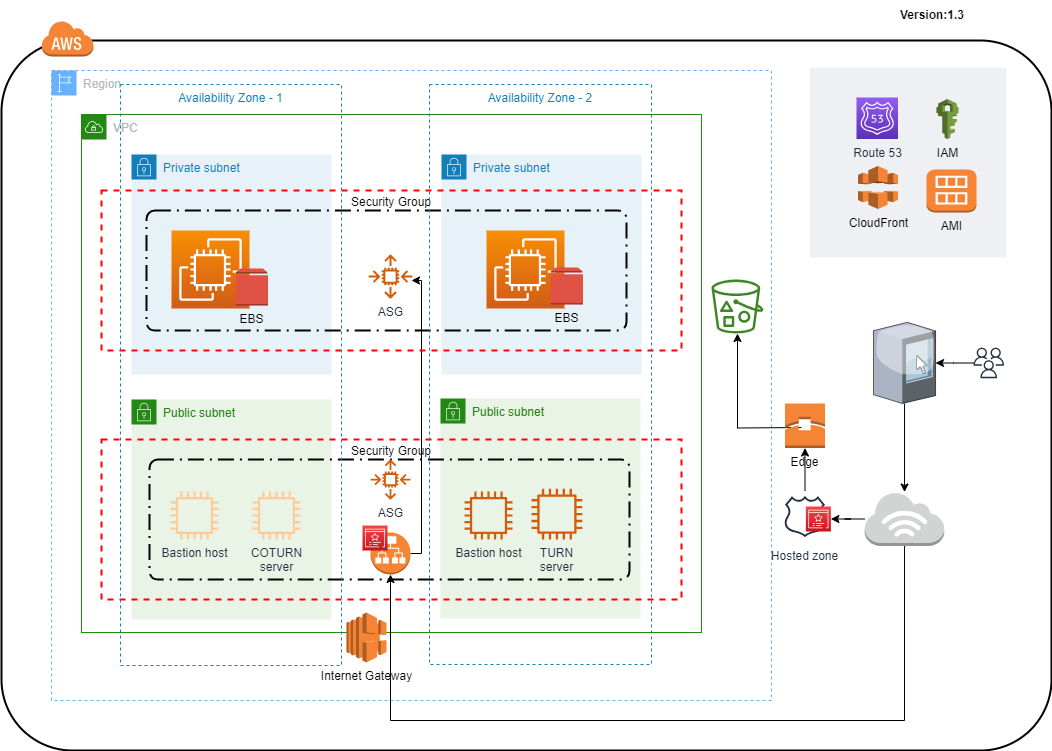
Infrastructure Layout#
Tokkio Workflow setup on AWS requires several AWS resources including EC2 instances, Security Groups, Application Load Balancer, CloudFront for hosting UI content, S3 bucket, etc. The diagram below illustrates the overall layout of components deployed on AWS.
Installation Steps#
Note
Before proceeding with the installation steps, ensure you have reviewed the Deployment section to understand the deployment workflow and building blocks, including the Controller Instance, Config File, Environment Variables File, and Application Instance.
Clone the NVIDIA/ACE.git repository and navigate to the AWS deployment scripts directory.
git clone https://github.com/NVIDIA/ACE.git
cd ACE/workflows/tokkio/5.0.0-ga/scripts/one-click/aws
Prepare a config file, either by copying the base
config-template.ymlor by copying one of the example config files available underconfig-template-examplesfolder.
#list of example templates
config-template-examples/
└── tokkio-3streams
    ├── config-template.yml
    └── my-config.env
Copy a config template of your choice as the base config template for this installation.
cp config-template-examples/tokkio-3streams/config-template.yml ./my-config.yml
Modify the
my-config.ymlwith your specific settings. For more details about each parameter, refer to Advanced Configuration
vi my-config.yml
Set up environment variables.
Similar to the config-template file, you can copy an example env file from the
config-template-examplesfolder.Modify the environment variables file with your specific settings. For more details about each environment variable, refer to Environment Variables and Prerequisites Setup
cp config-template-examples/tokkio-3streams/my-config.env my-env-file.env
vi my-env-file.env
Source the environment variables file.
source my-env-file.env
Run the installation command.
./envbuild.sh install --tf-binary terraform --component all --config-file ./my-config.yml
Capture installation results at the end of logs. Output will look like the sample below:
access_urls:
  ace_configurator_endpoint: "https://<ace_configurator_sub_domain>.<base_domain>"
  api_endpoint: "https://<api_sub_domain>.<base_domain>"
  grafana_endpoint: "https://<grafana_sub_domain>.<base_domain>"
  ui_endpoint: "https://<ui_sub_domain>.<base_domain>"
ssh_command:
app:
  bastion: ssh -i /home/my-user/.ssh/id_rsa -o StrictHostKeyChecking=no -o UserKnownHostsFile=/dev/null <username>@<bastion-instance-ip-address>
  master: ssh -i /home/my-user/.ssh/id_rsa -o StrictHostKeyChecking=no -o UserKnownHostsFile=/dev/null -o ProxyCommand="ssh -i /home/my-user/.ssh/id_rsa -o StrictHostKeyChecking=no -o UserKnownHostsFile=/dev/null -W %h:%p <username>@<bastion-instance-ip-address>" <username>@<app-instance-ip-address>
turn:
  master: ssh -i /home/my-user/.ssh/id_rsa -o StrictHostKeyChecking=no -o UserKnownHostsFile=/dev/null <username>@<turn-instance-ip-address>
Verify installation.
Login to the application instance using the SSH command from the installation results
ssh_command.app.masterCheck pod status:
kubectl get pods -n <application-namespace>Wait for all pods to reach Ready status (may take up to 60 minutes)
Once all the pods are healthy, you can access the UI using the URL from installation output
access_urls.ui_endpointFor the first time, the browser should prompt for permissions such as Mic, Speaker, or Camera necessary for the UI to operate. Upon accepting the permissions, the UI should load.

Uninstallation Steps#
Uninstalling Just the Application#
Source the correct environment variables file
source my-env-file.env
Run the commands below to uninstall just the application components.
./envbuild.sh uninstall --tf-binary terraform --component app --config-file ./my-config.yml
Uninstalling the Whole Setup#
Source the correct environment variables file
source my-env-file.env
Run the below uninstall command.
./envbuild.sh uninstall --tf-binary terraform --component all --config-file ./my-config.yml
Caution
This step uninstalls the entire Kubernetes cluster, and AWS infrastructure that was brought up during the install step. So use this with caution.
Additional Considerations#
Cost#
Many of the resources in this setup may not fall within the Free tier; you can check AWS billing reference pages to understand cost implications.
Security#
The security of Tokkio in production environments is the responsibility of the end users deploying it. When deploying in a production environment, please have security experts review any potential risks and threats; define the trust boundaries, secure the communication channels, integrate AuthN & AuthZ with appropriate access controls, keep the deployment including the containers up to date, and ensure the containers are secure and free of vulnerabilities.
Essential Skills and Background#
Familiarity With Amazon Web Services (AWS)#
Users should have a basic understanding of Amazon Web Services, including its core services and billing model. Below are some of the key areas users should be familiar with:
AWS Global Infrastructure: Understanding of AWS Regions and Availability Zones.
Identity and Access Management (IAM): Familiarity with IAM users, groups, roles, and policies for secure access control.
Core Services: Knowledge of fundamental AWS services such as EC2, S3, and DynamoDB for compute, storage, and database.
Networking: Understanding of VPC, subnets, security groups, and route tables for secure and efficient network design.
Management Tools: Familiarity with AWS Management Console for setting up one-time pre-requisites.
Others include Route53 for DNS service and Loadbalancers for traffic distribution.
Familiarity with Command-Line-Interface (CLI)#
Basic Commands: Users should be comfortable with basic command-line operations, such as navigating directories, executing scripts, and managing files.
Environment Configuration: Understanding how the environment variables and how the PATH setup works on Linux will greatly help in operating the OneClick script.
Scripting Basics: Basic scripting knowledge (e.g., shell scripting) is beneficial for understanding how the OneClick script operates and for troubleshooting any issues that may arise.
Familiarity with YAML#
YAML Syntax and Structure: YAML is often used for configuration files in cloud-native applications due to its readability and flexibility. The configuration templates used in OneClick script use YAML format. Users should be familiar with YAML syntax and structure.
Familiarity with the Kubernetes eco system#
Tokkio pipeline is a cloud native application and uses concepts like containerization, Kubernetes, Helm, etc. Users need to be familiar with these to get the best results from using the deployment scripts and the app.
Kubernetes Basics: Users should have a basic understanding of Kubernetes core concepts such as pods, services, and deployments
kubectl: Familiarity with the kubectl, the command line tool used to interact with Kubernetes clusters, including querying the status or logs of running application pods, etc.
Helm: Understanding the Helm package manager for Kubernetes that simplifies application deployment by managing charts (collections of pre-configured Kubernetes resource definitions) and how to use Helm with override values will help configure the templates appropriately.