Customization Options#
The reference workflow is described in detail in the section Reference Workflow. This page describes the common customizations that can be performed for the workflow (you can use the links below to jump to the relevant sections):
Digital Human Agent Customization: Modify the bot’s behavior, LLM settings, and response characteristics.
Avatar and Scene Customization: Change the digital human’s appearance and environment by creating and uploading custom avatars and scenes.
Number of Concurrent Streams Customization: Scale the number of simultaneous user interactions based on available system resources.
UI Customization: Modify the user interface layout or create a custom UI for the Tokkio application.
Audio2Face-3D Microservice Customization: Fine-tune avatar facial animations and lip-syncing parameters.
Adding a New Microservice: Extend functionality by integrating additional microservices into the workflow.
NVCF Deployment: Utilize serverless options for Audio2Face-3D and Riva services through NVIDIA Cloud Functions.
Disable Tracing Feature: Turn off the observability and tracing features if not needed.
Running on a single GPU: Run the Tokkio application on a single GPU.
Note
This section assumes that you have the reference workflow already successfully deployed.
Digital Human Agent Customization#
Sample notebooks: NVIDIA/ACE
The Digital Human Agent customizations are performed by adding custom logic to the Digital Human Agent pipeline, which is a part of the ACE Controller microservice. For more details regarding the ACE Controller microservice, please refer to the ACE Controller Overview.
Various customizations described in this section follow the Rapid Iteration path of using the ACE Configurator Method or the Local Developer Workflow Method to make changes to the Digital Human Agent pipeline. For persistent changes, one needs to publish and use the custom ACE Controller container as described in Updating ACE Controller container.
Beginner Friendly Customizations#
Beginner friendly customizations are those that can be made by modifying configuration files without changing the code. These include but are not limited to the following:
LLM processor selection: Switching between NIM, RAG, and OpenAI for processing user queries. Sample notebook 06_update_llm.ipynb provides an example of switching to a different LLM model. This can be used as an example of switching between different LLM processors as well. Please refer to the config.yaml sample below for the details regarding the relevant parameter llm_processor.
RAG endpoint customization: Changing the RAG Endpoint URL and the RAG collection_name (applicable when using RAG pipeline). Please refer to the config.yaml sample below for the details regarding the relevant parameter rag_server_url for NvidiaRAGService to be updated to achieve this customization. The customization can be performed in a way similar to the process shown in 06_update_llm.ipynb.
LLM model selection: Selecting NIM or OpenAI models as applicable to the pipeline. Please refer to the relevant parameters for specifying the model for NvidiaLLMService or OpenAILLMService as explained in the config.yaml sample below.
Greetings and prompt customization: Changing the avatar name, greetings, and the prompt as applicable to the use case. Sample notebooks 01_avatar_name.ipynb and 02_prompt_greeting.ipynb detail the steps for both of these customizations, respectively.
Adjust fillers: Adjust the filler phrases and response latency threshold that determine when the digital human uses conversational fillers while waiting for responses from the LLM or RAG. Please refer to the config.yaml sample below for the details regarding the relevant parameter filler to adjust the filler phrases and the time_delay. The customization can be achieved with config file updates similar to 01_avatar_name.ipynb or 02_prompt_greeting.ipynb.
Developer workflows supported: ACE Configurator Method and Local Developer Workflow Method
Steps:#
Use the ACE Configurator Method or the local workflow to navigate to the contents of the ACE Controller microservice.
The configuration for the ACE Controller microservice is located in the config.yaml file. A sample config.yaml file is shown below with the relevant parameters explained in the comments.
Pipeline:
    # Only one of the following LLM service configurations will be active based on this setting:
    # - "NvidiaLLMService" - Uses the NvidiaLLMService configuration
    # - "NvidiaRAGService" - Uses the NvidiaRAGService configuration
    # - "OpenAILLMService" - Uses the OpenAILLMService configuration
    llm_processor: "NvidiaLLMService" # OR NvidiaLLMService OR NvidiaRAGService OR OpenAILLMService
    filler:
        - "Let me think"
        - "Hmmm"
    time_delay: 2.0

UserPresenceProcesssor:
    welcome_message: "Hello"
    farewell_message: "Bye"

ProactivityProcessor:
    timer_duration: 100
    default_message: "I'm here if you need me!"

OpenAILLMContext:
    name: "Aki"
    prompt: "You are {name}, a virtual marketing and communications expert at Nvidia.
            You are a digital human brought to life with NVIDIA Digital Human Blueprint for Customer Service using
            microservices like Audio2Face-3D for facial animation, Riva (spelled Reeva) Parakeet for speech recognition
            and you use Elevenlabs for text to speech. It includes the open source ACE controller to orchestrate all
            the modules and allowing you to be streamed to a web browser. With this blueprint, NVIDIA partners can now
            build and customize Digital humans for their use case. You are not allowed to make any stock investment
            recommendations or compare NVIDIA to its competitors. Beyond your professional expertise, you are a passionate
            advocate for STEM education with keen interest in gaming and enhancement in tech. Your favorite graphics card
            is RTX4090 but you're eyeing the new RTX5090. Do not respond with a bulleted or numbered list. You have a
            bubbly personality. Respond with one sentence or less than 100 characters. Keep the conversation engaging
            and ask follow ups. DO NOT INCLUDE SPECIAL CHARACTERS, MARKDOWN, EMOJIS, OR ANYTHING ELSE BESIDES TEXT IN
            YOUR RESPONSE. Keep your answers factual and don't make up facts."

# This configuration is only used when llm_processor is set to "NvidiaRAGService"
NvidiaRAGService:
    use_knowledge_base: true
    max_tokens: 1000
    rag_server_url: "http://0.0.0.0:8081"
    collection_name: "collection_name"
    suffix_prompt: "Respond with one sentence or less than 75 characters."

# This configuration is only used when llm_processor is set to "NvidiaLLMService"
NvidiaLLMService:
    base_url: "https://integrate.api.nvidia.com/v1"
    model: "meta/llama-3.1-8b-instruct"

# This configuration is only used when llm_processor is set to "OpenAILLMService"
OpenAILLMService:
    model: "gpt-4o"

RAGMultimodalResponseProcessor:
    confidence_threshold: 0.37
    top_n: 2

FacialGestureProviderProcessor:
    user_stopped_speaking_gesture: "Taunt"
    start_interruption_gesture: "Pensive"
    probability: 0.5

# ADVANCED CONFIGURATION SECTION BELOW
# AnimationGraph service configuration is only needed if your 3D avatar scene has support for gestures and postures.
# Changing these values will not have an effect unless your scene supports them.
AnimationGraphService:
    animation_types:
        posture:
            duration_relevant_animation_name: "posture"
            animations:
                posture:
                    default_clip_id: "Attentive"
                    clips:
                        - clip_id: Talking
                          description: "Small gestures with hand and upper body: Avatar is talking"
                          duration: -1
                          meaning: Emphasizing that Avatar is talking
                        - clip_id: Listening
                          description: "Small gestures with hand and upper body: Avatar is listening"
                          duration: -1
                          meaning: Emphasizing that one is listening
                        - clip_id: Idle
                          description: "Small gestures with hand and upper body: Avatar is idle"
                          duration: -1
                          meaning: Show the user that the avatar is waiting for something to happen
                        - clip_id: Thinking
                          description: "Gestures with hand and upper body: Avatar is thinking"
                          duration: -1
                          meaning: Show the user that the avatar thinking about his next answer or is trying to remember something
                        - clip_id: Attentive
                          description: "Small gestures with hand and upper body: Avatar is attentive"
                          duration: -1
                          meaning: Show the user that the avatar is paying attention to the user
Update and save the config.yaml file with the desired customizations.
Apply the changes by using the ACE Configurator or the local workflow.
Note
If the changes are made without using the ACE Configurator or the local workflow, follow the instructions in Updating ACE Controller container to apply the changes in your already deployed Tokkio workflow.
Advanced Customizations#
Advanced customizations require modifying the source code to implement new functionality or change existing behavior. These include but are not limited to the following:
Adding/Removing a frame processor in the pipeline for the digital human agent. This includes swapping the processors as well (e.g., choosing a different ASR/TTS provider, like Deepgram/Cartesia in place of the default TTS provider used by the bot pipeline, enabling/disabling speculative speech handling, etc). Please refer to the sample notebooks 04_add_a_frame_processor.ipynb, 07_change_tts_provider.ipynb, 08_enable_speculative_speech_processing.ipynb, 09_create_frame_processor.ipynb as examples for performing these customizations.
Passing additional parameters/modifying parameters that are passed to various frame processors that are a part of the pipeline. Please refer to the sample notebook 03_avatar_voice.ipynb as an example for performing this type of customization.
Adding/updating the dependencies for the Python packages used by the pipeline. Please refer to the sample notebook 07_change_tts_provider.ipynb as an example for performing this type of customization. It includes adding a new dependency (Cartesia or any other TTS provider) as a project dependency and updating the bot.py file to use the new dependency.
Developer workflows supported: ACE Configurator Method and Local Developer Workflow Method
Steps:
Use the ACE Configurator Method or the local workflow to navigate to the contents of the ACE Controller microservice.
Open the bot.py file.
Update the bot.py file to add/remove/update the frame processor as needed. Note that the relevant frame processor should be imported (if applicable), constructed and added to the pipeline. Refer to any frame processor added to the pipeline in the bot.py file as an example.
Save the changes and apply them by using the ACE Configurator or the local workflow.
Note
If the changes are made without using the ACE Configurator or the local workflow, follow the instructions in Updating ACE Controller container to apply the changes in your already deployed Tokkio workflow.
Updating ACE Controller container#
For customizations that are not supported or performed through either of the developer workflows, follow the steps below to update the ACE Controller container. This method allows for persistent changes to the Digital Human Agent pipeline.
Steps:
The agent configuration, as well as the source, can be updated directly in the downloaded source for the Tokkio chart ACE/workflows/tokkio/5.0.0-ga/.
Update the files as needed (any code changes, configuration changes, etc.).
Build and publish the updated container to NGC:
cd llm-rag

docker build -t nvcr.io/<MY_ORG>/<MY_TEAM>/ace-controller:<MY_VERSION> .

docker push nvcr.io/<MY_ORG>/<MY_TEAM>/ace-controller:<MY_VERSION>
Replace the placeholders in the command above to the correct values for your team. MY_ORG: NGC ORG for your team. MY_TEAM: Your team on NGC, to which you can upload and access the container images. MY_VERSION: Version number for your ace controller image.
Download the Helm chart variation that is deployed. For example, https://catalog.ngc.nvidia.com/orgs/nvidia/teams/ace/helm-charts/tokkio-1stream-with-ui/files?version=5.0.0-GA
Create a new override values YAML file, e.g., my_controller_override_values.yaml for overriding the ace controller container version. A sample of the same is given below. Please update the placeholders <IMAGE_NAME> and <IMAGE_TAG> with the correct values.
  tokkio-app:
    ace-controller:
      applicationSpecs:
        ace-controller-deployment:
          containers:
            ace-controller-container:
              env:
              - name: ANIMGRAPH_URL
                value: http://ia-animation-graph-microservice:8020
              - name: REDIS_URL
                value: redis://redis-timeseries-redis-timeseries-svc:6379
              - name: A2F_GRPC_URL
                value: a2f-a2f-deployment-a2f-service:50010
              - name: LP_GRPC_URL
                value: $egress.lp-grpc.address:$egress.lp-grpc.port
              - name: RIVA_SERVER_URL
                value: riva-speech:50051
              - name: OTEL_SDK_DISABLED
                value: 'false'
              - name: OTEL_SERVICE_NAME
                value: ace-controller
              - name: OTEL_EXPORTER_OTLP_ENDPOINT
                value: http://obs-opentelemetry-collector.platform.svc.cluster.local:4317
              - name: OTEL_EXPORTER_OTLP_PROTOCOL
                value: grpc
              - name: OTEL_PYTHON_LOGGING_AUTO_INSTRUMENTATION_ENABLED
                value: 'true'
              - name: IMAGE_NAME
                value: <IMAGE NAME>
              - name: IMAGE_TAG
                value: <IMAGE_TAG>
              image:
                repository: <IMAGE NAME>
                tag: <IMAGE_TAG>
      image: <IMAGE NAME>
      tag: <IMAGE_TAG>
Follow the steps listed in Integrating Customization changes without rebuild to apply the changes by re-deploying your Tokkio workflow.
Avatar and Scene Customization#
is_rebuild_needed: No
Use case:
Change the avatar/scene streamed to the browser UI
Tokkio allows you to customize your avatar. This involves creating your custom avatar, uploading your avatar scene to NGC or another file storage provider, and finally updating the UCS configuration to point to your uploaded scene.
Create avatar: To create a custom avatar model, follow the Avatar Customization section of the Unreal Renderer microservice to create your custom avatar look. We recommend the Custom Avatar: MetaHuman workflow as a good starting point to create your custom avatar.
Upload avatar: Follow the instructions in section NGC Resource Downloader to create and upload your new avatar scene to NGC. Alternatively, you can also use the Manual Resource Downloader or implement your custom resource downloader for a third-party file storage provider by following section Custom Resource Downloader.
Download Helm chart: Download the Helm chart of the sample LLM RAG workflow from NGC. As an example, https://catalog.ngc.nvidia.com/orgs/nvidia/teams/ace/helm-charts/tokkio-1stream-with-ui/files?version=5.0.0-GA .
Find the relevant block to update from the values.yaml of the downloaded Helm chart folder. Copy it over to a new yaml file. For example my_override_values.yaml. Then copy over the entire block shown below so that it retains the relevant path in the yaml file. Replace PATH_TO_REMOTE_RESOURCE value with the path to your resource location. Replace <VERSION> with the version of the ngc-resource-downloader container image.
my_override_values.yaml## ... unreal-renderer: applicationSpecs: deployment: initContainers: - env: - name: REMOTE_RESOURCE_PATH value: "{'metahumanPak': '', 'scenePak': '', 'unrealEngineProject': 'PATH_TO_REMOTE_RESOURCE'}" - name: DESTINATION_RESOURCE_PATH value: /home/interactive-avatar envFrom: - secretRef: name: ngc-api-key-secret image: nvidia/ace/ngc-resource-downloader:<VERSION> imagePullPolicy: IfNotPresent name: init volumeMounts: - mountPath: /home/interactive-avatar name: asset-volume # ...
Follow the steps listed in Integrating Customization changes without rebuild to apply the changes in your already deployed Tokkio workflow.
Number of concurrent streams customizations#
is_rebuild_needed: Yes
Use case:
User may scale to any number of concurrent streams on a single node, constrained only by the system resources such RAM, GPU Frame buffer size, and compute
Tokkio app variants are compiled for running 1, 3, and 6 concurrent streams, refer to Reference Workflow for details on those pre-built options. The following information is for users who wish to run any number of streams that is not included in one of the pre-built variants.
The number of max concurrency is primarily decided by the number of GPUs on the deployment node. The rule of thumb is
max_concurrency = num_GPU - 1 for T4 type GPU, and max_concurrency = (num_GPU - 1) * 2 for A10 and L4 type GPU.
For example, 4 A10 GPUs will allow max concurrency of (4 - 1) * 2 = 6 streams, and 4 T4 GPUs will only allow max concurrency of 4 - 1 = 3 streams
You will need at least 2 of any type of supported GPUs to run at least 1 stream. Please make sure you have enough compute allocated for the desired amount of concurrency before going into the configuration section
Configuration:
Apply the following changes to tokkio-app-params.yaml and follow the steps listed in Integrating Customization changes with rebuild to apply the changes by re-deploying your Tokkio workflow.
...
---
ace-controller-sdr:
  sdrMaxReplicas: '<max_concurrency>'
  wlThreshold: '1'
ace-controller:
  replicas: <max_concurrency>
animation-graph:
  animationServer:
    maxStreamCapacity: <max_concurrency>
  ucfVisibleGpus:
    - 1
ue-renderer-sdr:
  sdrMaxReplicas: '<max_concurrency>'
unreal-renderer:
  deployment:
    gpuDisableAlloc: false
    gpuAllocLimit: <1 for T4, and 2 for A10 or L4>
  replicas: <max_concurrency>
  ucfVisibleGpus: <[1 ~ number of GPUs - 1]>, e.g., [1, 2, 3] for 4 GPUs
vms:
configs:
  vst_config.json:
    network:
      max_webrtc_in_connections: <max_concurrency * 2>
      max_webrtc_out_connections: <max_concurrency * 2>
  ucfVisibleGpus:
    - 0
...
Apply the following changes to the values override file at deployment time:
...
tokkio-ingress:
  configs:
    ingress:
      MAX_NUM_SESSION: <max_concurrency>
...
UI Customization#
is_rebuild_needed: Yes
Use case:
Use a custom UI layout for Tokkio
Create a new UI from scratch
Embed the Tokkio UI in another website as an iframe
Refer to Customization for details regarding these customizations.
Follow the steps listed in Integrating Customization changes with rebuild to apply the changes by re-deploying your Tokkio workflow. Ensure to update the microservice version for the UI microservice in tokkio-app.yaml to the one you updated.
Audio2Face-3D Microservice Customization - Experimental#
is_rebuild_needed: No
Use case:
Tune avatar’s facial animation and lip motion
Tokkio uses the Audio2Face-3D microservice (A2F-3D) to drive the avatar’s facial animation including the lip motion. The Audio2Face-3D microservice takes avatar speech as input and generates a facial animation stream. The quality of the facial animation depends on the 3D avatar model and its blendshape setup. In addition, the generation also depends on the voice that drives that animation. To account for the different avatar assets and the different voice inputs the Audio2Face-3D microservice exposes a handful of parameters that can be tuned to improve the visual quality of the facial animation.
See the Audio2Face-3D parameter tuning guide for more information on various parameters.
To facilitate the tuning of the Audio2Face-3D microservice, we created a simple workflow and the Audio2Face-3D Tuning VSCode Extension. The A2F-3D Tuning workflow is made up of a pipeline with ElevenLabs TTS, Audio2Face-3D and Animation Graph microservices.
You can send a text prompt to the pipeline to generate speech audio and see the facial animation. Then you can use the Visual Studio Code extension to tune the parameters of the Audio2Face-3D microservice. The parameters are persisted in your local file system. To see the changed facial animation, you can apply the new parameters to a deployed Tokkio using the ACE Configurator.
Developer workflows supported: ACE Configurator.
Steps:
Update the reference pipeline to the tuning one:
Warning
These steps will permanently modify your deployed Tokkio. Before proceeding, make sure to back up your original downloaded files from the first step if you want to restore them later.
Use the ACE Configurator VS Code extension to download the ace-controller-ace-controller-deployment assets locally. You can do this from the ACE CONFIGURATOR section in the left sidebar.
Swap the bot.py file with this one:
bot.py. The file is also available in the Github repository bot.pyAdd the following new file to the ACE Controller microservice, in the same subfolder as bot.py:
tuningtools.py. The file is also available in the Github repository tuningtools.pySave all the changes and apply them with the ACE Configurator.
Install and configure the audio2face-3d-tuning-tool Visual Studio Code extension:
Open the Visual Studio Code marketplace and search for Audio2Face-3D Tuning Tool
Install the extension.
Setup access to the ACE Controller. Depending on your deployment, you might need to port forward the ACE Controller:
1. Port Forwarding Setup:
- If you have direct cluster access:
Skip to the port forwarding command below.
- If you don’t have direct cluster access:
If you deployed Tokkio using the Quickstart Guide, set up cloud cluster tunneling:
$ bash ./setup-cns-access.sh -f config-template.yml -t terraform -p 32768 -c app
Note
The script and configuration file are available in the cloned Github repository.
2. Port Forward the ACE Controller:
Run this command to port forward, for example 33033. The command also assumes that the Tokkio deployment is named app, but adjust the namespace as needed:
$ kubectl port-forward --address 0.0.0.0 pod/ace-controller-ace-controller-deployment-0 33033:8000 -n app
Patch the Audio2Face-3D deployment to switch up faster to the new stylization parameters:
You will need direct cluster access to patch the deployment, same as above.
$ kubectl patch deployment a2f-a2f-deployment --patch '{"spec":{"template":{"spec":{"containers":[{"name":"a2f-container"}],"terminationGracePeriodSeconds":1}}}}' -n app
Open the AUDIO2FACE-3D TUNING view in the left sidebar.
Enter the ACE Controller URL, for example localhost:33033. The URL may vary depending on your deployment.
Note
Check the Firewall rules to ensure that the port is open on the deployment machine and can receive outside connections.
Tune the Audio2Face-3D microservice parameters:
Start the Tokkio UI.
Use the ACE Configurator VS Code extension to download the a2f-a2f-deployment assets locally. You can do this from the ACE CONFIGURATOR section in the left sidebar.
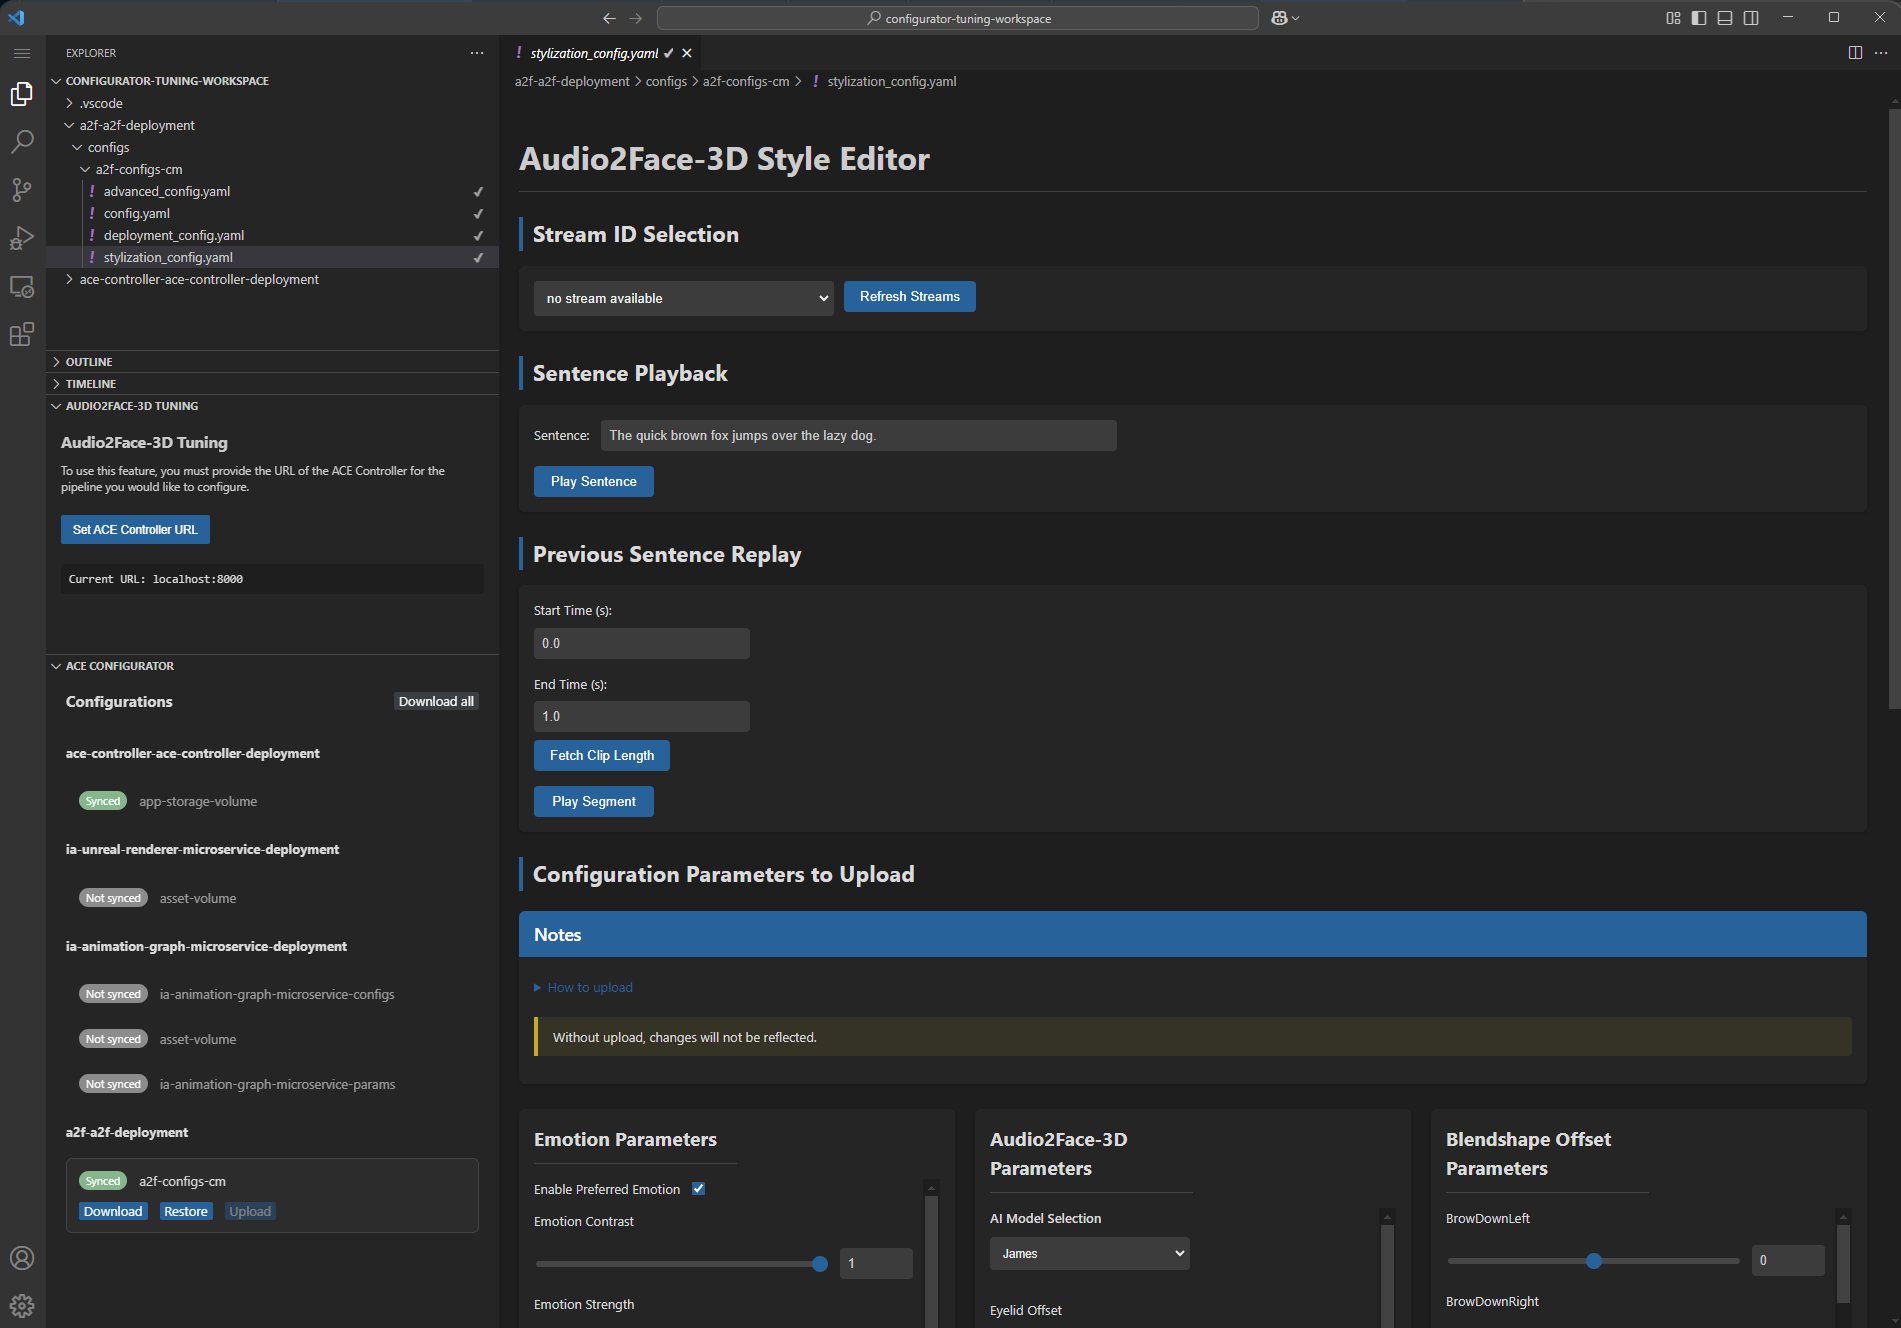
Open the configs/a2f-configs-cm/stylization_config.yaml file. The UI will look similar as in the Audio2Face-3D Tuning Tool. You should see a custom view where you can:
Click on the Refresh Streams button and select the desired Stream ID from the dropdown menu.
Input a text prompt and click on the Play Sentence button. In the Tokkio UI, you should see the avatar speaking the sentence you input.
Trim the audio and animation in the Previous Sentence Replay section. Click on the Fetch Clip Length button to get the number of seconds of the input sentence. You can then adjust the Start Time (s) and End Time (s) to replay a portion of the generated audio and animation.
Warning
The uploaded stylization parameters will permanently modify your deployed Tokkio. If you want to revert to the original parameters, we recommend saving the original configuration files somewhere safe.
Tune the stylization parameters in the Configuration Parameters to Upload section. Adjust the parameters to your liking and then save the file. Go to the ACE CONFIGURATOR section in the left sidebar, navigate to the a2f-a2f-deployment and click on Upload. Wait for the parameters to complete uploading. You can then replay the sentence and see the new animation in the Tokkio UI.
Apply changes in other Tokkio deployments
The changed parameters are persisted in your local file system and applied to your deployed Tokkio using the ACE Configurator. You can also copy the parameters to another deployment which supports the ACE Configurator. To do this:
Save the stylization_config.yaml file from your local machine in another location. Ideally, outside the currently opened workspace in VSCode since the ACE Configurator might replace the existing files.
Change the ACE Controller URL to the deployment you want to update and download the a2f-a2f-deployment assets.
A pop up will appear asking you to confirm if you want to replace the existing files with the new ones. Since you saved the file in a different location, it is safe to click on Yes.
Copy back the previously saved stylization_config.yaml file into the opened workspace in VSCode.
ACE Configurator extension will detect the changed file and allow you to apply the changes. In the left ACE CONFIGURATOR side panel, in the a2f-a2f-deployment section, click on Upload.
Wait for the parameters to complete uploading.
The Tokkio deployment should now have the updated Audio2Face-3D stylization parameters.
Adding a new microservice#
If required, you can also add a new microservice to Tokkio to customize your use case. Refer to the UCS Tool (https://docs.nvidia.com/ucf/2.8.1/text/UCS_Introduction.html)to create and build a new UCS microservice.
Note
The addition of a microservice to Tokkio workflow must be done with careful consideration of the the endpoints that the microservice would interface with. You may use UCS Studio to visualize and connect the microservice endpoints for additional microservices.
Once the microservice is added to the Tokkio graph in UCS Studio, follow the steps listed in Integrating Customization changes with rebuild to apply the changes by re-deploying your Tokkio workflow.
Use existing endpoints for microservices#
is_rebuild_needed: No
Use case:
Use the serverless option of Audio2Face-3D and Riva service hosted through NVCF (NVIDIA Cloud Functions) instead of hosting them locally
Download the Helm chart variation that is deployed. For example, ue_helm_chart_url_1stream-ui
Create a new override values yaml file, e.g: my_nvcf_override_values.yaml
Update my_nvcf_override_values.yaml to disable Audio2Face-3D and/or Riva service at the top level. You can check values.yaml regarding the hierarchy of the values.
audio2face-3d:
  enabled: false
riva-api:
  enabled: false
Note that the ACE Controller expects connection to these microservices. You can update the bot.py to pass in the URL for these microservice deployments. Refer to the relevant code snippet below to see how to pass in the URL for these microservices. Follow the steps listed in Advanced Customizations to directly edit the bot.py file for the updated Riva/A2F-3D URLs.
riva_server_ip = os.getenv("RIVA_SERVER_URL", "localhost:50052")
if riva_server_ip != "localhost:50052":
    riva_server_ip.replace("http://", "")
stt = RivaASRService(
    server=riva_server_ip,
    language="en-US",
    sample_rate=16000,
    model="parakeet-1.1b-en-US-asr-streaming-silero-vad-asr-bls-ensemble",
)


a2f = Audio2Face3DService(
    target=os.getenv("A2F_GRPC_URL", "0.0.0.0:50010"),
    sample_rate=16000,
    bit_per_sample=16,
    send_silence_on_start=True,
)
Follow the steps listed in Integrating Customization changes without rebuild to apply the changes by re-deploying your Tokkio workflow.
Disable Tracing Feature#
is_rebuild_needed: Yes
Use case:
The tracing feature can be disabled if desired. By default, the tracing feature is enabled, that please be noted that the application deployment will not succeed if the observability stack is not installed. In cases where the installation of the observability stack is not possible, make sure the tracing feature is disabled.
Configuration:
Apply the following changes to tokkio-app-params.yaml and follow the steps listed in Integrating Customization changes with rebuild to apply the changes by re-deploying your Tokkio workflow.
...
---
tokkio-ingress-mgr:
  configs:
    ingress:
      enableTracing: false
      otelExporterOtlpEndpoint: ''

anim-graph-sdr:
  disableTracing: 'true'
  otelExporterOtlpEndpoint: ''

ace-controller-sdr:
  disableTracing: 'true'
  otelExporterOtlpEndpoint: ''

renderer-sdr:
  disableTracing: 'true'
  otelExporterOtlpEndpoint: ''

ace-controller:
  OTEL_SDK_DISABLED: 'true'
  OTEL_EXPORTER_OTLP_ENDPOINT: ''
...
Running on a single GPU#
is_rebuild_needed: Yes
Use case:
A single stream deployment with avatar resolution of 720p can be run on a single GPU like L40 or a more powerful one.
Configuration:
For the single stream deployment version of the app (Source: NVIDIA/ACE), in the values.yaml file, set the visibleGpus to 0. Also, in the tokkio-app-params.yaml file, set the ucfVisibleGpus and nvidiaVisibleDevices to 0.
Follow the steps listed in Integrating Customization changes with rebuild to apply the changes by re-deploying your Tokkio workflow.