Installing and Upgrading cuBB SDK
This page describes how to install or upgrade cuBB SDK and the dependent CUDA driver, MOFED, NIC firmware, and nvidia-peermem driver on the host system per release. You must update the dependent software components to the specific version listed in the Release Manifest.
To prevent dependency errors, you should perform all steps in this section during the initial installation and each time you upgrade to a new Aerial release.
The default nvidia-peermem kernel module included in the CUDA driver is needed to run Aerial SDK and it doesn’t work with MOFED driver container. If the host system has previous MOFED and nv-peer-mem containers running, please stop and remove existing MOFED and nv-peer-mem driver containers first.
            $ sudo docker stop OFED
$ sudo docker rm OFED
$ sudo docker stop nv_peer_mem
$ sudo docker rm nv_peer_mem
Execute the following commands to install MOFED on the host.
            $ export OFED_VERSION=5.7-1.0.2.0
$ export UBUNTU_VERSION=20.04

$ wget http://www.mellanox.com/downloads/ofed/MLNX_OFED-$OFED_VERSION\
  /MLNX_OFED_LINUX-$OFED_VERSION-ubuntu$UBUNTU_VERSION-x86_64.tgz
$ tar xvf MLNX_OFED_LINUX-$OFED_VERSION-ubuntu$UBUNTU_VERSION-x86_64.tgz
$ cd MLNX_OFED_LINUX-$OFED_VERSION-ubuntu$UBUNTU_VERSION-x86_64

$ sudo ./mlnxofedinstall --upstream-libs --dpdk --with-mft --with-rshim --add-kernel-support --force
$ sudo rmmod nv_peer_mem nvidia_peermem
$ sudo /etc/init.d/openibd restart

# To check what version of OFED you have installed
$ ofed_info -s
MLNX_OFED_LINUX-5.7-1.0.2.0:
This section describes how to update the Mellanox NIC firmware.
To download the NIC firmware, refer to the Mellanox firmware download page. For example, to update the CX6-DX NIC firmware, download it from the ConnectX-6 Dx Ethernet Firmware Download Center page.
In the download menu, there are multiple versions of the firmware specific to the NIC hardware, as identified by its OPN and PSID. To look up the OPN and PSID, use this command:
            $ sudo mlxfwmanager -d $MLX0PCIEADDR
Querying Mellanox devices firmware ...

Device #1:
----------

  Device Type:      ConnectX6DX
  Part Number:      MCX623106AE-CDA_Ax
  Description:      ConnectX-6 Dx EN adapter card; 100GbE; Dual-port QSFP56; PCIe 4.0 x16; Crypto; No Secure Boot
  PSID:             MT_0000000528
  PCI Device Name:  b5:00.0
  Base GUID:        b8cef6030033fdee
  Base MAC:         b8cef633fdee
  Versions:         Current        Available
     FW             22.34.1002     N/A
     PXE            3.6.0700       N/A
     UEFI           14.27.0014     N/A
The OPN and PSID are the “Part Number” and the “PSID” shown in the output. For example, depending on the hardware, the CX6-DX OPN and PSID could be:
            OPN  = MCX623106AC-CDA_Ax, PSID = MT_0000000436
OPN  = MCX623106AE-CDA_Ax, PSID = MT_0000000528
Download the firmware bin file that matches the hardware. If the file has a .zip extension, unzip
it with the unzip command to get the .bin file. Here is an example for the CX6-DX NIC with OPN MCX623106AE-CDA_Ax:
            $ wget https://www.mellanox.com/downloads/firmware\
  /fw-ConnectX6Dx-rel-22_35_1012-MCX623106AE-CDA_Ax-UEFI-14.28.15-FlexBoot-3.6.804.bin.zip
$ unzip fw-ConnectX6Dx-rel-22_35_1012-MCX623106AE-CDA_Ax-UEFI-14.28.15\
  -FlexBoot-3.6.804.bin.zip
To flash the firmware image onto the CX6-DX NIC, enter the following commands:
            $ sudo flint -d $MLX0PCIEADDR --no -i fw-ConnectX6Dx-rel-22_35_1012-MCX623106AE\
  -CDA_Ax-UEFI-14.28.15-FlexBoot-3.6.804.bin b

    Current FW version on flash:  22.34.1002
    New FW version:               22.35.1012

FSMST_INITIALIZE -   OK
Writing Boot image component -   OK

# Reset the NIC
$ sudo mlxfwreset -d $MLX0PCIEADDR --yes --level 3 r
Perform the steps below to enable the NIC firmware features required for Aerial.
            # eCPRI flow steering enable
$ sudo mlxconfig -d $MLX0PCIEADDR --yes set FLEX_PARSER_PROFILE_ENABLE=4
$ sudo mlxconfig -d $MLX0PCIEADDR --yes set PROG_PARSE_GRAPH=1

# Accurate TX scheduling enable
$ sudo mlxconfig -d $MLX0PCIEADDR --yes set REAL_TIME_CLOCK_ENABLE=1
$ sudo mlxconfig -d $MLX0PCIEADDR --yes set ACCURATE_TX_SCHEDULER=1

# Maximum level of CQE compression
$ sudo mlxconfig -d $MLX0PCIEADDR --yes set CQE_COMPRESSION=1

# Reset NIC
$ sudo mlxfwreset -d $MLX0PCIEADDR --yes --level 3 r
To verify the above NIC features are enabled:
            $ sudo mlxconfig -d $MLX0PCIEADDR q | grep "CQE_COMPRESSION\|PROG_PARSE_GRAPH\
\|FLEX_PARSER_PROFILE_ENABLE\|REAL_TIME_CLOCK_ENABLE\|ACCURATE_TX_SCHEDULER"

         FLEX_PARSER_PROFILE_ENABLE          4
         PROG_PARSE_GRAPH                    True(1)
         ACCURATE_TX_SCHEDULER               True(1)
         CQE_COMPRESSION                     AGGRESSIVE(1)
         REAL_TIME_CLOCK_ENABLE              True(1)
This section describes how to update the A100x NIC firmware.
Ensure there is a network connection for the BF2 BMC interface so that firmware update can be performed via the Internet:
The A100x Ubuntu 20.04 BFB image GA release is available on the DOCA web page.
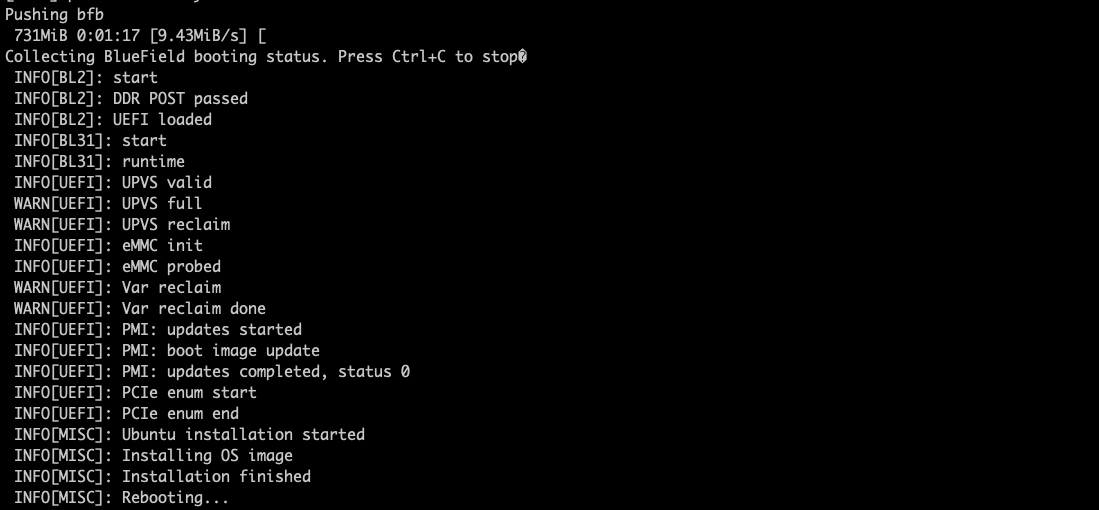
Run the below commands to download and flash the BFB image:
            # Download BFB image
$ wget https://content.mellanox.com/BlueField/BFBs/Ubuntu20.04\
  /DOCA_1.4.0_BSP_3.9.2_Ubuntu_20.04-4.signed.bfb

# Flash the signed version for CR or production board
$ sudo bfb-install --rshim rshim0 --bfb DOCA_1.4.0_BSP_3.9.2_Ubuntu_20.04-4.signed.bfb
Here is an example output:

Log in to BF2 and run the FW update script (you will need to power cycle the server afterwards):
            #Set a temporary static IP for rshim interface ‘tmfifo_net0’:
$ sudo ip addr add 192.168.100.1/24 dev tmfifo_net0

# Login with default BF2 IP address 192.168.100.2
ssh 192.168.100.2
user: ubuntu
password: ubuntu

# Password update is required upon login for the first time.

# After login, run below script on BF2 to update fw
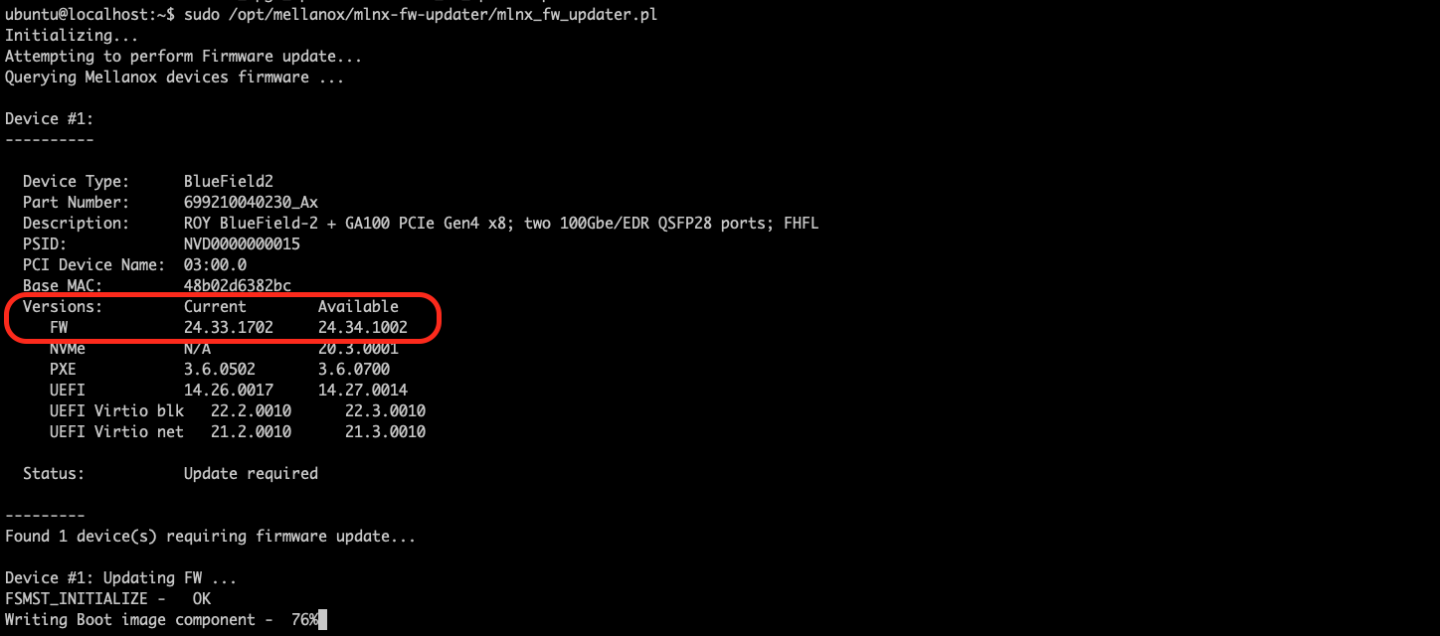
$ sudo /opt/mellanox/mlnx-fw-updater/mlnx_fw_updater.pl
Here is an example output:

An alternative to using BF2 is to download the firmware from the MLNX BlueField2 web page and burn it directly after flashing the BFB image (you will need to power cycle the server afterwards):
            #Enable MST
$ sudo mst start
$ sudo mst status
# MST modules:
# ------------
# MST PCI module is not loaded
# MST PCI configuration module loaded
#
# MST devices:
# ------------
# /dev/mst/mt41686_pciconf0 - PCI configuration cycles access.
# domain:bus:dev.fn=0000:b8:00.0 addr.reg=88 data.reg=92 cr_bar.gw_offset=-1
# Chip revision is: 01

#Download FW and burn it
$ wget https://content.mellanox.com/firmware/fw-BlueField-2-rel-24_35_1012-699210040230_Ax-NVME-20.3.1\
  -UEFI-21.4.10-UEFI-22.4.10-UEFI-14.28.15-FlexBoot-3.6.804.signed.bin.zip
$ unzip fw-BlueField-2-rel-24_35_1012-699210040230_Ax-NVME-20.3.1\
  -UEFI-21.4.10-UEFI-22.4.10-UEFI-14.28.15-FlexBoot-3.6.804.signed.bin.zip
$ sudo flint -d /dev/mst/mt41686_pciconf0 -i ./fw-BlueField-2-rel-24_35_1012-699210040230_Ax-NVME-20.3.1\
  -UEFI-21.4.10-UEFI-22.4.10-UEFI-14.28.15-FlexBoot-3.6.804.signed.bin b
There is some issue upgrading from 24.32.xxxx->24.34.xxxx. To work-arround it please upgrade first to 24.33.1048 and later to the 24.34.xxxx versions.
Run the following code to switch the A100x to the BF2-as-CX mode:
            # Enable MST
$ sudo mst start
$ sudo mst status

# MST modules:
# ------------
#     MST PCI module is not loaded
#     MST PCI configuration module loaded
#
# MST devices:
# ------------
# /dev/mst/mt4125_pciconf0         - PCI configuration cycles access.
#                                    domain:bus:dev.fn=0000:b5:00.0 addr.reg=88 data.reg=92 cr_bar.gw_offset=-1
#                                    Chip revision is: 00
# /dev/mst/mt41686_pciconf0        - PCI configuration cycles access.
#                                    domain:bus:dev.fn=0000:b8:00.0 addr.reg=88 data.reg=92 cr_bar.gw_offset=-1
#                                    Chip revision is: 01

# Setting BF2 CX6 Dx port to Ethernet mode (not Infiniband)
$ sudo mlxconfig -d /dev/mst/mt41686_pciconf0 --yes set LINK_TYPE_P1=2
$ sudo mlxconfig -d /dev/mst/mt41686_pciconf0 --yes set LINK_TYPE_P2=2

# Setting BF2 Embedded CPU mode
$ sudo mlxconfig -d /dev/mst/mt41686_pciconf0 --yes set INTERNAL_CPU_MODEL=1
$ sudo mlxconfig -d /dev/mst/mt41686_pciconf0 --yes set INTERNAL_CPU_PAGE_SUPPLIER=EXT_HOST_PF
$ sudo mlxconfig -d /dev/mst/mt41686_pciconf0 --yes set INTERNAL_CPU_ESWITCH_MANAGER=EXT_HOST_PF
$ sudo mlxconfig -d /dev/mst/mt41686_pciconf0 --yes set INTERNAL_CPU_IB_VPORT0=EXT_HOST_PF
$ sudo mlxconfig -d /dev/mst/mt41686_pciconf0 --yes set INTERNAL_CPU_OFFLOAD_ENGINE=DISABLED

# Accurate scheduling related settings
$ sudo mlxconfig -d /dev/mst/mt41686_pciconf0 --yes set CQE_COMPRESSION=1
$ sudo mlxconfig -d /dev/mst/mt41686_pciconf0 --yes set PROG_PARSE_GRAPH=1
$ sudo mlxconfig -d /dev/mst/mt41686_pciconf0 --yes set ACCURATE_TX_SCHEDULER=1
$ sudo mlxconfig -d /dev/mst/mt41686_pciconf0 --yes set FLEX_PARSER_PROFILE_ENABLE=4
$ sudo mlxconfig -d /dev/mst/mt41686_pciconf0 --yes set REAL_TIME_CLOCK_ENABLE=1

# NOTE: need power cycle the host for those settings to take effect

# Verify that the NIC FW changes have been applied
$ sudo mlxconfig -d /dev/mst/mt41686_pciconf0 q | grep "CQE_COMPRESSION\|PROG_PARSE_GRAPH\|ACCURATE_TX_SCHEDULER\
\|FLEX_PARSER_PROFILE_ENABLE\|REAL_TIME_CLOCK_ENABLE\|INTERNAL_CPU_MODEL\|LINK_TYPE_P1\|LINK_TYPE_P2\
\|INTERNAL_CPU_PAGE_SUPPLIER\|INTERNAL_CPU_ESWITCH_MANAGER\|INTERNAL_CPU_IB_VPORT0\|INTERNAL_CPU_OFFLOAD_ENGINE"
         INTERNAL_CPU_MODEL                  EMBEDDED_CPU(1)
         INTERNAL_CPU_PAGE_SUPPLIER          EXT_HOST_PF(1)
         INTERNAL_CPU_ESWITCH_MANAGER        EXT_HOST_PF(1)
         INTERNAL_CPU_IB_VPORT0              EXT_HOST_PF(1)
         INTERNAL_CPU_OFFLOAD_ENGINE         DISABLED(1)
         FLEX_PARSER_PROFILE_ENABLE          4
         PROG_PARSE_GRAPH                    True(1)
         ACCURATE_TX_SCHEDULER               True(1)
         CQE_COMPRESSION                     AGGRESSIVE(1)
         REAL_TIME_CLOCK_ENABLE              True(1)
         LINK_TYPE_P1                        ETH(2)
         LINK_TYPE_P2                        ETH(2)
Run below to disable flow rules for each reboot:
            # Update interface names if needed
$ sudo ethtool -A ens6f0 rx off tx off
$ sudo ethtool -A ens6f1 rx off tx off

# Verify the change has been applied
$ sudo ethtool -a  ens6f0
Pause parameters for ens6f0:
Autonegotiate:  off
RX:             off
TX:             off

$ sudo ethtool -a  ens6f1
Pause parameters for ens6f1:
Autonegotiate:  off
RX:             off
TX:             off
MOFED should be installed before CUDA driver.
If the installed CUDA driver is older than the version specified in the release manifest, follow the below instructions to remove the old CUDA driver and install the driver version that matches the version specified in the release manifest.
Removing Old CUDA Driver
If this is the first time to install CUDA driver on the system, please go directly to the next section “Installing CUDA Driver”. If this is an existing system and you don’t know how the CUDA driver was installed previously, see How to remove old CUDA toolkit and driver. Otherwise, run the following commands to remove the old CUDA driver.
            # Check the installed CUDA driver version
$ apt list --installed | grep cuda-drivers

# Remove the driver if you have the older version installed.
# For example, cuda-drivers-510 was installed on the system.
$ sudo apt purge cuda-drivers-510
$ sudo apt autoremove

# Remove the CUDA repository
$ sudo add-apt-repository --remove "deb https://developer.download.nvidia.com/compute/cuda/repos/ubuntu2004/x86_64/ /"
Installing CUDA Driver
            # Install CUDA driver 515.43.04 from CUDA 11.7.0 package
$ wget https://developer.download.nvidia.com/compute/cuda/11.7.0\
  /local_installers/cuda-repo-ubuntu2004-11-7-local_11.7.0-515.43.04-1_amd64.deb
$ sudo dpkg -i cuda-repo-ubuntu2004-11-7-local_11.7.0-515.43.04-1_amd64.deb
$ sudo cp /var/cuda-repo-ubuntu2004-11-7-local/cuda-*-keyring.gpg /usr/share/keyrings/

$ sudo apt-get update
$ sudo apt-get -y install cuda-drivers-515 gdm3-
$ sudo reboot

# check dkms status and nvidia-smi
$ dkms status
nvidia, 515.43.04, 5.4.0-65-lowlatency, x86_64: installed
nvidia, 515.43.04, 5.4.0-96-generic, x86_64: installed

$ nvidia-smi
+-----------------------------------------------------------------------------+
| NVIDIA-SMI 515.43.04    Driver Version: 515.43.04    CUDA Version: 11.7     |
|-------------------------------+----------------------+----------------------+
| GPU  Name        Persistence-M| Bus-Id        Disp.A | Volatile Uncorr. ECC |
| Fan  Temp  Perf  Pwr:Usage/Cap|         Memory-Usage | GPU-Util  Compute M. |
|                               |                      |               MIG M. |
|===============================+======================+======================|
|   0  NVIDIA A100-PCI...  On   | 00000000:B6:00.0 Off |                    0 |
| N/A   26C    P0    33W / 250W |      0MiB / 40960MiB |      0%      Default |
|                               |                      |             Disabled |
+-------------------------------+----------------------+----------------------+

+-----------------------------------------------------------------------------+
| Processes:                                                                  |
|  GPU   GI   CI        PID   Type   Process name                  GPU Memory |
|        ID   ID                                                   Usage      |
|=============================================================================|
|  No running processes found                                                 |
+-----------------------------------------------------------------------------+
Loading nvidia-peermem
Currently, there is no service to load nvidia-peermem.ko automatically. See the system initialization script section to load in aerial-init.sh. User can also load the module manually by the following command.
            $ sudo modprobe nvidia-peermem

# Verify it is loaded
$ lsmod | grep peer

nvidia_peermem         16384  0
ib_core               344064  9 rdma_cm,ib_ipoib,nvidia_peermem,iw_cm,ib_umad,rdma_ucm,ib_uverbs,mlx5_ib,ib_cm
nvidia              39055360  430 nvidia_uvm,nvidia_peermem,gdrdrv,nvidia_modeset
If the system fails to load nvidia-peermem, try the instructions in How to remove old CUDA toolkit and driver then follow the above “Installing CUDA Driver” instructions again.
This step is optional. To remove the old cuBB container, enter the following commands:
            $ sudo docker stop <cuBB container name>
$ sudo docker rm <cuBB container name>
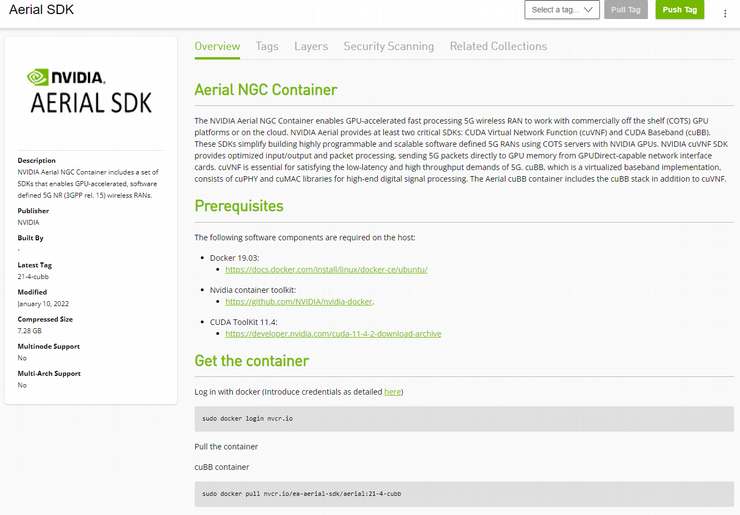
The cuBB container is available from the Nvidia GPU Cloud (NGC).
Once logged in to NGC, there is a common NGC container page for a variety of containers. Toward the top of that page, look for a docker pull command line for the cuBB SDK container.
Enter the command shown on the NGC page. Once the docker pull command is executed, the cuBB docker image will be loaded and ready to use.
Use the following command to run the cuBB container if it is not running. The --restart unless-stopped option instructs the container to run automatically after reboot.

            $ sudo docker run --restart unless-stopped -dP --gpus all --network host --shm-size=4096m --privileged -it -v /lib/modules:/lib/modules -v /dev/hugepages:/dev/hugepages -v /usr/src:/usr/src -v ~/share:/opt/cuBB/share --name cuBB <cuBB container IMAGE ID>
$ sudo docker exec -it cuBB /bin/bash