2. Installation
This page outlines how to install or update Clara Deploy SDK on your system.
As of version 0.7.0, the Clara Deploy SDK has been tested with the following system requirements:
Ubuntu Linux 18.04 LTS
We use the NVIDIA Triton Inference Server 1.15.0 (Container Image tag 20.07-v1-py3). Release 1.15.0 is based on NVIDIA CUDA 11.0.194, which requires NVIDIA Driver release 450 or later. However, if you are running on Tesla (for example, T4 or any other Tesla board), you may use NVIDIA driver release 418.xx or 440.30. The CUDA driver’s compatibility package only supports particular drivers. For a complete list of supported drivers, see the CUDA Application Compatibility topic. For more information, see CUDA Compatibility and Upgrades.
Installation of CUDA Toolkit would make both CUDA and NVIDIA Display Drivers available
Due to AWS kernel update 5.3.0-1017-aws,
nvidia-smiwill fail withNVIDIA-SMI has failed because it couldn’t communicate with the NVIDIA driver
This issue affects AWS, Azure and GCP, and it is recommended that the NVIDIA driver is installed using CUDA 10.2 deb package.
NVIDIA GPU is Pascal or newer, including Pascal, Volta, Turing and Ampere families
Kubernetes 1.15.4
Docker 19.03.1
NVIDIA Docker 2.2.0
Docker configured with nvidia as the default runtime (Prerequisite of NVIDIA device plugin for k8s)
Helm 2.15.2
At least 30GB of available disk space
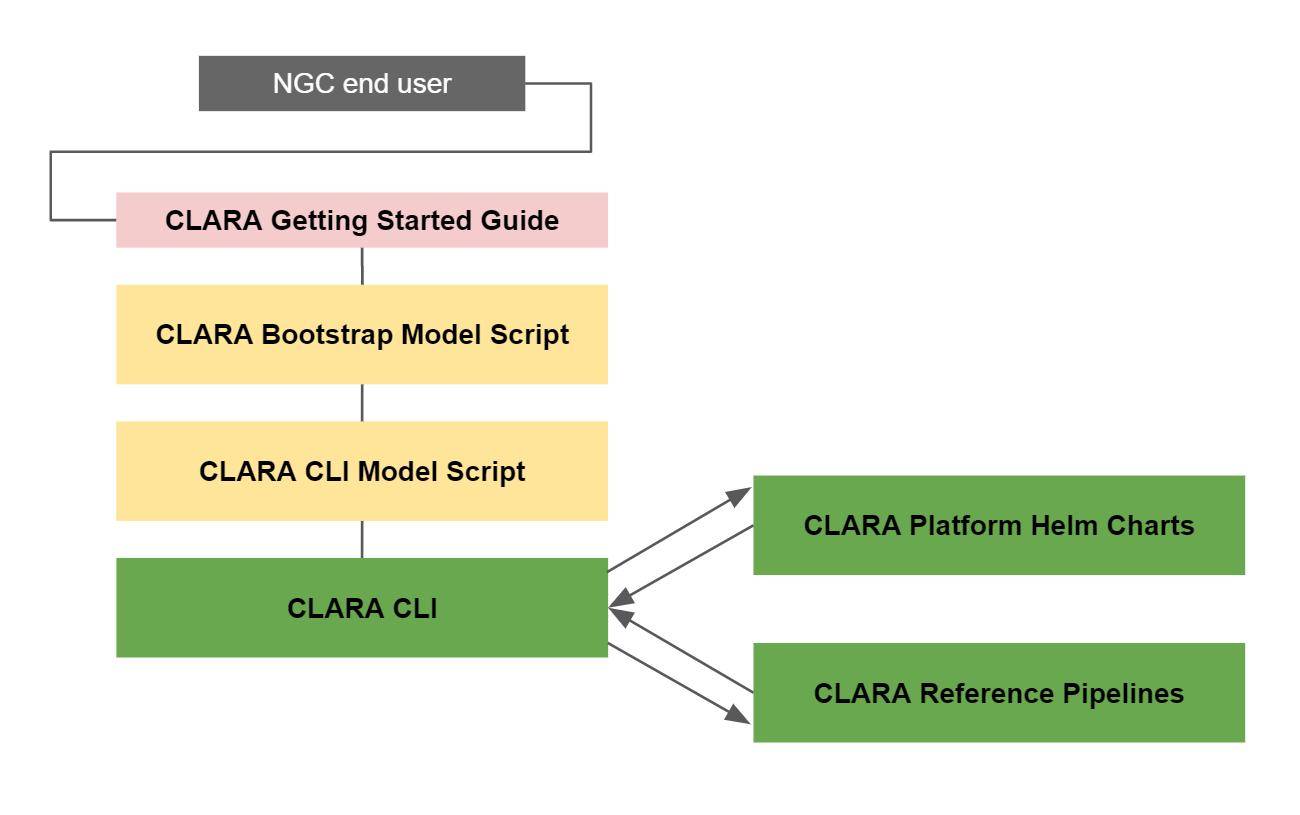
It is recommended that the user uses the bootstrap script to install the dependencies for Clara Deploy SDK.
The Clara installation workflow is outlined in the diagram below:
Download the
bootstrap.zipfile from NGC.Log in to NGC.
Navigate to Resources either in Catalog (public user) or in Private Repository (remember to select your appropriate org and team).
Find and select Clara Deploy Bootstrap.
Go to the File Browser section and download the latest version of the
bootstrap.zipfile.Unzip the
bootstrap.zipfile:
            # Unzip
unzip bootstrap.zip -d bootstrap
Skip this step if you are performing a new install of Clara Deploy SDK. Before upgrading a previous install of Clara Deploy SDK, run the
uninstall_prereq.shscript:# Run the script sudo ./uninstall_prereq.sh
Use the following command to check that all Clara pods have been terminated:
kubectl get pods
ImportantWe do not recommend manually deleting Clara Deploy components; the uninstall_prereq.sh script will delete all necessary binaries and stop all Clara Deploy containers.
Install all prerequisites required to run Clara Deploy SDK using the
bootstrap.shscript:# Run the script sudo ./bootstrap.sh
This will install the following required prerequisites:
Docker
NVIDIA Container Runtime for Docker
Kubernetes (including kubectl)
Helm
NoteIf your system does not have NVIDIA CUDA Toolkit installed, you will be provided with a link to install it.
Install Clara CLI.
Log in to NGC.
Navigate to Resources either in Catalog (public user) or in Private Repository (remember to select your appropriate org and team).
Find and select Clara Deploy CLI.
Go to the File Browser section and download the latest version of the
cli.zipfile.Extract the binaries into
/usr/bin/using following command. You should see output similar to that shown below:
            sudo unzip cli.zip -d /usr/bin/ && sudo chmod 755 /usr/bin/clara*
Archive:  cli.zip
inflating: /usr/bin/clara
inflating: /usr/bin/clara-dicom
inflating: /usr/bin/clara-monitor
inflating: /usr/bin/clara-platform
inflating: /usr/bin/clara-pull
inflating: /usr/bin/clara-render
Verify that clara CLI has been successfully installed:
clara version
Generate
claracompletion script for Bash
sudo bash -c 'clara completion bash > /etc/bash_completion.d/clara-completion.bash' && exec bash
Configure Clara CLI to use your NGC credentials:
If –orgteam is not specified, the orgteam defaults to ‘nvidia/clara’ which points to the publicly available Clara NGC artifacts.
clara config --key NGC_API_KEY [--orgteam NGC_ORG/NGC_TEAM] [-y|--yes]
NoteThe user must specifiy an
--orgteamparameter if the Clara component (e.g. platform) resides in a private org/team within NGC. Failing to specify the private org/team will result in Kubernetes failing to pull the container image for the desired Clara component.NoteTo learn more about NGC API Key go to https://docs.nvidia.com/ngc/ngc-getting-started-guide/index.html#generating-api-key
Pull and deploy Clara Platform with the following steps:
Pull the latest Clara Platform helm charts:
clara pull platform
Start the Clara Deploy SDK:
clara platform start
Pull and deploy Clara Deploy services.
Pull the latest Clara Deploy services helm charts:
            clara pull dicom
clara pull render
clara pull monitor
clara pull console
Start the Clara Deploy SDK:
            clara dicom start
clara render start
clara monitor start
clara console start
The console is not included in the current version of Clara Deploy, so the “console” commands will safely fail.
The deploy script will automatically start the following components:
The Clara Platform
The DICOM Adapter
The Render Server
The Monitor Server
To verify that the installation is successful, run the following command:
helm ls
The following three helm charts should be returned:
claraclara-dicom-adapterclara-monitor-serverclara-render-serverclara-console
To verify that the helm charts are up and running, run the following command:
kubectl get pods
The command should return pods with the below prefixes:
clara-clara-platformapiserver-clara-dicom-adapter-clara-monitor-server-fluentd-elasticsearch-clara-monitor-server-grafana-clara-monitor-server-monitor-server-clara-render-server-clara-renderer-clara-resultsservice-clara-ui-clara-console-clara-console-mongodb-clara-workflow-controller-elasticsearch-master-0elasticsearch-master-1
They should be all in a Running state
Clara can also be installed with a set of Ansible playbooks. This has the added benefit of being able to be deployed across multiple hosts at one time.
2.4.1. Steps to Install
#. Download Ansible. #.
Download the ansible.zip file from NGC.
Log in to NGC,
Select the appropriate org and team.
Navigate to Resources.
Find and select Clara Deploy Ansible Installation.
Go to the File Browser section and download the latest version of the
ansible.zipfile.Unzip the
ansible.zipfile:
            # Unzip
ansible.zip -d ansible
Configure your Ansible hosts details in the file
playbooks/clara_hosts. See Ansible’s inventory documentation for more information on how to work with inventory files.NoteYou may choose to update
/etc/ansible/hostsinstead of updating this file and can leave off the-iflag from the commands below.Install Clara Prerequisites To install Clara prerequisites (Docker, NVIDIA Driver, NVIDIA Docker, Openshify Python Libraries, Kubernetes and Helm) run:
ansible-playbook -K install-clara-prereqs.yml -i clara_hosts
Installing Clara Components To install basic Clara components run:
ansible-playbook -K install-clara.yml -i clara_hosts
By default only
platformanddicomare installed, however, the user may override the default variable clara_components as:ansible-playbook -K install-clara.yml -i clara_hosts -e 'clara_components=["platform", "dicom", "render"]'
or by updating the default value of clara_components in
ansible/playbooks/roles/clara-components/default/main.yml.
Researchers and data scientists who don’t have access to a GPU server can still get started with Clara Deploy SDK without needing to become a Docker and Kubernetes expert. Clara Deploy SDK has been validated on the following services:
Amazon Web Services (AWS)
Microsoft Azure Cloud Services (Azure)
Google Cloud Platform Services (GCP)
The following subsections describe the configuration for each CSP. Once the VM is provisioned according to the documentation, you can follow the Steps to Install section above to install Clara Deploy SDK.
2.5.1. AWS Virtual Machine Configuration
The AWS VM configuration used for testing can be found below:
Location : US East (Ohio)
Operating System : Ubuntu 18.04
Amazon machine image : Ubuntu Server 18.04 LTS (HVM), SSD Volume Type (64-bit)
Instance type : p3.8xlarge (32 vcpus, 244 GB memory, 4 NVIDIA GPUs in the Pascal, Volta and Turing families)
Storage: General Purpose SSD (100 GB)
Ports Open : SSH, HTTP, HTTPS
2.5.2. Azure Virtual Machine Configuration
The Azure VM configuration used for testing can be found below:
Location : West US2
Operating System: Ubuntu 18.04
Size : Standard NC6s_v2 (6 vcpus, 112 GB memory, 1 GPU-NVIDIA Tesla P100)
OS Disk Size : Premium SSD, 300GB (mounted on root)
Ports Open : SSH, HTTP, HTTPS
2.5.3. GCP Virtual Machine Configuration
The GCP VM configuration used for testing can be found below:
Location :
Region: us-central1 (Iowa)
Zone: us-central1-c
Operating System : Ubuntu 18.04 LTS
Machine type: 8vCPU, 32GB, 1 GPU (NVIDIA Tesla P4), Turn on display device
Disk Size: SSD 100GB
Ports Open : SSH, HTTP, HTTPS