Clara Workflow Creation
This document describes how a workflow is defined in Clara Deploy SDK. A workflow can be created within a helm chart as a sequence of steps (stages). A step-by-step guide is provided to create a new workflow and deploy it within the Clara Deploy SDK. This document includes an example workflow that uses the “dicom-reader” provided by the Clara Deploy SDK, a user created container that performs the AI, and the dicom-writer container provided by the Clara Deploy SDK. Additionally, this document provides guidance on how to create a helm chart for any user container.
The clara-wf command line tool can be used to define a workflow within Clara, to update or create a Helm chart for a new or existing container, and for testing workflows locally.
Workflows have the following characteristics:
Workflow ID: A Workflow ID is created manually and is configured with a dicom-server configuration file.
name: User-defined workflow name. This name is used in dicom-server configuration.
stages: Containers that are used in the workflow. The sequence in which containers are used in the workflow is defined under “stages”.
waitlocks: Dependency of each stage on other stages. Lock files are automatically generated based on stage name.
ioFolders: Input of each stage in the workflow. Last entry is the output of the last stage of the workflow. The result of the last entry is sent to DICOM adapter.
args: Command line arguments that are supported for this workflow and defined in the helm chart for the container. An argument and its value are expressed within double quotes and picked up for execution at run time.
To Create a Helm Chart for User-Defined Containers
Ensure the container is updated with clara driver callbacks as described in workflow driver documentation.
Navigate to the clara-reference-workflows folder.
Run the following command to generate the helm chart.
./clara-wf cs <container-name>
For example, to generate a user-ai stage, run the following command:
./clara-wf cs user-ai
That command generates [container-name] specific fields in the clara-reference-workflow/charts/clara-workflow/values.yaml file.
In
clara-reference-workflow/charts/clara-workflow/values.yaml, locate container-specific fields under the “stages:” section. Verify the key value pairs are same as defined by the user container. Most values can be used as they are. Update them manually, if needed.Pass container-specific arguments via workflow definition, if necessary.
For example, when adding the user-ai container as a stage with clara-wf, the following is generated for the user-ai container under the stage key in clara-reference-workflow/charts/clara-workflow/values.yaml:
            stages:

...

##BEGIN_user-ai##
  user-ai:
    image:
      repository: user-ai
      tag: latest
    mount:
      in:
        name: "input"
      out:
        name: "output"
    stageName: "user-ai"
    appDir: "/app"
    inputLock: "/app/locks/input.lock"
    inputs: "input"
    logName: "/app/logs/user-ai.log"
    outputs: "output"
    lockDir: "/app/locks"
    lockName: "user-ai.lock"
    timeout: "300"
    publishPath: "/publish"
##END_user-ai##
To Create a Workflow
To create a workflow named user-workflow with the dicom-reader container, the user-ai container and the dicom-writer container, perform the following steps. The dicom-reader and dicom-writer containers are provided in the Clara Deploy SDK. The user-ai container is a user-created AI container.
Create and build the
user-ai:latestcontainer image with Clara Workflow Driver. Thedicom-readercontainer image (clara/dicom-reader:[version]) and thedicom-writercontainer image (clara/dicom-writer:[version]) would be available once deployment script (deploy.sh) in Clara Deploy SDK is executed. For additional details see section 6.2 of the Clara Deploy SDK Documentation.Ensure that container specific Helm details are generated for each container and are present under the “stage:” key in
clara-reference-workflow/charts/clara-workflow/values.yaml. Verify the correctness of each container specific key-value details.Generate the workflow ID. Run
cat /proc/sys/kernel/random/uuidto create an ID that can be used for a new workflow.
#. Update clara-reference-workflow/charts/clara-workflow/values.yaml under the workflows: key with the newly created workflow.
#.
Add the workflow ID, name (user-workflow), stages in the workflow, waitLocks for each stage, ioFolders for each stage, and args for any arguments, if desired, to be passed to the container(s).
For this example, the following configuration details can be used:
The workflow ID
7b413e24-d018-4689-8c41-73272f6649d4is created.The workflow name is
user-workflow.The workflow uses the
dicom-reader,user-ai, anddicom-writercontainers.The sequence of containers is
dicom-reader, thenuser-ai, thendicom-writer.
The Workflow starts with dicom-reader. The output of dicom-reader is fed to user-ai, and the output of user-ai is fed into dicom-writer. The user-ai container waits on the dicom-reader.lock file and dicom-writer waits on the user-ai.lock file. The ioFolders configuration specifies the input folder of each container. The last entry is an input to DICOM adapter to read the result.
            7b413e24-d018-4689-8c41-73272f6649d4:
  name: "user-workflow"
  stages: ["dicom-reader", "user-ai", "dicom-writer"]
  waitLocks: ["", "dicom-reader.lock", "user-ai.lock"]
  ioFolders: ["dicom-reader/input", "dicom-reader/output", "user-ai/  output", "dicom-writer/output"]
  args: ["", "", ""]
If you want to provide arguments to the user-ai container's [entrypoint](https://docs.docker.com/engine/reference/builder/#entrypoint) (e.g., `-p foo`), use the following configuration:
            args: ["", ["-p", "foo"], ""]

Note: The random workflow ID can be used only for one workflow, for any other new workflow a new ID must be created.
In
clara-platform/files/dicom-server-config.yaml, update the following DICOM adaptor configuration settings.Either use an existing
ae-titleor include theae-titleto be used under theae-titles:key. If you add a newae-titlecalleduser-ae-title, this must be configured withNvidia.Clara.Dicom.Processors.JobProcessor,Nvidia.Clara.DicomServerin the Processors field. An existingae-titlecan be used to configure the newly createdae-title.Include the new workflow under the “workflows:” key with following details: name, clara-ae-title, destination name and workflow ID, such as the following:
            name: user-workflow
clara-ae-title: CT_AI
destination-name: DCM4CHEE
workflow: 7b413e24-d018-4689-8c41-73272f6649d4
To test the workflow locally without Clara Core and Clara DICOM adaptor, place input data of the workflow at “clara-reference-workflow/test-data/{random job ID in UUID}/{first stage name}/input” folder (e.g.,
clara-reference-workflow/test-data/11111111-1111-1111-1111-111111111111/dicom-reader/input), then execute the following command in the clara-reference-workflows directory:
            ./clara-wf test [workflow-ID] [job-ID] [timeout in seconds (default:300)]

For the example case, use the following command:
./clara-wf test 7b413e24-d018-4689-8c41-73272f6649d4 11111111-1111-1111-1111-111111111111
If you want to run the workflow with the deployed Clara, send DICOM data to DICOM adapter after copying TensorRT Inference Server model folder (if uesd) and publishing your workflow.
            # Copy model folder
sudo cp -r [model folder path] /clara-io/models/
# Publish workflow
sudo ./clara-wf publish 7b413e24-d018-4689-8c41-73272f6649d4 "User AI" /clara-io/clara-core/workflows/
Default Workflows
A set of default workflows are provided with this release. See clara-reference-workflow/charts/clara-workflow/values.yaml for details.
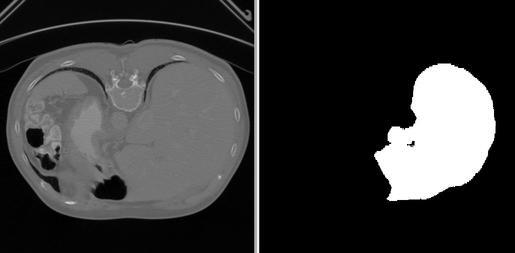
The Liver Segmentation workflow is one of the reference workflows provided with Clara Deploy SDK. This workflow takes an abdominal CT reconstructed volume (in DICOM format) as an input and processes the input volume with Liver Segmentation AI model. The AI model generates the labeled liver, and tumors (within the liver) as a binary mask (volume, same size as input). Liver is labeled as 1, tumors within the liver are labeled as 2, and the background is labeled as 0. Workflow in its final step, outputs the binary mask as a volume in DICOM format. The image below shows a slice of the input volumetric data (on left) in transverse direction and the segmented liver mask on the same slice (on right).
Configuration Details
The Liver Segmentation workflow is defined as a reference workflow in clara-reference-workflows/charts/clara-workflow/values.yaml. The following are the configuration details for the workflow.
            fd3ee8bf-b9f3-4808-bd60-243f870ff9bd:
name: "liver-seg"
stages: ["dicom-reader", "ai-livertumor", "dicom-writer"]
waitLocks: ["", "dicom-reader.lock", "ai-livertumor.lock"]
ioFolders: ["dicom-reader/input", "dicom-reader/output", "ai-livertumor/output", "dicom-writer/output"]
args: ["", "", ""]
Workflow ID: fd3ee8bf-b9f3-4808-bd60-243f870ff9bd
name: liver-seg
stages: “dicom-reader”, “ai-livertumor”, “dicom-writer”
waitlocks: “ai-livertumor” waits for dicom-reader.lock and “dicom-writer” waits for ai-livertumor.lock
ioFolders: defines data input folder for each container in the workflow. Last entry is the input to DICOM Adapter
args: No arguments are specified in the reference workflow
Helm Chart
The “ai-livertumor” helm chart is present in clara-reference-workflows/charts/clara-workflow/values.yaml under the “stages:” key.
            ```bash
##BEGIN_ai-livertumor##
ai-livertumor:
    image:
    repository: clara/ai-livertumor
    tag: [tag]
    mount:
    in:
        name: "input"
    out:
        name: "output"
    stageName: "ai-livertumor"
    appDir: "/app"
    inputLock: "/app/locks/input.lock"
    inputs: "input"
    logName: "/app/logs/ai-livertumor.log"
    outputs: "output"
    lockDir: "/app/locks"
    lockName: "ai-livertumor.lock"
    timeout: "300"
    publishPath: "/publish"
##END_ai-livertumor##
```
Where [tag] is the tag of the image for this release.
Workflow Execution
The Liver Segmentation workflow comes configured with DICOM Adapter in clara-platform/files/dicom-server-config.yaml. A default execution of the deployed Clara Deploy SDK executes the Liver Segmentation workflow. Optionally, the workflow can be executed using the clara-wf command line tool, with the following steps:
Navigate to clara-reference-workflows folder
Execute: ./clara-wf test fd3ee8bf-b9f3-4808-bd60-243f870ff9bd