AJA Video Systems
AJA provides a wide range of proven, professional video I/O devices, and a partnership between NVIDIA and AJA has led to the addition of Clara Holoscan support to the AJA NTV2 SDK and device drivers as of the NTV2 SDK 16.1 release.
GPU compute performance is a key component of Clara Holoscan hardware platforms, and to optimize GPU based video processing applications the AJA drivers and SDK now offer RDMA support for NVIDIA GPUs. This feature allows video data to be captured directly from the AJA card to GPU memory, which significantly reduces latency and system PCI bandwidth for GPU video processing applications as sysmem to GPU copies are eliminated from the processing pipeline.
RDMA support from AJA devices has also been incorporated into the AJA GStreamer plugin in order to enable zero-copy GPU buffer integration with the DeepStream SDK. This support allows DeepStream applications to process video data along the entire pipeline, from the initial capture to final display, without ever leaving GPU memory.
The following instructions describe the steps required to setup and use an AJA device with Clara Holoscan platforms, including RDMA and DeepStream integration. Note that the AJA NTV2 SDK support for Clara Holoscan includes all of the AJA Developer Products, though the following instructions have only been verified for the Corvid 44 12G BNC and KONA HDMI products, specifically.
To install an AJA Video Systems device into the Clara AGX Developer Kit, remove the side access panel by removing two screws on the back of the Clara AGX. This provides access to the two available PCIe slots, labelled 13 and 14 in the Clara AGX Developer Kit User Guide:
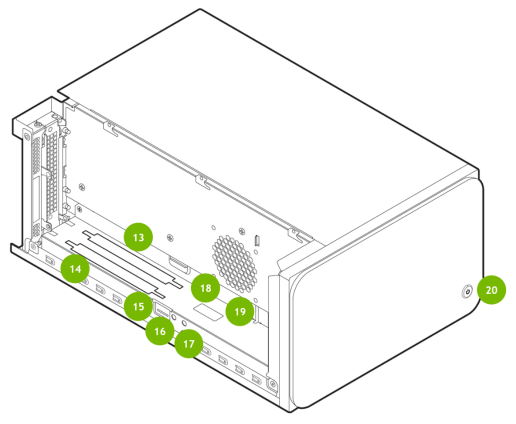
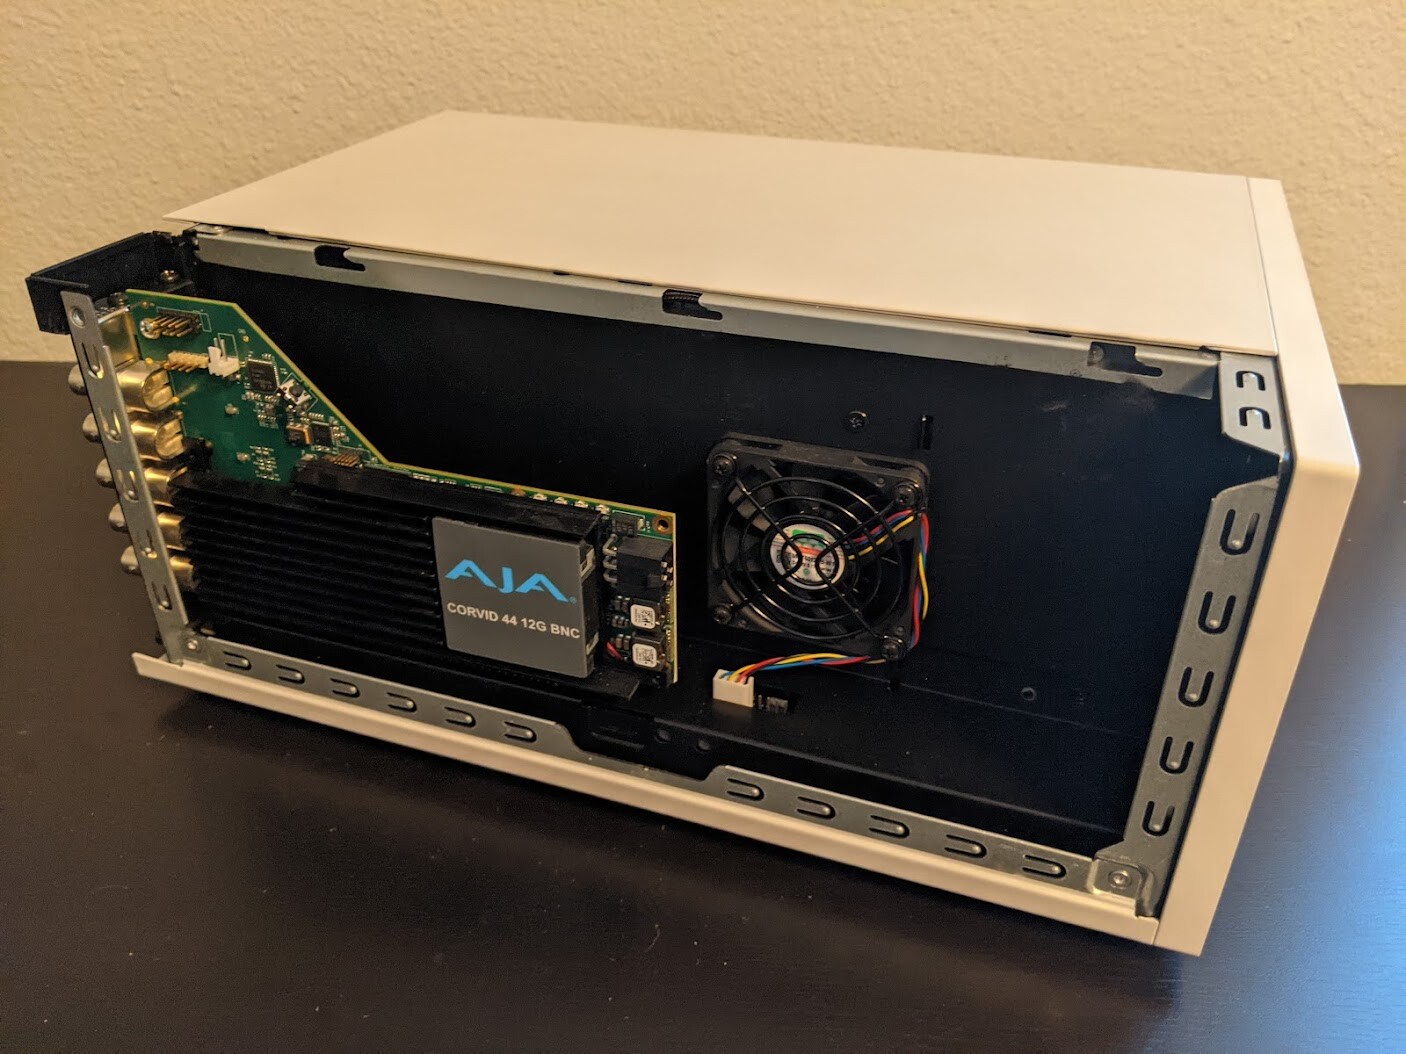
While these slots are physically identical PCIe x16 slots, they are connected to the Clara AGX via different PCIe bridges. Only slot 14 shares the same PCIe bridge as the RTX6000 dGPU, and so the AJA device must be installed into slot 14 for RDMA support to be available. The following image shows a Corvid 44 12G BNC card installed into slot 14 as needed to enable RDMA support.
Download the AJA NTV2 SDK
Login to your AJA developer account at https://sdksupport.aja.com.
NoteAccess to the AJA NTV2 SDK requires access to the AJA developer program, which can be requested from https://aja.com/developer/request.
Under Knowledgebase on the left side, go to NTV2 SDK Downloads.
Under Current NTV2 SDKs, go to NTV2 SDK 16.1 for Linux, MacOS and Windows.
At the bottom of the page, under Attachments, download
ntv2sdklinux_16.1.0.3.zipandntv2sdklinux_16.1.0.3_arm.zip. The first zip file contains the NTV2 SDK itself, while the second zip file contains libraries and binaries that have been built for the arm64 architecture as required by Clara Holoscan.NoteIf a newer version of the 16.1 SDK has been released, replace
16.1.0.3above and in all following steps with the version that is available for download.Move the downloaded zip files to a new directory, e.g.
${HOME}/aja. In all following steps, this path will be referred to asAJA_BASE.$ export AJA_BASE=${HOME}/aja $ mkdir ${AJA_BASE} $ mv ~/Downloads/ntv2sdklinux_16.1.0.3.zip ${AJA_BASE} $ mv ~/Downloads/ntv2sdklinux_16.1.0.3_arm.zip ${AJA_BASE}
Build and install the AJA drivers with RDMA support
Extract the NTV2 SDK zip files.
            $ cd ${AJA_BASE}
$ export NTV2_SDK=ntv2sdklinux_16.1.0.3
$ unzip ${NTV2_SDK}.zip
$ unzip ${NTV2_SDK}_arm.zip
Copy the arm64 libraries to the main SDK directory.
$ cp ${AJA_BASE}/${NTV2_SDK}_arm/lib/* ${AJA_BASE}/${NTV2_SDK}/lib/
Build the AJA drivers with RDMA support.
            $ cd ${AJA_BASE}/${NTV2_SDK}/ajadriver/linux
$ export AJA_RDMA=1
$ make
Load the AJA drivers.
            $ sudo ${AJA_BASE}/${NTV2_SDK}/bin/load_ajantv2
  loaded ajantv2 driver module
  created node /dev/ajantv20
Ensure that the AJA driver and RDMA are working by using the
rdmawhackerutility included with the NTV2 SDK.$ cd ${AJA_BASE}/${NTV2_SDK}/ajaapps/crossplatform/rdmawhacker $ make $ ${AJA_BASE}/${NTV2_SDK}/bin/rdmawhacker DMA engine 1 WRITE 8388608 bytes rate: 4678.72 MB/sec 584.84 xfers/sec <Ctrl-C to exit>
Clone the ntv2-gst git repo.
            $ cd ${AJA_BASE}
$ git clone https://github.com/ibstewart/ntv2-gst.git
NoteThe
ibstewart/ntv2-gstrepo is a fork of theaja-video/ntv2-gstrepo that adds some changes required for RDMA support.Setup the build environment and paths.
            $ sudo apt install libgstreamer1.0-dev libgstreamer-plugins-base1.0-dev
$ sudo ln -sf /usr/lib/aarch64-linux-gnu/tegra/libnvdsbufferpool.so /opt/nvidia/deepstream/deepstream-6.0/lib/
$ export GST_CUDA=/usr/local/cuda-11.1/targets/sbsa-linux
$ export GST_DEEPSTREAM=/opt/nvidia/deepstream/deepstream-6.0
$ export GST_NTV2=${AJA_BASE}/${NTV2_SDK}
NoteIf the following error is output when creating the symlink using the
lncommand above, make sure that DeepStream has been installed as described in Reinstalling Clara Holoscan SDK Packages.ln: target '/opt/nvidia/deepstream/deepstream-6.0/lib/' is not a directory
Build and install the plugin.
            $ cd ${AJA_BASE}/ntv2-gst/gst-plugin
$ ./autogen.sh
$ make
$ sudo make install
$ sudo ln -sf /usr/local/lib/gstreamer-1.0/libgstaja.so /usr/lib/aarch64-linux-gnu/gstreamer-1.0/
The following gst-launch-1.0 command can be used to test the AJA
GStreamer plugin with an SDI device.
$ gst-launch-1.0 ajavideosrc mode=720p5994-rgba nvmm=true ! nv3dsink
The above assumes that a 720p @ 59.94 FPS video stream is being broadcast to SDI
channel 1 (i.e. plugin index 0) of the AJA SDI video capture card. This video
stream may be generated by any SDI source, but for testing purposes it may be
useful to use the ntv2player utility that is included with the NTV2 SDK
in order to generate a known test pattern. This test pattern can even be
generated by the same AJA card that is receiving the stream by connecting a
loopback between two channels on the same AJA card.
For example, if a loopback is created by connecting an SDI cable between
channels 1 and 2 on the same AJA card, the following command can be used to
output a test signal on channel 2 that is then received on channel 1 using the
gst-launch-1.0 command above.
$ ${AJA_BASE}/${NTV2_SDK}_arm/bin/ntv2player -v=720p -c=2
To use an AJA KONA HDMI card, input-mode=hdmi needs to be set in the
gst-launch-1.0 command. For reference, see the following command.
$ gst-launch-1.0 ajavideosrc mode=UHDp30-rgba input-mode=hdmi nvmm=true ! nv3dsink
KONA HDMI is a capture-only device, and therefore is not capable of outputting a test signal via a loopback cable as described in the SDI case above. To capture from a KONA HDMI, a suitable signal must be produced from another HDMI device.
If issues are encounted when running these commands, see Troubleshooting, below.
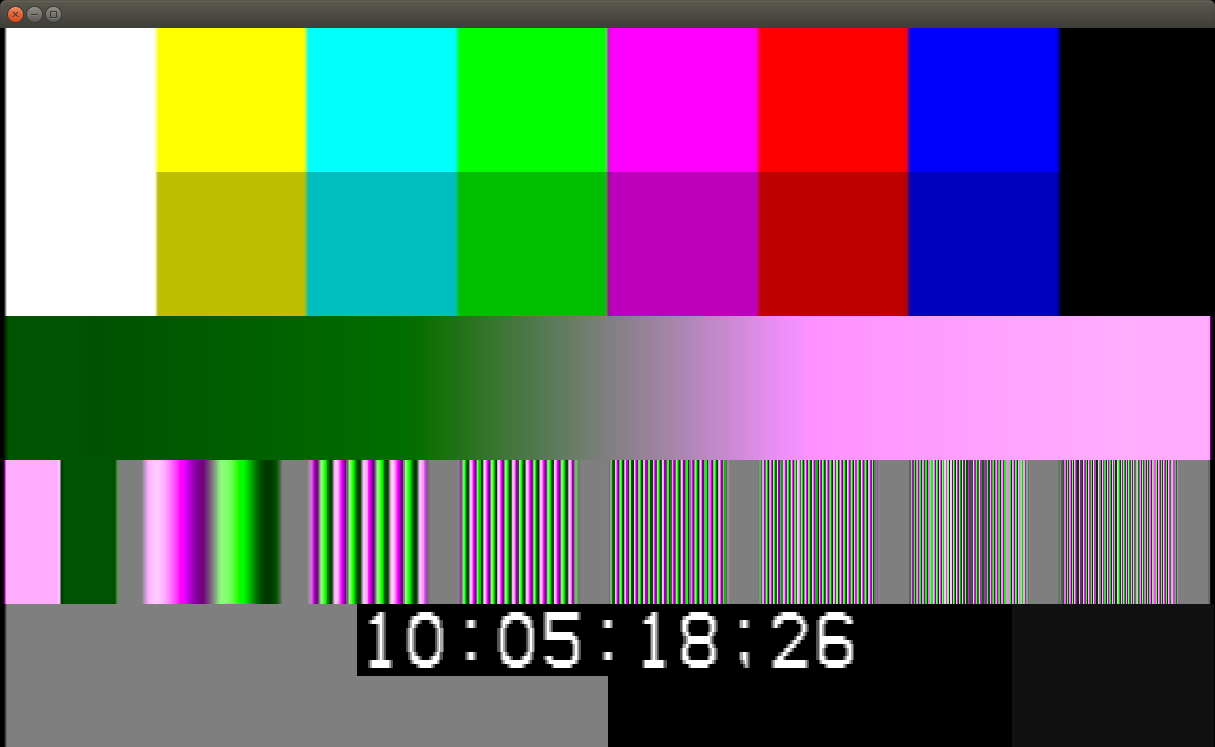
Fig. 1 AJA GStreamer plugin receiving ntv2player test pattern
The nvmm=true parameter that is provided to the ajavideosrc
plugin is what enables the use of RDMA so that the buffers written by the
plugin are output directly to GPU memory via NVMM buffers (i.e. using the
GStreamer caps video/x-raw(memory:NVMM)).
Enabling RDMA also requires the use of an rgba mode due to
GPU support limitations. See Problem 3 in
the Troubleshooting section below for more details.
Since the AJA plugin using RDMA outputs to GPU
(video/x-raw(memory:NVMM)) buffers directly, an RDMA stream from the
AJA plugin may be passed directly into DeepStream without requiring any
additional buffer conversions or transfers between sysmem and GPU. Assuming that
the Clara Holoscan DeepStream sample is installed, the following command will
run a GStreamer pipeline that captures a stream from the AJA card using RDMA and
passes it through DeepStream using the sample model files included with the
DeepStream sample.
            $ gst-launch-1.0 ajavideosrc mode=720p5994-rgba nvmm=true \
    ! m.sink_0 nvstreammux name=m width=1280 height=720 batch-size=1 \
    ! nvinfer config-file-path=/opt/nvidia/clara-holoscan-sdk/clara-holoscan-deepstream-sample/build/DeepstreamJetsonAGXSample/dsjas_nvinfer_config.txt \
    ! nvdsosd ! nv3dsink sync=false
If issues are encounted when running this commands, see Troubleshooting, below.
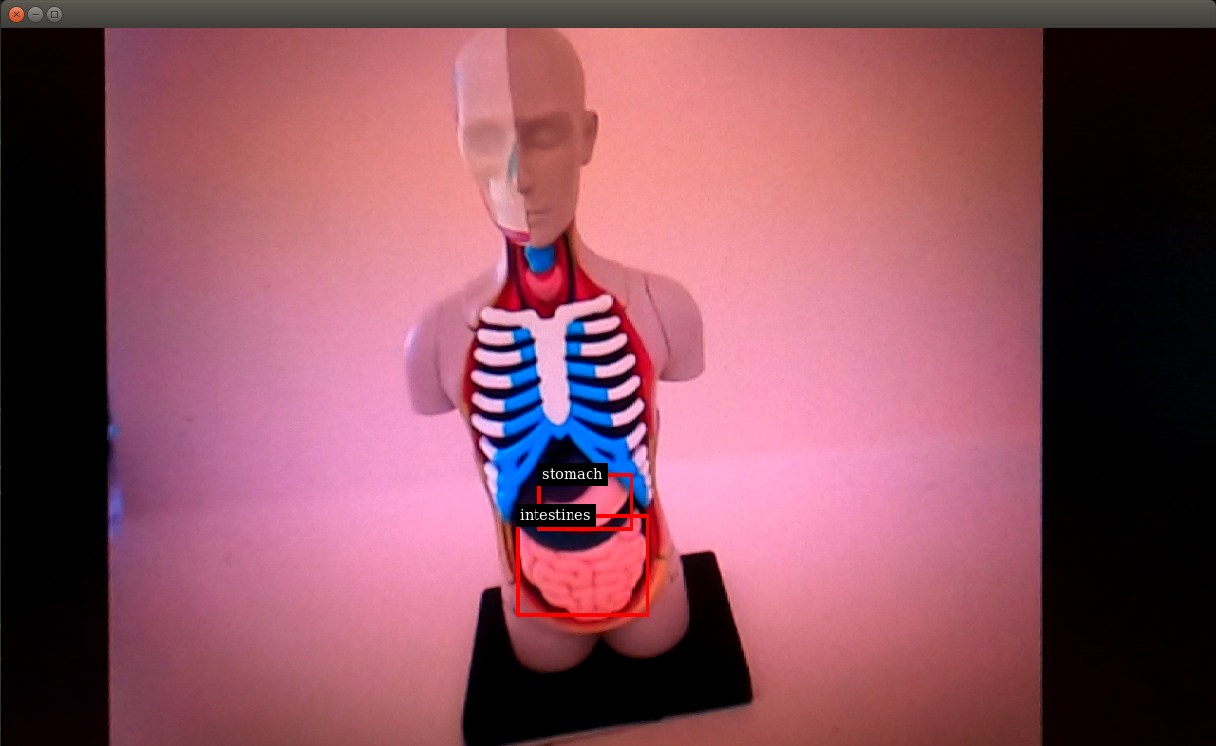
Fig. 2 AJA integration with DeepStream
If the gst-launch-1.0 commands described in steps above fail to render a video stream onto the display, the following steps may help resolve the issue.
Problem: The command fails with the error:
            ERROR: from element /GstPipeline:pipeline0/GstNv3dSink:nv3dsink0:
GStreamer error: state change failed and some element failed to post
a proper error message with the reason for the failure.
Solution: Make sure the
DISPLAYenvironment variable is set (replace:0with the ID of the X11 display you are using):$ export DISPLAY=:0
Problem: The command fails with the error:
            WARNING: from element /GstPipeline:pipeline0/GstAjaVideoSrc:ajavideosrc0: Signal lost
Additional debug info:
gstajavideosrc.cpp(1325): gst_aja_video_src_create (): /GstPipeline:pipeline0/GstAjaVideoSrc:ajavideosrc0:
No input source was detected - video frames invalid
Solution: This error occurs when the
modeparameter provided to theajavideosrcplugin does not match the video format that is being received by the AJA card.The video format that is being received by the AJA card as well as the format that is being requested by the plugin can be checked by using the
ntv2watcherutility that is included with the NTV2 SDK:$ sudo apt install libqt5multimedia5 $ ${AJA_BASE}/${NTV2_SDK}_arm/bin/ntv2watcher
In the app, select Routing on the left navigation bar to see the current status and pipeline setup of the AJA card:

Fig. 3 Routing display of the ntv2watcher utility
In this example, we can see that SDI channel 1 is currently receiving a
1080p60avideo signal while the pipeline setup by the plugin is expecting a720p59.94signal (Frame Store 1). To resolve this, themodeparameter for the plugin should be changed to match the signal that is being received.To view this list of modes that are supported by the plugin, use the
gst-inspect-1.0utility (the following output is shortened for illustration purposes):$ gst-inspect-1.0 ajavideosrc ... mode : Video Mode to use for playback flags: readable, writable Enum "GstAjaRawModes" Default: 15, "HD720 8Bit 59.94p" (0): NTSC 8Bit 23.98i - ntsc-2398 (1): NTSC 8Bit 24i - ntsc-24 (2): NTSC 8Bit 59.94i - ntsc (3): NTSC 8Bit RGBA 23.98i - ntsc-2398-rgba (4): NTSC 8Bit RGBA 24i - ntsc-24-rgba (5): NTSC 8Bit RGBA 59.94i - ntsc-rgba ... (38): HD1080 8Bit RGBA 23.98p - 1080p2398-rgba (39): HD1080 8Bit RGBA 24p - 1080p24-rgba (40): HD1080 8Bit RGBA 25p - 1080p25-rgba (41): HD1080 8Bit RGBA 29.97p - 1080p2997-rgba (42): HD1080 8Bit RGBA 30p - 1080p30-rgba (43): HD1080 8Bit RGBA 50i - 1080i50-rgba (44): HD1080 8Bit RGBA 50p - 1080p50-rgba (45): HD1080 8Bit RGBA 59.94i - 1080i5994-rgba (46): HD1080 8Bit RGBA 59.94p - 1080p5994-rgba (47): HD1080 8Bit RGBA 60i - 1080i60-rgba (48): HD1080 8Bit RGBA 60p - 1080p60-rgba ...
In this particular example, the
1080p60-rgbamode can be used for the plugin in order to match the signal that is being received:$ gst-launch-1.0 ajavideosrc mode=1080p60-rgba nvmm=true ! nv3dsink
Problem: The command fails with the error:
WARNING: erroneous pipeline: could not link ajavideosrc0 to nv3dsink0
Solution: The reason for this error is that the video format that is being requested by the
ajavideosrcplugin (i.e. themodeparameter) is not supported by thenv3dsinkplugin.The most likely reason for this incompatibility is that the
nv3dsink– and all NVIDIA GStreamer/DeepStream plugins – do not support the packedUYVY(8-bit) orv210(10-bit) YUV 4:2:2 formats that are output by theajavideosrcplugin. Because of this, an RGBA mode must be used with theajavideosrcplugin when it is used with NVIDIA plugins.In order to select an RGBA mode, ensure that the
modeparameter that is given to theajavideosrcplugin has the-rgbasuffix, e.g.1080p60-rgba.Problem: The command fails with the error:
ERROR: [TRT]: INVALID_CONFIG: Deserialize the cuda engine failed.
Solution: The reason for this error is that the DeepStream engine files for the DeepStream sample application have not been generated. See Rebuilding TensorRT Engines for the steps to resolve this issue.
Problem: After loading the AJA drivers with
load_ajantv2, the display briefly flashes and then the desktop applications, UI, and cursor no longer appear.Solution: If a loopback cable between the GPU and AJA card is connected, such as is done for the Video Pipeline Latency Tool, loading the AJA drivers may cause the system to detect the AJA card as another display and adjust the desktop to use the loopback output as the primary display. To resolve this, remove any loopback cable between the GPU and AJA device.