


Custom Installation with cloud-init#
By accessing the instructions for custom installation and scaled deployment, the Customer acknowledges that this workflow bypasses individual end-user license prompts. Use of these tools is governed by the NVIDIA Software License Agreement (which includes the NVIDIA CUDA EULA). By proceeding, the Administrator represents they have the authority to bind the Customer to these terms and conditions.
Overview#
This topic describes custom installation workflows for IT administrators and engineers who deploy NVIDIA DGX Spark systems with cloud-init, USB installation media, and locally hosted Debian packages and firmware. These workflows implement the initial provisioning stage described in Enterprise Lifecycle Integration. For cloud-init concepts and where provisioning fits in the fleet lifecycle, refer to Cloud-init for DGX Spark. This topic also describes how cloud-init is incorporated into BaseOS and FastOS images.
BaseOS and FastOS Overview#
This topic covers two DGX Spark image types:
BaseOS is the DGX OS installer image (ISO format). Use it when you are
performing initial provisioning or reinstallation with site-specific
cloud-init configuration. You obtain a BaseOS ISO, customize it with
repack_baseos.sh, and flash the repacked image to USB (or boot it over
PXE).
FastOS is the DGX Spark recovery image (tar.gz format). Use it when you
are re-flashing a device to the supported factory recovery baseline. You
obtain a FastOS recovery tarball, customize it with repack_fastos.sh,
and use the repacked output to create recovery USB media.
The following table summarizes when to start from each image type:
Goal |
Start From |
Repack Script |
|---|---|---|
Custom installation or initial provisioning with cloud-init |
BaseOS ISO (DGX OS installer) |
|
Factory recovery or re-image to baseline |
FastOS recovery tarball |
|
OEM variant hardware |
Image from your OEM |
Per OEM delivery |
For the standard recovery download and procedure, refer to System Recovery. For fleet lifecycle context, refer to Enterprise Lifecycle Integration.
IT Administrator Workflows#
Before you follow the repack, USB, and OEMDATA procedures in this
topic, determine whether the target device already runs an OEM-enabled
cloud-init stack or requires re-imaging to a known baseline.
Device State |
Typical First Step |
When to Use This Topic |
|---|---|---|
OEM cloud-init already active on shipped devices |
Prepare a USB stick with the content that works with the update sources you provide (no re-image) |
This topic illustrates the full set of actions. Skip steps that are
already complete when the product moves to another holder. Use the
USB and |
OEM cloud-init not active or unknown baseline |
Re-image to a known baseline (FastOS recovery or BaseOS ISO per your OEM) |
Full repack, USB, and |
Factory baseline only |
Re-image with FastOS (optionally repacked with cloud-init) |
Use when restoring to a supported recovery image is sufficient |
Site-specific installation from scratch |
Repack BaseOS ISO with cloud-init and required packages or firmware |
Use when re-imaging alone will not deliver required users, network, packages, or policy |
Cloud-init or Re-Imaging Only#
Use the following guidance when you choose between cloud-init and re-imaging:
Re-image only when the goal is a factory or OEM-approved baseline reset and the recovery or OEM image already meets site policy.
Re-image plus cloud-init when the baseline must include site users, network settings, OOBE policy, first-boot packages or firmware, or air-gapped update sources described in this topic.
Cloud-init without re-image when the device already runs an OEM-enabled cloud-init stack. Do not repeat steps that are already complete. Prepare a USB stick with the content that works with the update sources you provide.
Prerequisites and Source Media#
Obtain the following resources before you run the repack scripts in this topic:
Resource |
Format |
Source |
|---|---|---|
BaseOS / DGX OS installer |
|
Enterprise customers obtain the DGX OS ISO through NVIDIA Enterprise
or an OEM website. |
FastOS recovery image |
|
DGX Spark System Recovery Image (refer also to System Recovery). The download page lists the current file
name; use that name in repack and PXE examples that reference
|
Customization scripts and OEM templates |
Directory tree |
Reference scripts and an example |
Debian packages (optional) |
|
Site-specific content that you supply: packages from public
repositories, an OEM, or packages you build or approve. This topic
does not provide a package download portal. Place |
Firmware (optional) |
|
Site-specific content that you supply: firmware from public
repositories, an OEM or ODM, or packages you build or approve. This
topic does not provide a firmware download portal. Place firmware on
|
Note
When you apply cloud-init, the customization workflows in this topic are the same for enterprise and end-user deployments. Obtain BaseOS or FastOS media from the source that matches your deployment (for example, NVIDIA Enterprise or an OEM website for the DGX OS ISO, or the FastOS recovery image described in DGX OS), then follow the cloud-init procedures in this topic.
USB and Image Layout#
When you write a repacked BaseOS ISO to a USB drive, the drive receives the ISO partition layout. For DGX OS images, that layout is two partitions:
A large installer volume (main installation image).
A small EFI System Partition (ESP).
Repacking does not change that two-partition layout.
You can deliver additional customization material in three ways. These are alternatives or combinations, not requirements to use all three:
Option A: Embed content in the repacked ISO
Place material under oemdata/ on the installer image, for example,
oemdata/cloud-init/ (cloud-init OEM seed), oemdata/oem-iso-cfg.sh,
and optionally oemdata/debs/ and firmware files inside the image. The
installer can access embedded content from /cdrom during installation.
No separate OEMDATA USB partition is required for that material.
Option B: Add an ``OEMDATA`` partition on USB
After the ISO’s two partitions, create an additional partition labeled
OEMDATA in the remaining space on the same USB drive, or use a second
USB drive with an OEMDATA volume. This partition holds hook.sh,
optional debs/ and firmware/ directories, and optional URL pointer
files (apt-repo.url, apt-packages.txt, lvfs-mirror.url).
Option C: Host packages and firmware on a network server
Host curated APT packages and firmware on a host reachable from the
installation network. Use OEMDATA (or server delivery of hook.sh)
to point the client at that server.
Typical USB layout after flashing a repacked BaseOS ISO and adding
OEMDATA:
sda1   installer volume (from ISO)
sda2   ESP (from ISO)
sda3   OEMDATA (optional; customer-created)
First Boot Behavior#
On first boot after installation, behavior depends on what you configured:
Cloud-init OEM seed on the repacked ISO (
oemdata/cloud-init/): Cloud-init applies users, network settings, and related policy from the seed. During installation,oem-iso-cfg.shcopies the seed into the target system.``hook.sh`` on the ``OEMDATA`` partition (when present and the USB drive remains connected): Cloud-init mounts the partition labeled
OEMDATA, runshook.sh, andhook.shinstalls packages and firmware fromdebs/andfirmware/and/or configures APT and LVFS sources from the URL files on that partition.
These paths are independent. You can use ISO seed only, OEMDATA hook
only, or both.
Where to Place Customization Content#
The following table summarizes where each type of content belongs:
Content |
ISO |
USB |
Network Server |
|---|---|---|---|
Cloud-init OEM seed ( |
Yes — primary location for ISO-based installation |
No |
Possible through network hook delivery |
|
Yes — copied by |
No |
No |
|
No |
Yes — partition root |
Yes — optional server delivery |
|
Optional — |
Optional — |
Yes — served APT tree |
Firmware ( |
Optional — in image |
Optional — |
Yes — LVFS mirror or signbinpack directory |
|
No |
Optional |
N/A (points to server) |
|
No |
Optional |
N/A |
|
No |
Optional |
N/A (points to server) |
OEMDATA URL and List File Reference#
When you use OEMDATA with a network mirror or curated local server,
hook.sh reads the following optional files from the OEMDATA
partition root.
File |
Required |
Format and Behavior |
|---|---|---|
|
Optional |
Format: One line containing the base URL of the APT repository.
The URL must match the path your web server serves (the parent of
|
|
Optional |
Format: One package name or |
|
Optional |
Format: One line containing the base URL of the firmware directory.
Point at a directory of |
The following examples match these formats:
http://192.168.1.1:8080/lvfs-mirror/signbinpack-2.152.3-release
http://192.168.1.1:8080/deb-repo/
nvidia-spark-ota-check
BaseOS#
Repacking the BaseOS image is required for the customization workflows described in this topic. For partition layout, content placement, and first-boot behavior, refer to USB and Image Layout, Where to Place Customization Content, and First Boot Behavior.
The procedures that follow cover repacking the BaseOS ISO, USB
partitioning and the OEMDATA layout, hosting a minimal .deb
repository and firmware tree (for example, on a desktop), cloud-init
integration, security considerations, and verification steps. Full reference
listings for hook.sh, oem-iso-cfg.sh, and
repack_baseos.sh, plus example OEM cloud-init content, appear in
Reference: OEM Scripts and cloud-init.
After you complete those procedures, use
Validation scenarios and feedback questions
for structured validation and feedback prompts.
FastOS#
FastOS recovery images support cloud-init customization for factory
re-flash workflows. Use repack_fastos.sh to copy your cloud-init tree
into a FastOS recovery tarball and repack it. Download the recovery media
from System Recovery. FastOS repack does
not use the USB OEMDATA partition layout described for BaseOS in
USB Partitioning and the OEMDATA Layout.
For repack steps, refer to
Customize FastOS Images with repack_fastos.sh.
File Layouts#
This topic includes three file layout examples: repackaging, USB structure, and curated local server layout. Follow these examples because the reference scripts expect their default directory structures. To build a USB drive or host a minimal APT and firmware tree, use the scripts listed in Reference: OEM Scripts and cloud-init.
Example Hardware Connection#
The following figure shows an example hardware topology and workflow for the
cloud-init customization process. It illustrates OS image preparation, the
USB OEMDATA layout, the DGX Spark device under test (DUT), and a local
server that hosts curated APT packages and firmware.
The figure uses the following color legend:
Yellow: OS preparation workflow (cloud-init files, BaseOS repackage, and USB flash)
Pink: USB
OEMDATApartition layout and filesBlue: DGX Spark DUT
Aqua: Local server hosting curated APT and firmware content
Switch: Network switch that connects the DGX Spark systems
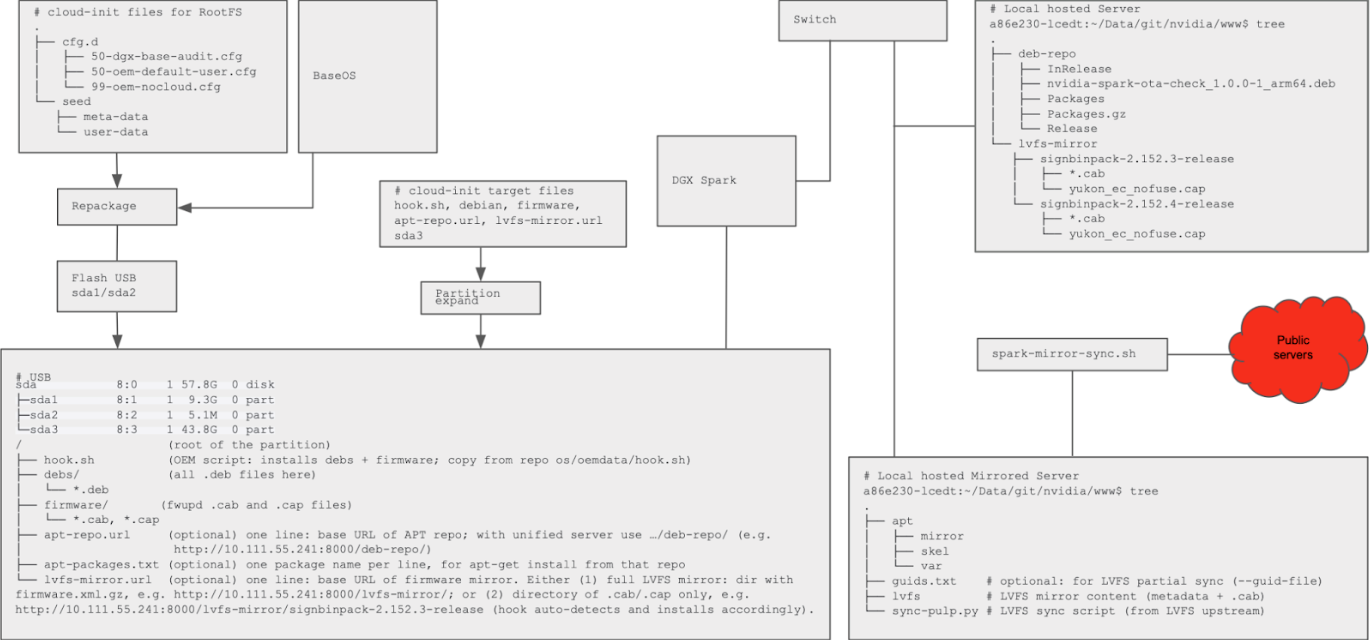
Spark custom installation: repacked BaseOS ISO, USB OEMDATA, optional local server, and client integration.#
Air-Gapped and Custom Installation Patterns#
The following patterns describe how cloud-init, USB layout, and optional
local services combine. They align with enterprise customization
workflows that use cloud-init OEM seeds and, when needed, an OEMDATA
partition on the USB device.
Installation and Update Patterns
The following table summarizes the installation and update patterns described in this topic:
Pattern |
What You Configure |
|
Related Sections |
|---|---|---|---|
Skip out-of-box experience (OOBE), keep factory software |
Cloud-init with a user-creation session in OEM seed data in the repacked ISO; no separate |
Not used |
Customize the BaseOS Image with repack_baseos.sh; Cloud-init Integration; OEM cloud-init tree under |
Keep OOBE, skip first-boot updates |
Cloud-init with an empty user session (no extra user provisioning in seed) in the repacked ISO; no separate |
Not used |
Same cloud-init and repack references as the row above. |
USB-hosted packages and firmware |
An additional partition labeled |
Required |
|
Local server with mirrored (MIRRORED) public sources |
A separate host mirrors upstream Ubuntu ports and LVFS content (for example, using |
Required (for |
How the Pieces Fit
The following sequence illustrates a typical deployment workflow:
Prepare a bootable USB drive with or without an APT or firmware server.
Flash the DGX Spark from a USB drive or through PXE boot.
Apply configuration with cloud-init. Configuration can include network settings, user accounts, firmware updates, APT updates, and related tasks.
Store configuration and firmware or APT content on a USB drive. This can be the same USB drive used for flashing or a separate drive.
Store configuration on the same or a different USB drive and host curated firmware and APT sources on a server.
Host all firmware and APT configuration on the server.
Select and adapt one of these options for your deployment. The examples in this topic provide a framework that you can extend to match your site requirements.
For USB partition layout, content placement, and first-boot behavior, refer
to USB and Image Layout,
Where to Place Customization Content,
and First Boot Behavior. hook.sh
is reference material for the USB and server layouts described in this
topic. If your layout changes, adapt hook.sh accordingly.
Example Constants#
The following tables list example IP addresses, ports, and directory paths. Replace these values with settings that match your environment.
Warning
Do not use the default username and password in production deployments. Remove the default credentials or replace them with credentials approved by your organization.
Example Constants for the Repository Server (Port 8080 or 80)
Item |
Example Value |
|---|---|
Desktop or server IP |
|
Python HTTP server port |
|
Web root |
|
APT subdirectory |
|
LVFS subdirectory |
|
Customize the BaseOS Image with repack_baseos.sh#
Run repack_baseos.sh from the $work_dir directory in the shared
reference code to produce a customized BaseOS ISO (a new installer image
that combines the BaseOS content with reference or customized
cloud-init). You can write the repacked ISO to a USB drive and combine
it with an additional OEMDATA partition as described in
USB Partitioning and the OEMDATA Layout.
Example command:
cd $work_dir
./repack_baseos.sh -iso <ISO_FILE> -iso-root <ISO_ROOT_DIR>
repack_baseos.sh Options
The following table describes the command-line options for
repack_baseos.sh:
Option |
Description |
|---|---|
|
Path to the local DGX OS ISO file. |
|
Directory where the ISO is extracted and
repacked (default: |
|
Volume ID for the repacked ISO (maximum 32 characters). |
|
Remove extraction directories after repacking (default: keep them). |
|
Verbose output. |
The following example uses a local ISO file and a custom extraction directory:
ISO=~/Downloads/tmp/BaseOS/7.4.0/DGXOS-7.4.0-2026-01-26-16-04-58-arm64.iso
OUT=~/Downloads/tmp/BaseOS/Repack
./repack_baseos.sh -iso "$ISO" -iso-root "$OUT"
repack_baseos.sh copies the OEM cloud-init tree and
oem-iso-cfg.sh onto the repacked ISO. If $OEMDATA_SRC/cloud-init
exists, it replaces $ISO_ROOT/oemdata/cloud-init with that tree
(including seed/, cfg.d/, and related files). If
$OEMDATA_SRC/oem-iso-cfg.sh exists, it copies that file to
$ISO_ROOT/oemdata/.
The BaseOS installer (Subiquity or autoinstall) runs oem-iso-cfg.sh
during installation when the ISO is mounted at /cdrom. It runs in
the target (installed) system context: it copies the cloud-init seed
from /cdrom/oemdata/cloud-init/ to /var/lib/cloud/seed/nocloud
and cloud.cfg.d. Logging goes to /var/log/oem-iso-cfg.log.
Example cloud-init layout on the ISO:
.
├── cfg.d
│   ├── 50-dgx-base-audit.cfg
│   ├── 50-oem-default-user.cfg
│   └── 99-oem-nocloud.cfg
└── seed
    ├── meta-data
    └── user-data
After repacking, write the new ISO to a USB drive and follow
UEFI-Bootable Method: Write ISO to Whole Disk, Then Add a Second Partition
to add an OEMDATA partition for Debian packages, firmware, and
cloud-init-related content.
Customize FastOS Images with repack_fastos.sh#
For factory recovery workflows, customize a FastOS recovery tarball with
repack_fastos.sh to embed your cloud-init tree. Download the recovery
media from System Recovery before you
repack.
The following example shows the cloud-init tree and a typical
repack_fastos.sh command:
: tree ./oemdata/cloud-init
./oemdata/cloud-init
├── cfg.d
│   ├── 50-dgx-base-audit.cfg
│   ├── 50-oem-default-user.cfg
│   └── 99-oem-nocloud.cfg
└── seed
    ├── meta-data
    └── user-data
: sudo ./repack_fastos.sh -f ~/Downloads/tmp/usb.customer-1.135.33.tar.gz -c ./oemdata/cloud-init
The repacked FastOS contains the script to create a bootable USB drive, which is used to flash the DGX Spark.
Warning
Re-flashing DGX Spark with a FastOS recovery image is a destructive operation. The process erases local storage on the target system, including user data, installed software, configuration files, and logs. Back up any required data before you begin, and confirm that you are using the correct image and target system.
It is a known issue that when cloud-init runs on a customer-specific
FastOS image, it can take several minutes, approximately 400 seconds, to
complete while waiting for dashboard-admin to release the APT lock at
/var/lib/apt/lists/lock.
USB Partitioning and the OEMDATA Layout#
This section describes how to add an OEMDATA partition to a USB
drive after you write a repacked BaseOS ISO to the device.
Baseline: Bootable Image First, Then Add a Second Partition
—————————————————————
When you create a bootable USB device by writing the ISO to the whole
disk (dd if=image.iso of=/dev/sdX), the disk uses the ISO partition
table. For DGX OS images, this layout typically includes two partitions:
a large installer volume and a small ESP. You cannot add an OEMDATA
partition in the remaining space without following the repartitioning flow
described in this section. The ISO defines the layout the installer
expects, and unused space after that layout is not available until you
create another partition there.
Note
The USB layout in this section is reference material from
NVIDIA. Create the extra partition and set its filesystem label to
OEMDATA so the example cloud-init seed and hook.sh in this
guide can mount it by volume label during first boot. The label comes
from OEM customization practice. Corporate IT, OEM partners, and
integrators use the same steps when they follow this reference. You
do not need to be an OEM vendor to create or populate the partition.
Until you add that partition, put Debian packages (and firmware) inside
the ISO when repacking (oemdata/debs and optional firmware in the
image). There is no separate OEMDATA volume in that baseline.
To add an OEMDATA partition for Debian packages and firmware on the
same USB drive, use the flow in
UEFI-Bootable Method: Write ISO to Whole Disk, Then Add a Second Partition.
UEFI-Bootable Method: Write ISO to Whole Disk, Then Add a Second Partition#
Use a USB device larger than the ISO (for example, 32 GB or 64 GB for a ~14 GB ISO). Write the ISO to the whole disk so the first sector and partition table match the ISO. UEFI can then boot from the device. Add a further partition in the remaining space for Debian packages and firmware. When the ISO already occupies two partitions, the new partition is usually partition 3.
Complete the following steps to create the OEMDATA partition:
Warning
Writing the ISO to a USB device overwrites the selected
device’s partition table and existing contents. Verify the target device
name with lsblk before running dd, parted, or mkfs.
Selecting the wrong device can erase the host system disk or another
attached storage device.
Write the ISO to the whole USB device (the disk is bootable). Optional:
pv /path/to/repacked.iso | sudo dd of="$USB" bs=4M conv=fsyncfor progress ifpvis installed.Inspect how much space the ISO used. The DGX OS ISO typically creates two partitions (MBR or
msdos): a large primary (approximately 13.6 GB) and a small ESP (approximately 5 MB). Note the end of partition 2 to start the new partition after it. The rest of the disk (for example, from approximately 14 GB to 62 GB) is free.Add a new primary partition in the free space from the end of the ISO layout to 100%. Run the following commands, replacing
/dev/sdXwith your USB device:
USB=/dev/sdX   # for example /dev/sdb; confirm with lsblk
sudo dd if=/path/to/repacked.iso of="$USB" bs=4M status=progress conv=fsync
sudo parted "$USB" print
# Example: ISO uses up to ~14 GiB; create partition 3 from 14 GiB to end of disk
sudo parted -s "$USB" mkpart primary 14GiB 100%
Use the actual end of partition 2 from parted print if you want to
avoid a small gap (for example, 13.7GiB or 13700MiB).
Format the new partition and set the label
OEMDATA. The new partition is number 3 when the ISO already created two partitions (main plus ESP). If your ISO had only one partition, use${USB}2instead. Run the following command:
sudo mkfs.ext4 -L OEMDATA "${USB}3"
Mount the partition, create the directory layout, and copy files. The following example uses
/tmp/usb-dataas the mount point:
sudo mkdir -p /tmp/usb-data
sudo mount "${USB}3" /tmp/usb-data
sudo mkdir -p /tmp/usb-data/debs /tmp/usb-data/firmware
sudo cp /path/to/*.deb /tmp/usb-data/debs/
sudo cp /path/to/*.cab /path/to/*.cap /tmp/usb-data/firmware/
sudo cp /path/to/repo/os/oemdata/hook.sh /tmp/usb-data/
sudo umount /tmp/usb-data
OEMDATA Partition Layout on a USB Drive
The following examples show a typical lsblk output and OEMDATA
directory tree:
nvidia@nvidia:~$ lsblk
NAME        MAJ:MIN RM  SIZE RO TYPE MOUNTPOINTS
sda           8:0    1 57.8G  0 disk
├─sda1        8:1    1  9.3G  0 part
├─sda2        8:2    1  5.1M  0 part
└─sda3        8:3    1 43.8G  0 part /tmp/usb-data

nvidia@nvidia:/tmp/usb-data$ tree
.
├── apt-packages.txt    # optional: update list
├── apt-repo.url        # optional: apt repo url for hook.sh
├── debs                # optional: debs on USB for direct upgrade
├── firmware            # optional: fw on USB for direct upgrade
├── hook.sh             # optional: hook on USB
└── lvfs-mirror.url     # optional: lvfs repo url for hook.sh
The following table describes each path on the OEMDATA partition.
For file format rules for apt-repo.url, apt-packages.txt, and
lvfs-mirror.url, refer to OEMDATA URL and List File Reference.
Path |
Purpose |
|---|---|
|
Mount point root |
|
OEM script that installs Debian
packages and firmware; copy from
|
|
All |
|
|
|
See OEMDATA URL file reference. Earlier in this topic. |
|
Package list; see URL file ref. Earlier in this topic. |
|
Firmware URL; see file reference Earlier in this topic. |
Cloud-init (in seed/user-data) mounts by label OEMDATA and
invokes hook.sh on first boot. The sample user-data copies
hook.sh to /tmp, exports OEM_MNT to the partition root, runs
that copy, then removes it so paths such as $OEM_MNT/debs still
resolve on the mounted volume. The provided oemdata/hook.sh installs
from debs/ and firmware/ (.cab and .cap). For first-boot
behavior across ISO seed and OEMDATA hook paths, refer to
First Boot Behavior.
Host a Minimal APT Repository and Firmware Tree#
This section describes how to host a minimal APT repository and firmware
tree on a desktop or server. In this context, minimal means you index
your own Debian packages and firmware with conventional tooling (for
example, dpkg-scanpackages), serve them over HTTP from a compact
directory layout, and point clients at that layout. This workflow is not
a full Ubuntu ports mirror or LVFS synchronization. The steps here assume
packages and firmware are trusted, as in many air-gapped installations,
and they do not cover hardening for an internet-exposed package mirror.
Refer to
Security Considerations for
risks and mitigations.
One network resource can serve both the APT repository and the
LVFS-related tree. Use a single web root (WEB_ROOT) with
REPO_DIR and LVFS_DIR as subdirectories.
Define the web root and repository directories with the following commands:
WEB_ROOT=/var/www   # or for example $HOME/oem-server
REPO_DIR="$WEB_ROOT/deb-repo"
LVFS_DIR="$WEB_ROOT/lvfs-mirror"
sudo mkdir -p "$REPO_DIR" "$LVFS_DIR"
sudo chown "$USER" "$REPO_DIR" "$LVFS_DIR"
On a Desktop or Server#
Complete the following steps to host a minimal APT repository and firmware tree on a desktop or server system:
Install tools for the APT repository:
sudo apt-get install -y dpkg-devCopy
.debfiles intoREPO_DIR.Generate the APT index (
Packages.gz). Re-run this step whenever you add or change.debfiles. Run the following commands:
cd "$REPO_DIR"
dpkg-scanpackages . /dev/null | gzip -9c > Packages.gz
Optional: Add
Releaseand uncompressedPackagesto avoid 404 responses.aptmight requestRelease,Packages(uncompressed), and similar. A repository that only hasPackages.gzcan return 404 responses thataptcan tolerate whenPackages.gzis present. To serve these files, run the following commands:
cd "$REPO_DIR"
zcat Packages.gz > Packages 2>/dev/null || gzip -dc Packages.gz > Packages
# Minimal Release file (paths relative to repo root); example block:
{
  echo "Origin: OEM Local Repo"
  echo "Label: oem-local"
  echo "Suite: ."
  echo "Codename: ."
  echo "Architectures: arm64 amd64"
  echo "Components: ."
  echo "Description: OEM local package repository"
  echo "Date: $(date -u -R)"
  echo "MD5Sum:"
  printf ' %s %s Packages.gz\n' "$(md5sum Packages.gz | awk '{print $1}')" "$(stat -c%s Packages.gz)"
  printf ' %s %s Packages\n' "$(md5sum Packages | awk '{print $1}')" "$(stat -c%s Packages)"
  echo "SHA256:"
  printf ' %s %s Packages.gz\n' "$(sha256sum Packages.gz | awk '{print $1}')" "$(stat -c%s Packages.gz)"
  printf ' %s %s Packages\n' "$(sha256sum Packages | awk '{print $1}')" "$(stat -c%s Packages)"
} > Release
cp Release InRelease
Whenever you regenerate Packages.gz in step 3, repeat step 4:
recreate uncompressed Packages, write Release, and copy
InRelease using the commands in the code block above.
Serve both APT and LVFS over HTTP from one server.
Option A (Python):
Run the following command from WEB_ROOT to start a simple HTTP
server:
cd "$WEB_ROOT"
python3 -m http.server 8080 --bind 0.0.0.0
Option B (Nginx): Install and enable Nginx, then add a configuration similar to the following example:
location /deb-repo {
  alias /var/www/deb-repo;
  autoindex on;
}
location /lvfs-mirror {
  alias /var/www/lvfs-mirror;
  autoindex on;
}
With this layout, the server root lists only deb-repo/ and
lvfs-mirror/. On the USB drive you must use full paths, not the
server root alone.
The following examples show typical APT and LVFS URLs:
APT repository URL:
http://192.168.1.1:8080/deb-repo/(Python) orhttp://192.168.1.1/deb-repo/(Nginx).Firmware directory URL: a subdirectory of
.cab/.capfiles, for examplehttp://192.168.1.1:8080/lvfs-mirror/signbinpack-2.152.3-release/(hook.shauto-detects and installs each file).
Firewall: allow inbound HTTP on the port you use (for example,
sudo ufw allow 80/tcp,sudo ufw allow 8080/tcp,sudo ufw reload).
On the DGX Spark Client: hook.sh and OEMDATA Files#
Place the following files on the USB drive OEMDATA partition when
you want hook.sh on the client to use your hosted APT repository.
For file format rules, refer to OEMDATA URL and List File Reference.
apt-repo.url: Include this file when the client should use your hosted APT repository.apt-packages.txt: Optional. If present, one package per line. Each line can be either a package name (for example,nvidia-spark-ota-check) or a full.debfile name (for example,nvidia-spark-ota-check_1.0.0-1_arm64.deb); the hook derives the package name from a.debfile name when needed and runsapt-get installfor that set.
With apt-repo.url present, hook.sh wires oem-local.list,
updates the index, then either installs listed packages from
apt-packages.txt or performs the single-source upgrade when
apt-packages.txt is absent. Refer to the listing in
First Boot: OEMDATA hook.sh and cloud-init Seed
or oem-reference-includes/hook.sh in your checkout.
Troubleshooting: Use the following notes when you diagnose APT repository issues on the client:
Ignore or 404 for
Release.gpgandInRelease: Expected for an unsigned repository;[trusted=yes]makesaptignore the missing signature.“Unable to locate package”: The repository is added (
/etc/apt/sources.list.d/oem-local.list).aptfetchesReleasebut might not loadPackagesif theReleasefile is wrong. Ensure thatReleasehasDate, pathsPackages.gzandPackages, and runcp Release InRelease(step 4 above). The hook’s fallback (download.debanddpkg -i) works even whenaptdoes not see the package.
Minimal LVFS Mirror on the Same Host#
Use LVFS_DIR under the same WEB_ROOT as the APT repository.
hook.sh can install firmware from this tree over the LAN when
lvfs-mirror.url points at a directory of .cab/.cap files, in
addition to any .cab/.cap from the USB firmware/ directory.
On a Desktop (Server)#
Complete the following steps to populate and serve a minimal LVFS mirror on the same host as the APT repository:
Populate
LVFS_DIRwith firmware content that you supply (for example, from a public repository, an OEM or ODM, or packages you build or approve). Place firmware files (for example, from a signbinpack release) in a subdirectory such as$LVFS_DIR/signbinpack-2.152.3-release/. Pointlvfs-mirror.urlon the client at that subdirectory’s URL.hook.shreads the directory listing and runsfwupdmgr installfor each.cab/.capfile.Serve the mirror over HTTP using the same web server as the APT repository (run from
WEB_ROOT). For example:http://192.168.1.1:8080/lvfs-mirror/signbinpack-2.152.3-release/(Python) orhttp://192.168.1.1/lvfs-mirror/signbinpack-2.152.3-release/(Nginx).On the host that serves both trees, allow inbound HTTP on the ports you use for that server (typically the same ports you opened for the APT repository). Run the following commands, for example:
sudo ufw allow 80/tcp
sudo ufw allow 8080/tcp
sudo ufw reload
On the DGX Spark Client#
Place the following file on the USB drive OEMDATA partition when you
want hook.sh on the client to use your hosted firmware mirror:
lvfs-mirror.url: Include a single line with the base URL of the firmware directory. When the URL points to a directory of.cab/.capfiles (for example, a signbinpack release subdirectory), the hook fetches the directory listing, downloads each file, and runsfwupdmgr installfor each one.
By default, fwupd installs only trusted (LVFS-signed) firmware. If
installation of local or vendor .cab/.cap files fails with a
message such as “firmware signature missing or not trusted” (for
example, signbinpack content from the mirror or from USB firmware/),
edit /etc/fwupd/fwupd.conf on the client and set
OnlyTrusted=false under [fwupd]:
The following example shows the required setting:
[fwupd]
OnlyTrusted=false
Note
Use OnlyTrusted=false only when you control the
firmware source and accept the risk.
Mirror the Full Ubuntu Ports and LVFS Content on a Server#
This section describes how to create a unified mirror layout for Ubuntu
Ports APT repositories and LVFS content under ~/mirror. In the
examples, Spark A acts as the mirror server and serves the content over
HTTP on port 8080; Spark B acts as the client.
The provided scripts have been run and verified on DGX Spark systems.
They have not been validated on x86 platforms and might require
modifications for those environments. The APT mirror example adds only
the noble-proposed repository by default. To mirror additional
repositories, update the script by following the same pattern used for
noble-proposed.
Server Directory Layout#
The following example shows the expected directory tree under the mirror
root (for example, tree -L 2 ~/mirror):
.
├── apt
│   ├── mirror
│   ├── skel
│   └── var
├── guids.txt              # optional: LVFS partial sync (--guid-file)
├── hook.sh
├── lvfs                   # LVFS mirror (metadata + .cab)
├── spark-mirror-sync.sh   # One-shot mirror script
└── sync-pulp.py           # LVFS sync script (from LVFS upstream)
Client URL Patterns (Must Match Layout)
The following table shows the client URL patterns that must match the server layout:
Service |
URL Pattern |
|---|---|
|
|
|
|
If you rename lvfs, change both MetadataURI and
FirmwareBaseURI on clients to match.
Create the Top-Level Tree and sync-pulp.py#
Create the mirror directory tree and download sync-pulp.py with the
following commands:
mkdir -p ~/mirror/apt ~/mirror/lvfs
cd ~/mirror
wget -O sync-pulp.py https://gitlab.com/fwupd/lvfs-website/raw/master/contrib/sync-pulp.py
chmod +x sync-pulp.py
Create guids.txt only if you plan a partial LVFS sync. For the sync
command, refer to Partial Mirror (GUID File, ~50 MB). For the file format, refer to
Rules for guids.txt.
One-Shot Sync Script: spark-mirror-sync.sh#
Copy oemdata/spark-mirror-sync.sh from your distribution package
onto the Spark, or run it from a repository clone. Some trees place this
file under scripts/; use the path that matches your bundle. Run as
root (sudo); the script does not invoke sudo internally.
The script mirrors both APT and LVFS content. It has been verified on
DGX Spark; it might not work on x86 Ubuntu systems. The APT examples in
this guide use noble-proposed only. Add other suites or repositories
to the script if your deployment requires them.
The script performs the following actions:
Installs dependencies only if you pass
--install-deps/--install-apt-mirror.Creates
${MIRROR_ROOT}/apt-mirror.list.sparkif missing (noble-proposed,base_path=$MIRROR_ROOT/apt).Runs
apt-mirror, thensync-pulp.pyinto$MIRROR_ROOT/lvfs.Symlinks
/usr/local/bin/pythontopython3for tools that expectpython, and runssync-pulp.pywithpython3.
Run spark-mirror-sync.sh with environment variables set as shown in
the following examples:
export LVFS_USERNAME='you@example.com'
export LVFS_TOKEN='your-lvfs-token'
sudo -E ./spark-mirror-sync.sh --install-deps --install-apt-mirror   # first run only
sudo -E ./spark-mirror-sync.sh --install-deps --install-apt-mirror --skip-lvfs   # skip LVFS; sync separately
sudo -E ./spark-mirror-sync.sh
Default MIRROR_ROOT with sudo and without -H is
/root/mirror. To mirror under a user home directory (for example,
/home/nvidia/mirror), run the following command:
sudo env MIRROR_ROOT=/home/nvidia/mirror ./spark-mirror-sync.sh
Optional: APT_MIRROR_LIST, --skip-apt, --skip-lvfs,
LVFS_CLEANUP=1 for --cleanup on LVFS. If
$MIRROR_ROOT/guids.txt exists, the script passes --guid-file
automatically.
APT Mirror (noble-proposed under ~/mirror/apt)#
If a manual APT mirror is required, this section provides an example
workflow for creating one. The packaged /usr/bin/apt-mirror on Ubuntu
is often too old to mirror some DEP-11 paths (for example,
icons-64x64@2.tar). Install the current upstream apt-mirror Perl
script from GitHub with the following commands:
sudo apt install -y perl wget
sudo cp -a /usr/bin/apt-mirror /usr/bin/apt-mirror.distpkg 2>/dev/null || true
sudo wget -O /usr/local/bin/apt-mirror https://raw.githubusercontent.com/apt-mirror/apt-mirror/master/apt-mirror
sudo chmod +x /usr/local/bin/apt-mirror
Always run synchronization with /usr/local/bin/apt-mirror.
apt-mirror stores the Ubuntu tree under $base_path/mirror/. With
base_path set to ~/mirror/apt, the live archive path is
~/mirror/apt/mirror/ports.ubuntu.com/ubuntu-ports/, matching the
client URI after http://SERVER_IP:8080/apt/.
Create the mirror list file that /usr/local/bin/apt-mirror uses for
the mirror configuration. The following example uses
/home/nvidia/mirror/apt as the base path:
set base_path /home/nvidia/mirror/apt

# Only noble-proposed for ports.ubuntu.com/ubuntu-ports (+ optional deb-src if you mirror sources)

clean http://ports.ubuntu.com/ubuntu-ports
sudo /usr/local/bin/apt-mirror /etc/apt/mirror.spark.list
Re-run periodically (for example, through cron) when you need
fresher packages. Allow 8080/tcp from client subnets if a host
firewall is enabled.
The LVFS (fwupd) Mirror Under ~/mirror/lvfs#
Install the Python dependencies for sync-pulp.py with the following
command:
sudo apt install -y python3 python3-requests python3-lxml
Full Mirror (Large, on the Order of ~300 GB)
A full mirror requires an LVFS account and user token (not your account password). Refer to the LVFS site for account and token issuance. Run the following command to synchronize the full LVFS tree:
cd ~/mirror
./sync-pulp.py https://fwupd.org/downloads ~/mirror/lvfs \
  --username='your-email@example.com' \
  --token='YOUR_USER_TOKEN'
Re-run to update; existing valid files are skipped.
Optional: --cleanup removes files no longer in the manifest.
Partial Mirror (GUID File, ~50 MB)
On a representative Spark, run
sudo fwupdtool get-devices or fwupdmgr get-devices --show-all.
Build ~/mirror/guids.txt, then run the following command:
./sync-pulp.py https://fwupd.org/downloads ~/mirror/lvfs \
  --username='your-email@example.com' \
  --token='YOUR_USER_TOKEN' \
  --guid-file=guids.txt
Patch After Mirror: Choose MetadataURI for Clients#
After synchronization, choose a metadata file that has a matching
.jcat file with the same basename (for example,
firmware.xml.xz and firmware.xml.xz.jcat, or a versioned pair
such as firmware-08681-stable.xml.xz and
firmware-08681-stable.xml.xz.jcat). Use the newest stable pair that
exists on disk. Partial mirrors from --guid-file often omit
top-level firmware.xml.* metadata. Run the following safety-net
script on the server before configuring clients:
LVFS_DIR="$HOME/mirror/lvfs"
LVFS_CDN="https://cdn.fwupd.org/downloads"
for ext in xz gz zst; do
  meta="${LVFS_DIR}/firmware.xml.${ext}"
  jcat="${meta}.jcat"
  if [[ ! -s "${meta}" ]]; then
    echo "Safety-net: ${meta##*/} missing; fetching from ${LVFS_CDN}"
    if curl -fSL --connect-timeout 10 --max-time 120 \
      -o "${meta}.new" "${LVFS_CDN}/firmware.xml.${ext}" \
      && curl -fSL --connect-timeout 10 --max-time 30 \
      -o "${jcat}.new" "${LVFS_CDN}/firmware.xml.${ext}.jcat"; then
      mv -f "${meta}.new" "${meta}"
      mv -f "${jcat}.new" "${jcat}"
    else
      rm -f "${meta}.new" "${jcat}.new"
      echo "WARN: failed to fetch firmware.xml.${ext} / .jcat from ${LVFS_CDN}" >&2
    fi
  fi
done
Run the following commands on the server to confirm that metadata and signature files are present:
cd ~/mirror/lvfs
for f in firmware*.xml.xz firmware*.xml.gz firmware*.xml.zst; do
  [ -f "$f" ] || continue
  [ -f "${f}.jcat" ] && echo "OK: $f"
done

# below three messages should be observed
OK: firmware.xml.xz
OK: firmware.xml.gz
OK: firmware.xml.zst
Rules for guids.txt#
Follow these rules when you create guids.txt for a partial LVFS sync:
One UUID per line, exactly as printed (lowercase hex is acceptable). No # comments, no hardware hints
after ←, no blank lines. Copy every Guid: line and every UUID
inside GUIDs: blocks for devices you want mirrored. The same GUID
often appears on more than one device (for example, several identical
NICs). List each UUID only once. Include UUIDs for internal or updatable
components whose firmware you want in the mirror (such as EC, TPM, UEFI
capsules, NVMe, or dbx). Omit removable USB devices if you do not
require LVFS content for that class of hardware.
Manual workflow: save the fwupdtool get-devices output; copy only
xxxxxxxx-xxxx-xxxx-xxxx-xxxxxxxxxxxx tokens; paste into
guids.txt; run sort -u guids.txt -o guids.txt to sort the file
and remove duplicate lines.
Optional JSON workflow (user session; requires jq):
Run the following command to extract GUIDs from fwupdmgr output:
fwupdmgr get-devices --json | jq -r '
  .. | objects | select(has("Guid")) | .Guid,
  (.. | objects | select(has("Guids")) | .Guids[]?)
' | sort -u > ~/mirror/guids.txt
Optional cleanup to remove non-UUID characters from guids.txt:
Run the following command to clean the GUID file:
awk '{ gsub(/[^0-9A-Fa-f-]/, "", $0); if (length($0)) print $0 }' \
    ~/mirror/guids.txt > ~/mirror/guids.txt.clean
mv ~/mirror/guids.txt.clean ~/mirror/guids.txt
Example guids.txt for NVIDIA DGX Spark (spark-cr01,
sudo fwupdtool get-devices): The following listing reflects a
typical Spark (Kingston USB flash drive, EC, four ConnectX-7 ports with
the same four GUIDs repeated, Samsung NVMe, TPM, two UEFI ESRT firmware
slots, and UEFI dbx), including that USB device:
09321615-5d32-5758-8308-52a4a7be8efc
095ba8dd-3778-52b4-9f32-02a67c210ce5
0eb9bda9-3010-493a-a6a8-b5e80eddf870
10ec82f4-ff64-5362-9e5d-688febf5dbb0
12029307-5bb1-5200-99a5-536f1be9d081
35abf34a-7ed8-51b2-ba1b-edef527d47e6
3d13c989-e6a8-4ead-95ee-921f09868f65
59007998-a3d7-54a3-b30e-eb3b77e2f351
5f106816-21fe-5d90-896a-175038b9256f
67d35028-ca5b-5834-834a-f97380381082
75b1af35-b88a-59d2-a3c7-a38537f8607f
93768061-87bf-5c78-b9ea-5b7a6301012b
b488217b-3895-4fc0-b1bf-ab7005a2d45a
b5e95689-ad65-5e57-8778-897f04396256
cfc0de0b-adb3-5060-ba22-e4010a78368f
dd1a238a-5f8e-46bd-9401-a88da99c5a96
Smaller Mirror (same machine; omit DT microDuo 3C): Delete these three Kingston-only lines:
09321615-5d32-5758-8308-52a4a7be8efc5f106816-21fe-5d90-896a-175038b9256f75b1af35-b88a-59d2-a3c7-a38537f8607f
sync-pulp.py cannot combine --guid-file and --filter-tag in
one run; run twice if you need both, or consult LVFS offline
documentation. Filtered syncs can occasionally leave orphaned metadata
relative to .jcat pairs; verify pairs and fetch missing top-level
metadata with the safety-net script above if needed.
Serve ~/mirror With Python#
After the mirror sync completes, serve the ~/mirror tree over HTTP
with Python as follows.
cd ~/mirror
python3 -m http.server 8080 --bind 0.0.0.0
apton the wire:http://SERVER_IP:8080/apt/mirror/...LVFS on the wire:
http://SERVER_IP:8080/lvfs/...
Keep this process running (tmux, a systemd user unit, or equivalent)
while clients update.
apt-repo.url and lvfs-mirror.url must point to the correct addresses
to use the mirror APT repository and LVFS content.
Cloud-init Integration#
The OEM user-data file integrates hook.sh with cloud-init during
first boot. Refer to oemdata/cloud-init/seed/user-data in your
repository checkout. That example runs the hook. If the exit code is
1, it logs mirror-setup success with logger and runs sync.
Security Considerations#
Consider the following security implications when you deploy custom
installation media, local mirrors, and hook.sh automation:
Secure Boot: Before booting recovery or customized installation media, confirm the Secure Boot requirements for your deployment and platform policy. Use only NVIDIA-provided or otherwise approved boot media. If Secure Boot settings are changed for installation or recovery, restore the required Secure Boot state before returning the system to service.
hook.shand USB contents: The hook runs with elevated privileges and executes content from theOEMDATApartition. Anyone with physical access can replacehook.sh, Debian packages, or firmware on the USB drive. Treat the USB drive as trusted input: use tamper-aware handling, restrict who can prepare USB devices, or verify integrity (for example, hashes or signatures) if your policy requires it.Local APT repository: The hook adds the repository with
[trusted=yes], so packages from that repository are not signature-verified. Ensure the repository server and network are trusted.Local firmware mirror: Firmware from the mirror (or a directory of
.cab/.cap) is installed byfwupd. If you setOnlyTrusted=false, unverified or vendor-signed firmware is allowed only when you control the firmware source and accept the risk.URLs on the USB drive: The values in
apt-repo.urlandlvfs-mirror.urlidentify servers on your network. Those servers must be trustworthy. If an attacker compromises one of those servers, or performs a man-in-the-middle (MITM) attack on the path between the client and the server, the client could install malicious packages or firmware.Network exposure: The host that serves the APT repository and firmware tree is reachable from other systems on the same local network used for DGX Spark installation. Harden that host (access control, firewall, operating system updates). When your security policy requires it, place installation and repository access on a dedicated or isolated network segment instead of a general-purpose LAN.
Verify the Customization and Installation Outcomes#
Use the following subsections to confirm that your custom installation, mirror configuration, and first-boot provisioning completed successfully.
During and After an ISO-Based Installation#
OEM ISO configuration is logged at /var/log/oem-iso-cfg.log when the
installer runs oem-iso-cfg.sh from /cdrom. Review this log file
to confirm that cloud-init seed files were copied during installation.
After Mirror- or USB-Driven Updates#
After first boot completes, confirm that mirror- or USB-driven updates applied successfully:
Confirm that the expected Debian or Ubuntu packages are installed from the mirror.
Confirm expected firmware versions after
fwupdmgr update, as applicable.Inspect cloud-init logs for hook execution and errors.
Disable cloud-init for subsequent boots if your operational model requires it, per your site policy.
Prepare the Installation Media and Client (Verification Flow)#
Use the following checklist when validating an end-to-end flow:
When you use the curated local repository workflow, host packages and firmware per Host a Minimal APT Repository and Firmware Tree and start the web server from
WEB_ROOT.Prepare a bootable USB drive with your repack script and BaseOS.
Add another partition on the same USB drive, mount it locally, and copy
hook.shinto the mounted root directory, as required by your imaging procedure.Flash the system boot package (SBP) to a known prior version if your test plan requires it (for example,
2.144.9). For current package naming, refer to the DGX Spark Software Release Packages document, section 6, DGX Spark OTA1 Branch / OTA1.1.Warning
Flashing the client re-images the DGX Spark system and erases local storage. Do not proceed until backups are complete, the bootable media has been verified, and the target system has been identified.
Flash the client using the bootable USB drive.
After flashing, verify that the DGX Spark boots successfully, cloud-init completed without errors, the expected users and configuration are present, required packages and firmware versions are installed, and the Secure Boot state matches your deployment policy.
Using AI Tools#
You can use AI-assisted coding tools, such as Claude or Codex, to help you apply the instructions in this topic. The following examples were validated with Claude and Codex.
Reconstructing the File Layout with AI Tools#
This topic provides the information needed to integrate cloud-init with an existing DGX Spark ISO or recovery image. In validated tests, Claude and Codex reconstructed the reference file layout and replaced the credential placeholders with deployment-specific values.
Enter a prompt similar to the following example:
reconstruct files from "Custom Installation with cloud-init 2607.pdf",
Reference session, username is oem_abc, password is oem_abc_123_.
all YOUR_USERNAME and YOUR_PASSWORD need to replace with username and
password.
The generated file layout matched the source-code layout and included
the updated username and password values. The generated cloud-init and
hook.sh scripts were verified to work correctly. The following
directory tree shows the expected layout:
.
├── oemdata
│   ├── cloud-init
│   │   ├── cfg.d
│   │   │   ├── 50-dgx-base-audit.cfg
│   │   │   ├── 50-oem-default-user.cfg
│   │   │   └── 99-oem-nocloud.cfg
│   │   └── seed
│   │       ├── meta-data
│   │       └── user-data
│   ├── hook.sh
│   └── oem-iso-cfg.sh
├── repack_baseos.sh
└── repack_fastos.sh
Reference: OEM Scripts and cloud-init#
Note
The sample code uses YOUR_USERNAME and YOUR_PASSWORD as
placeholder values for the DGX Spark account credentials. Before you use
the sample code, replace these placeholders with the username and
password for your DGX Spark system.
The following listings are reference copies of scripts and configuration
files from the DGX OS customization repository (paths under os/ and
oemdata/). They supplement
Customize the BaseOS Image with repack_baseos.sh,
and Cloud-init Integration.
Compare these listings with your repository checkout and release notes.
Behavior and paths can change between releases.
The following directory tree shows the file layout used in this configuration tool for repackaging:
.
├── oemdata
│   ├── cloud-init
│   │   ├── cfg.d
│   │   │   ├── 50-dgx-base-audit.cfg
│   │   │   ├── 50-oem-default-user.cfg
│   │   │   └── 99-oem-nocloud.cfg
│   │   └── seed
│   │       ├── meta-data
│   │       └── user-data
│   ├── hook.sh
│   └── oem-iso-cfg.sh
├── repack_baseos.sh
└── repack_fastos.sh
First Boot: OEMDATA hook.sh and cloud-init Seed#
hook.sh lives on the OEMDATA partition. The example
seed/user-data runcmd mounts that partition, copies the hook to
/tmp for execution, exports OEM_MNT, and runs the copy. The
cfg.d and seed files are representative OEM cloud-init content
carried on the ISO and copied at installation time.
Important
Keep the required installation media, OEMDATA partition,
and local mirror reachable during first boot. Cloud-init runs the
provisioning workflow during this stage and can take several minutes while
it installs packages, applies firmware updates, refreshes APT or fwupd
metadata, and runs hook.sh. Do not power off the system or disconnect
required media until provisioning completes.
oemdata/hook.sh#
The following script is the reference hook.sh that runs from the
OEMDATA partition or from a network URL during first boot.
#!/bin/sh
# OEM hook script: run from cloud-init when OEMDATA partition is mounted.
# Copy this file to the root of the OEMDATA partition (next to debs/ and firmware/).
# Optional: apt-repo.url (full path to repo, e.g. …/deb-repo/), apt-packages.txt;
# lvfs-mirror.url (base URL only, dir containing firmware.xml.gz,
# e.g. …/lvfs-mirror/ — not a subpath).
# Exit: 0 = success, no apt/fwupd updates in final pass;
# 1 = success and at least one applied;
# 255 = failure (-1 in 8-bit).
# After a successful final pass, current sources.list.d is renamed to
# sources.list.d.cldnt,
# stock apt is restored from sources.list.d.org, and public LVFS is re-enabled.
# Override: MIRROR_SERVER_IP, MIRROR_SERVER_PORT, LVFS_METADATA_NAME, LVFS_WEB_SUBDIR
# OEM_MNT is the OEMDATA partition root (debs/, firmware/, urls).
# Normally the directory containing this script; cloud-init may copy this file
# to /tmp and set OEM_MNT explicitly.
# This tree does not use functions.sh. If you extend the USB copy,
# source helpers only as
#   . "$OEM_MNT/your-helper.sh"
# never . "$(dirname "$0")/..." or files vanish when $0 is under /tmp.

# By USING THIS SCRIPT, USER AGREES TO THE TERMS OF THE EULA,
# SOL is enabled by default.
# TELEMETRY is not enabled by default. If enabling telemetry, user agrees to
# accept TELEMETRY terms.

OEM_MNT=${OEM_MNT:-$(dirname "$0")}
WIFI_ADAPTER=${WIFI_ADAPTER:-wlP9s9} # Default WiFi adapter name

# -----------------------------------------------------------------------------
# Defaults / mirror URLs (used by mirror + OEM stages)
# -----------------------------------------------------------------------------
_hook_config_defaults() {
 MIRROR_SERVER_IP=${MIRROR_SERVER_IP:-192.168.1.1}
 MIRROR_SERVER_PORT=${MIRROR_SERVER_PORT:-8080}
 LVFS_WEB_SUBDIR=${LVFS_WEB_SUBDIR:-lvfs}
 LVFS_METADATA_NAME=${LVFS_METADATA_NAME:-firmware.xml.xz}
 MIRROR_APT_URI="http://${MIRROR_SERVER_IP}:${MIRROR_SERVER_PORT}/apt/mirror/"\
 "ports.ubuntu.com/ubuntu-ports/"
 MIRROR_FW_BASE="http://${MIRROR_SERVER_IP}:${MIRROR_SERVER_PORT}/${LVFS_WEB_SUBDIR}"
}

# -----------------------------------------------------------------------------
# HTTP GET to stdout (wget or curl)
# -----------------------------------------------------------------------------
_hook_http_get() {
 wget -qO - "$1" 2>/dev/null || curl -sL "$1" 2>/dev/null
}

# -----------------------------------------------------------------------------
# OOBE post-steps (EXIT trap): run when user "YOUR_USERNAME" exists;
# never fail the hook.
# -----------------------------------------------------------------------------
_hook_oobe_supplementary_groups() {
 usermod -aG adm,sudo,audio,dip,plugdev,users,lpadmin \
  YOUR_USERNAME 2>/dev/null || true
}

_hook_oobe_spark_autostart_and_keyboard() {
 install -d -m 0755 -o YOUR_USERNAME -g YOUR_USERNAME \
  /home/YOUR_USERNAME/.config/autostart 2>/dev/null || true
 if [ ! -f /home/YOUR_USERNAME/.config/autostart/nvidia-spark-docs.desktop ]; then
   ( umask 022
     cat > /home/YOUR_USERNAME/.config/autostart/nvidia-spark-docs.desktop << 'EOF'
[Desktop Entry]
Type=Application
Name=NVIDIA Spark documentation
Exec=xdg-open https://build.nvidia.com/spark
X-GNOME-Autostart-enabled=true
EOF
   ) 2>/dev/null || true
   chown YOUR_USERNAME:YOUR_USERNAME \
     /home/YOUR_USERNAME/.config/autostart/nvidia-spark-docs.desktop \
     2>/dev/null || true
   chmod 0644 /home/YOUR_USERNAME/.config/autostart/nvidia-spark-docs.desktop \
     2>/dev/null || true
 fi
 if [ -f "$OEM_MNT/oem-keyboard-spark.sh" ]; then
   echo "[oem hook] running $OEM_MNT/oem-keyboard-spark.sh"
   sh "$OEM_MNT/oem-keyboard-spark.sh" || true
 fi
}

_hook_oobe_skip_gnome_initial_setup() {
 install -d -m 0755 -o YOUR_USERNAME -g YOUR_USERNAME \
  /home/YOUR_USERNAME/.config 2>/dev/null || true
 touch /home/YOUR_USERNAME/.config/gnome-initial-setup-done 2>/dev/null || true
 chown YOUR_USERNAME:YOUR_USERNAME \
  /home/YOUR_USERNAME/.config/gnome-initial-setup-done 2>/dev/null || true
}

_hook_oobe_hotspot_teardown_if_ethernet() {
 # Run as a child (not ".") so dgx-oobe sees $0 under /opt/nvidia/dgx-oobe
 # (functions.sh path).
 # Use bash: functions.sh uses bash syntax; /bin/sh (dash) errors with
 # "(" unexpected.
 _hs=/opt/nvidia/dgx-oobe/oobe-hotspot-shutdown.sh
 if [ -f "$_hs" ]; then
   command -v bash >/dev/null 2>&1 && bash "$_hs" || true
 fi
}

_hook_oobe_disable_systemd_units() {
 for u in dgx-oobe dgx-oobe-admin dgx-oobe-hotspot dgx-oobe-hostname \
   dgx-oobe-hotspot-watchdog; do
   systemctl stop "$u" 2>/dev/null || true
   systemctl disable "$u" 2>/dev/null || true
 done
 if [ -f /etc/NetworkManager/dnsmasq-shared.d/dgx-oobe.conf ]; then
   rm -f /etc/NetworkManager/dnsmasq-shared.d/dgx-oobe.conf
 fi
 systemctl restart avahi-daemon 2>/dev/null || true
 # Disable WiFi adapter scan
 if [ -z "${WIFI_ADAPTER}" ]; then
     return 0
 fi
 if ip link show ${WIFI_ADAPTER}_scan >/dev/null 2>&1; then
     /usr/bin/ip link set ${WIFI_ADAPTER}_scan down || true
     /usr/sbin/iw dev ${WIFI_ADAPTER}_scan del || true
 fi
}

_hook_oobe_ubuntu_pro_attach() {
 if [ -n "${UBUNTU_PRO_TOKEN:-}" ] && command -v pro >/dev/null 2>&1; then
   pro attach "$UBUNTU_PRO_TOKEN" --no-prompt 2>/dev/null || true
 fi
}

_hook_oobe_sol_if_consent() {
 echo "[oem hook] Enabling SOL"
 install -d -m 0755 /opt/nvidia/dgx-telemetry 2>/dev/null || true
 touch /opt/nvidia/dgx-telemetry/eula_accepted 2>/dev/null || true
 sync
 systemctl daemon-reload 2>/dev/null || true
 if ! systemctl enable --now nvidia-dgx-sol 2>/dev/null; then
   echo "[oem hook] warning: systemctl enable --now nvidia-dgx-sol failed" \
     "(check status; unit may stay disabled)" >&2 || true
   systemctl start nvidia-dgx-sol 2>/dev/null || true
 fi
}

_hook_oobe_telemetry_if_consent() {
 echo "[oem hook] Enabling telemetry"
 install -d -m 0755 /opt/nvidia/dgx-telemetry 2>/dev/null || true
 touch /opt/nvidia/dgx-telemetry/technical_consent \
   /opt/nvidia/dgx-telemetry/functional_consent 2>/dev/null || true
 sync
 systemctl daemon-reload 2>/dev/null || true
 if ! systemctl enable --now nvidia-dgx-telemetry 2>/dev/null; then
   echo "[oem hook] warning: systemctl enable --now nvidia-dgx-telemetry failed" \
     "(check status; unit may stay disabled)" >&2 || true
   systemctl start nvidia-dgx-telemetry 2>/dev/null || true
 fi
}

_hook_oobe_complete_flag_marker() {
 install -d -m 0755 /opt/nvidia/dgx-oobe 2>/dev/null || true
 touch /opt/nvidia/dgx-oobe/oobe-complete-flag 2>/dev/null || true
}

# When cloud-init created user "nvidia", run one-time OOBE-aligned steps on every
# script exit.
# (EXIT runs after normal completion, exit 1, or exit 255 so these steps still run.)
_hook_oobe_post() {
 set +e
 if [ "$(id -u)" -ne 0 ]; then
   return 0
 fi
 if ! getent passwd YOUR_USERNAME >/dev/null 2>&1; then
   return 0
 fi
 echo "[oem hook] OOBE post-steps for user YOUR_USERNAME (EXIT trap)"
 _hook_restore_stock_apt_and_lvfs || true
 _hook_oobe_supplementary_groups || true
 _hook_oobe_spark_autostart_and_keyboard || true
 _hook_oobe_skip_gnome_initial_setup || true
 _hook_oobe_hotspot_teardown_if_ethernet || true
 _hook_oobe_disable_systemd_units || true
 _hook_oobe_ubuntu_pro_attach || true
 _hook_oobe_sol_if_consent || true
 _hook_oobe_complete_flag_marker || true

 return 0
}

trap '_hook_oobe_post' EXIT

# -----------------------------------------------------------------------------
# Unified Spark mirror: local apt + fwupd LVFS remote
# -----------------------------------------------------------------------------
_hook_mirror_archive_stock_sources() {
 if [ ! -d /etc/apt/sources.list.d.org ]; then
   if [ -d /etc/apt/sources.list.d ]; then
     mv /etc/apt/sources.list.d /etc/apt/sources.list.d.org
   fi
 fi
 rm -rf /etc/apt/sources.list.d
 mkdir -p /etc/apt/sources.list.d
}

_hook_mirror_write_deb822_sources() {
 cat > /etc/apt/sources.list.d/local-mirror.sources <<EOF
# Ubuntu from local mirror (under web root .../apt/mirror/)
Types: deb deb-src
URIs: ${MIRROR_APT_URI}
Suites: noble-proposed
Components: main restricted universe multiverse
Signed-By: /usr/share/keyrings/ubuntu-archive-keyring.gpg
EOF
}

_hook_mirror_write_fwupd_local_remote() {
 mkdir -p /etc/fwupd/remotes.d
 cat > /etc/fwupd/remotes.d/local-lvfs-mirror.conf <<EOF
[fwupd Remote]
Enabled=true
Type=download
Title=Local LVFS Mirror
MetadataURI=${MIRROR_FW_BASE}/${LVFS_METADATA_NAME}
FirmwareBaseURI=${MIRROR_FW_BASE}
EOF
}

_hook_mirror_disable_public_lvfs() {
 fwupdmgr disable-remote lvfs 2>/dev/null || {
   [ -f /etc/fwupd/remotes.d/lvfs.conf ] && \
     mv /etc/fwupd/remotes.d/lvfs.conf \
       /etc/fwupd/remotes.d/lvfs.conf.disabled
 }
}

_hook_mirror_apply_local_mirror() {
 _hook_mirror_archive_stock_sources
 _hook_mirror_write_deb822_sources
 _hook_mirror_write_fwupd_local_remote
 _hook_mirror_disable_public_lvfs
}

# Retry apt update to tolerate transient lock contention (e.g. another apt process).
# 600 cycles, 1 second each.
_hook_apt_update_with_retries() {
 _attempt=1
 _max_attempts=600
 while [ "$_attempt" -le "$_max_attempts" ]; do
   if apt-get update -o Acquire::Languages=none || apt-get update; then
     return 0
   fi
   if [ "$_attempt" -lt "$_max_attempts" ]; then
     echo "apt update failed (attempt ${_attempt}/${_max_attempts});" \
       "retrying in 1s..."
     sleep 1
   fi
   _attempt=$((_attempt + 1))
 done
 echo "apt update failed after ${_max_attempts} attempts"
 return 1
}

# Succeed if either update works; exit 255 only when both fail.
_hook_apt_update_initial() {
 if _hook_apt_update_with_retries; then
   return 0
 fi
 exit 255
}

# -----------------------------------------------------------------------------
# OEMDATA: local .deb drop, optional apt repo, firmware USB, optional LVFS URL
# -----------------------------------------------------------------------------
_hook_oem_install_debs_from_usb() {
 echo "Checking for debs in USB OEMDATA partition..."
 if [ -d "$OEM_MNT/debs" ] && ls "$OEM_MNT/debs"/*.deb >/dev/null 2>&1; then
   echo "Installing debs from USB OEMDATA partition..."
   dpkg -i "$OEM_MNT/debs"/*.deb || true
   apt-get install -f -y
 fi
}

_hook_oem_install_from_local_repo() {
 echo "Checking for local APT repo..."
 if [ ! -f "$OEM_MNT/apt-repo.url" ]; then
   echo "apt-repo.url not found"
   return 0
 fi
 repo_url=$(sed -n '1s/[[:space:]]*//p' "$OEM_MNT/apt-repo.url")
 if [ -z "$repo_url" ]; then
   echo "No local APT repo URL found"
   return 0
 fi
 echo "Adding local APT repo: $repo_url"
 printf 'deb [trusted=yes] %s ./\n' "$repo_url" > \
   /etc/apt/sources.list.d/oem-local.list
 repo_host=$(echo "$repo_url" | sed -n 's|.*://\([^:/]*\).*|\1|p')
 if [ -n "$repo_host" ]; then
   rm -f /var/lib/apt/lists/partial/*"$repo_host"* \
     /var/lib/apt/lists/*"$repo_host"* 2>/dev/null || true
 fi
 _hook_apt_update_with_retries || true

 if [ ! -f "$OEM_MNT/apt-packages.txt" ]; then
   echo "apt-packages.txt not found; apt upgrade using OEM local repo only" \
     "(single-source apt)"
   apt upgrade -y \
     -o Dir::Etc::sourcelist="/etc/apt/sources.list.d/oem-local.list" \
     -o APT::Architecture="$(dpkg --print-architecture)" \
     || true
   return 0
 fi
 pkgs=$(grep -v '^[#;]' "$OEM_MNT/apt-packages.txt" | while read -r line; do
   line="${line%%[[:space:]]*}"
   [ -z "$line" ] && continue
   case "$line" in *\.deb)
     line="${line%.deb}"; line="${line%_*}"; line="${line%_*}"
   esac
   echo "$line"
 done | tr '\n' ' ')
 if [ -z "$pkgs" ]; then
   return 0
 fi
 echo "Installing packages from local repo: $pkgs"
 if ! apt-get install -y $pkgs; then
   echo "Fallback: downloading .deb and installing with dpkg..."
   base="${repo_url%/}"
   for pkg in $pkgs; do
     pkg_file=$(
       _hook_http_get "$base/Packages.gz" | zcat 2>/dev/null | awk -v pkg="$pkg" '
/^Package: /{name=$2}
/^Filename: /{if(name==pkg){print $2; exit}}
/^$/{name=""}
'
     )
     pkg_file="${pkg_file#./}"
     [ -z "$pkg_file" ] && continue
     tmp_deb="/tmp/$(basename "$pkg_file")"
     if _hook_http_get "$base/$pkg_file" > "$tmp_deb" 2>/dev/null && \
       [ -s "$tmp_deb" ]; then
       dpkg -i "$tmp_deb" && echo "PASS: $pkg (dpkg)" || true
     else
       echo "FAIL: could not download $pkg"
     fi
     rm -f "$tmp_deb"
   done
   apt-get install -f -y 2>/dev/null || true
 fi
}

_hook_oem_install_firmware_usb() {
 echo "Checking for firmware in USB OEMDATA partition..."
 if [ ! -d "$OEM_MNT/firmware" ]; then
   return 0
 fi
 echo "Installing firmware from USB OEMDATA partition..."
 find "$OEM_MNT/firmware" -maxdepth 1 -type f \
   \( -name '*.cab' -o -name '*.cap' \) | while read -r f; do
   name=$(basename "$f")
   echo "Installing firmware: $name"
   if fwupdmgr install --allow-reinstall "$f"; then
     echo "PASS: $name"
   else
     echo "FAIL: $name"
   fi
 done
}

# Supports (1) full LVFS mirror: URL points to dir with firmware.xml.gz;
# (2) directory of .cab/.cap only.
_hook_oem_lvfs_mirror_from_url() {
 echo "Checking for LVFS mirror URL..."
 if [ ! -f "$OEM_MNT/lvfs-mirror.url" ]; then
   return 0
 fi
 lvfs_base=$(sed -n '1s/[[:space:]]*//p' "$OEM_MNT/lvfs-mirror.url")
 lvfs_base="${lvfs_base%/}/"
 if [ -z "$lvfs_base" ]; then
   return 0
 fi
 lvfs_meta_url="${lvfs_base}firmware.xml.gz"
 curl_meta_code=$(curl -sI -o /dev/null -w '%{http_code}' \
   "$lvfs_meta_url" 2>/dev/null)
 if ( wget -q --spider "$lvfs_meta_url" 2>/dev/null ) || \
   [ "$curl_meta_code" = "200" ]; then
   echo "Adding LVFS mirror (metadata): $lvfs_base"
   mkdir -p /etc/fwupd/remotes.d
   cat > /etc/fwupd/remotes.d/oem-lvfs-mirror.conf << EOF
[fwupd Remote]
Title=OEM LVFS Mirror
MetadataURI=${lvfs_base}firmware.xml.gz
FirmwareBaseURI=$lvfs_base
Enabled=true
EOF
   echo "Refreshing fwupd and upgrading firmware from mirror..."
   fwupdmgr refresh --force || fwupdmgr refresh
   fwupdmgr update || true
 else
   echo "No firmware.xml.gz at $lvfs_base; treating as directory of .cab/.cap..."
   _hook_http_get "$lvfs_base" | grep -oE 'href="[^"]*\.(cab|cap)"' | \
     sed 's/href="//;s/"$//' | while read -r f; do
     [ -z "$f" ] && continue
     tmp_f="/tmp/$(basename "$f")"
     if _hook_http_get "$lvfs_base$f" > "$tmp_f" 2>/dev/null && [ -s "$tmp_f" ]; then
       echo "Installing firmware from mirror: $f"
       fwupdmgr install --allow-reinstall "$tmp_f" && \
         echo "PASS: $f" || echo "FAIL: $f"
     fi
     rm -f "$tmp_f"
   done
 fi
}

# -----------------------------------------------------------------------------
# Final pass: apt upgrade + fwupd loop; sets HOOK_APT_UPDATED,
# HOOK_FW_UPDATED, HOOK_FW_FAILED
# -----------------------------------------------------------------------------
_hook_final_apt_upgrade() {
 echo "apt update with retry (600x, 1s)"
 if _hook_apt_update_with_retries; then
   :
 else
   echo "apt update failed"
   exit 255
 fi

 echo "apt -s upgrade | grep -q '^[[:space:]]*Inst '"
 if apt -s upgrade | grep -q '^[[:space:]]*Inst '; then
   DEBIAN_FRONTEND=noninteractive apt -y \
     -o Dpkg::Options::=--force-confold upgrade || exit 255
   HOOK_APT_UPDATED=1
 fi
}

_hook_fwupdmgr_refresh_and_count() {
 echo "fwupdmgr refresh --force"
 fwupdmgr refresh --force

 HOOK_FW_APPLICABLE=""
 if command -v jq >/dev/null 2>&1; then
   _hook_jq_fw_count='(if type == "object" and (.Devices | type) == "array" '
   _hook_jq_fw_count="${_hook_jq_fw_count}then .Devices "
   _hook_jq_fw_count="${_hook_jq_fw_count}"'elif type == "array" then . else '
   _hook_jq_fw_count="${_hook_jq_fw_count}[] end) | "
   _hook_jq_fw_count="${_hook_jq_fw_count}"'[.[] | select((.Releases // []) | '
   _hook_jq_fw_count="${_hook_jq_fw_count}"'length > 0)] | length'
   HOOK_FW_APPLICABLE=$(
     fwupdmgr get-upgrades --json 2>/dev/null | jq -r "$_hook_jq_fw_count" \
       2>/dev/null || echo ""
   )
 fi
 HOOK_FW_APPLICABLE=$(printf '%s' "$HOOK_FW_APPLICABLE" | tr -d '\r\n\t ')
 case "$HOOK_FW_APPLICABLE" in
   ''|*[!0-9]*) HOOK_FW_APPLICABLE="?" ;;
 esac
 echo "fwupdmgr: applicable firmware devices (Releases>0): ${HOOK_FW_APPLICABLE:-?}"
}

_hook_fwupdmgr_upgrade_loop() {
 set +e
 case "$HOOK_FW_APPLICABLE" in
   [1-9]|[1-9][0-9]*)
     HOOK_FW_ITER=0
     while [ "$HOOK_FW_ITER" -lt 5 ]; do
       HOOK_FW_ITER=$((HOOK_FW_ITER + 1))
       HOOK_FW_OFFLINE_CAN_BREAK=0
       HOOK_FW_IMMEDIATE_CAN_BREAK=0
       echo "fwupdmgr upgrade -y --offline"
       fwupdmgr upgrade -y --offline
       HOOK_FW_R1=$?
       echo "fwupdmgr upgrade -y --no-reboot-check"
       fwupdmgr upgrade -y --no-reboot-check
       HOOK_FW_R2=$?
       case $HOOK_FW_R1 in
         0) HOOK_FW_UPDATED=1; HOOK_FW_OFFLINE_CAN_BREAK=1 ;;
         2) HOOK_FW_OFFLINE_CAN_BREAK=1 ;;
         *) echo "fwupdmgr upgrade -y --offline failed (exit $HOOK_FW_R1)"; \
            HOOK_FW_FAILED=1 ;;
       esac
       case $HOOK_FW_R2 in
         0) HOOK_FW_UPDATED=1; HOOK_FW_IMMEDIATE_CAN_BREAK=1 ;;
         2) HOOK_FW_IMMEDIATE_CAN_BREAK=1 ;;
         *) echo "fwupdmgr upgrade -y --no-reboot-check failed (exit $HOOK_FW_R2)"; \
            HOOK_FW_FAILED=1 ;;
       esac
       if [ "$HOOK_FW_FAILED" -eq 1 ]; then
         break
       fi
       if [ "$HOOK_FW_OFFLINE_CAN_BREAK" -eq 1 ] && \
         [ "$HOOK_FW_IMMEDIATE_CAN_BREAK" -eq 1 ]; then
         echo "fwupdmgr upgrade -y --offline and fwupdmgr upgrade -y" \
           "--no-reboot-check both finished OK"
         break
       fi
     done
     ;;
 esac
 set -e
}

_hook_restore_stock_apt_and_lvfs() {
 echo "Restoring stock apt sources and re-enabling public LVFS after" \
   "mirror-based updates"
 if [ -d /etc/apt/sources.list.d.org ]; then
   if [ -d /etc/apt/sources.list.d.cldnt ]; then
     rm -rf /etc/apt/sources.list.d.cldnt
   fi
   if [ -d /etc/apt/sources.list.d ]; then
     mv /etc/apt/sources.list.d /etc/apt/sources.list.d.cldnt
   fi
   mv /etc/apt/sources.list.d.org /etc/apt/sources.list.d
 fi
 if [ -f /etc/fwupd/remotes.d/lvfs.conf.disabled ]; then
   mv /etc/fwupd/remotes.d/lvfs.conf.disabled /etc/fwupd/remotes.d/lvfs.conf
 fi
 # Non-interactive: enable-remote otherwise blocks on "Enable new remote?"
# (no TTY under cloud-init).
# The LVFS disclaimer box goes to stdout; cloud-init captures runcmd output into
# cloud-init-provisioning.log.
 fwupdmgr -y --no-remote-check enable-remote lvfs >/dev/null 2>&1 || true
}

_hook_exit_with_status() {
 if [ "$HOOK_FW_FAILED" -eq 1 ]; then
   exit 255
 fi
 if [ "$HOOK_APT_UPDATED" -eq 1 ] || [ "$HOOK_FW_UPDATED" -eq 1 ]; then
   exit 1
 fi
 exit 0
}

# -----------------------------------------------------------------------------
# Main
# -----------------------------------------------------------------------------
_hook_main() {
 _hook_config_defaults
 _hook_mirror_apply_local_mirror
 _hook_oem_install_debs_from_usb
 _hook_oem_install_from_local_repo
 _hook_oem_install_firmware_usb
 _hook_oem_lvfs_mirror_from_url

 HOOK_APT_UPDATED=0
 HOOK_FW_UPDATED=0
 HOOK_FW_FAILED=0
 _hook_fwupdmgr_refresh_and_count
 _hook_fwupdmgr_upgrade_loop
 _hook_apt_update_initial
 _hook_final_apt_upgrade
 _hook_restore_stock_apt_and_lvfs
 _hook_exit_with_status
}

_hook_main
ISO Install: oem-iso-cfg.sh, repack_baseos.sh, repack_fastos.sh, and OEM cloud-init on the ISO#
oem-iso-cfg.sh runs during installation from the repacked ISO
(Subiquity or autoinstall) with /cdrom mounted. The
repack_baseos.sh script copies the OEM cloud-init tree and
oem-iso-cfg.sh onto the repacked ISO under ISO_ROOT/oemdata/. It
does not copy .deb packages; package installation from USB or network
sources is handled by hook.sh on first boot when you use an
OEMDATA partition or network delivery.
oemdata/oem-iso-cfg.sh#
The following listing shows oem-iso-cfg.sh, which runs during
ISO-based installation:
#!/bin/bash

set -euo pipefail
set -x
export DEBIAN_FRONTEND=noninteractive

LOGFILE=/var/log/oem-iso-cfg.log
_OEM_TRAP='echo "[oem][fatal] script failed at line $LINENO" | '\
'tee -a "$LOGFILE" >&2; exit 1'
trap "$_OEM_TRAP" ERR
exec > >(tee -a "$LOGFILE") 2>&1

echo "[oem] Starting customization script"
OEM_DEB_SRC=/cdrom/oemdata/debs
OEM_CLOUD_SRC=/cdrom/oemdata/cloud-init
OEM_CLOUD_CFG_SRC="$OEM_CLOUD_SRC/cfg.d"
OEM_CLOUD_SEED_SRC="$OEM_CLOUD_SRC/seed"
OEM_NOCLOUD_DST=/var/lib/cloud/seed/nocloud
OEM_CFG_DST=/etc/cloud/cloud.cfg.d

if [ -d "$OEM_CLOUD_SRC" ]; then
   echo "[oem] Detected OEM cloud-init configuration at $OEM_CLOUD_SRC"
   find "$OEM_CLOUD_SRC"

   echo "[oem] Enabling cloud-init NoCloud seed and config"
   mkdir -p -v "$OEM_NOCLOUD_DST" "$OEM_CFG_DST"

   if [ -d "$OEM_CLOUD_SEED_SRC" ]; then
       echo "[oem] Copying seed files from $OEM_CLOUD_SEED_SRC -> $OEM_NOCLOUD_DST"
       cp -av "$OEM_CLOUD_SEED_SRC"/. "$OEM_NOCLOUD_DST"/
   else
       echo "[oem] No seed directory found at $OEM_CLOUD_SEED_SRC"
   fi

   if [ -d "$OEM_CLOUD_CFG_SRC" ]; then
       echo "[oem] Copying cfg files from $OEM_CLOUD_CFG_SRC -> $OEM_CFG_DST"
       cp -av "$OEM_CLOUD_CFG_SRC"/. "$OEM_CFG_DST"/
   else
       echo "[oem] No cfg.d directory found at $OEM_CLOUD_CFG_SRC"
   fi

   echo "[oem] cloud-init OEM configuration enabled."
else
   echo "[oem] No OEM cloud-init configuration found."
fi

echo "[oem] oemdata contents"
find /cdrom/oemdata -type f

if [ ! -f /cdrom/oemdata/build_type ]; then
   echo "build_type is not found, no further customization"
   exit 0
fi

BUILD_TYPE=$(cat /cdrom/oemdata/build_type | tr '[:upper:]' '[:lower:]')
echo "[oem] Build Type: ${BUILD_TYPE}"

echo "[oem] Install packages"
pushd ${OEM_DEB_SRC}

if ls "$OEM_DEB_SRC"/*.deb >/dev/null 2>&1; then
 echo "[oem] Installing OEM packages from $OEM_DEB_SRC"

 # Prepare isolated APT environment
 APT_DIR="$(mktemp -d /tmp/oem-apt-XXXXXX)"
 APT_ARCH="$(dpkg --print-architecture)"
 mkdir -p "$APT_DIR/lists" "$APT_DIR/cache" "$APT_DIR/state" "$APT_DIR/debs"
 cp -a "$OEM_DEB_SRC"/.  "$APT_DIR/debs"
 cd "$APT_DIR/"
 dpkg-scanpackages debs /dev/null > "$APT_DIR/Packages"
 TEMP_SOURCE_LIST="$APT_DIR/oemrepo.list"
 echo "deb [trusted=yes] file:$APT_DIR ./" > "$TEMP_SOURCE_LIST"

 echo "[oem] Installing OEM packages from $OEM_DEB_SRC"
 echo "================================================"
 ls -l "$APT_DIR/debs"
 echo "================================================"

 # Clean up temp APT environment (do NOT remove OEM_DEB_SRC)
 rm -rf "$APT_DIR"
fi

if [ -f /cdrom/oemdata/post.${BUILD_TYPE}.sh ]; then
   echo "[oem] Run post-install script"
   /cdrom/oemdata/post.${BUILD_TYPE}.sh
fi

echo "[oem] Log installed packages"
apt list --installed > /var/log/oem-installed-packages.log

echo "[oem] Customization complete."
exit 0
repack_baseos.sh#
The following listing shows the reference repack_baseos.sh script:
#!/bin/bash
set -e

# Build steps:
# 1. Get the BaseOS ISO File, no download option is provided in this script.
# 2. Provide the -iso <ISO_FILE> argument.
# 3. Run the script.
# 4. Flash and test the repacked ISO.

# Parse command-line arguments
ISO_FILE=""
ISO_ROOT="$PWD/iso-root"
VOLUME_ID=""
DEBUG=false
USE_EXISTING=true # Default: reuse existing valid files
SCRIPT_DIR="$(cd "$(dirname "${BASH_SOURCE[0]}")" && pwd)"
OEMDATA_SRC="$SCRIPT_DIR/oemdata"

# In-place sed: GNU sed uses "sed -i CMD"; BSD/macOS requires "sed -i '' CMD".
sed_i() {
   if sed --version >/dev/null 2>&1; then
       sed -i "$@"
   else
       sed -i '' "$@"
   fi
}

# Function to display help message
show_help() {
   cat <<EOF
Usage: $(basename "$0") [-iso <ISO_FILE>] [-iso-root <ISO_ROOT_DIR>]
 [-volume-id <VOLUME_ID>] [-clean] [-debug] [-h]

This script performs the following actions:

1. Extracts the ISO to the -iso-root directory using xorriso
2. Extracts the EFI system partition from the ISO using dpkg-deb
3. Modifies GRUB configuration to remove the Installation Options submenu
4. Copies cloud-init to <iso-root>/oemdata/cloud-init/ and oem-iso-cfg.sh to
   <iso-root>/oemdata/ from repo oemdata
5. Repacks the ISO with the updated packages using xorriso

Options:
 -iso <ISO_FILE>         (Optional) Path to local ISO file
 -iso-root <ISO_ROOT>    (Optional) Directory where the ISO will be extracted
                         Default: ./iso-root
 -volume-id <VOLUME_ID>  (Optional) Volume ID for the repacked ISO
                         (max 32 characters)
                         Default: First 32 characters of ISO filename (without .iso)
 -clean                  (Optional) Remove extraction directories after
                         repacking
                         Default: keep extraction directories for reuse
 -debug                  (Optional) Enable verbose debug output
 -h, --help              Show this help message and exit

Note: Extraction directories are kept by default for reuse in subsequent runs.

Example:
 $(basename "$0")
 $(basename "$0") -iso /path/to/local-DGXOS.iso
 $(basename "$0") -iso /path/to/local-DGXOS.iso -iso-root /tmp/my-iso-root
 $(basename "$0") -clean
 $(basename "$0") -volume-id "DGXOS-CUSTOM"
 $(basename "$0") -debug

EOF
}

while [[ $# -gt 0 ]]; do
   case "$1" in
       -iso)
           ISO_FILE="$2"
           shift 2
           ;;
       -iso-root)
           ISO_ROOT="$2"
           shift 2
           ;;
       -volume-id)
           VOLUME_ID="$2"
           shift 2
           ;;
       -clean)
           USE_EXISTING=false
           shift
           ;;
       -debug)
           DEBUG=true
           shift
           ;;
       -h | --help)
           show_help
           exit 0
           ;;
       *)
           echo "Error: Unknown option '$1'"
           echo "Use -h or --help for usage information"
           exit 1
           ;;
   esac
done

# Enable verbose output if debug mode is on
if [[ "$DEBUG" == "true" ]]; then
   set -x
   VERBOSE_OUTPUT="/dev/stdout"
else
   VERBOSE_OUTPUT="/dev/null"
fi

check_iso() {

   # Validate ISO file exists
   if [[ ! -f "$ISO_FILE" ]]; then
       echo "Error: ISO file '$ISO_FILE' does not exist"
       exit 1
   fi

   # Generate default VOLUME_ID if not provided
   if [[ -z "$VOLUME_ID" ]]; then
       # Get the basename without path and remove .iso extension
       ISO_BASENAME=$(basename "$ISO_FILE" .iso)
       # Take first 32 characters
       VOLUME_ID="${ISO_BASENAME:0:32}"
       # Trim trailing special characters to end on alphanumeric
       VOLUME_ID=$(echo "$VOLUME_ID" | sed 's/[^a-zA-Z0-9]*$//')
   fi

   # Validate VOLUME_ID length
   if [[ ${#VOLUME_ID} -gt 32 ]]; then
       echo "Error: Volume ID must be 32 characters or less"
       echo "Current volume ID: '$VOLUME_ID' (${#VOLUME_ID} characters)"
       exit 1
   fi

   if [[ -z "$VOLUME_ID" ]]; then
       echo "Error: Volume ID cannot be empty"
       exit 1
   fi

   echo "=========================================="
   echo "DGX OS ISO Update Script"
   echo "=========================================="
   echo "ISO File: $ISO_FILE"
   echo "ISO Root: $ISO_ROOT"
   echo "Volume ID: $VOLUME_ID"
   echo "=========================================="
}

# Step 1: Extract the ISO using xorriso
extract_iso() {
   echo ""
   echo "Step 1: Extracting ISO to $ISO_ROOT..."
   # Make directory writable before removing (xorriso extracts with read-only
   # permissions)
   if [[ -d "$ISO_ROOT" ]]; then
       chmod -R u+w "$ISO_ROOT" 2>/dev/null || true
   fi
   rm -rf "$ISO_ROOT"
   mkdir -p "$ISO_ROOT"
   if [[ "$DEBUG" == "true" ]]; then
       xorriso -osirrox on -indev "$ISO_FILE" -extract / "$ISO_ROOT"
   else
       xorriso -osirrox on -indev "$ISO_FILE" -extract / "$ISO_ROOT" \
           >"$VERBOSE_OUTPUT" 2>&1
   fi
   echo "ISO extraction complete."
}

# Step 2: Extract the EFI system partition
extract_debs() {
   echo ""
   echo "Step 2: Extracting EFI system partition..."
   CDBOOT_EXTRACT="$PWD/cdboot-extract"
   # Make directory writable before removing
   if [[ -d "$CDBOOT_EXTRACT" ]]; then
       chmod -R u+w "$CDBOOT_EXTRACT" 2>/dev/null || true
   fi
   rm -rf "$CDBOOT_EXTRACT"
   mkdir -p "$CDBOOT_EXTRACT"
   if [[ "$DEBUG" == "true" ]]; then
       dpkg-deb -x "$ISO_ROOT"/pool/main/c/cd-boot-images-arm64/cd-boot-images-arm64*.deb "$CDBOOT_EXTRACT"
   else
       dpkg-deb -x "$ISO_ROOT"/pool/main/c/cd-boot-images-arm64/cd-boot-images-arm64*.deb "$CDBOOT_EXTRACT" \
           >"$VERBOSE_OUTPUT" 2>&1
   fi
   echo "EFI system partition extracted to $CDBOOT_EXTRACT."
}

# Step 3: Modify GRUB configuration
modify_grub() {
   echo ""
   echo "Step 3: Modifying GRUB configuration..."
   GRUB_CFG="$ISO_ROOT/boot/grub/grub.cfg"

   if [[ -f "$GRUB_CFG" ]]; then
       # Create a backup
       cp "$GRUB_CFG" "${GRUB_CFG}.backup"

       # Remove the "Installation Options" submenu section (from
       # 'submenu "Installation Options"' to its closing '}')
       # This uses sed to delete from the pattern to the matching closing brace
       sed_i '/^submenu "Installation Options" {$/,/^}$/d' "$GRUB_CFG"

       # Remove this one supported added in BaseOS. Blacklist the driver run on
       # GA1.05 firmware with 6.17+ kernel.
       sed_i 's/module_blacklist=r8169/module_blacklist=r8169 \
           initcall_blacklist=tegra234_cbb_init/g' "$GRUB_CFG"

       echo "  ✓ Removed 'Installation Options' submenu from GRUB configuration"
       echo "  Backup saved to: ${GRUB_CFG}.backup"
   else
       echo "  ⚠ Warning: GRUB configuration file not found at $GRUB_CFG"
   fi
}

# Step 4: Copy OEM cloud-init and oem-iso-cfg.sh into ISO oemdata
install_oemdebs() {
   echo ""
   echo "Step 4: Installing cloud-init into ISO oemdata..."

   # Copy repo oemdata/cloud-init/ (full tree: seed/, cfg.d/, etc.) and
   # oem-iso-cfg.sh so they are on the repacked ISO
   if [[ -d "$OEMDATA_SRC" ]]; then
       if [[ -d "$OEMDATA_SRC/cloud-init" ]]; then
           echo "Copying OEM cloud-init tree from $OEMDATA_SRC/cloud-init to ISO..."
           rm -rf "$ISO_ROOT/oemdata/cloud-init"
           cp -a "$OEMDATA_SRC/cloud-init" "$ISO_ROOT/oemdata/cloud-init"
           echo "  ✓ cloud-init directory copied (seed/, cfg.d/, and all files)."
       fi
       if [[ -f "$OEMDATA_SRC/oem-iso-cfg.sh" ]]; then
           echo "Copying oem-iso-cfg.sh to ISO..."
           cp "$OEMDATA_SRC/oem-iso-cfg.sh" "$ISO_ROOT/oemdata/"
           echo "  ✓ oem-iso-cfg.sh copied."
       fi
   else
       echo "Warning: Repo oemdata not found at $OEMDATA_SRC" \
           "(cloud-init will not be added)."
   fi

   echo "=========================================="
   echo "OEM cloud-init contents (used by cloud-init service at first boot):"
   find "$ISO_ROOT/oemdata/cloud-init" -type f 2>/dev/null | sort || true
   echo "=========================================="
}

# Step 5: Repack the ISO
repack_iso() {
   echo ""
   echo "Step 5: Repacking the ISO..."
   OUTPUT_ISO="$PWD/${VOLUME_ID}-repacked-$(date +%Y-%m-%d-%H-%M-%S).iso"
   if [[ "$DEBUG" == "true" ]]; then
       xorriso -as mkisofs \
           -iso-level 3 \
           -allow-lowercase \
           -volid "$VOLUME_ID" \
           -J \
           -joliet-long \
           -l \
           -c boot/boot.cat \
           -partition_offset 16 \
           -append_partition 2 0xef \
               "$CDBOOT_EXTRACT/usr/share/cd-boot-images-arm64/images/boot/grub/efi.img" \
           -e --interval:appended_partition_2:all:: \
           -no-emul-boot \
           -partition_cyl_align all \
           -o "$OUTPUT_ISO" \
           "$ISO_ROOT"
   else
       xorriso -as mkisofs \
           -iso-level 3 \
           -allow-lowercase \
           -volid "$VOLUME_ID" \
           -J \
           -joliet-long \
           -l \
           -c boot/boot.cat \
           -partition_offset 16 \
           -append_partition 2 0xef \
               "$CDBOOT_EXTRACT/usr/share/cd-boot-images-arm64/images/boot/grub/efi.img" \
           -e --interval:appended_partition_2:all:: \
           -no-emul-boot \
           -partition_cyl_align all \
           -o "$OUTPUT_ISO" \
           "$ISO_ROOT" >"$VERBOSE_OUTPUT" 2>&1
   fi
   echo ""
   echo "=========================================="
   echo "ISO repacking complete!"
   echo "Output ISO: $OUTPUT_ISO"
   echo "=========================================="
}

# Step 6: Cleanup
cleanup() {
   echo ""
   echo "Step 6: Cleaning up..."
   if [[ "$USE_EXISTING" == "false" ]]; then
       # -clean flag was used: thorough cleanup of everything
       echo "Performing thorough cleanup (-clean mode)..."

       # Clean up extraction directories
       if [[ -d "$ISO_ROOT" ]]; then
           chmod -R u+w "$ISO_ROOT" 2>/dev/null || true
           rm -rf "$ISO_ROOT"
           echo "  - Removed ISO extraction directory: $ISO_ROOT"
       fi

       if [[ -d "$CDBOOT_EXTRACT" ]]; then
           chmod -R u+w "$CDBOOT_EXTRACT" 2>/dev/null || true
           rm -rf "$CDBOOT_EXTRACT"
           echo "  - Removed CD boot extraction directory: $CDBOOT_EXTRACT"
       fi

       echo "Cleanup complete. All temporary files removed."
   fi

   echo ""
   echo "=========================================="
   echo "Extraction directories preserved for reuse:"
   if [[ -d "$ISO_ROOT" ]]; then
       echo "  - ISO extraction: $ISO_ROOT"
   fi
   if [[ -d "$CDBOOT_EXTRACT" ]]; then
       echo "  - CD boot extraction: $CDBOOT_EXTRACT"
   fi
   if [[ -f "$OUTPUT_ISO" ]]; then
       echo "  - Repacked ISO: $OUTPUT_ISO"
   fi
   echo "=========================================="
}

main() {
   check_iso
   extract_iso
   extract_debs
   modify_grub
   install_oemdebs
   repack_iso
   cleanup
}

main
repack_fastos.sh#
The following listing shows the reference repack_fastos.sh script:
#!/usr/bin/env bash
set -euo pipefail

usage() {
 cat <<'EOF'
Usage:
 repack_fastos.sh -f <fastos_tarball> -c <cloud_init_directory>
 [-o <output_tarball>] [-l <xz_level>]

Required:
 -f  Path to input FastOS USB tarball (e.g. usb.customer-1.135.33.tar.gz)
 -c  Path to cloud-init directory containing:
     - seed/meta-data
     - seed/user-data
     - cfg.d/*

Optional:
 -o  Output tarball path (default: <input>-cloudinit.tar.gz beside input)
 -l  xz compression level 0-9 for rebuilt fastos parts (default: 3)
 -h  Show help

Example:
 ./repack_fastos.sh \
   -f $PATH_TO_FASTOS/usb.customer-1.135.33.tar.gz \
   -c $PATH_TO_cloud-init/oemdata/cloud-init
EOF
}

FASTOS_TARBALL=""
CLOUD_INIT_DIR=""
OUTPUT_TARBALL=""
XZ_LEVEL="3"

while getopts ":f:c:o:l:h" opt; do
 case "${opt}" in
   f) FASTOS_TARBALL="${OPTARG}" ;;
   c) CLOUD_INIT_DIR="${OPTARG}" ;;
   o) OUTPUT_TARBALL="${OPTARG}" ;;
   l) XZ_LEVEL="${OPTARG}" ;;
   h)
     usage
     exit 0
     ;;
   :)
     echo "ERROR: -${OPTARG} requires an argument."
     usage
     exit 1
     ;;
   \?)
     echo "ERROR: Invalid option: -${OPTARG}"
     usage
     exit 1
     ;;
 esac
done

if [[ -z "${FASTOS_TARBALL}" || -z "${CLOUD_INIT_DIR}" ]]; then
 echo "ERROR: -f and -c are required."
 usage
 exit 1
fi

if [[ ! "${XZ_LEVEL}" =~ ^[0-9]$ ]]; then
 echo "ERROR: -l must be a single digit 0-9."
 exit 1
fi

FASTOS_TARBALL="$(realpath "${FASTOS_TARBALL}")"
CLOUD_INIT_DIR="$(realpath "${CLOUD_INIT_DIR}")"

if [[ ! -f "${FASTOS_TARBALL}" ]]; then
 echo "ERROR: Input tarball not found: ${FASTOS_TARBALL}"
 exit 1
fi

if [[ ! -d "${CLOUD_INIT_DIR}" ]]; then
 echo "ERROR: cloud-init directory not found: ${CLOUD_INIT_DIR}"
 exit 1
fi

for req_file in "seed/meta-data" "seed/user-data"; do
 if [[ ! -f "${CLOUD_INIT_DIR}/${req_file}" ]]; then
   echo "ERROR: Missing required file: ${CLOUD_INIT_DIR}/${req_file}"
   exit 1
 fi
done

if [[ ! -d "${CLOUD_INIT_DIR}/cfg.d" ]]; then
 echo "ERROR: Missing required directory: ${CLOUD_INIT_DIR}/cfg.d"
 exit 1
fi

if [[ -z "${OUTPUT_TARBALL}" ]]; then
 input_dir="$(dirname "${FASTOS_TARBALL}")"
 input_name="$(basename "${FASTOS_TARBALL}")"
 input_base="${input_name%.tar.gz}"
 OUTPUT_TARBALL="${input_dir}/${input_base}-cloudinit.tar.gz"
fi

WORKDIR="$(mktemp -d /tmp/repack-fastos.XXXXXX)"
MNT_DIR="${WORKDIR}/mnt-fastos-root"

cleanup() {
 set +e
 if command -v mountpoint >/dev/null 2>&1 && mountpoint -q "${MNT_DIR}"; then
   sudo umount "${MNT_DIR}"
 fi
 rm -rf "${WORKDIR}"
}
trap cleanup EXIT

echo "[1/8] Extracting input tarball..."
tar -xzf "${FASTOS_TARBALL}" -C "${WORKDIR}"

USBIMG_DIR=""
for d in "${WORKDIR}"/*; do
 if [[ -d "${d}/usb" ]]; then
   USBIMG_DIR="${d}"
   break
 fi
done

if [[ -z "${USBIMG_DIR}" ]]; then
 echo "ERROR: Could not find extracted directory containing usb/."
 exit 1
fi

USB_DIR="${USBIMG_DIR}/usb"

shopt -s nullglob
part_files=( "${USB_DIR}"/fastos.part* )
shopt -u nullglob

if [[ "${#part_files[@]}" -eq 0 ]]; then
 echo "ERROR: No fastos.part* files found in ${USB_DIR}"
 exit 1
fi

if [[ -f "${USB_DIR}/fastos.partaa" ]]; then
 chunk_size_bytes="$(stat -c%s "${USB_DIR}/fastos.partaa")"
else
 chunk_size_bytes="$(stat -c%s "${part_files[0]}")"
fi

echo "[2/8] Reconstructing fastos.part2.img from split xz stream..."
cat "${part_files[@]}" | xz -d -c > "${USB_DIR}/fastos.part2.img"

echo "[3/8] Mounting image..."
mkdir -p "${MNT_DIR}"
sudo mount -o loop "${USB_DIR}/fastos.part2.img" "${MNT_DIR}"

echo "[4/8] Injecting cloud-init files..."
sudo mkdir -p "${MNT_DIR}/var/lib/cloud/seed/nocloud"
sudo mkdir -p "${MNT_DIR}/etc/cloud/cloud.cfg.d"

sudo install -m 0644 \
 "${CLOUD_INIT_DIR}/seed/meta-data" \
 "${MNT_DIR}/var/lib/cloud/seed/nocloud/meta-data"

sudo install -m 0644 \
 "${CLOUD_INIT_DIR}/seed/user-data" \
 "${MNT_DIR}/var/lib/cloud/seed/nocloud/user-data"

cfg_count=0
for cfg in "${CLOUD_INIT_DIR}"/cfg.d/*; do
 if [[ -f "${cfg}" ]]; then
   sudo install -m 0644 "${cfg}" \
     "${MNT_DIR}/etc/cloud/cloud.cfg.d/$(basename "${cfg}")"
   cfg_count=$((cfg_count + 1))
 fi
done

if [[ "${cfg_count}" -eq 0 ]]; then
 echo "ERROR: No files found under ${CLOUD_INIT_DIR}/cfg.d/"
 exit 1
fi

sudo rm -f "${MNT_DIR}/etc/cloud/cloud-init.disabled"
sync

echo "[5/8] Unmounting image..."
sudo umount "${MNT_DIR}"

echo "[6/8] Re-compressing and splitting fastos parts (xz -${XZ_LEVEL})..."
# Remove only split chunks; keep fastos.part2.img as compression input.
rm -f "${USB_DIR}"/fastos.part??
xz -T0 "-${XZ_LEVEL}" -c "${USB_DIR}/fastos.part2.img" | \
  split -b "${chunk_size_bytes}" - "${USB_DIR}/fastos.part"
# Keep usb layout compatible with CreateUSBKey.sh expectations.
rm -f "${USB_DIR}/fastos.part2.img"

echo "[7/8] Regenerating checksum.txt..."
(
 cd "${USBIMG_DIR}"
 : > checksum.txt
 while IFS= read -r -d '' rel_file; do
   sha256sum "${rel_file}" >> checksum.txt
 done < <(find usb -type f -print0 | sort -z)
)

echo "[8/8] Repacking output tarball..."
mkdir -p "$(dirname "${OUTPUT_TARBALL}")"
tar -czf "${OUTPUT_TARBALL}" -C "${WORKDIR}" "$(basename "${USBIMG_DIR}")"

echo "Done."
echo "Output: ${OUTPUT_TARBALL}"
echo "Chunk size used for split (bytes): ${chunk_size_bytes}"
echo "Tip: verify with: tar -tzf \"${OUTPUT_TARBALL}\" | rg \"usb/fastos.part\""
Cloud-init Configurations#
The following listings show example OEM cloud-init files on the ISO
under oemdata/cloud-init/. oem-iso-cfg.sh copies these files to
the installed system during installation.
oemdata/cloud-init/cfg.d/50-dgx-base-audit.cfg#
The following file enables provisioning audit logging:
#cloud-config
output:
 all: "| tee -a /var/log/cloud-init-provisioning.log"


write_files:
 - path: /var/lib/cloud/scripts/per-instance/50-dgx-base-audit.sh
   permissions: '0755'
   content: |
     #!/bin/sh
     set -eu
     mkdir -p /var/log/provisioning
     audit=/var/log/provisioning/provisioning_audit.txt
     {
       echo "Base image cloud-init completed at: $(date -u +%Y-%m-%dT%H:%M:%SZ)"
       echo "Hostname: $(hostname)"
       echo "Datasource: $(cloud-init query datasource || true)"
       echo "Instance ID: $(cloud-init query instance_id || true)"
     } > "$audit"
     chmod 0644 "$audit"
oemdata/cloud-init/cfg.d/50-oem-default-user.cfg#
The following file sets the default system user:
# Use YOUR_USERNAME as the default user instead of ubuntu (developer flavor).
# Ensures the console and system default user is YOUR_USERNAME so login works
# after install.
system_info:
 default_user:
   name: YOUR_USERNAME
   groups: [sudo]
   shell: /bin/bash
   lock_passwd: false
oemdata/cloud-init/cfg.d/99-oem-nocloud.cfg#
The following file configures cloud-init to use the NoCloud datasource:
# Tell cloud-init to use NoCloud and read seed from /var/lib/cloud/seed/nocloud/
# Without this, cloud-init reports DataSourceNone and ignores the seed files.
datasource_list: [NoCloud]
datasource:
 NoCloud:
   seedfrom: file:///var/lib/cloud/seed/nocloud/
oemdata/cloud-init/seed/meta-data#
The following file sets the cloud-init instance identifier:
# instance-id is used by cloud-init as a unique instance identifier.

instance-id: oem-spark-01
oemdata/cloud-init/seed/user-data#
The OEMDATA runcmd entries run in one shell script on the target.
The first multiline block defines an EXIT trap to unmount
OEMDATA and create cloud-init.disabled, copies hook.sh to
/tmp for execution (with OEM_MNT exported so the hook still
resolves paths on the mounted partition), and removes the copy afterward.
The next block checks for oem-hook-pending-reboot (when hook.sh
exits 1) and schedules a delayed reboot.
#cloud-config
# Default user(YOUR_USERNAME:YOUR_PASSWORD)

growpart:
  mode: 'off'

no_ssh_fingerprints: true
resize_rootfs: false

# Allow password auth for console and SSH (required for YOUR_USERNAME login)
ssh_pwauth: true

# Create default user YOUR_USERNAME with password YOUR_PASSWORD
# Use hashed password so login works reliably (chpasswd as backup)
# **** REMOVE BOTH USERS AND CHPASSWD IF USER WANT TO RUN OOBE ****
users:
  - name: YOUR_USERNAME
    groups: [sudo]
    shell: /bin/bash
    lock_passwd: false
    # SHA-512 hash for password "YOUR_PASSWORD" (random 16-char salt)
    hashed_passwd: #GET_WITH_THIS_COMMAND <openssl passwd -6 -salt \
      random_16-char_salt "YOUR_PASSWORD">

chpasswd:
  expire: false
  users:
    - name: YOUR_USERNAME
      password: YOUR_PASSWORD
      type: text

runcmd:
  # hostnamectl can fail on first boot if systemd-hostnamed/D-Bus is not ready
  # yet; do not rely on it alone.
  - |
    echo YOUR_USERNAME > /etc/hostname
    hostname YOUR_USERNAME 2>/dev/null || true
    if grep -qE '^127\.0\.1\.1[[:space:]]+YOUR_USERNAME' /etc/hosts 2>/dev/null; then
      :
    elif grep -qE '^127\.0\.1\.1' /etc/hosts 2>/dev/null; then
      sed -i 's/^127\.0\.1\.1.*/127.0.1.1 YOUR_USERNAME/' /etc/hosts
    else
      echo "127.0.1.1 YOUR_USERNAME" >> /etc/hosts
    fi
    hostnamectl set-hostname YOUR_USERNAME 2>/dev/null || true
  - [ sh, -c, 'userdel ubuntu 2>/dev/null || true' ]
  - [ sh, -c, 'rm -rf /home/ubuntu 2>/dev/null || true' ]
  - |
    echo "OEM cloud-init seed ran at $(date -Iseconds)" \
      >> /var/log/oem-cloud-init-seed.log
  - [ chmod, '0644', /var/log/oem-cloud-init-seed.log ]
  - |
    mkdir -p /etc/ssh/sshd_config.d
    printf '%s\n' 'PasswordAuthentication yes' \
      'ChallengeResponseAuthentication no' \
      > /etc/ssh/sshd_config.d/99-oem-password-auth.conf
    systemctl reload sshd 2>/dev/null || true
  # Mount USB data partition (label OEMDATA) and run hook.sh if present
  # (hook installs debs/firmware)
  - |
    OEM_MNT=/mnt/oemdata
    HOOK_RUN=/tmp/oemdata-hook.sh
    NET_HOOK=/tmp/network-hook.sh
    HOOK_EXECUTED=0
    mkdir -p "$OEM_MNT"
    # One trap for all normal completion: umount + disable cloud-init on next boots.
    # Do not use "exit" here: cloud-init shellifies all runcmd items into one /bin/sh
    # script; exit would skip every later runcmd line (e.g. pending-reboot
    # check) before the EXIT trap runs.
    # Do not use "set -e" in this block: if sync/mkdir/touch after the hook
    # fails, the shell would exit before the post-hook runcmd; EXIT would still
    # run _oemdata_exit (cloud-init.disabled) but the pending-reboot log/reboot
    # would never run.
    _oemdata_exit() {
      echo "OEMDATA exit trap: disabling cloud-init and unmounting OEMDATA"
      umount "$OEM_MNT" 2>/dev/null || true
      rmdir "$OEM_MNT" 2>/dev/null || true
      mkdir -p /etc/cloud
      touch /etc/cloud/cloud-init.disabled
    }
    _run_oem_hook() {
      _src="$1"
      _origin="$2"
      cp -f "$_src" "$HOOK_RUN" || return 1
      chmod 700 "$HOOK_RUN"
      echo "Running OEM hook from $HOOK_RUN (source: $_origin)"
      set +e
      export OEM_MNT
      sh "$HOOK_RUN"
      _hook_rc=$?
      rm -f "$HOOK_RUN"
      HOOK_EXECUTED=1
      if [ "$_hook_rc" -eq 1 ]; then
        echo "mirror setup success"
        sync
        mkdir -p /var/lib/oem
        touch /var/lib/oem/oem-hook-pending-reboot
      elif [ "$_hook_rc" -ne 0 ]; then
        echo "OEM hook exited with code $_hook_rc"
      fi
      return 0
    }
    _iface_ipv4() {
      ip -4 -o addr show dev "$1" 2>/dev/null | awk '{print $4}' | \
        cut -d/ -f1 | head -n1
    }
    _download_hook() {
      _url="$1"
      _out="$2"
      if command -v curl >/dev/null 2>&1; then
        curl -fsSL --connect-timeout 5 --max-time 20 "$_url" -o "$_out"
      elif command -v wget >/dev/null 2>&1; then
        wget -q -T 20 -O "$_out" "$_url"
      else
        echo "Neither curl nor wget is available to download network hook."
        return 1
      fi
    }
    trap '_oemdata_exit' EXIT
    if mount -L OEMDATA "$OEM_MNT" 2>/dev/null; then
      echo "OEMDATA partition found, checking for hook.sh"
      if [ -f "$OEM_MNT/hook.sh" ]; then
        _run_oem_hook "$OEM_MNT/hook.sh" "OEMDATA"
      fi
    else
      echo "No OEMDATA partition found, skipping USB OEM hook."
      rmdir "$OEM_MNT" 2>/dev/null || true
    fi
  # cloud-init.disabled is created in OEM block EXIT trap above
  # (covers no-OEMDATA path too).
  # Reboot if OEM hook requested it (hook exit 1). Runs in same shellified script
  # after OEM block (no "exit" above).
  - |
    echo "OEM post-hook: checking pending-reboot marker"
    if [ -f /var/lib/oem/oem-hook-pending-reboot ]; then
      rm -f /var/lib/oem/oem-hook-pending-reboot
      echo "reboot required (OEM mirror apt/fwupd updates); scheduling reboot" \
        "(+30s so cloud-init can finish modules-final)"
      # EXIT trap may not run before reboot; disable cloud-init and unmount
      # OEMDATA now.
      _oemdata_exit
      sync
      # Immediate reboot races remaining modules-final (e.g. cc_keys_to_console)
      # and can log SystemExit:1.
      # Background sleep + reboot: runcmd exits, cloud-init completes, then reboot
      # (shutdown +m is minute-only).
      ( sleep 30; /sbin/reboot ) </dev/null >/dev/null 2>&1 &
    else
      echo "reboot not required (no OEM pending-reboot marker)"
    fi
Validation Scenarios and Feedback Questions#
The validation scenarios in this section align with Table 1 (Installation and Update Patterns) and the procedures from Customize the BaseOS Image with repack_baseos.sh through Reference: OEM Scripts and cloud-init. Complete the scenario that matches your deployment. For log-based and post-installation verification that complements these flows, refer to Verify the Customization and Installation Outcomes.
How Scenarios Map to This Document
The following table maps each validation scenario to the related installation patterns and sections in this topic:
Scenario |
Related Table 1 patterns |
Where to work |
|---|---|---|
Customized BaseOS ISO |
Cloud-init OEM seed on the repacked ISO (with or without OOBE); |
Customize the BaseOS Image with repack_baseos.sh; Cloud-init Integration; During and After an ISO-Based Installation; ISO Install: oem-iso-cfg.sh, repack_baseos.sh, repack_fastos.sh, and OEM cloud-init on the ISO. |
Air-gapped USB installation |
USB-hosted packages and firmware or local server sources through |
USB Partitioning and the OEMDATA Layout; Host a Minimal APT Repository and Firmware Tree; On the DGX Spark Client: hook.sh and OEMDATA Files; First Boot: OEMDATA hook.sh and cloud-init Seed. |
Local repository and application updates |
Curated or mirrored APT layout; can extend beyond first-boot automation. |
Host a Minimal APT Repository and Firmware Tree; On the DGX Spark Client: hook.sh and OEMDATA Files; After Mirror- or USB-Driven Updates. If your application update process is separate from the ISO/ |
Validation Scenarios#
The following are example scenarios. Complete each one that matches your deployment to validate your custom installation workflow:
Customized BaseOS ISO (repack + cloud-init on the image): Build a customized BaseOS installation image from the latest release you are targeting and verify that the customization is present on the installed system.
Refer to Customize the BaseOS Image with repack_baseos.sh and place OEM cloud-init under
oemdata/cloud-init/as in ISO Install: oem-iso-cfg.sh, repack_baseos.sh, repack_fastos.sh, and OEM cloud-init on the ISO. Adjustuser-dataandmeta-dataper Cloud-init Integration and the OOBE patterns in Table 1.Produce a flashable ISO using your NVIDIA-provided release workflow and
repack_baseos.sh(or an equivalent process) so the image includes your cloud-init seed.Add or verify cloud-init
user-dataandmeta-dataon the ISO (OEM seed paths as in ISO Install: oem-iso-cfg.sh, repack_baseos.sh, repack_fastos.sh, and OEM cloud-init on the ISO).Perform the installation from that ISO onto the target system (for example, by booting the repacked image from USB).
Verify users, packages, and configuration against expectations using During and After an ISO-Based Installation.
Air-gapped installation using USB (
OEMDATA, optional local mirror): Perform the installation using installation media and, where applicable, Debian packages and firmware supplied fromOEMDATAand/or your network mirror.
Prepare the USB layout per USB Partitioning and the OEMDATA Layout. Host packages and firmware using Host a Minimal APT Repository and Firmware Tree, then configure the client with
hook.shand optional URL files as in On the DGX Spark Client: hook.sh and OEMDATA Files. Reference script: First Boot: OEMDATA hook.sh and cloud-init Seed.Wipe or prepare the USB drive if your process requires it (reflashing can replace the entire device).
Obtain Debian packages and firmware that your process permits on the disconnected network:
Use the APT or package acquisition tools your OEM or NVIDIA program supplies (for example, an APT downloader or an approved transfer method).
Use the program manifest (or an equivalent bill of materials) to determine which software and firmware to stage and from which approved sources.
NVIDIA may supply a baseline manifest to the OEM; the OEM may extend it for firmware or other deltas.
Populate
OEMDATA(and any server tree) using the directory layout and URLs described in USB Partitioning and the OEMDATA Layout and Host a Minimal APT Repository and Firmware Tree as applicable (debs/,firmware/,apt-repo.url,lvfs-mirror.url, and so on).Ensure that cloud-init on the ISO or target uses the sample
runcmdflow when you rely on this information:hook.shstays onOEMDATA, but first boot runs a copy under/tmpwithOEM_MNTset to the mount (First Boot: OEMDATA hook.sh and cloud-init Seed, oemdata/cloud-init/seed/user-data).
Perform installation using your customized ISO and attached
OEMDATAmedia as described in scenario 1 and USB Partitioning and the OEMDATA Layout.Verify packages, firmware, and customizations using During and After an ISO-Based Installation and After Mirror- or USB-Driven Updates, as appropriate.
Local repository and application updates: Use your standard IT administration tools to host a local APT repository, then distribute application software updates (application packages only; exclude firmware, kernel, and driver components unless your policy permits them).
The minimal repository layout in Host a Minimal APT Repository and Firmware Tree shows HTTP-served package trees; On the DGX Spark Client: hook.sh and OEMDATA Files describes how to wire
OEMDATAURL files on the client. Details that are specific to your application update delivery mechanism (for example, whichmeta-dataor cloud-init files to change and how to publish packages) might be specified outside this document; use Host a Minimal APT Repository and Firmware Tree and On the DGX Spark Client: hook.sh and OEMDATA Files as the reference model for repository layout and client configuration.In cloud-init
meta-data(or the configuration channel your update process uses), change repository URLs from public endpoints to your local mirror URLs in accordance with your program requirements.Deploy the updated
user-dataandmeta-data(or equivalent) to the device according to your update process.Publish the application packages (or your approved subset) to the local repository.
Verify that the device receives the expected package updates (use After Mirror- or USB-Driven Updates for verification after updates driven by
hook.shor the mirror, where applicable).