ConnectX-7 I/O Replacement#
This topic describes how to replace the ConnectX-7 I/O card in the NVIDIA DGX™ B200 system.
ConnectX-7 I/O Card Replacement Overview#
This is a high-level overview of the procedure to replace a ConnectX-7 I/O card.
Identify the failed card.
Get a replacement ConnectX-7 I/O card from NVIDIA Enterprise Support.
Ensure the system is shut down.
If cables do not reach, label all the cables and unplug them from the motherboard tray.
Slide the motherboard out until it locks in place.
Open the rear compartment.
Pull out the card directly above the failed ConnectX-7 to make room for the procedure.
Pull out the ConnectX-7 I/O card.
Remove the IPEX cables from the failed card.
Install the IPEX cables to the new card.
Install the new ConnectX-7 I/O card.
Install the card that goes over the ConnectX-7 card.
Close the rear motherboard compartment.
Slide the motherboard back into the system.
Plug in all cables using the labels as a reference.
Power on the system.
Update the firmware if necessary and test the ConnectX-7 I/O card.
Send the failed unit to NVIDIA Enterprise Support using the packaging provided.
Prepare the System for Replacement#
Identify which I/O card to replace.
Use the
nvsmcommand or network tools to determine which card failed. After you have this information, contact NVIDIA Enterprise Support to get a replacement.When the new card arrives, power off the system.
Based on the
nvsmoutput, identify which card needs replacing, the card in slot 1 or slot 2.
Remove the I/O Card above the ConnectX-7 Card to be Replaced#
Pull out the motherboard tray and access the I/O door. Refer to Motherboard Tray - Opening and Closing the I/O Door for information about accessing the I/O door.
Remove the I/O card that is above the ConnectX-7 card. The card can be the M.2 boot drive assembly or a network interface card.
Refer to M.2 Boot Drive Assembly Replacement to remove the M.2 boot drive carrier.
The images at the preceding link show how to remove the boot drive carrier on the right, above the ConnectX-7 card in slot 2. If you need to replace the ConnectX-7 card in slot 1, follow the instructions, but use the thumbscrew on the left side of the motherboard tray.
Refer to Network Interface Card Replacement to remove the Ethernet NIC.
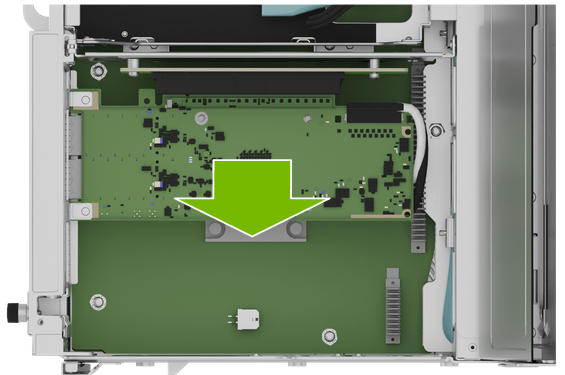
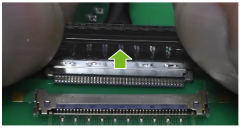
Remove the ConnectX-7 Card#
Pull the card out of the slot:
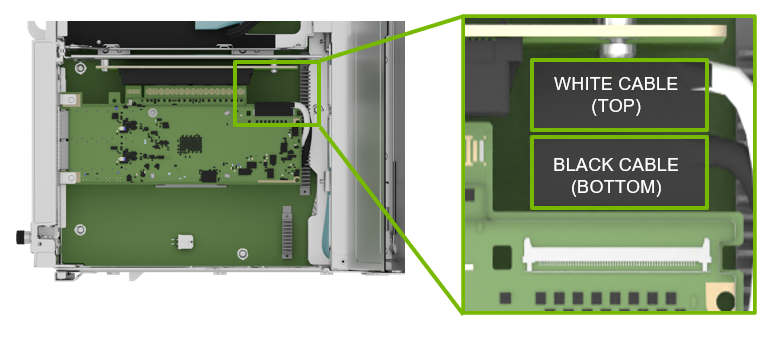
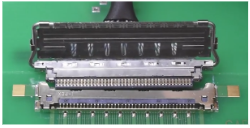
Before you pull the card too far, remove the white and black IPEX cables from the card.
The white cable connects to the top of the card and the black cable connects to the bottom (heatsink) of the card:
Follow the instructions in Remove an IPEX Cable to remove the IPEX connectors.
Remove an IPEX Cable#
Repeat this process for both white and black cables.
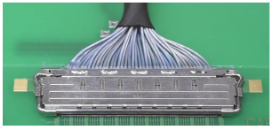
Locate the IPEX cable attached to the connector:
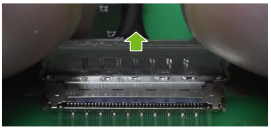
Lift the locking door:
Push the cable away from the connector:
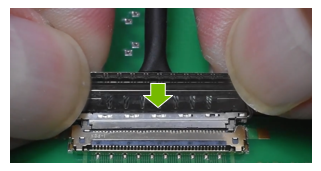
Install ConnectX-7 Card#
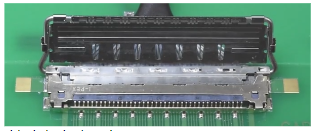
Attach the IPEX cables following the instructions in the figure:
The white cable connects to the top of the card and the black cable connects to the bottom (heatsink) of the card. These cables need to be installed before inserting the card.
Follow the instructions in Insert an IPEX Cable to insert the IPEX connectors.
Insert the card in the slot:
Note the two IPEX cables on the right side of the card.

Insert an IPEX Cable#
Repeat this process for both white and black cables.
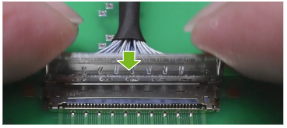
Align the IPEX cable to the connector:
Press the cable into the connector:
Confirm the cable is in the connector:
Close the latching mechanism:
Make sure the cable is locked to the connector on the board:
Install the I/O Card above the ConnectX-7 Card#
Reinstall the I/O card that is above the ConnectX-7 card. Refer to one of the two following procedures:
M.2 boot driver carrier. Refer to M.2 Boot Drive Assembly Replacement for more information.
Ethernet NIC. Refer to Network Interface Card Replacement for more information.
Close the motherboard tray I/O door and insert the motherboard tray. Refer to Motherboard Tray - Opening and Closing the I/O Door for more information.
Power on the System and Confirm the Replacement#
Power on and boot the system.
Update the firmware on the card.
For more information, refer to Updating the ConnectX-7 Firmware.
Use the
nvsmcommand to confirm that the system is operating correctly:sudo nvsm show health
Send the failed unit to NVIDIA Enterprise Support using the packaging provided.