Container Deployment
NVIDIA BlueField DPU Container Deployment Guide
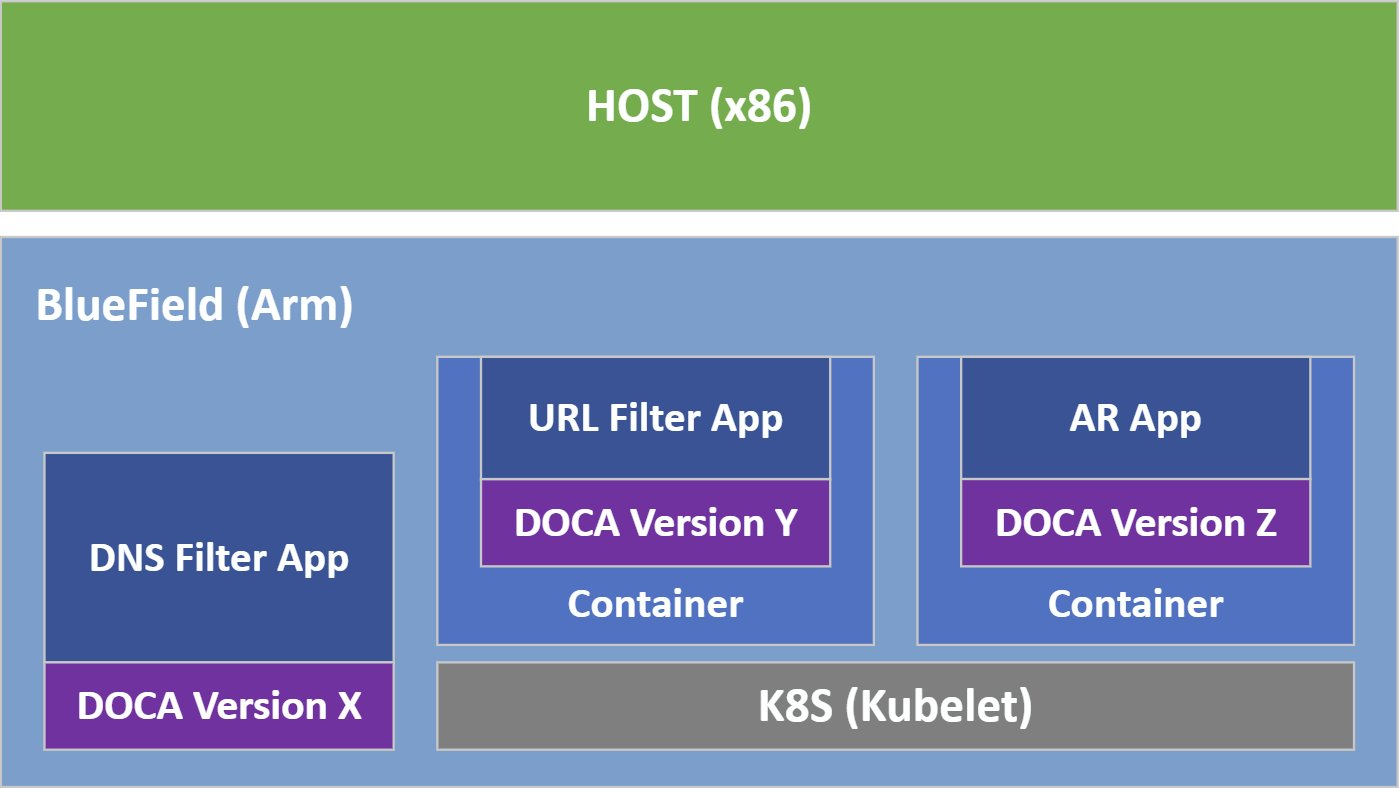
This document provides an overview and deployment configuration of DOCA containers for NVIDIA® BlueField® DPU.
DOCA containers allow for easy deployment of ready-made DOCA environments to the DPU, whether it is a DOCA service bundled inside a container and ready to be deployed, a DOCA application container to play with, or a development environment already containing the desired DOCA version.
Containerized environments enable the users to decouple DOCA programs from the underlying BlueField OS. Each container is pre-built with all needed libraries and configurations to match the specific DOCA version of the program at hand. One only needs to pick the desired version of the application or service and pull the ready-made container of that version from NVIDIA's container catalog.
The different DOCA containers are listed on NGC, NVIDIA's container catalog, and can be found under both the "DOCA" and "DPU" labels.
- Refer to the NVIDIA DOCA Installation Guide for details on how to install BlueField related software
- BlueField OS version required is 3.8.0 and higher (Ubuntu 20.04)
Deploying containers on top of the BlueField DPU requires the following setup sequence:
- Pull the container .yaml configuration files.
- Modify the container's .yaml configuration file.
- Deploy the container. The image is automatically pulled from NGC.
Some of the steps only need to be performed once, while others are required before the deployment of each container.
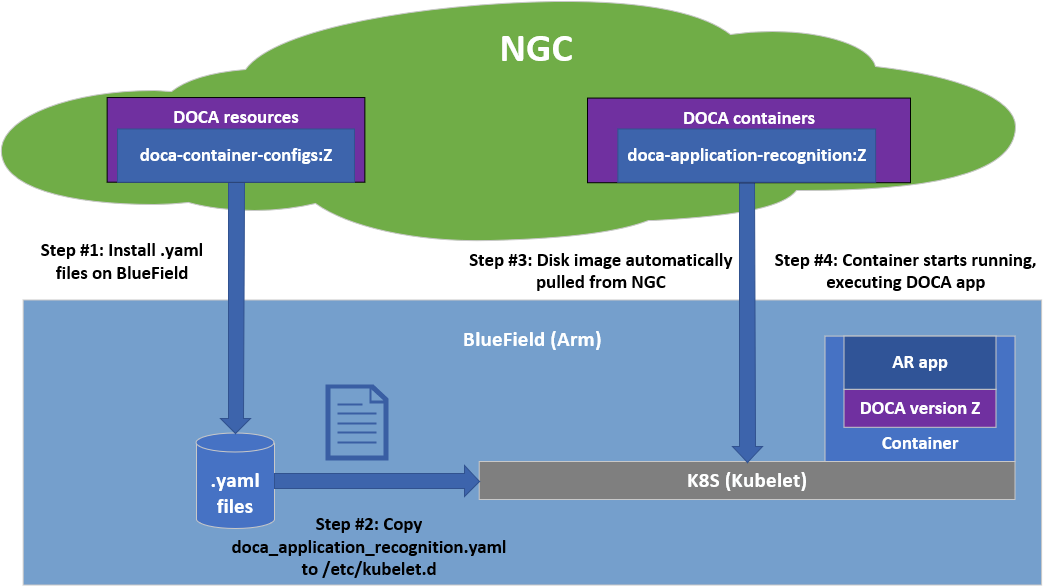
What follows is an example of the overall setup sequence using the DOCA application recognition (AR) container as an example.
3.1. Activate Container-related Services on DPU
This step is necessary only for BlueField OS versions prior to 3.9.0.
This step should only be performed once per DPU.
Containers are deployed on the BlueField using Kubernetes (K8S) using the standalone Kubelet service. To start and enable Kubelet and containerd, run:
            systemctl start kubelet
systemctl start containerd
systemctl enable kubelet
systemctl enable containerd
3.2. Pull Container YAML Configurations
This step pulls the .yaml configurations from NGC. If you have already performed this step for other DOCA containers you may skip to the next section.
Pulling the latest resource version can be done using the following command:
            # Pull the entire resource as a *.zip file
wget --content-disposition https://api.ngc.nvidia.com/v2/resources/nvidia/doca/doca_container_configs/versions/1.4.0/zip -O doca_container_configs_1.4.0.zip
# Unzip the resource
unzip -o doca_container_configs_1.4.0.zip -d doca_container_configs_1.4.0
More information about additional versions can be found in the NGC resource page.
The resource contains a configs directory, under which can be found a dedicated folder per DOCA version. For example, 1.3.0 will include all currently available .yaml configuration files for DOCA 1.3.0 containers.
3.3. Container-specific Instructions
Some containers require specific configuration steps for the resources used by the application running inside the container and modifications for the .yaml configuration file of the container itself.
Please refer to the container-specific instructions as listed under the container's respective page on NGC.
3.4. Spawn Container
Once the desired .yaml file is updated, simply copy the configuration file to Kubelet's input folder. Here is an example using the doca_application_recognition.yaml, corresponding to the DOCA AR application.
cp doca_application_recognition.yaml /etc/kubelet.d
Kubelet automatically pulls the container image from NGC and spawns a pod executing the container. In this example, the DOCA AR application starts executing right away, and its printouts would be seen via the container's logs.
3.5. Stop Container
The recommended way to stop a pod and its containers is as follows:
- Delete the .yaml configuration file so that Kubelet will stop the pod:
rm /etc/kubelet.d/<file name>.yaml
- Stop the pod directly (only if it still shows "Ready"):
crictl stopp <Pod ID>
- Once the pod stops, it may also be necessary to stop the container itself:
crictl stop <Container ID>
3.6. Useful Container Commands
- View currently active pods and their IDs (it might take up to 20 seconds for the pod to start):
crictl pods
- View currently active containers and their IDs:
crictl ps
- View all containers, including containers that recently finished their execution:
crictl ps -a
- Examine the logs of a given container:
crictl logs <Container ID>
- Attach a shell to a running container:
crictl exec -it <Container ID> /bin/bash
- Examine the Kubelet logs, in case something didn't work as expected:
journalctl -u kubelet
For additional information and guides on using crictl, refer to Kubernetes own documentation.
4.1. Using Entrypoint Script
When possible, DOCA containers are shipped with an init script, entrypoint.sh. This script is the first thing to spawn once a container boots and is responsible for executing the DOCA program. Using a container's .yaml file, we can control the command line arguments that the script passes to it.
The exact command-line arguments are described per application on the application's respective reference guide and per DOCA service in the respective DOCA service documentation page. The matching .yaml fields are described per application on the application’s page on NGC.
4.2. Manual Execution from Within Container
Although most containers define the entrypoint.sh script as the container's ENTRYPOINT, this option is only valid for interaction-less sessions. As some DOCA applications expect an interactive shell session, the .yaml file supports an additional execution option.
Uncommenting (i.e., removing # from) the following 2 lines in the .yaml file causes the container to boot without spawning the application.
            # command: ["sleep"]
# args: ["infinity"]
In this execution mode, you can attach a shell to the spawned container:
crictl exec -it <container-id> /bin/bash
Once attached, you get a full shell session, and you can execute the application as if it were running directly on the DPU, using the exact same command-line arguments.
When dealing with an application that spawns an interactive shell session, this option allows you to interact with the application directly through the shell.
Whenever there is some error with spawning a given container, it is recommended to first go over the list of common errors provided in this section. These errors account for the vast majority of deployment errors, and it is usually easier to verify them first before trying to parse the Kubelet journal log.
5.1. Yaml Syntax
The syntax of the .yaml file is extremely sensitive, and minor changes could break it and cause it to stop working. Things you should pay attention to are:
- Indentation – the file uses spaces (' ') for indentations (2 per indent). Using any other number of spaces causes an undefined behavior.
5.2. System Resources
The container only spawns once all the required system resources are allocated on the DPU and can be reserved for the container. The most notable resource in this case is the huge pages required for most DOCA programs.
Make sure that the huge pages are allocated as required per container. Both the amount and size of the pages are important and must match precisely.
5.3. Shared Folders and Files
If the .yaml file defines a shared folder between the container and the DPU, the folder must exist prior to spawning the container. If the program searches for a specific file within said folder, this file must exist as well. Otherwise, the program aborts and stops the container.
The set of DOCA-based containers hosted on NGC also includes development containers that can be used as part of two development workflows:
- To serve as a BlueField OS-like development environment
- Used for a multi-staged build of DOCA-based containers
The DOCA development containers, doca:devel and doca:devel-cuda, are a subset of several flavors of the DOCA base image.
More information about these DOCA base images can be found on the containers' NGC page.
6.1. Kubernetes Deployment
Just like other DOCA containers, these development containers can be deployed on top of the DPU using their respective .yaml files:
- doca:devel – doca_devel.yaml
- doca:devel-cuda - doca_devel_cuda.yaml
The required prerequisite for deploying the containers is the following:
            # Allocate huge-pages, required by most DOCA Applications
sudo echo 2048 > /sys/kernel/mm/hugepages/hugepages-2048kB/nr_hugepages
6.2. Docker Deployment
There are scenarios in which development containers are used as development environments, whether on top of the DPU or even on top of a QEMU-emulated environment on the host. More information on the recommended development setup for DOCA-based development can be found in NVIDIA DOCA Developer Guide. When used as development environments, it is recommended to deploy the containers directly using Docker as it provides a more developer-friendly user experience.
- Make sure Docker is installed on your host/DPU. Run:
docker version
If it is not installed, visit the official Install Docker Engine webpage for installation instructions.
- Make sure the docker service is started. Run:
            sudo systemctl daemon-reload
sudo systemctl start docker
- Pull the container image:
- DOCA's development containers can be pulled directly from NGC using a simple docker pull command that can be copied directly from NGC:
- Visit the DOCA Base Image NGC page.
- Under the "Pull Tag" dropdown menu, select the desired development tag.
- The docker pull command is copied to your clipboard. Example command:
sudo docker pull nvcr.io/nvidia/doca/doca:1.3.0-devel
- Some of DOCA's development containers can also be installed directly on the host/DPU through the SDK Manager:
- The SDK Manager drops a .tar file on the selected environment (host/DPU).
- Go to where the tar file is saved and run the following command:
sudo docker load -i <filename>
sudo docker load -i doca_devel_ubuntu_20.04-inbox-5.5.tar
- DOCA's development containers can be pulled directly from NGC using a simple docker pull command that can be copied directly from NGC:
- If working with QEMU on an x86-based host, follow the instructions as listed in the "Setup" section of the NVIDIA DOCA Developer Guide.
- Once loaded locally, you may find the image's ID using the following command:
sudo docker images
- Run the docker image:
sudo docker run -v <source-code-folder>:/doca_devel --privileged -it -e container=docker <image-name/ID>
/<...>/buildEnv, and the image is loaded image with the ID185c50ecb31d, the command would look like this:sudo docker run -v /<...>/buildEnv:/doca_devel --privileged -it -e container=docker 185c50ecb31d
After running the command, you get a shell inside the container where you can build your project using the regular build commands.Note:Make sure to map a folder that everyone has Write privileges to. Otherwise, the docker would not be able to write the output files to it.
Notice
This document is provided for information purposes only and shall not be regarded as a warranty of a certain functionality, condition, or quality of a product. NVIDIA Corporation nor any of its direct or indirect subsidiaries and affiliates (collectively: “NVIDIA”) make no representations or warranties, expressed or implied, as to the accuracy or completeness of the information contained in this document and assume no responsibility for any errors contained herein. NVIDIA shall have no liability for the consequences or use of such information or for any infringement of patents or other rights of third parties that may result from its use. This document is not a commitment to develop, release, or deliver any Material (defined below), code, or functionality.
NVIDIA reserves the right to make corrections, modifications, enhancements, improvements, and any other changes to this document, at any time without notice.
Customer should obtain the latest relevant information before placing orders and should verify that such information is current and complete.
NVIDIA products are sold subject to the NVIDIA standard terms and conditions of sale supplied at the time of order acknowledgement, unless otherwise agreed in an individual sales agreement signed by authorized representatives of NVIDIA and customer (“Terms of Sale”). NVIDIA hereby expressly objects to applying any customer general terms and conditions with regards to the purchase of the NVIDIA product referenced in this document. No contractual obligations are formed either directly or indirectly by this document.
NVIDIA products are not designed, authorized, or warranted to be suitable for use in medical, military, aircraft, space, or life support equipment, nor in applications where failure or malfunction of the NVIDIA product can reasonably be expected to result in personal injury, death, or property or environmental damage. NVIDIA accepts no liability for inclusion and/or use of NVIDIA products in such equipment or applications and therefore such inclusion and/or use is at customer’s own risk.
NVIDIA makes no representation or warranty that products based on this document will be suitable for any specified use. Testing of all parameters of each product is not necessarily performed by NVIDIA. It is customer’s sole responsibility to evaluate and determine the applicability of any information contained in this document, ensure the product is suitable and fit for the application planned by customer, and perform the necessary testing for the application in order to avoid a default of the application or the product. Weaknesses in customer’s product designs may affect the quality and reliability of the NVIDIA product and may result in additional or different conditions and/or requirements beyond those contained in this document. NVIDIA accepts no liability related to any default, damage, costs, or problem which may be based on or attributable to: (i) the use of the NVIDIA product in any manner that is contrary to this document or (ii) customer product designs.
No license, either expressed or implied, is granted under any NVIDIA patent right, copyright, or other NVIDIA intellectual property right under this document. Information published by NVIDIA regarding third-party products or services does not constitute a license from NVIDIA to use such products or services or a warranty or endorsement thereof. Use of such information may require a license from a third party under the patents or other intellectual property rights of the third party, or a license from NVIDIA under the patents or other intellectual property rights of NVIDIA.
Reproduction of information in this document is permissible only if approved in advance by NVIDIA in writing, reproduced without alteration and in full compliance with all applicable export laws and regulations, and accompanied by all associated conditions, limitations, and notices.
THIS DOCUMENT AND ALL NVIDIA DESIGN SPECIFICATIONS, REFERENCE BOARDS, FILES, DRAWINGS, DIAGNOSTICS, LISTS, AND OTHER DOCUMENTS (TOGETHER AND SEPARATELY, “MATERIALS”) ARE BEING PROVIDED “AS IS.” NVIDIA MAKES NO WARRANTIES, EXPRESSED, IMPLIED, STATUTORY, OR OTHERWISE WITH RESPECT TO THE MATERIALS, AND EXPRESSLY DISCLAIMS ALL IMPLIED WARRANTIES OF NONINFRINGEMENT, MERCHANTABILITY, AND FITNESS FOR A PARTICULAR PURPOSE. TO THE EXTENT NOT PROHIBITED BY LAW, IN NO EVENT WILL NVIDIA BE LIABLE FOR ANY DAMAGES, INCLUDING WITHOUT LIMITATION ANY DIRECT, INDIRECT, SPECIAL, INCIDENTAL, PUNITIVE, OR CONSEQUENTIAL DAMAGES, HOWEVER CAUSED AND REGARDLESS OF THE THEORY OF LIABILITY, ARISING OUT OF ANY USE OF THIS DOCUMENT, EVEN IF NVIDIA HAS BEEN ADVISED OF THE POSSIBILITY OF SUCH DAMAGES. Notwithstanding any damages that customer might incur for any reason whatsoever, NVIDIA’s aggregate and cumulative liability towards customer for the products described herein shall be limited in accordance with the Terms of Sale for the product.
Trademarks
NVIDIA, the NVIDIA logo, and Mellanox are trademarks and/or registered trademarks of Mellanox Technologies Ltd. and/or NVIDIA Corporation in the U.S. and in other countries. The registered trademark Linux® is used pursuant to a sublicense from the Linux Foundation, the exclusive licensee of Linus Torvalds, owner of the mark on a world¬wide basis. Other company and product names may be trademarks of the respective companies with which they are associated.
Copyright
© 2022 NVIDIA Corporation & affiliates. All rights reserved.