Sim-to-Real Strategy 1: Domain Randomization#
What Do I Need for This Module?
Hands-on. You’ll need the teleop-docker container, the SO-101 teleop arm, and an NVIDIA GPU for Isaac Lab simulation.
Now that you’ve done teleoperation on a real robot, let’s try it in simulation with Isaac Lab.
In this module, you’ll use the teleop arm to drive a simulated SO-101 robot, allowing us to collect demonstrations with Isaac Lab.
Because it’s simulation, we have control of the world and can manipulate it in interesting ways, like using domain randomization to ensure our dataset will be sufficiently varied.
Teleoperation in Simulation#
Learning Objectives#
By the end of this session, you’ll be able to:
Explain domain randomization and why it improves sim-to-real transfer
Collect demonstration data through teleoperation, in simulation
Apply domain randomization to augment demonstrations
What Is Domain Randomization?#
Domain randomization (DR) is a sim-to-real strategy based on this idea: instead of making simulation perfectly match reality, randomize simulation parameters during training so the policy becomes robust to any value in the range, including real-world values.
Put in simple terms: think about how you might learn to catch a ball.
If you always catch it in the same pose, you might not learn to reach and catch the ball, or hold the glove in different orientations. By varying where the ball is thrown to you when you practice, you will likely learn a better “policy” for catching the ball.
What should we randomize?
There is no single answer for what to randomize. But a good rule of thumb is to randomize parameters that are likely to vary in the real world, or to change in the robot’s environment.
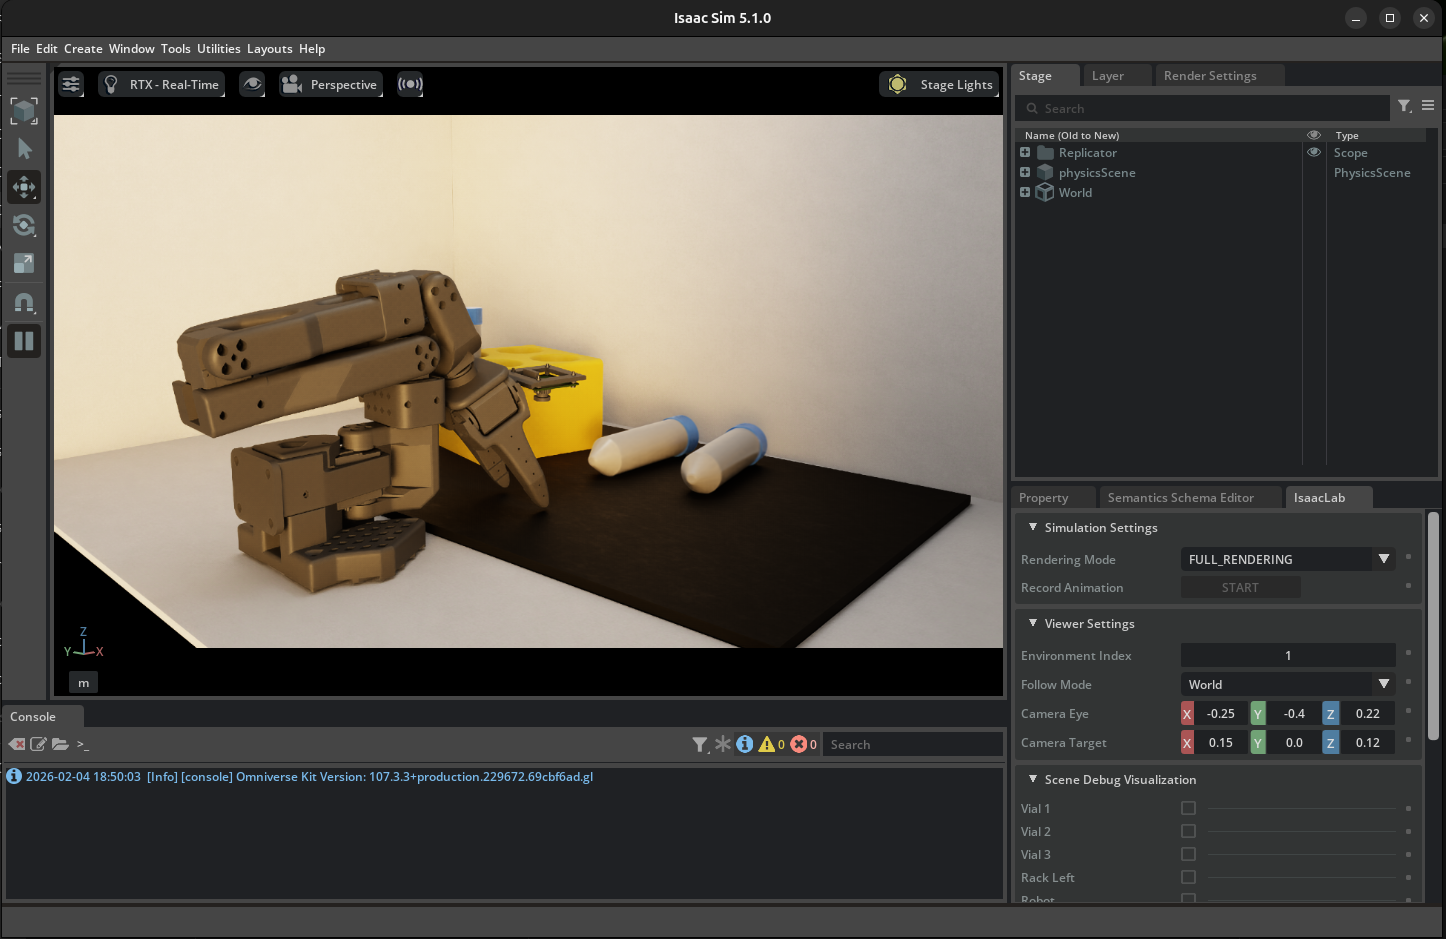
Let’s analyze what worked well for this case study of the SO-101 with a vial rack.
Domain Randomization Example. Each time the scene is reset, a number of parameters are randomized within given ranges.#
Visual Domain Randomization:
Object colors, textures, materials
Lighting intensity, direction, color temperature
Camera position, orientation, field of view
Background appearance
Other examples of visual domain randomization include:
Physics Domain Randomization:
Object mass, friction, restitution
Joint damping, friction, limits
Actuator delays, noise, offsets
Sensor noise characteristics
Strengths and Limitations
Strengths:
No real-world data required for augmentation
Handles unknown parameters
Scales to many parameters
Simple to implement
Limitations:
More art than science (tuning ranges)
Trades optimality for robustness
May produce conservative, slow motions
Doesn’t work well for highly dynamic tasks
Teleoperation: Collecting Human Demonstrations#
In this lesson we’ll apply domain randomization during teleoperation. We will use these to perform a kind of robot learning known as imitation learning.
Why Imitation Learning? (expand to read)
Teleoperation enables us to capture human expertise in action, allowing the system to benefit from the natural, intuitive motions people provide when performing tasks.
Humans instinctively know what matters for task success, leading to demonstrations that reflect important aspects of the job.
This process also brings in diversity, as different individuals may approach the same task in unique ways. Most importantly, demonstrations collected through teleoperation reliably represent successful task completion, ensuring high-quality data for imitation learning.
Hands-On: Collecting Demonstrations#
Here is a video of the task:
Example: Teleoperation of SO-101, being replayed through the LeRobot Dataset Visualizer.#
On top are the observations from cameras, and below are the positions of robot joints.
See this dataset on Hugging Face, using the Dataset Visualizer
Tip
Having trouble with cameras or robot connection? See the Troubleshooting Guide.
Launch Simulation Environment (Docker)#
If you still have the
teleop-dockercontainer’s terminal open from the last module, you can skip this step. If not, expand the dropdown and run the command.
Start the Isaac Sim container used for sim teleop and sim evaluation:
xhost +
docker run --name teleop -it --privileged --gpus all -e "ACCEPT_EULA=Y" --rm --network=host \
   -e "PRIVACY_CONSENT=Y" \
   -e DISPLAY \
   -v /dev:/dev \
   -v /run/udev:/run/udev:ro \
   -v $HOME/.Xauthority:/root/.Xauthority \
   -v ~/docker/isaac-sim/cache/kit:/isaac-sim/kit/cache:rw \
   -v ~/docker/isaac-sim/cache/ov:/root/.cache/ov:rw \
   -v ~/docker/isaac-sim/cache/pip:/root/.cache/pip:rw \
   -v ~/docker/isaac-sim/cache/glcache:/root/.cache/nvidia/GLCache:rw \
   -v ~/docker/isaac-sim/cache/computecache:/root/.nv/ComputeCache:rw \
   -v ~/docker/isaac-sim/logs:/root/.nvidia-omniverse/logs:rw \
   -v ~/docker/isaac-sim/data:/root/.local/share/ov/data:rw \
   -v ~/docker/isaac-sim/documents:/root/Documents:rw \
   -v ~/.cache/huggingface/lerobot/calibration:/root/.cache/huggingface/lerobot/calibration \
   -v ~/Sim-to-Real-SO-101-Workshop/docker/env:/root/env \
   -v ~/Sim-to-Real-SO-101-Workshop:/workspace/Sim-to-Real-SO-101-Workshop \
   teleop-docker:latest
Practice Teleoperation in Simulation#
Let’s launch the simulation environment to practice teleoperation without recording.
This is a good way to get familiar with the teleop controls and camera views before collecting data.
(Optional) Run this quick sanity check to make sure your environment variables are set correctly.
echo "Teleop port is ${TELEOP_PORT} with id ${TELEOP_ID}"
If they aren’t set, find the ports using lerobot-find-port and assign them again:
Example of setting port vars
setenv TELEOP_PORT=/dev/ttyACM # !! make sure to update
setenv ROBOT_PORT=/dev/ttyACM # !! make sure to update

setenv TELEOP_ID=orange_teleop # use this line as-is
setenv ROBOT_ID=orange_robot # use this as-is
Move the teleop arm to a packed position. If the robot is in a strange starting position, it may run into items in simulation on startup.
Run the following command to open Isaac Lab, with our pre-configured simulation environment. You can choose between two options:
Lerobot-So101-Teleop-Vials-To-Rackwhich has no domain randomization orLerobot-So101-Teleop-Vials-To-Rack-DR, which has domain randomization enabled.
lerobot_agent --task Lerobot-So101-Teleop-Vials-To-Rack-DR
This will launch Isaac Sim and load the training environment.
Note
The first time this launches, it will take about 2 minutes to load.
If it gets stuck, check the console for errors. It’s likely the robot isn’t fully connected. Power cycle the robot (plug/replug power on the back) if you have issues.
Keep Isaac Lab open for the next step.
Setup Cameras#
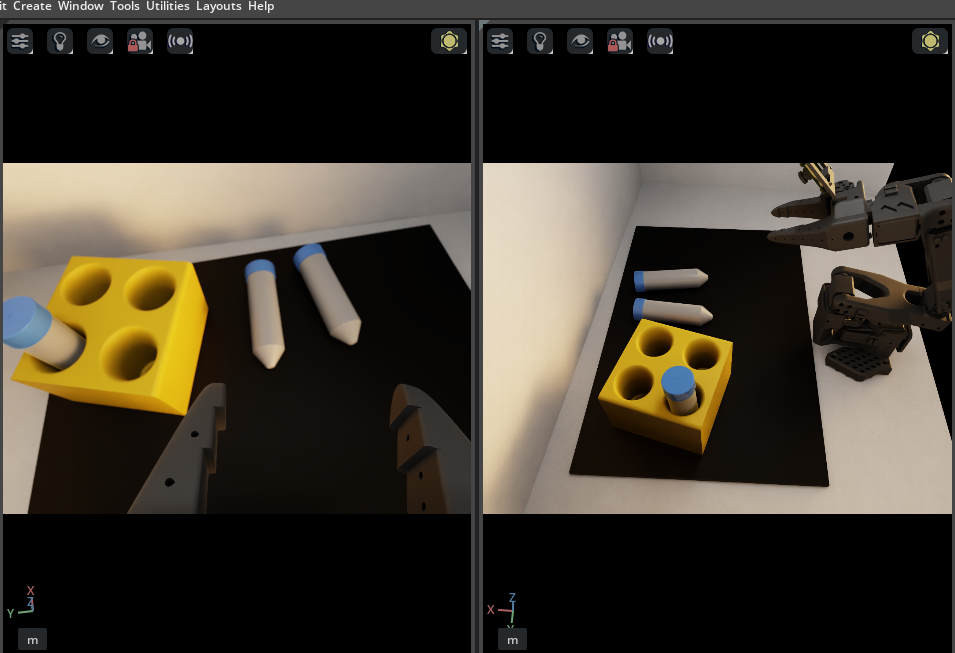
We need our simulation to show us the same camera views our AI model will use.
When doing teleoperation for training VLAs, it’s crucial that we use the same camera views for teleoperation that the model will use for autonomous operation.
Otherwise, we may introduce biases or advantages the model won’t have.
Important
Only look through the gripper and external cameras when teleoperating.
When looking at the scene with your own eyes, or other cameras in the simulation scene, you may introduce perceptual affordances that the model will not have access to during inference.
The policy will only see what the cameras see. Train yourself to rely solely on the camera views displayed on your screen. This ensures your demonstrations reflect what the policy can actually perceive.
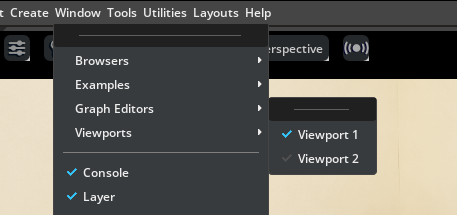
By default you’ll just see the general perspective camera. Let’s fix that.
Go to Window > Viewports, and enable both viewport Viewport 1 and Viewport 2 so we can see two cameras rendered at once.

In one viewport, go to the camera menu, and choose the
gripper_cam.
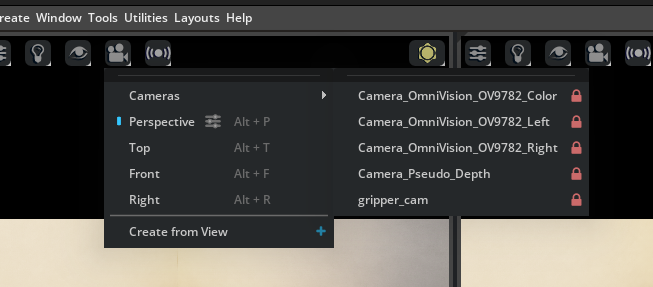
In the other viewport, go to the camera menu, and choose the
Camera_OmniVision_9782_Colorcamera.
For each viewport, set the aspect ratio to 4:3 to match the cameras.
Go to the settings menu in the viewport.
Under Viewport > Aspect Ratio on the right side you’ll see
16:9. Change it to4:3.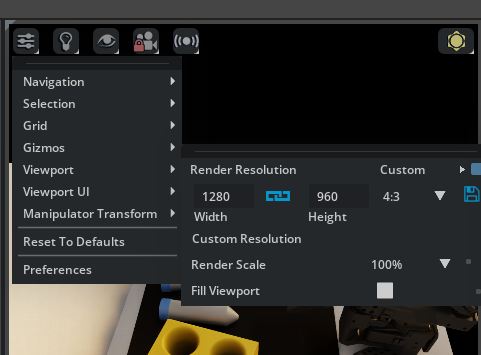
Now try teleoperating, and take some time to get familiar with the teleop controls and camera views before collecting data in episodic format.
Press R to reset the environment with domain randomization. If it doesn’t work, click on the viewport to give the application focus, and try again.
Notice in the terminal, you will see status updates about the subtask success, such as when the vials are grasped or placed in the rack.
Controls (click in Viewport to use these commands)
Press R to reset the environment (also stops recording)
Episodes are queued for processing while you continue working
When finished, stop Isaac Lab by pressing CTRL+C in the terminal.
Start Recording Demonstrations#
When ready to collect data, we’ll add a few extra arguments for where to save the data we collect.
Before launching the teleop agent, set your Hugging Face username as an environment variable. This is used to organize your datasets in a unique namespace.
If you don’t have one, or don’t want to login, you can make up a username for local data collection.
Run this, replacing
your-hf-usernamewith your actual Hugging Face username:
export HF_USER=your-hf-username
You only need to do this once per terminal session before running the following commands. Feel free to use a made up username if you don’t want to login and upload your demos.
Overall Flow#
For each episode we will:
Reset the environment: Press R to randomize vial positions, rack position, camera poses, and lighting. You can do this every episode, or every few episodes.
Record: Press S to start recording.
Execute: Immediately begin the demonstration. For each episode, perform one pick-and-place operation, which means picking up one vial and placing it into one open slot on the rack.
Complete: Press S to stop recording
How many demonstrations should you collect? If you’re going to train your own policy, try collecting at least 70 demonstrations based on our experience. More could be better. If you’re just exploring, you can collect less.
Demonstration Quality Guidelines:
Good demonstrations:
Smooth, deliberate motions
Clear grasp contact with vial
Successful placement in rack
Avoid:
Jerky, hesitant motions
Missed grasps or drops
Including more than the actual task execution
Recording Demonstrations#
Launch recording session. This will be just like the environment before, but we have additional controls to cancel, start recording, and stop recording.
lerobot_agent --task Lerobot-So101-Teleop-Vials-To-Rack-DR \
    --repo_id ${HF_USER}/so101_teleop_vials \
    --repo_root $(pwd)/datasets/so101_teleop_vials \
    --task_name "Pick up the vial and place it in the rack"
Set up the window, viewports, and cameras (same as in Practice Teleoperation):
Window > Viewport: Enable both viewports so you see two camera views at once.
In one viewport, open the camera menu and choose gripper_cam.
In the other viewport, open the camera menu and choose Camera_OmniVision_9782_Color.
For each viewport: open the viewport settings, go to Viewport > Aspect Ratio, and set to 4:3 (instead of 16:9).
Recording Controls: Isaac Sim viewport must be in “focus” (click the app’s UI)
Press S to start/stop recording an episode
Press C to cancel the current recording (useful for mistakes)
Press R to reset the environment (also stops recording)
Completed episodes are queued for processing so you can continue working.
Example terminal output:
[INFO]: Started recording.
[INFO]: Stopped recording.
[INFO]: Copy episode to CPU...
[INFO]: Episode added to queue.
[INFO]: [ASYNC] received episode from queue...
[INFO]: Cleared buffers
Repeat the recording process until you have collected the desired number of demonstrations.
When completely finished with all demonstrations, make sure you see the message
[INFO]: No More episodes in queue. Wait a few seconds if you don’t see it. This means all the episodes have been processed and saved.Stop Isaac Lab by pressing CTRL+C in the terminal.
Review Collected Data#
Optional: if you recorded a demonstration, use the LeRobot dataset visualizer to review your recorded episodes:
lerobot-dataset-viz \
    --repo-id ${HF_USER}/so101_teleop_vials \
    --root $(pwd)/datasets/so101_teleop_vials \
    --episode-index 0
Change --episode-index to view different episodes.
Domain Randomization in Simulation#
To maximize domain randomization benefits, collect demonstrations across multiple sessions. The environment randomizes conditions between episodes automatically.
Let’s take a look at the code.
Code Tour: Domain Randomization Implementation#
The Isaac Lab environment implements DR through reset event handlers. Here’s a tour of the key randomization methods from the teleop environment codebase.
In the workshop repo, these randomizations are applied in DR task variants (for example, Lerobot-So101-Teleop-Vials-To-Rack-DR). The base Lerobot-So101-Teleop-Vials-To-Rack task keeps the sky light off and uses a fixed orange robot color.
Lighting Randomization (randomize_sky_light)
File: sim_to_real_so101/source/sim_to_real_so101/mdp/resets.py
Randomizes the environment’s dome light on each reset—exposure, color temperature, and HDRI texture:
 1def randomize_sky_light(
 2    env,
 3    env_ids: torch.Tensor | None,
 4    exposure_range: tuple[float, float],
 5    temperature_range: tuple[float, float],
 6    textures_root: str,
 7    asset_cfg: SceneEntityCfg = None,
 8):
 9    # Sample random exposure and color temperature
10    exposure = math_utils.sample_uniform(*exposure_range, (1,), device="cpu").item()
11    temperature = math_utils.sample_uniform(*temperature_range, (1,), device="cpu").item()
12
13    # Select random HDRI texture from available options
14    textures = glob.glob(os.path.join(textures_root, "*.exr"))
15    texture = textures[torch.randint(0, len(textures), (1,)).item()]
16
17    # Apply to the dome light
18    prim.GetAttribute("inputs:exposure").Set(exposure)
19    prim.GetAttribute("inputs:colorTemperature").Set(temperature)
20    prim.GetAttribute("inputs:texture:file").Set(Sdf.AssetPath(texture))
Camera Pose Randomization (randomize_camera_pose)
File: sim_to_real_so101/source/sim_to_real_so101/mdp/resets.py
Adds small position and rotation offsets to the external camera:
 1def randomize_camera_pose(
 2    env,
 3    env_ids: torch.Tensor | None,
 4    prim_path_pattern: str,
 5    pos_range: dict[str, tuple[float, float]] = None,  # e.g., {"x": (-0.02, 0.02)}
 6    rot_range: dict[str, tuple[float, float]] = None,  # e.g., {"pitch": (-0.05, 0.05)}
 7):
 8    # Sample random offsets relative to USD default pose
 9    x = base_pos[0] + math_utils.sample_uniform(*pos_range.get("x", (0, 0)), (1,)).item()
10    y = base_pos[1] + math_utils.sample_uniform(*pos_range.get("y", (0, 0)), (1,)).item()
11    z = base_pos[2] + math_utils.sample_uniform(*pos_range.get("z", (0, 0)), (1,)).item()
12
13    # Combine base quaternion with random delta rotation
14    delta_quat = math_utils.quat_from_euler_xyz(roll, pitch, yaw)
15    final_quat = math_utils.quat_mul(base_quat_tensor, delta_quat)
Object Pose Randomization (reset_vials_rack)
File: sim_to_real_so101/source/sim_to_real_so101/mdp/resets.py
Randomizes vial and rack positions, with probability of pre-placing vials in slots:
 1def reset_vials_rack(
 2    env,
 3    env_ids: torch.Tensor,
 4    vials: list[str],
 5    rack: str,
 6    rack_pose_range: dict[str, tuple[float, float]],
 7    pose_range: dict[str, tuple[float, float]],
 8    rack_placement_prob: float = 0.33,
 9):
10    # Randomize rack position and orientation
11    new_rack_positions, new_rack_orientations = random_asset_pose(
12        env, env_ids, rack, rack_pose_range, {}
13    )
14
15    # With some probability, pre-place a vial in a random slot
16    if torch.rand(1).item() < rack_placement_prob:
17        vial_idx = torch.randint(0, len(vial_objects), (1,)).item()
18        slot_idx = torch.randint(0, total_slots, (1,)).item()
19        # Transform slot position from rack local frame to world frame
20        slot_position, slot_orientation = math_utils.combine_frame_transforms(
21            new_rack_positions, new_rack_orientations,
22            slot_position_local, slot_orientation_local
23        )
24        vial.write_root_pose_to_sim(slot_pose, env_ids=env_ids)
Wiring It Up: Event Configuration
File: sim_to_real_so101/source/sim_to_real_so101/tasks/task_env_cfg.py
These randomization functions are registered as reset events in the environment config:
 1@configclass
 2class TaskEventCfg(EventCfg):
 3
 4    reset_sky_light = EventTerm(
 5        func=randomize_sky_light,
 6        mode="reset",
 7        params={
 8            "exposure_range": (-4.0, 3.0),
 9            "temperature_range": (2500.0, 9500.0),
10            "textures_root": f"{assets_path}/hdri",
11            "asset_cfg": SceneEntityCfg("sky_light"),
12        },
13    )
14
15    reset_camera_external_pose = EventTerm(
16        func=randomize_camera_pose,
17        mode="reset",
18        params={
19            "prim_path_pattern": "{ENV_REGEX_NS}/LightStudio/LightBox/camera_mount",
20            "pos_range": {"x": (-0.02, 0.02), "y": (-0.02, 0.02), "z": (-0.01, 0.01)},
21            "rot_range": {"roll": (-0.05, 0.05), "pitch": (-0.05, 0.05), "yaw": (-0.05, 0.05)},
22        },
23    )
Every time an episode resets, Isaac Lab calls each registered EventTerm with mode="reset", applying fresh randomization.
For this workshop migration, the mat yaw randomization range is tightened to (-0.1, 0.1) in DR task configs.
Tip
You can experiment with domain randomization by changing the ranges or which resets run. In task_env_cfg.py, the TaskEventCfg class registers each randomization as an EventTerm with a params dict. For example, adjust exposure_range or temperature_range in reset_sky_light, or pos_range / rot_range in reset_camera_external_pose, to widen or narrow variation. Commenting out an EventTerm disables that randomization.
Note where you’re editing - if inside the container, changes might be lost on restart.
Subtask Rating#
Notice in the terminal output, that our simulation can detect when the vial is grasped, and when it is placed in the rack.
[GRASP] Vial grasped in env(s): [0]
[RELEASE] Vial released in env(s): [0]
[RACK] vial_2 placed in rack in env(s): [0]
This strategy is useful when we start policy inference, because we can automatically score how well the policy is performing.
Sim vs. Real Teleoperation Comparison#
Aspect |
Simulation |
Real Robot |
|---|---|---|
Domain randomization |
Automatic |
Manual, limited to what you can physically change in the environment |
Data collection speed |
Faster reset, parallel envs possible |
Real-time only |
Hardware wear |
None |
Accumulates over time |
Visual diversity |
Procedural generation |
Requires manual variation |
Physics accuracy |
Approximated |
Ground truth |
When to Use Each#
Use simulation when:
Building initial dataset with DR
Hardware is limited or shared
Exploring task or policy variations quickly and safely
Real environment isn’t ready, accessible, or during development
Use real robot when:
Collecting high-quality ground truth
Validating sim-trained policies
Capturing real-world nuances (friction, lighting)
Key Takeaways#
Domain randomization makes policies robust by training on varied conditions
Teleoperation captures human expertise in demonstration form
Always teleoperate using only camera views—not your eyes
DR augmentation multiplies your dataset with varied conditions
Combined real demonstrations + DR augmentation is a powerful baseline
What’s Next?#
With augmented demonstrations collected, learn how policies are trained and served. In the next session, Isaac GR00T: Vision-Language-Action Models, you’ll study VLAs and the GR00T architecture before running evaluations.