AWS EMR#
This is a getting started guide for the cuDF for Apache Spark on AWS EMR. At the end of this guide, the user will be able to run a sample Apache Spark application on NVIDIA GPUs on AWS EMR.
Different versions of EMR ship with different versions of Spark, cuDF for Apache Spark, cuDF and xgboost4j-spark:
EMR |
Spark |
Plugin jar |
xgboost4j-spark jar |
|---|---|---|---|
7.13 |
3.5.6 |
rapids-4-spark_2.12-25.08.0.jar |
xgboost4j-spark_3.0-1.4.2-0.3.0.jar |
7.12 |
3.5.6 |
rapids-4-spark_2.12-25.08.0.jar |
xgboost4j-spark_3.0-1.4.2-0.3.0.jar |
7.11 |
3.5.6 |
rapids-4-spark_2.12-25.06.1.jar |
xgboost4j-spark_3.0-1.4.2-0.3.0.jar |
7.10 |
3.5.5 |
rapids-4-spark_2.12-25.04.1.jar |
xgboost4j-spark_3.0-1.4.2-0.3.0.jar |
7.9 |
3.5.5 |
rapids-4-spark_2.12-25.02.1.jar |
xgboost4j-spark_3.0-1.4.2-0.3.0.jar |
7.8 |
3.5.4 |
rapids-4-spark_2.12-24.12.0.jar |
xgboost4j-spark_3.0-1.4.2-0.3.0.jar |
7.7 |
3.5.2 |
rapids-4-spark_2.12-24.10.1.jar |
xgboost4j-spark_3.0-1.4.2-0.3.0.jar |
7.6 |
3.5.3 |
rapids-4-spark_2.12-24.10.1.jar |
xgboost4j-spark_3.0-1.4.2-0.3.0.jar |
7.5 |
3.5.2 |
rapids-4-spark_2.12-24.08.1.jar |
xgboost4j-spark_3.0-1.4.2-0.3.0.jar |
7.4 |
3.5.2 |
rapids-4-spark_2.12-24.08.1.jar |
xgboost4j-spark_3.0-1.4.2-0.3.0.jar |
7.3 |
3.5.1 |
rapids-4-spark_2.12-24.06.0.jar |
xgboost4j-spark_3.0-1.4.2-0.3.0.jar |
7.2 |
3.5.1 |
rapids-4-spark_2.12-24.02.0.jar |
xgboost4j-spark_3.0-1.4.2-0.3.0.jar |
7.1 |
3.5.0 |
rapids-4-spark_2.12-23.10.0.jar |
xgboost4j-spark_3.0-1.4.2-0.3.0.jar |
7.0 |
3.5.0 |
rapids-4-spark_2.12-23.10.0.jar |
xgboost4j-spark_3.0-1.4.2-0.3.0.jar |
6.15 |
3.4.1 |
rapids-4-spark_2.12-23.08.1.jar |
xgboost4j-spark_3.0-1.4.2-0.3.0.jar |
6.14 |
3.4.1 |
rapids-4-spark_2.12-23.06.0.jar |
xgboost4j-spark_3.0-1.4.2-0.3.0.jar |
6.13 |
3.4.1 |
rapids-4-spark_2.12-23.06.0.jar |
xgboost4j-spark_3.0-1.4.2-0.3.0.jar |
6.12 |
3.4.0 |
rapids-4-spark_2.12-23.06.0.jar |
xgboost4j-spark_3.0-1.4.2-0.3.0.jar |
6.12 |
3.3.2 |
rapids-4-spark_2.12-23.02.0.jar |
xgboost4j-spark_3.0-1.4.2-0.3.0.jar |
6.10 |
3.3.1 |
rapids-4-spark_2.12-22.12.0.jar |
xgboost4j-spark_3.0-1.4.2-0.3.0.jar |
For more details about each EMR release, refer to the EMR release notes.
For more information on AWS EMR, refer to the AWS documentation.
Leveraging cuDF for Apache Spark User Tools for Qualification and Bootstrap#
To use the qualification and bootstrap tools for EMR, you will want to install the cuDF for Apache Spark user tools package. Instructions for installing and setting up the cuDF for Apache Spark user tools package for EMR can be found here: link.
Qualify CPU Workloads for GPU Acceleration#
The qualification tool is launched to analyze CPU applications that have already run. The tool will output the applications recommended for acceleration along with estimated speed-up and cost saving metrics. Additionally, it will provide information on how to launch a GPU-accelerated cluster to take advantage of the speed-up and cost savings.
Usage: spark_rapids_user_tools emr qualification --eventlogs <s3-log-path> --cpu_cluster <cluster-name>
Help (to see all options available): spark_rapids_user_tools emr qualification --help
Example output:
 1+----+------------+--------------------------------+----------------------+-----------------+-----------------+---------------+-----------------+
 2|    | App Name   | App ID                         | Recommendation       |   Estimated GPU |   Estimated GPU |           App |   Estimated GPU |
 3|    |            |                                |                      |         Speedup |     Duration(s) |   Duration(s) |      Savings(%) |
 4|----+------------+--------------------------------+----------------------+-----------------+-----------------+---------------+-----------------|
 5|  0 | query24    | application_1664888311321_0011 | Strongly Recommended |            3.49 |          257.18 |        897.68 |           59.70 |
 6|  1 | query78    | application_1664888311321_0009 | Strongly Recommended |            3.35 |          113.89 |        382.35 |           58.10 |
 7|  2 | query23    | application_1664888311321_0010 | Strongly Recommended |            3.08 |          325.77 |       1004.28 |           54.37 |
 8|  3 | query64    | application_1664888311321_0008 | Strongly Recommended |            2.91 |          150.81 |        440.30 |           51.82 |
 9|  4 | query50    | application_1664888311321_0003 | Recommended          |            2.47 |          101.54 |        250.95 |           43.08 |
10|  5 | query16    | application_1664888311321_0005 | Recommended          |            2.36 |          106.33 |        251.95 |           40.63 |
11|  6 | query38    | application_1664888311321_0004 | Recommended          |            2.29 |           67.37 |        154.33 |           38.59 |
12|  7 | query87    | application_1664888311321_0006 | Recommended          |            2.25 |           75.67 |        170.69 |           37.64 |
13|  8 | query51    | application_1664888311321_0002 | Recommended          |            1.53 |           53.94 |         82.63 |            8.18 |
14+----+------------+--------------------------------+----------------------+-----------------+-----------------+---------------+-----------------+
15
16Instance types conversions:
17-----------  --  ------------
18m5d.8xlarge  to  g4dn.8xlarge
19-----------  --  ------------
20To support acceleration with T4 GPUs, switch the worker node instance types
Configure and Launch AWS EMR with GPU Nodes#
Follow the AWS EMR documentation for using the NVIDIA Spark accelerator. Below is an example.
Launch an EMR Cluster using AWS CLI#
In this example, we will use the AWS CLI to launch a cluster with one Primary node (m5.xlarge) and one g4dn.2xlarge nodes using script here .
You will need:
an existing S3 bucket, preferably in the same region as your cluster
an SSH key-pair already registered in the AWS console
a subnet and VPC configuration (default or a custom configuration)
1git clone https://github.com/NVIDIA/cudf-spark-examples
2cd cudf-spark-examples/scripts/csp-startup-scripts/emr
3python3 emr-spark-plugin-startup.py --release_label="emr-7.12.0" --key_name="demo-key-pair" --service_role="DemoServiceRole" --instance_profile="DemoInstanceProfile" --worker_instance="g4dn.2xlarge" --s3_bucket_name=my_bucket --subnet="demo_subnet"
Please fill with actual value for KeyName, SubnetId, service-role, and InstanceProfile`.
The service role and instance profile are AWS IAM roles associated with your cluster, which will allow the EMR cluster to access services provided by AWS.
The python script references a configuration JSON file and a bootstrap file based on the EMR version being used. The config.json for EMR 7 or config.json for EMR 6 files install the cuDF for Apache Spark on your cluster, configures YARN to use GPUs, configures Spark to use RAPIDS, and configures the YARN capacity scheduler. The cgroup-bootstrap-action-emr.sh for EMR 7 or cgroup-bootstrap-action-emr.sh for EMR 6 script(s) opens cgroup permissions to YARN on your cluster.
Running the cuDF for Apache Spark User Tools Bootstrap for Optimal Cluster Spark Settings#
The bootstrap tool will generate optimized settings for cuDF for Apache Spark on a GPU cluster for EMR. The tool will fetch the characteristics of the cluster – including number of workers, worker cores, worker memory, and GPU accelerator type and count. It will use the cluster properties to then determine the optimal settings for running GPU-accelerated Spark applications.
Usage: spark_rapids_user_tools emr bootstrap --cluster <cluster-name>
Help (to see all options available): spark_rapids_user_tools emr bootstrap --help
Example output:
1##### BEGIN : RAPIDS bootstrap settings for gpu-cluster
2spark.executor.cores=16
3spark.executor.memory=32768m
4spark.executor.memoryOverhead=7372m
5spark.rapids.sql.concurrentGpuTasks=2
6spark.rapids.memory.pinnedPool.size=4096m
7spark.sql.files.maxPartitionBytes=512m
8spark.task.resource.gpu.amount=0.0625
9##### END : RAPIDS bootstrap settings for gpu-cluster
A detailed description for bootstrap settings with usage information is available in the cuDF for Apache Spark Configuration and Spark Configuration page.
Running an Example Join Operation Using Spark Shell#
Please follow EMR doc Connect to the primary node using SSH to ssh to the EMR cluster’s primary node. And then get into sparks shell and run the sql join example to verify GPU operation.
Note
Use hadoop user for SSH and below command.
spark-shell
Running following Scala code in Spark Shell
1val data = 1 to 10000
2val df1 = sc.parallelize(data).toDF()
3val df2 = sc.parallelize(data).toDF()
4val out = df1.as("df1").join(df2.as("df2"), $"df1.value" === $"df2.value")
5out.count()
6out.explain()
Submit Spark jobs to an EMR Cluster Accelerated by GPUs#
Similar to spark-submit for on-prem clusters, AWS EMR supports a Spark application job to be submitted. The mortgage examples we use are also available as a SPARK application. You can also use spark shell to run the Scala code or pyspark to run the python code on the primary node through CLI. In the Spark History Server UI, you can find the CPU operations have been replaced by GPU operations with GPU prefix:
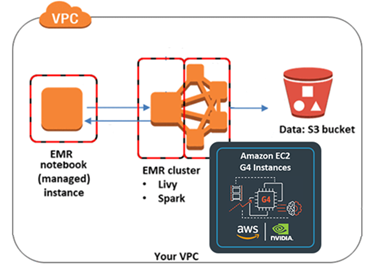
Running GPU Accelerated Mortgage ETL Example using EMR Notebook#
An EMR Notebook is a “serverless” Jupyter notebook. Unlike a traditional notebook, the contents of an EMR Notebook itself—the equations, visualizations, queries, models, code, and narrative text—are saved in Amazon S3 separately from the cluster that runs the code. This provides an EMR Notebook with durable storage, efficient access, and flexibility.
You can use the following step-by-step guide to run the example mortgage dataset using cuDF for Apache Spark on Amazon EMR GPU clusters. For more examples, refer to the cuDF for Apache Spark ETL demos
Create EMR Notebook and Connect to EMR GPU Cluster#
Go to the Amazon EMR page and select “Studios” under “EMR Studios.” You can create a Studio if you haven’t already.
Create a notebook by clicking on “Workspaces (Notebooks)” on the left column and then clicking on the “Create Workspace” button. Select the studio you selected in the prior step.
Enter a Workspace name, description and a location (which should be set by default to the studio S3 path). Under “Advanced configuration”, you can pick an EMR cluster that you have already launched.

Run Mortgage ETL PySpark Notebook on EMR GPU Cluster#
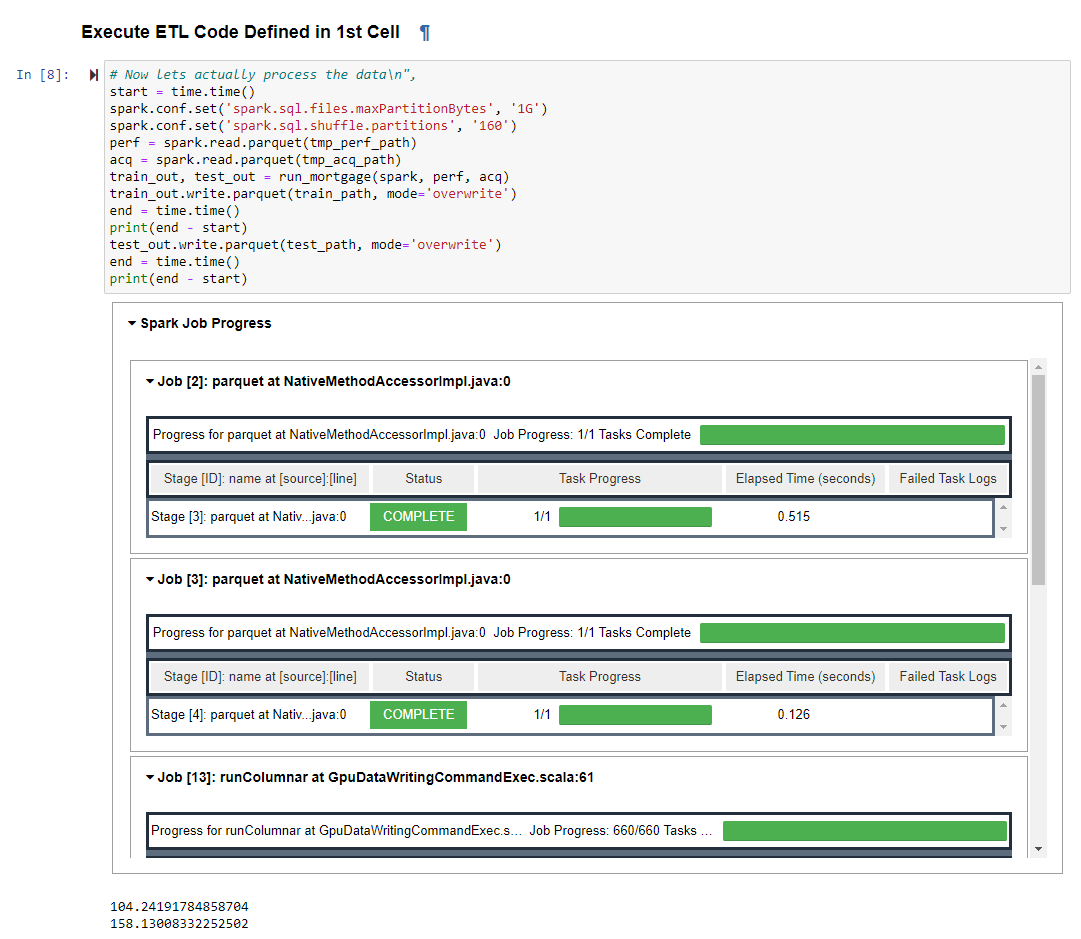
Download the Mortgate ETL PySpark Notebook. Make sure to use PySpark as kernel. This example use 1 year (year 2000) data for a two node g4dn GPU cluster. You can adjust settings in the notebook for full mortgage dataset ETL.
When executing the ETL code, you can also see the Spark Job Progress within the notebook and the code will also display how long it takes to run the query