Databricks#
This guide shows how to set up the RAPIDS Accelerator for Apache Spark 3.x on Databricks. It will enable you to run a sample Apache Spark application on NVIDIA GPUs on Databricks.
Prerequisites#
Select a version of the Databricks Machine Learning runtime with GPU support and GPU-accelerated worker nodes that’s compatible with RAPIDS Accelerator. Refer to the section Software Requirements for a complete list of Databricks runtime versions supported by RAPIDS Accelerator.
Limitations#
When you create a GPU-accelerated cluster, the Databricks UI requires the driver node to be a GPU node. However, you can use the Databricks API to create a cluster with a CPU driver node. The plugin doesn’t require a GPU driver node to operate because workloads are ran on GPU workers.
On a multi-GPU node, RAPIDS Accelerator can use only one GPU. This is due to a Databricks limitation.
Although it’s possible to set
spark.executor.resource.gpu.amount=1in the Spark Configuration tab, Databricks overrides this tospark.executor.resource.gpu.amount=N(where N is the number of GPUs per node). This results in failed executors when you start the cluster.Parquet rebase mode is set to
LEGACYby default.The following Spark configuration settings have the value
LEGACYby default on Databricks:1spark.sql.legacy.parquet.datetimeRebaseModeInWrite 2spark.sql.legacy.parquet.int96RebaseModeInWrite
These settings cause a CPU fallback for Parquet writes involving dates and timestamps. If you don’t need
LEGACYwrite semantics, change these settings toEXCEPTION, which is the default value in Apache Spark 3.3+.Databricks makes changes to existing runtimes by applying patches without notification. Issue-3098 is one example of this. NVIDIA runs regular integration tests on the Databricks environment to catch these issues and fix them when detected.
Databricks 11.3 returns an incorrect result for window frames defined by a range in case of DecimalTypes with precision greater than 38. There’s a bug filed in Apache Spark for it here, whereas when Databricks uses the plugin it returns the correct result.
Start a Databricks Cluster#
Each user has a Home directory in their workspace (/Workspace/Users/user@domain). Navigate to your Home directory in the UI by selecting Workspace > Home from the left navigation panel. Right click on the Home folder icon and select Create > File from the dropdown menu to create an init.sh script with the following content:
1#!/bin/bash
2sudo wget -O /databricks/jars/rapids-4-spark_2.12-26.04.2.jar https://repo1.maven.org/maven2/com/nvidia/rapids-4-spark_2.12/26.04.2/rapids-4-spark_2.12-26.04.2.jar
Then create a Databricks cluster by going to Compute and clicking Create compute. Ensure that the cluster meets the prerequisites listed above by configuring it like this:
Select a Databricks Runtime Version from the list of supported runtimes in the Prerequisites section.
Set the number of workers equal to the number of GPUs you want to use.
Select a worker type.
For AWS, use nodes with one GPU each, such as
p3.2xlargeorg4dn.xlarge.For Azure, choose GPU nodes such as
Standard_NC6s_v3.For GCP, choose N1 or A2 instance types with GPUs.
Select the driver type. Generally you may set this to the same value as the worker.
Click the Edit button, then navigate down to the Advanced Options section. Select the Init Scripts tab in the advanced options section and paste the workspace path into the initialization script:
/Users/user@domain/init.sh, then click Add.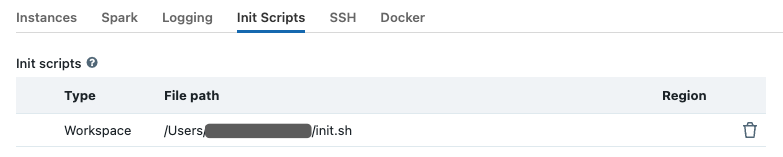
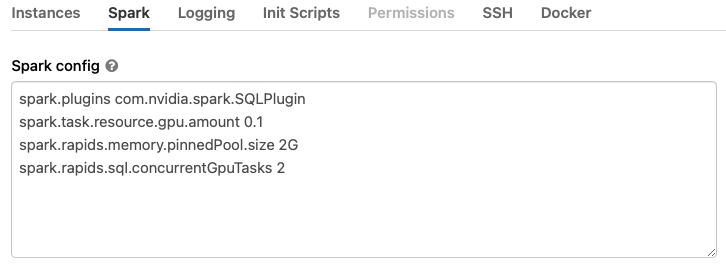
Select the Spark tab and paste the following configuration options into the Spark Config section. Change the configuration values based on the workers you choose. Refer to the documentation for Apache Spark configuration and RAPIDS Accelerator for Apache Spark descriptions for descriptions of the configuration settings.
The
spark.task.resource.gpu.amountconfiguration defaults to 1 in Databricks. That means that only one task can run on an executor with one GPU. This is limiting, especially for reads and writes from Parquet. Set the value 1/cores, where cores is the number of cores per executor. This will allow multiple tasks to run in parallel as they do on the CPU side. You may also use a value smaller than 1/cores if you wish.1spark.plugins com.nvidia.spark.SQLPlugin 2spark.task.resource.gpu.amount 0.1 3spark.rapids.memory.pinnedPool.size 2G 4spark.rapids.sql.concurrentGpuTasks 2
If you are running Pandas UDFs with GPU support from the plugin, you need at least three additional options:
The option spark.python.daemon.module specifies the Python daemon module that Databricks is to use. On Databricks the Python runtime requires different parameters than the one for Spark, so you must create a dedicated Python daemon module rapids.daemon_databricks and specify it here.
Set the option
spark.rapids.sql.python.gpu.enabledto true to enable GPU support for Python.Add the path of the plugin JAR (supposing it’s placed under
/databricks/jars/) to thespark.executorEnv.PYTHONPATHoption. For more details, see GPU Scheduling For Pandas UDF.
1spark.rapids.sql.python.gpu.enabled true
2spark.python.daemon.module rapids.daemon_databricks
3spark.executorEnv.PYTHONPATH /databricks/jars/rapids-4-spark_2.12-26.04.2.jar:/databricks/spark/python
Because the Python memory pool requires installing the cudf library, you must install the cudf library in each of the worker nodes (enter
pip install cudf-cu11 --extra-index-url=https://pypi.nvidia.com) or disable the Python memory pool (setspark.rapids.python.memory.gpu.pooling.enabled=false).Click
Create Cluster. Create Cluster creates a GPU-accelerated cluster that’s ready for use. Creating the cluser typically takes a few minutes.
Docker Container for Databricks#
The GitHub repo spark-rapids-container provides the Dockerfile and scripts to build custom Docker containers with RAPIDS Accelerator for Apache Spark.
Refer to the Databricks documentation for more details.
Import the GPU Mortgage Example Notebook#
Import the example notebook
from the repo into your workspace, then open the notebook. GitHub provides
download instructions
for the dataset.
 1%sh
 2
 3USER_ID=<your_user_id>
 4
 5wget http://rapidsai-data.s3-website.us-east-2.amazonaws.com/notebook-mortgage-data/mortgage_2000.tgz -P /Users/${USER_ID}/
 6
 7mkdir -p /dbfs/FileStore/tables/mortgage
 8mkdir -p /dbfs/FileStore/tables/mortgage_parquet_gpu/perf
 9mkdir /dbfs/FileStore/tables/mortgage_parquet_gpu/acq
10mkdir /dbfs/FileStore/tables/mortgage_parquet_gpu/output
11
12tar xfvz /Users/${USER_ID}/mortgage_2000.tgz --directory /dbfs/FileStore/tables/mortgage
In Cell 3, update the data paths if necessary. The example notebook merges the columns and prepares the data for XGBoost training. The temporary and final output results are written back to the Databricks File System (dbfs).
1orig_perf_path='dbfs:///FileStore/tables/mortgage/perf/*'
2orig_acq_path='dbfs:///FileStore/tables/mortgage/acq/*'
3tmp_perf_path='dbfs:///FileStore/tables/mortgage_parquet_gpu/perf/'
4tmp_acq_path='dbfs:///FileStore/tables/mortgage_parquet_gpu/acq/'
5output_path='dbfs:///FileStore/tables/mortgage_parquet_gpu/output/'
To run the notebook, click Run All.
Hints#
Spark logs in Databricks are removed upon cluster shutdown. It’s possible to save logs in a cloud storage location using Databricks cluster log delivery. Enable this option before starting the cluster to capture the logs.