CV Pipeline Customization#
The VSS CV pipeline consists of three main customizable components:
an object detector
a multi-object tracker
CV models used inside tracker
Each component can be customized with a fine-tuned version based on the use-case. The pipeline can also be customized for higher performance by running multiple chunks of video on the same GPU. These customizations can be done before deployment in the following ways:
For Deploy Using Helm update the
overrides.yamlfile as described below in section Customizations in Helm Chart DeploymentFor Deploy Using Docker Compose X86 set the appropriate environment variables in
.envfile as described below in section CV Customizations in Docker Compose Deployment
Customizations in Helm Chart Deployment#
Prerequisites#
The engine files for the models are generated when the VSS container is initialized. These engine files are cached in NGC_MODEL_CACHE.
If you are configuring a custom model, make sure to delete any stale TensorRT engines in NGC_MODEL_CACHE before restarting the VSS container.
This can be done by running the following command:
sudo microk8s kubectl delete pvc vss-ngc-model-cache-pvc
Customizing the Detector#
The grounding DINO detector can be customized to use a locally available ONNX model. The CV pipeline will generate the engine file for the custom model. It can also be customized to run at a specific frame interval. Here are the steps to customize the grounding DINO detector:
Add the
GDINO_MODEL_PATHenvironment variable,extraPodVolumesandextraPodVolumeMountsto the overrides file described in Enabling CV Pipeline: Set-of-Marks (SOM) and Metadata as shown below.
vss:
  applicationSpecs:
    vss-deployment:
      containers:
        vss:
          env:
          - name: GDINO_MODEL_PATH
            value: "/models/gdino/<your_finetuned_gdino_model>.onnx"
  extraPodVolumes:
  - name: gdino
    hostPath:
      path: <GDINO_MODEL_DIR>   # Path on host
  extraPodVolumeMounts:
  - name: gdino
    mountPath: /models/gdino
The detector can also be customized to run at a specific frame interval by setting
GDINO_INFERENCE_INTERVALas shown in Enabling CV Pipeline: Set-of-Marks (SOM) and Metadata. The value ofGDINO_INFERENCE_INTERVALis set to1by default, meaning Grounding DINO will run inference for every alternate frame. To get maximum accuracy,GDINO_INFERENCE_INTERVALmust be set to0, meaning Grounding DINO will run inference for every frame.
Customizing the Tracker#
The default tracker configuration is provided with the VSS blueprint and can be accessed in two ways:
cv_pipeline_tracker_config.ymlinnvidia-blueprint-vss/charts/vss/values.yamlof the VSS BlueprintIncluded inside the VSS container at
/opt/nvidia/via/config/default_tracker_config.yml
The default tracker configuration is tuned for performance, while object segmentation is disabled. For more details about the tracker configuration parameters, refer to NvMultiObjectTracker Library.
A custom tracker configuration using MaskTracker for higher accuracy tracking and object segmentation is also provided as part of the VSS blueprint. This higher accuracy configuration is included inside the VSS container at /opt/nvidia/via/config/config_tracker_MaskTracker.yml.
To use the higher accuracy tracker configuration, copy the contents of config_tracker_MaskTracker.yml to the overrides file described in Enabling CV Pipeline: Set-of-Marks (SOM) and Metadata as shown below.
vss:
  configs:
    cv_pipeline_tracker_config.yml:
      <Paste the tracker configs here, such as below>
      BaseConfig:
        minDetectorConfidence: 0.3529
      TargetManagement:
        enableBboxUnClipping: 1
        preserveStreamUpdateOrder: 0
        ...
      Segmenter:
        segmenterType: 1
        # below is the default Segmenter config file saved in VSS container already
        segmenterConfigPath: "/opt/nvidia/via/config/config_tracker_module_Segmenter.yml"
  applicationSpecs:
    vss-deployment:
      ...
For finer control, individual parameters can be modified in cv_pipeline_tracker_config.yml section in the overrides file.
Customizing Models in the Tracker#
The tracker internally uses the following models:
Re-identification model for higher accuracy tracking as mentioned in VSS CV Pipeline Models
MaskTracker uses SAM2 for tracking and segmentation as mentioned in VSS CV Pipeline Models. It includes image encoder, memory attention, mask decoder, and memory encoder models.
All these default models can be replaced with custom finetuned models. Custom finetuned models can be configured in cv_pipeline_tracker_config.yml section in the overrides file as described below.
Mount the custom models: The custom models must be locally available on the host machine. Mount the host machine paths by adding
extraPodVolumesandextraPodVolumeMountsto the overrides file:
vss:
  extraPodVolumes:
  - name: tracker-models
    hostPath:
      path: <TRACKER_MODELS_DIR>   # Path on host
  extraPodVolumeMounts:
  - name: tracker-models
    mountPath: /models/tracker_models
  applicationSpecs:
    vss-deployment:
      ...
Provide fine-tuned ONNX models: Once custom ONNX models are provided, change below sections in the overrides file.
To update the ReID model, replace the existing
onnxFilefield inReIDwith your own fine-tuned ONNX model incv_pipeline_tracker_config.ymlsection.vss: configs: cv_pipeline_tracker_config.yml: ... ReID: onnxFile: /models/tracker_models/<path to your custom reid onnx file> ...
To update the Segmenter models, change
segmenterConfigPathto/opt/configs/cv_pipeline_tracker_module_Segmenter.ymlincv_pipeline_tracker_config.ymlsection. This is the overridden Segmenter config file path. Create a sectioncv_pipeline_tracker_module_Segmenter.ymlin the overrides file and replace the existingonnxFilefields inImageEncoder,MemoryAttention,MaskDecoder, andMemoryEncoderwith your own fine-tuned ONNX models.vss: configs: cv_pipeline_tracker_config.yml: ... Segmenter: segmenterType: 1 # the Segmenter config overridden in the helm chart will be mapped to below path in VSS container segmenterConfigPath: /opt/configs/cv_pipeline_tracker_module_Segmenter.yml cv_pipeline_tracker_module_Segmenter.yml: ... ImageEncoder: ... onnxFile: /models/tracker_models/<path to your custom image encoder onnx file> MemoryAttention: ... onnxFile: /models/tracker_models/<path to your custom memory attention onnx file> MaskDecoder: ... onnxFile: /models/tracker_models/<path to your custom mask decoder onnx file> MemoryEncoder: ... onnxFile: /models/tracker_models/<path to your custom memory encoder onnx file>
The engine files will be generated internally by the VSS container. Hence, do not change the modelEngineFile field, which contains dummy paths.
Provide engine files: Alternatively, engine files can be directly changed in the overrides file. If provided, they take precedence over ONNX files.
To update the ReID model, replace the existing
modelEngineFilefield inReIDwith your own custom engine file incv_pipeline_tracker_config.ymlsection.vss: configs: cv_pipeline_tracker_config.yml: ... ReID: modelEngineFile: /models/tracker_models/<path to your custom reid engine file> ...
To update the Segmenter models, change
segmenterConfigPathto/opt/configs/cv_pipeline_tracker_module_Segmenter.ymlincv_pipeline_tracker_config.ymlsection. This is the overridden Segmenter config file path. Create a sectioncv_pipeline_tracker_module_Segmenter.ymlin the overrides file and replace the existingmodelEngineFilefields inImageEncoder,MemoryAttention,MaskDecoder, andMemoryEncoderwith your own custom engine files.vss: configs: cv_pipeline_tracker_config.yml: ... Segmenter: segmenterType: 1 # the Segmenter config overridden in the helm chart will be mapped to below path in VSS container segmenterConfigPath: /opt/configs/cv_pipeline_tracker_module_Segmenter.yml cv_pipeline_tracker_module_Segmenter.yml: ... ImageEncoder: ... modelEngineFile: /models/tracker_models/<path to your custom image encoder engine file> MemoryAttention: ... modelEngineFile: /models/tracker_models/<path to your custom memory attention engine file> MaskDecoder: ... modelEngineFile: /models/tracker_models/<path to your custom mask decoder engine file> MemoryEncoder: ... modelEngineFile: /models/tracker_models/<path to your custom memory encoder engine file>
Customizing CV Pipeline Chunks#
The CV pipeline can be configured to run multiple chunks of video on the same GPU. The default CV pipeline is configured to run maximum 2 chunks of video on the same GPU. This can be customized by setting the NUM_CV_CHUNKS_PER_GPU parameter. Increasing NUM_CV_CHUNKS_PER_GPU will give better performance at the cost of increased GPU utilization and memory consumption. Recommended values are 4 and 6 for increased performance.
The parameter NUM_CV_CHUNKS_PER_GPU can be configured in the overrides file as shown below.
vss:
  applicationSpecs:
    vss-deployment:
      containers:
        vss:
          env:
          - name: NUM_CV_CHUNKS_PER_GPU
            value: "4"
            ...
CV Customizations in Docker Compose Deployment#
Customizing the Detector#
The grounding DINO detector can be customized to use a locally available ONNX model. The CV pipeline will generate the engine file for the custom model. It can also be customized to run at a specific frame interval. Here are the steps to customize the grounding DINO detector:
Set
GDINO_MODEL_PATHenvironment variable to point to the ONNX model file. The model file must be present in theMODEL_ROOT_DIRdirectory, which is getting mounted in the Docker container.
GDINO_MODEL_PATH=<MODEL_ROOT_DIR>/<path_to_your_finetuned_gdino_model>.onnx
The detector can also be customized to run at a specific frame interval by setting
GDINO_INFERENCE_INTERVAL. The value ofGDINO_INFERENCE_INTERVALis set to1by default, meaning, Grounding DINO will run inference for every alternate frame. To get maximum accuracy,GDINO_INFERENCE_INTERVALmust be set to0, meaning, Grounding DINO will run inference for every frame. For example:
GDINO_INFERENCE_INTERVAL=0
Customizing the Tracker#
The default tracker configuration is provided with the VSS blueprint and can be accessed in VSS container at /opt/nvidia/via/config/default_tracker_config.yml.
The default tracker configuration is tuned for performance. For more details about the tracker configuration parameters, refer to NvMultiObjectTracker Library.
A custom tracker configuration using MaskTracker for higher accuracy tracking and object segmentation is also provided as part of the VSS blueprint. This higher accuracy configuration is included inside the VSS container at /opt/nvidia/via/config/config_tracker_MaskTracker.yml.
To use the higher accuracy tracker configuration, copy the file config_tracker_MaskTracker.yml in host, and set the path in CV_PIPELINE_TRACKER_CONFIG environment variable.
CV_PIPELINE_TRACKER_CONFIG=<path to config_tracker_MaskTracker.yml>
This is just one example of tracker configuration. You can create your own tracker configuration by referring to the NvMultiObjectTracker Library and modify the parameters as per your requirements.
Customizing Models in the Tracker#
The tracker internally uses the following models:
Re-identification model for higher accuracy tracking as mentioned in VSS CV Pipeline Models
MaskTracker uses SAM2 for tracking and segmentation as mentioned in VSS CV Pipeline Models. It includes image encoder, memory attention, mask decoder, and memory encoder models.
All these default models can be replaced with custom finetuned models. Custom finetuned models can be configured in custom tracker configuration file that is set using CV_PIPELINE_TRACKER_CONFIG environment variable.
To customize the models, follow the steps below:
Mount the custom models: The custom models must be locally available on the host machine in
MODEL_ROOT_DIRdirectory.Update fine-tuned ONNX models in tracker configuration: Once custom ONNX models are provided, change below sections in the custom tracker configuration file set by
CV_PIPELINE_TRACKER_CONFIGenvironment variable.
To update the ReID model, replace the existing
onnxFilefield inReIDwith your own fine-tuned ONNX model.... ReID: ... onnxFile: <MODEL_ROOT_DIR>/<path to your custom reid onnx file> ...
To update the Segmenter models, update the
segmenterConfigPathfield in the tracker configuration file to point to your custom segmenter config file (which must be located in theMODEL_ROOT_DIRdirectory). In your custom segmenter config fileconfig_tracker_module_Segmenter_custom.yml, replace the existingonnxFilefields inImageEncoder,MemoryAttention,MaskDecoder, andMemoryEncoderwith your own fine-tuned ONNX models.... Segmenter: segmenterConfigPath: <path to your custom segmenter config file> # must located in <MODEL_ROOT_DIR>. For example <MODEL_ROOT_DIR>/config_tracker_module_Segmenter_custom.yml
In your custom segmenter config file
config_tracker_module_Segmenter_custom.yml, update the onnx paths:# Assuming below onnxFiles are the custom models ... ImageEncoder: ... onnxFile: <MODEL_ROOT_DIR>/<path to your custom image encoder onnx file> MemoryAttention: ... onnxFile: <MODEL_ROOT_DIR>/<path to your custom memory attention onnx file> MaskDecoder: ... onnxFile: <MODEL_ROOT_DIR>/<path to your custom mask decoder onnx file> MemoryEncoder: ... onnxFile: <MODEL_ROOT_DIR>/<path to your custom memory encoder onnx file>
The engine files are generated internally by the VSS container. Do not change the modelEngineFile field, which contains dummy paths.
Provide engine files: Alternatively, engine files can be directly provided in the custom tracker configuration file. If provided, they take precedence over ONNX files.
To update the ReID model, replace the existing
modelEngineFilefield inReIDwith your own custom engine file.... ReID: ... modelEngineFile: <MODEL_ROOT_DIR>/<path to your custom reid engine file> ...
To update the Segmenter models, update the
segmenterConfigPathfield in the tracker configuration file to point to your custom segmenter config file (which must be located in theMODEL_ROOT_DIRdirectory). In your custom segmenter config fileconfig_tracker_module_Segmenter_custom.yml, replace the existingmodelEngineFilefields inImageEncoder,MemoryAttention,MaskDecoder, andMemoryEncoderwith your own custom engine files.... Segmenter: ... segmenterConfigPath: <path to your custom segmenter config file> # must located in <MODEL_ROOT_DIR>. For example <MODEL_ROOT_DIR>/config_tracker_module_Segmenter_custom.yml
In your custom segmenter config file
config_tracker_module_Segmenter_custom.yml, update the engine file paths:# Assuming below engineFiles are the custom models ... ImageEncoder: ... modelEngineFile: <MODEL_ROOT_DIR>/<path to your custom image encoder engine file> MemoryAttention: ... modelEngineFile: <MODEL_ROOT_DIR>/<path to your custom memory attention engine file> MaskDecoder: ... modelEngineFile: <MODEL_ROOT_DIR>/<path to your custom mask decoder engine file> MemoryEncoder: ... modelEngineFile: <MODEL_ROOT_DIR>/<path to your custom memory encoder engine file>
Customizing CV Pipeline Chunks#
The CV pipeline can be configured to run multiple chunks of video on the same GPU. The default CV pipeline is configured to run maximum 2 chunks of video on the same GPU. This can be customized by setting the NUM_CV_CHUNKS_PER_GPU parameter. Increasing NUM_CV_CHUNKS_PER_GPU will give better performance at the cost of increased GPU utilization and memory consumption. Recommended values are 4 and 6 for increased performance.
The parameter NUM_CV_CHUNKS_PER_GPU can be configured in .env file:
NUM_CV_CHUNKS_PER_GPU=4
Recommendations for CV Pipeline Configuration#
We recommend using two sets of configurations for the CV Pipeline:
Performance mode: This is the default configuration and is optimized for performance. It uses the following settings:
GDINO_INFERENCE_INTERVAL = 1
Use a lightweight backbone like Swin-Tiny in grounding DINO detector
Tracker configuration:
default_tracker_config.ymlModels used by tracker: Reidentification model
The metadata generated by CV pipeline will consist of bounding boxes, object IDs, and object types.
Accuracy mode: This configuration can be used for higher accuracy detection and tracking. It can be configured using the following settings:
GDINO_INFERENCE_INTERVAL = 0
Use a high accuracy backbone like SwinB in grounding DINO detector
Tracker configuration:
config_tracker_MaskTracker.ymlModels used by tracker: Reidentification model and SAM2 Segmenter models
The metadata generated by CV pipeline will additionally consist of objects masks along with bounding boxes, object IDs, and object types. In accuracy mode, object masks are overlaid on the video and provided as input to VLM.
Example: Guide to Customize the CV Pipeline to High Accuracy Mode#
VSS CV pipeline defaults to performance mode. This section provides the steps for customizing the CV pipeline to high accuracy mode.
Clear the PVC cache to delete stale TensorRT engines using the following command:
sudo microk8s kubectl delete pvc vss-ngc-model-cache-pvc
VLM that gives the best accuracy is GTP-4o. Set the
openai api keysecret:
export OPENAI_API_KEY=<your_openai_api_key>
sudo microk8s kubectl create secret generic openai-api-key-secret --from-literal=OPENAI_API_KEY=$OPENAI_API_KEY
Generate the
swinb.onnxfile:Obtain the PyTorch model from Grounding DINO repo
Then export the model to ONNX format using TAO Toolkit (refer to Exporting Grounding DINO guide for instructions)
Download the overrides_cv_accuracy_mode.yaml file and change the mount path in
overrides_cv_accuracy_mode.yamlto the host path folder ofswinb.onnxat following location:
extraPodVolumes:
  - name: gdino
    hostPath:
      path: <GDINO_MODEL_DIR>   # Path on host
Deploy using Helm with the
overrides_cv_accuracy_mode.yamlfile:
sudo microk8s helm install vss-blueprint nvidia-blueprint-vss-2.4.1.tgz --set global.ngcImagePullSecretName=ngc-docker-reg-secret -f overrides_cv_accuracy_mode.yaml
You can refer to Deploy Using Helm for more details on deployment status and accessing the VSS UI.
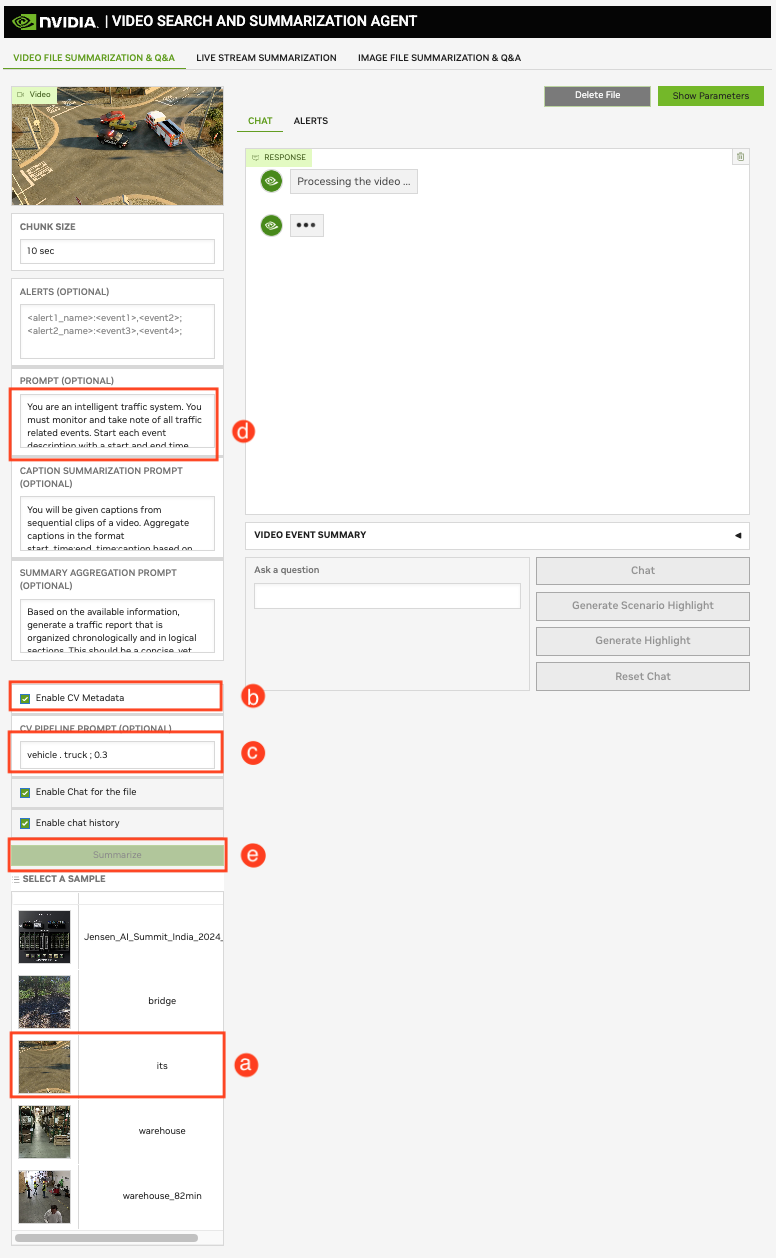
After all the pods are running, open the VSS UI and follow these steps:
Select the “its”, that is, traffic video. Tick checkbox enable CV Metadata. Set the following CV pipeline prompt
vehicle . truck;0.3. Set the prompt to: Traffic Camera Video (its) (With “Enable CV Metadata” Selected). Click on the Summarize button.
The above steps are shown in the screenshot below:
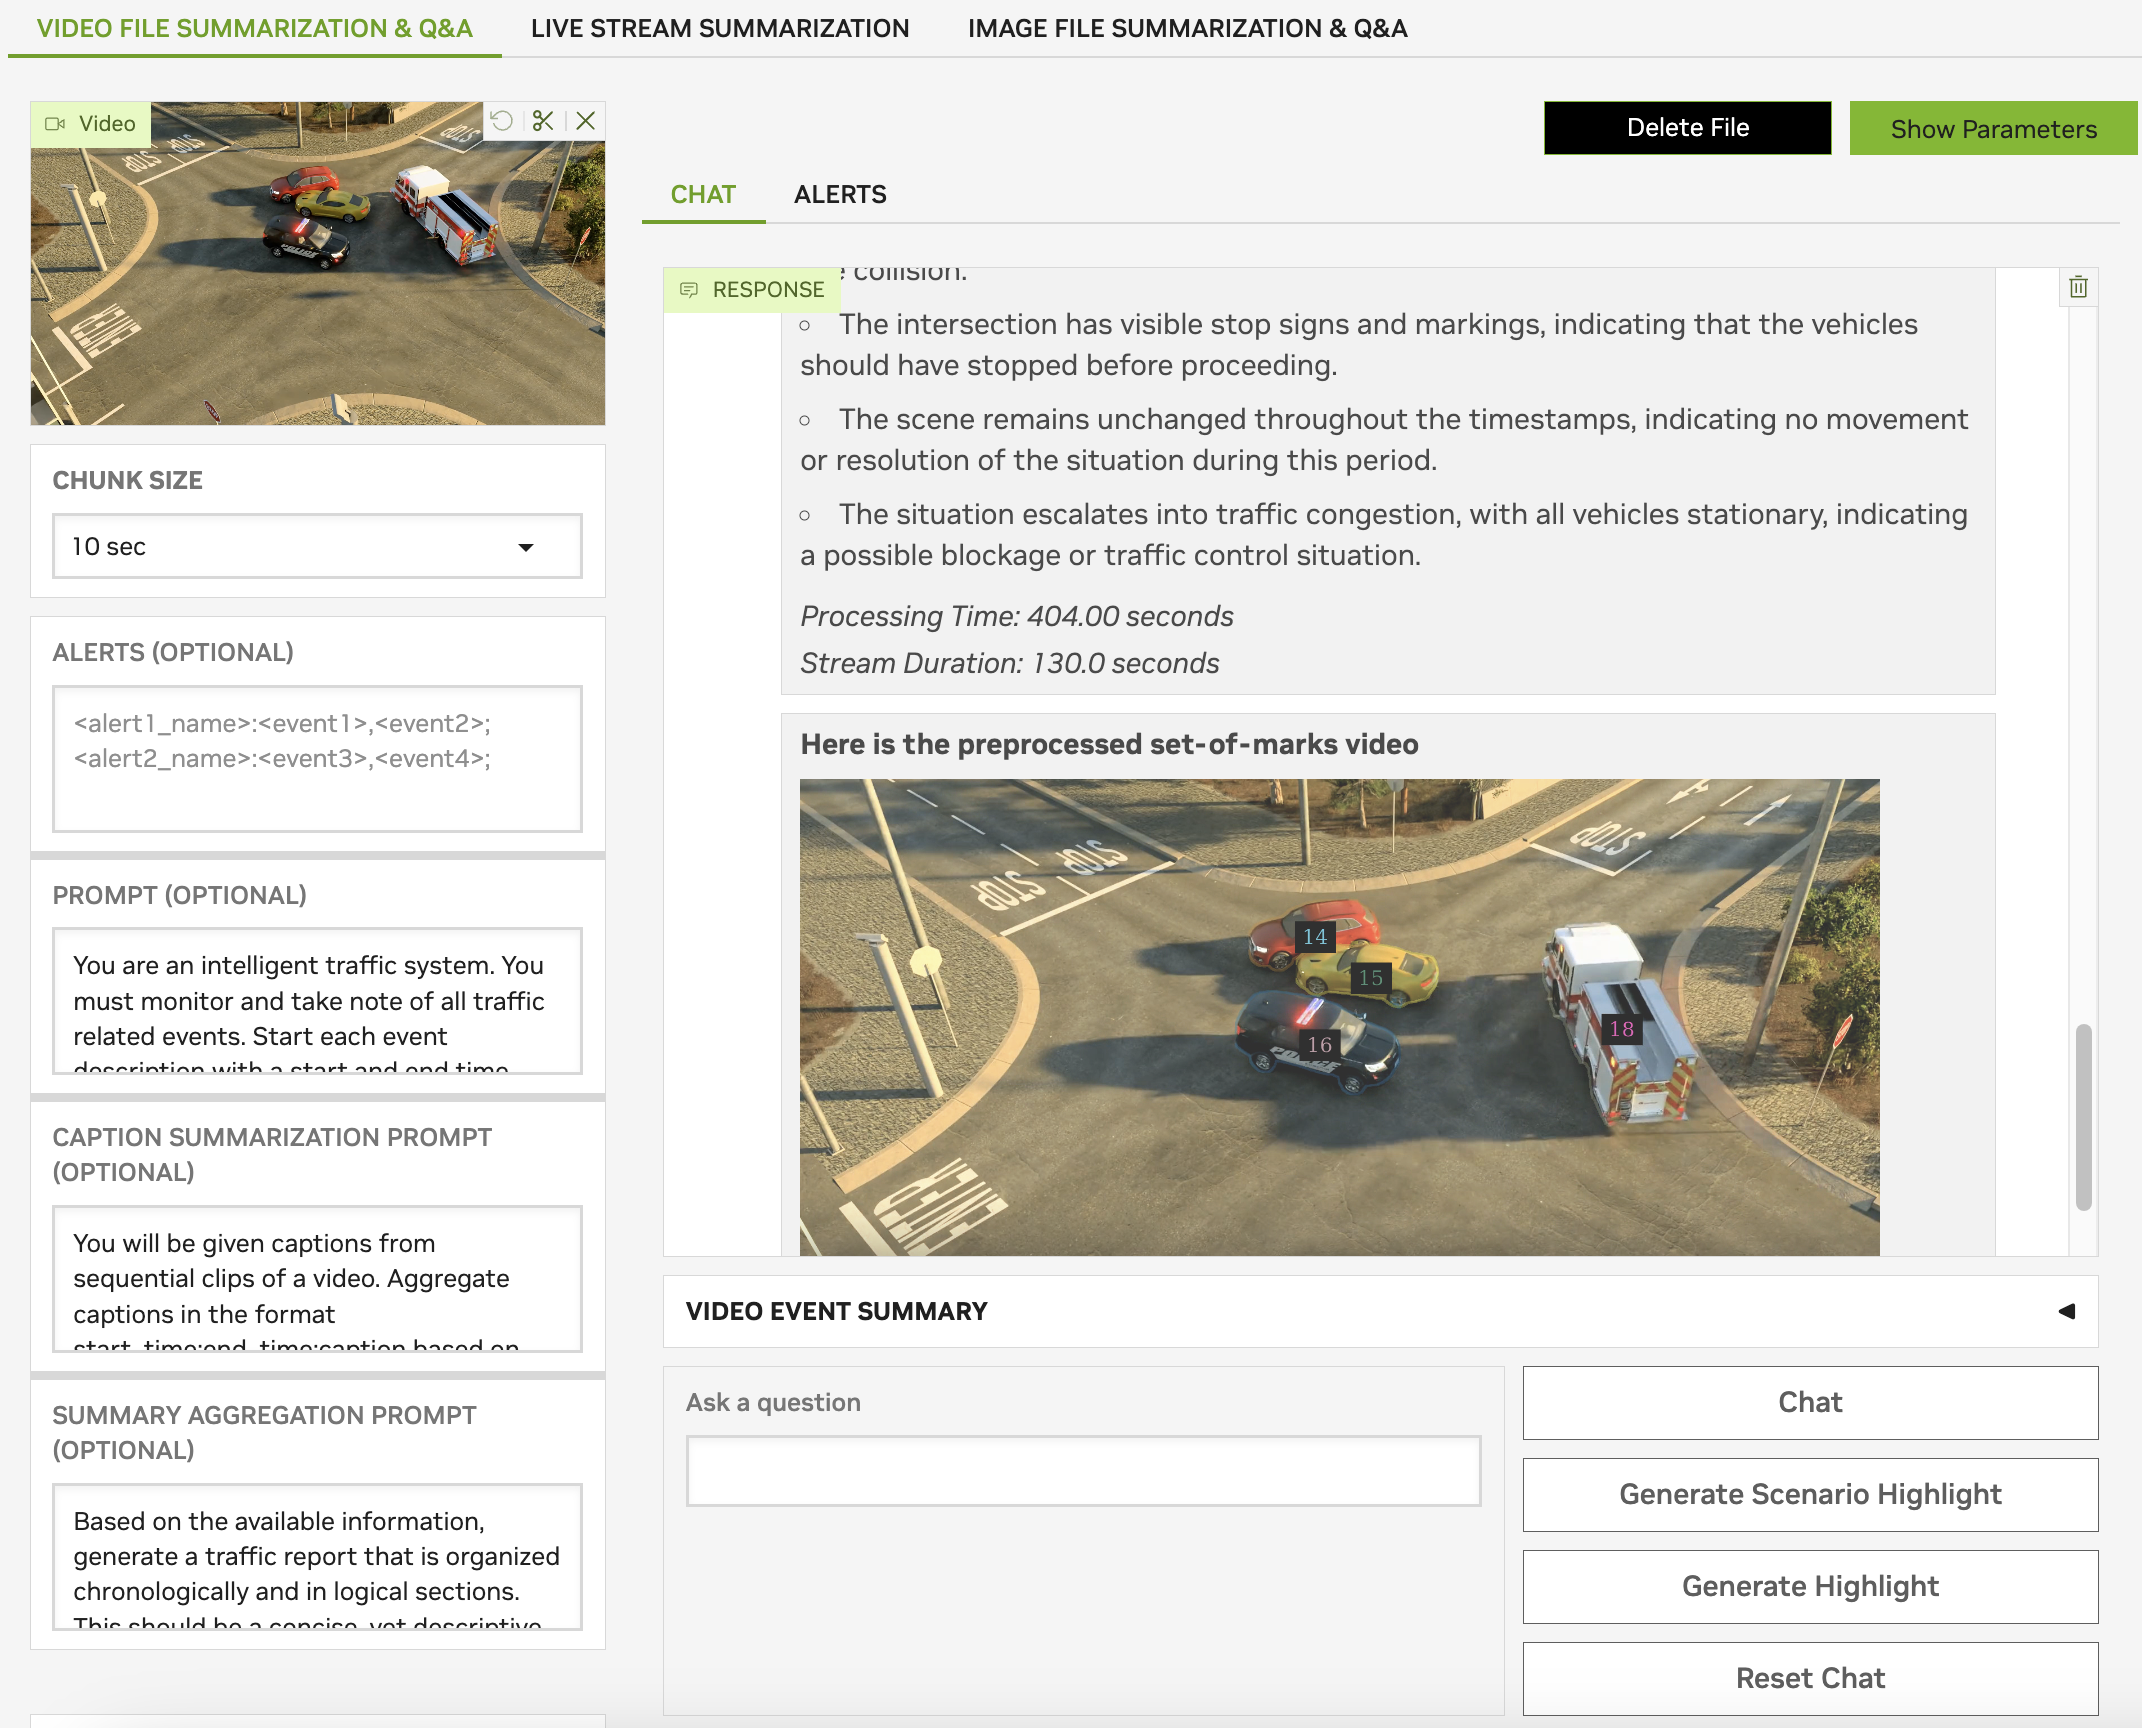
The summarization process will start in VSS. After the process completes, VSS UI is updated with summary and the Set-of-Marks overlay video as shown below. The video will contain the IDs and masks overlaid on the object. The Set-of-Marks video contains only the frames sampled for VLM and not all the frames of the input video.
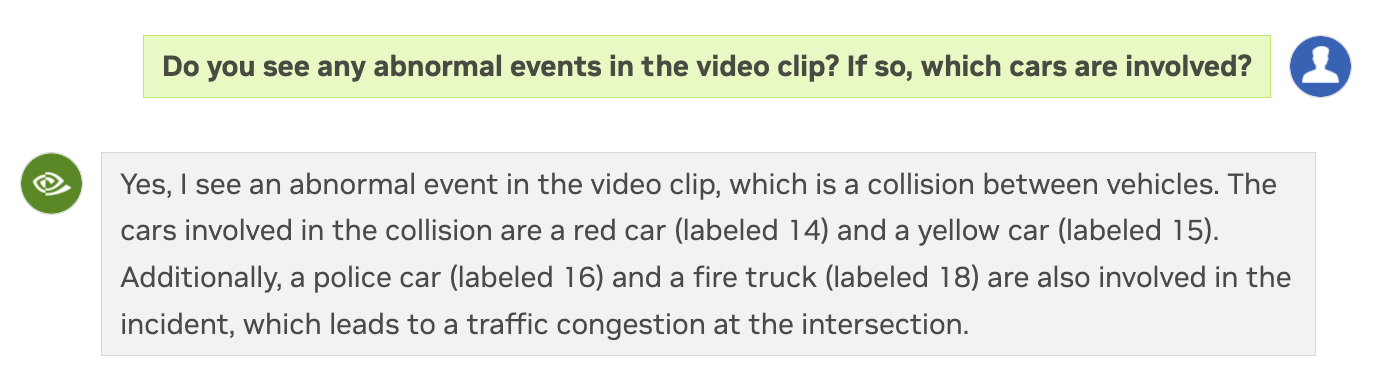
Based on the summary and Set-of-Marks video, you can ask questions in chat. One sample question is:
Do you observe any abnormal events in the video clip? If so, which cars are involved?
Verify that you observe an answer similar to: