UI Application#
A sample UI application based on Gradio is provided along with VSS. It supports file and live stream summarization, Q&A, and alerts.
The VSS container logs show the port on which the UI application server is running. The UI can be accessed by navigating to
http://<VIA_HOST_IP>:<FRONTEND_PORT>.
File Summarization, Q&A, and Alerts#
Note
File types supported: mp4, mkv - with h264/h265 video and Opus/Vorbis audio codecs.
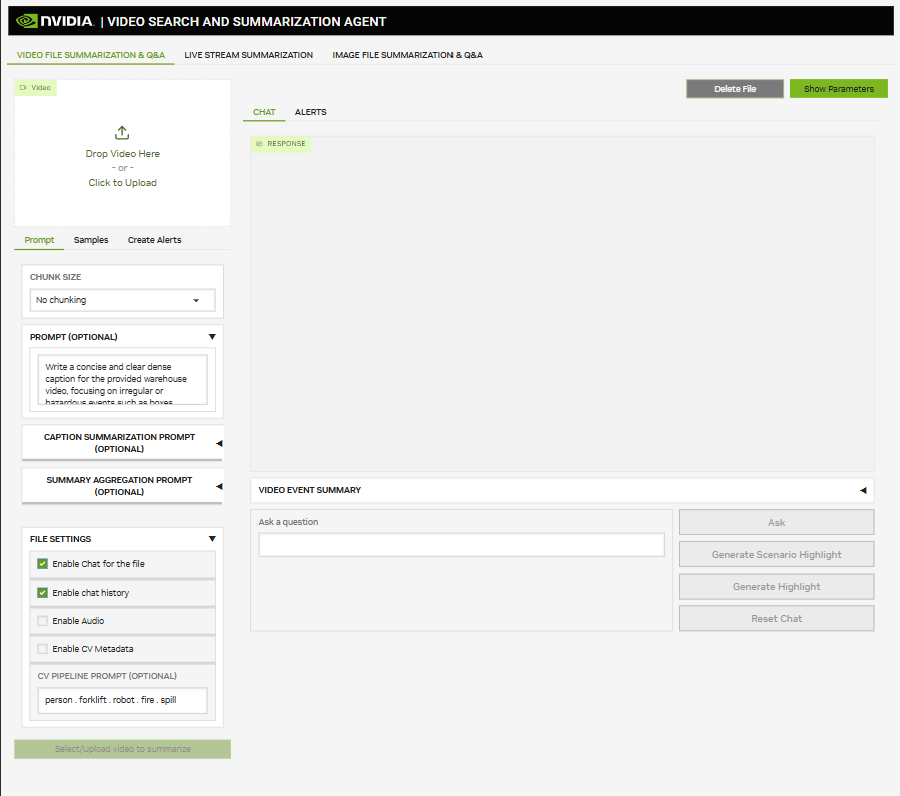
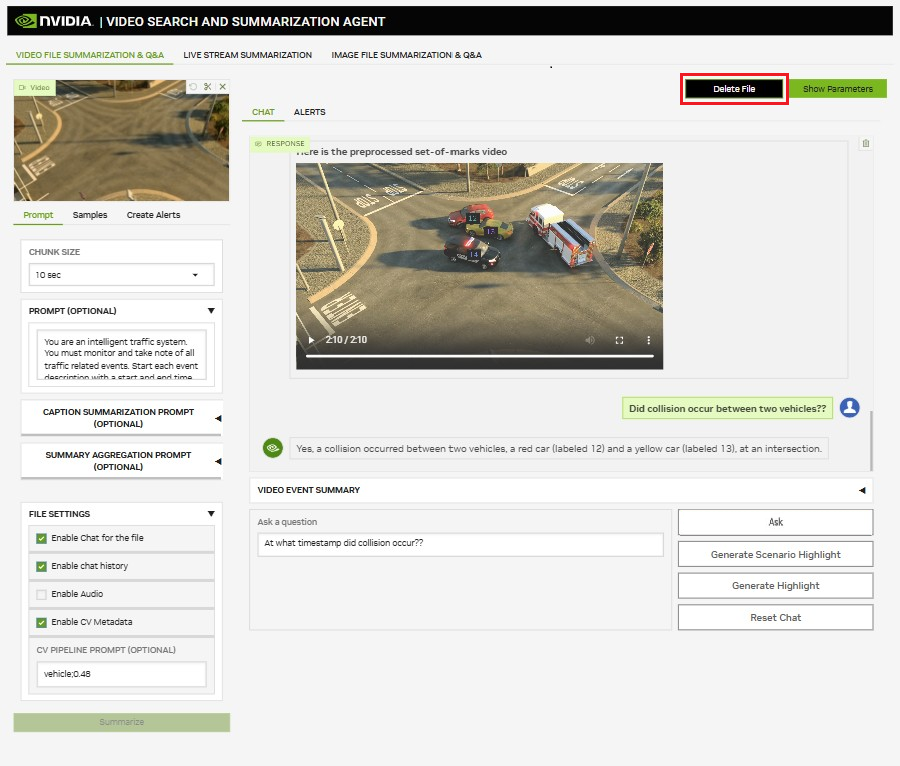
The following image shows the file summarization page of the UI. It also supports Q&A and alerts for video files.
To start file summarization, use the following:
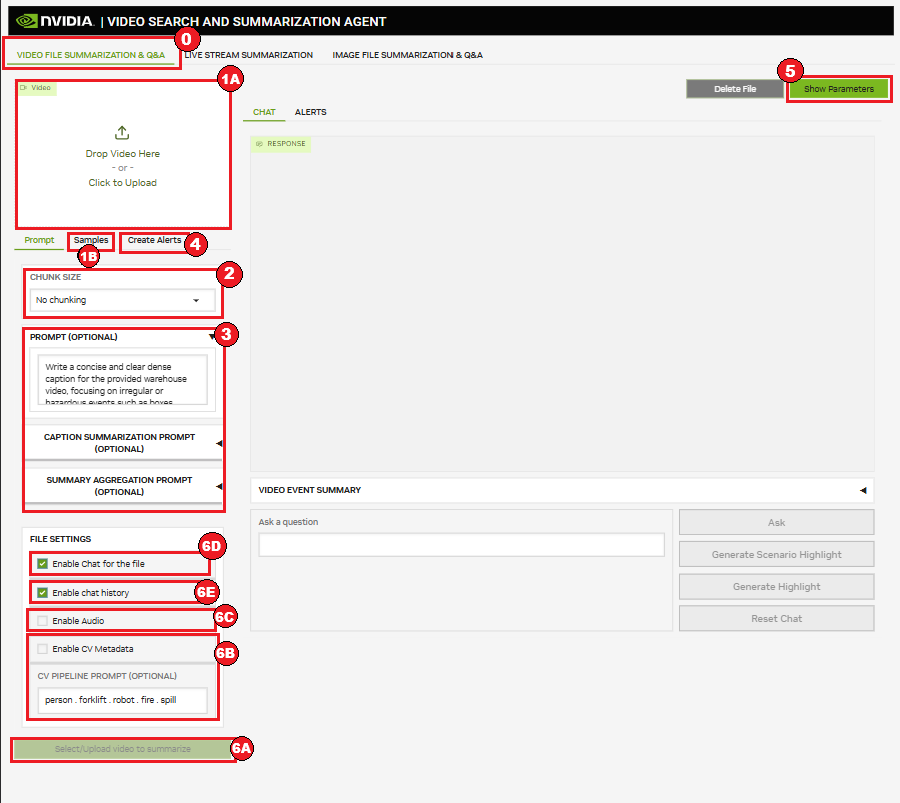
Ensure the Video File Summarization tab is selected.
Either:
Upload a file.
Choose a preloaded example from Samples Tab.
Select the chunk size from the drop down list.
(Optional) Set VLM prompt and summarization prompts for CA-RAG. Refer to Tuning Prompts for more details on the prompts.
(Optional) Refer to Add Alerts to Video File Summarization.
Adjust the parameters by clicking on Show Parameters and modifying the available parameters (Optional).
Select one of the following actions:
Click Summarize to start summarization only.
(Optional) Check Enable CV Metadata checkbox to enable CV metadata generation. Modify the prompt to detect specific objects.
(Optional) Check Enable Audio checkbox to enable audio transcript generation.
(Optional) Check Enable Chat for the file checkbox to enable Q&A after summarization.
(Optional) Check Enable chat history checkbox to preserve the context of the Q&A session. Q&A will take into account the conversation history.
Note
The audio and CVrelated configurations are hidden by default. Audio / CV pipeline needs to be enabled for the options to show.
The button and checkbox are enabled after a video is selected or uploaded.
The summarization takes from a few seconds to minutes, depending on various factors including video length, chunk size, prompt, VLM model, and GPUs installed on the host.
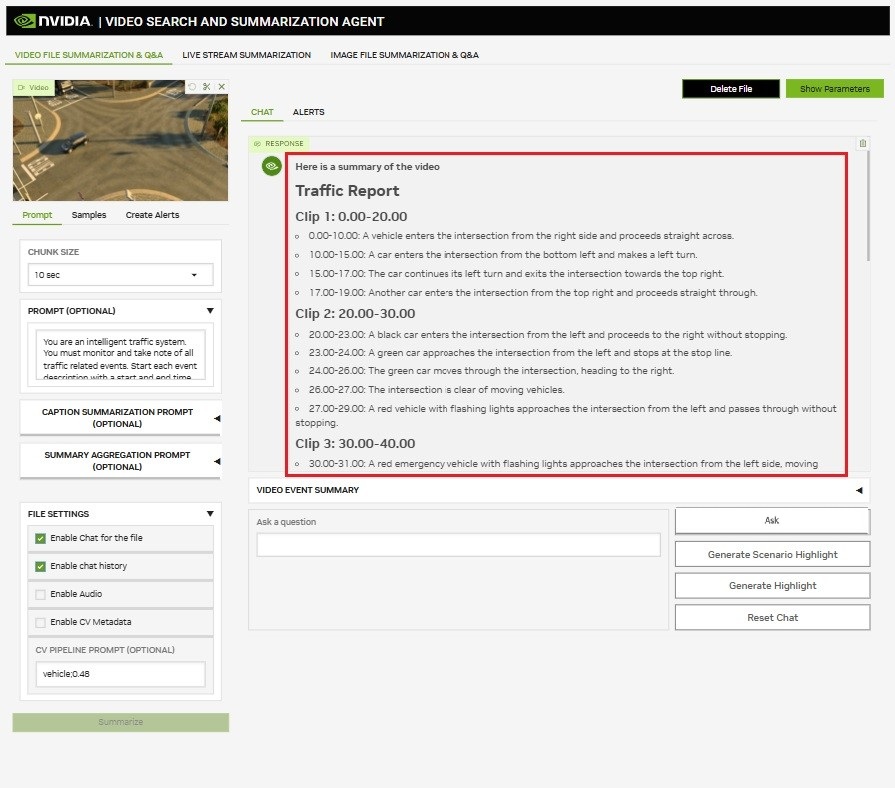
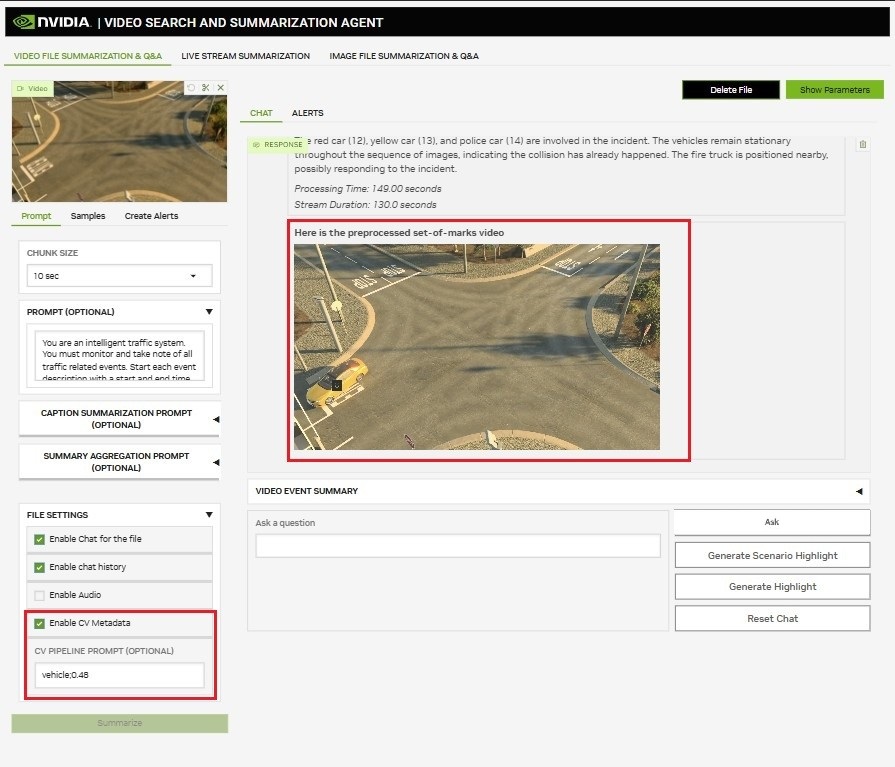
After the processing is finished, the response shows the video summary. For example:
If Enable CV Metadata was chosen, the response also shows the video overlaid with CV metadata (that is, masks and tracking IDs for detected objects) after the summary. (Optional) Modify the CV PIPELINE PROMPT to detect specific objects. For example:
Add Alerts to Video File Summarization#
For adding alerts to Video File Summarization, use the following steps:
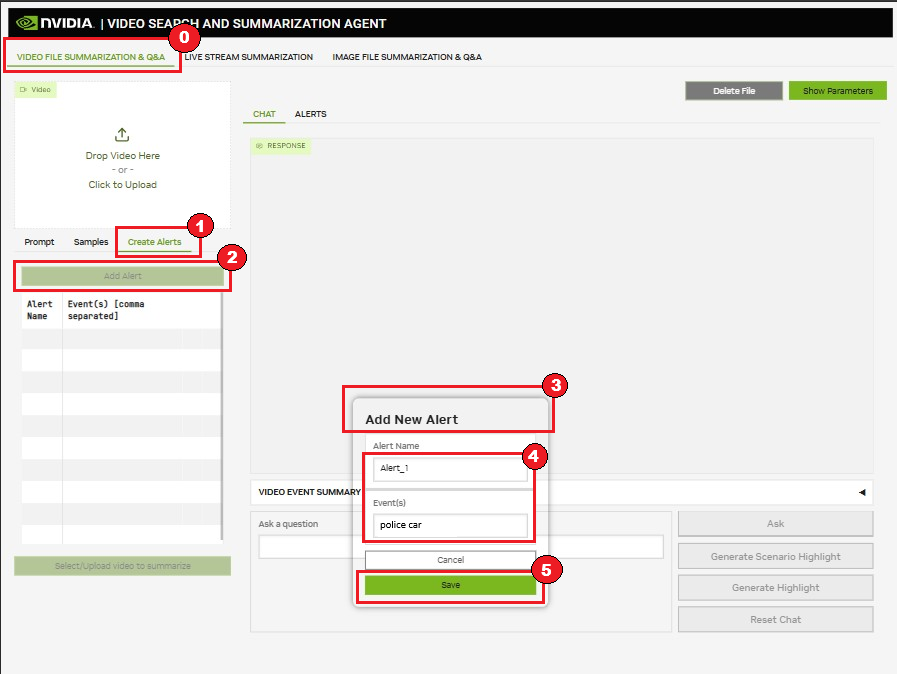
Ensure the Video File Summarization tab is selected.
Click Create Alerts.
Then click on Add Alert.
This will open a popup Add New Alert.
Enter the alert name and the events to alert on.
Click on Save to save the alert.
Note
The UI does not support adding/removing/modifying alerts for video file summarization after the summarization is started.
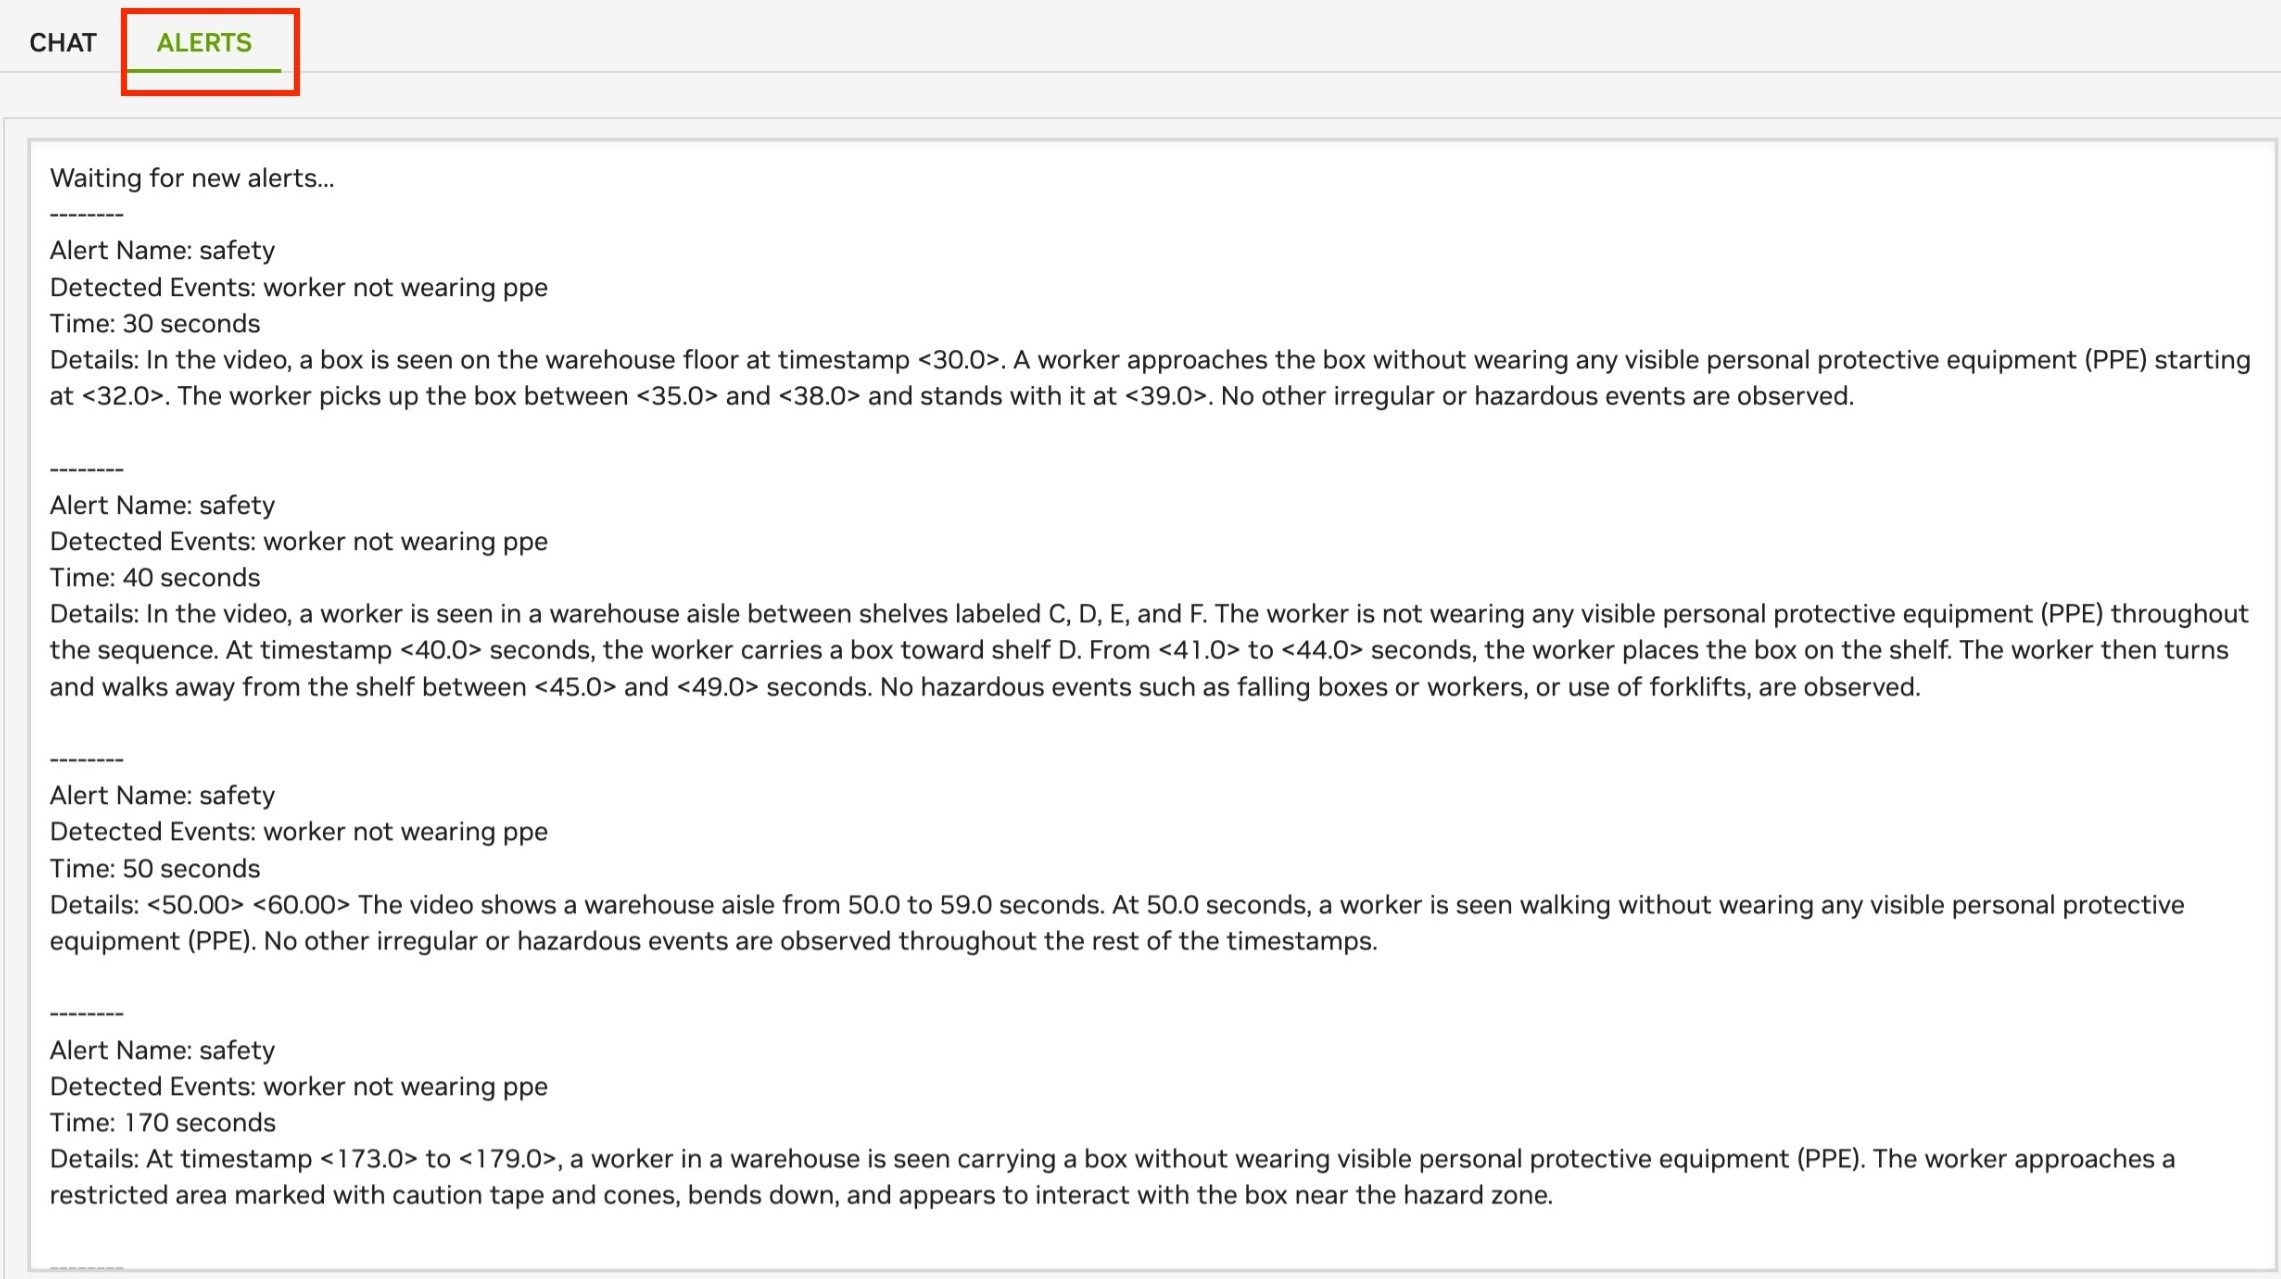
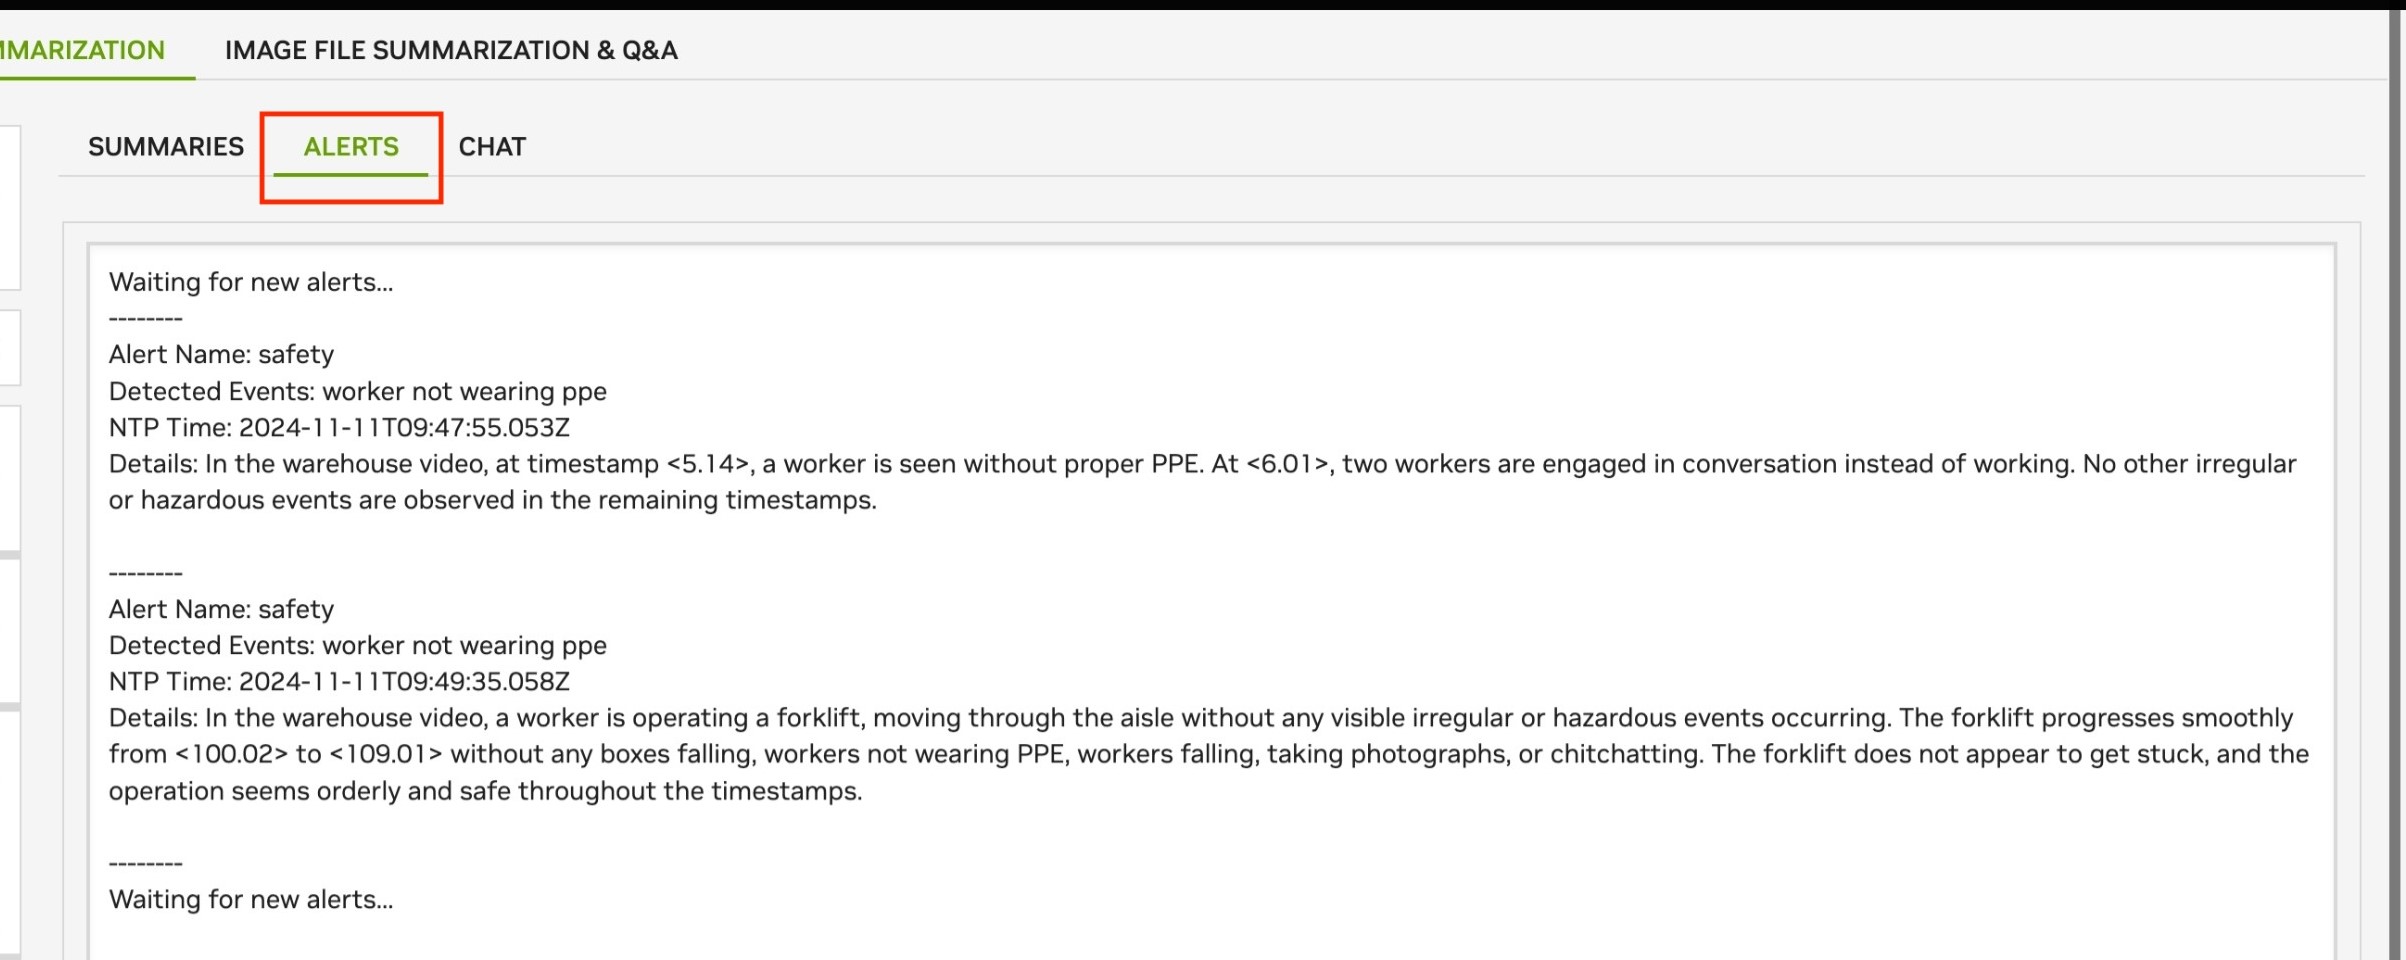
If any alerts were configured and detected, they are visible under the Alerts tab. For example:
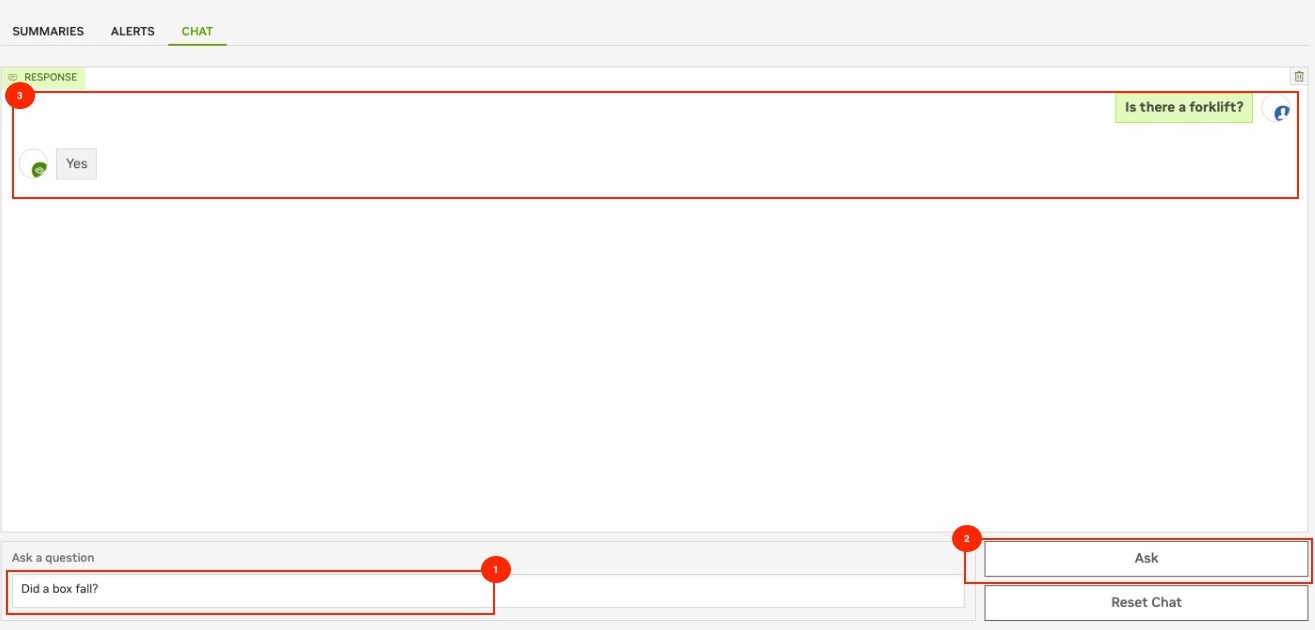
To do Q&A on the file (if Chat was chosen):
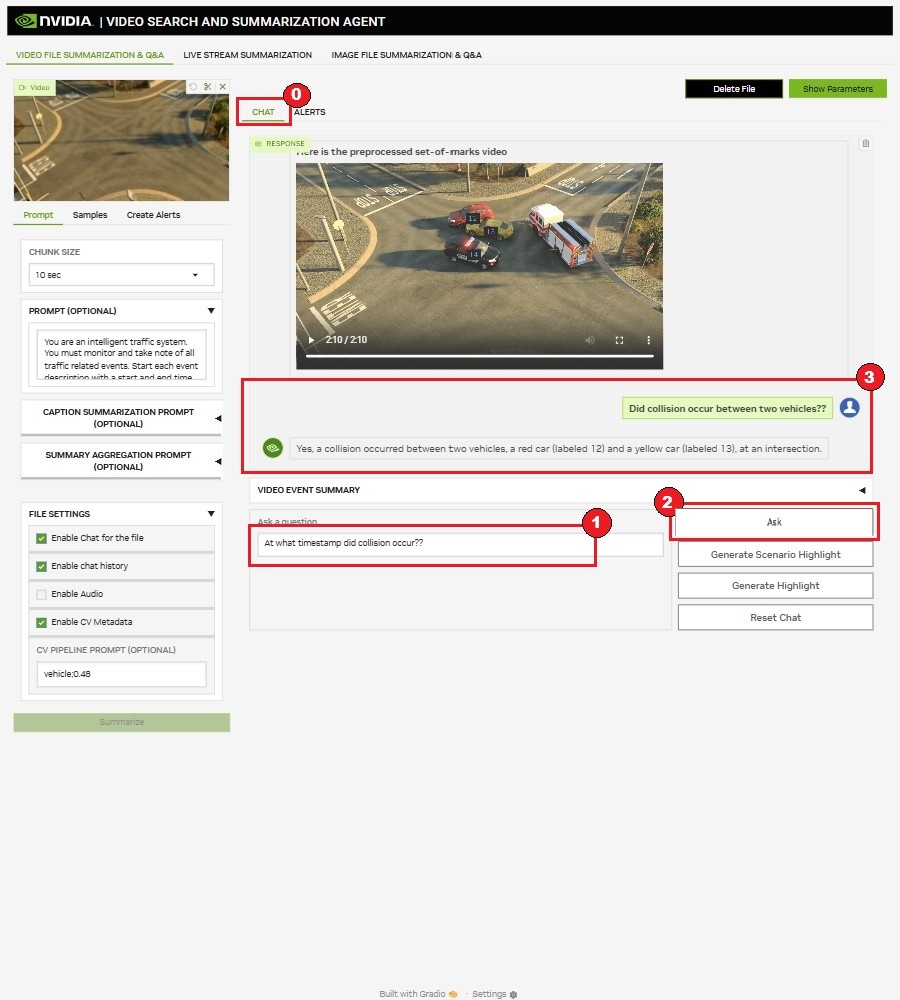
Go back to Chat.
Enter a question in the text box.
Click Ask.
Verify the answer is visible in the Chat window after the request is processed.
Note
The summarization and chat requests will keep running on the server side till the request is completed even after the browser window is closed or refreshed.
To generate highlights from the video file:
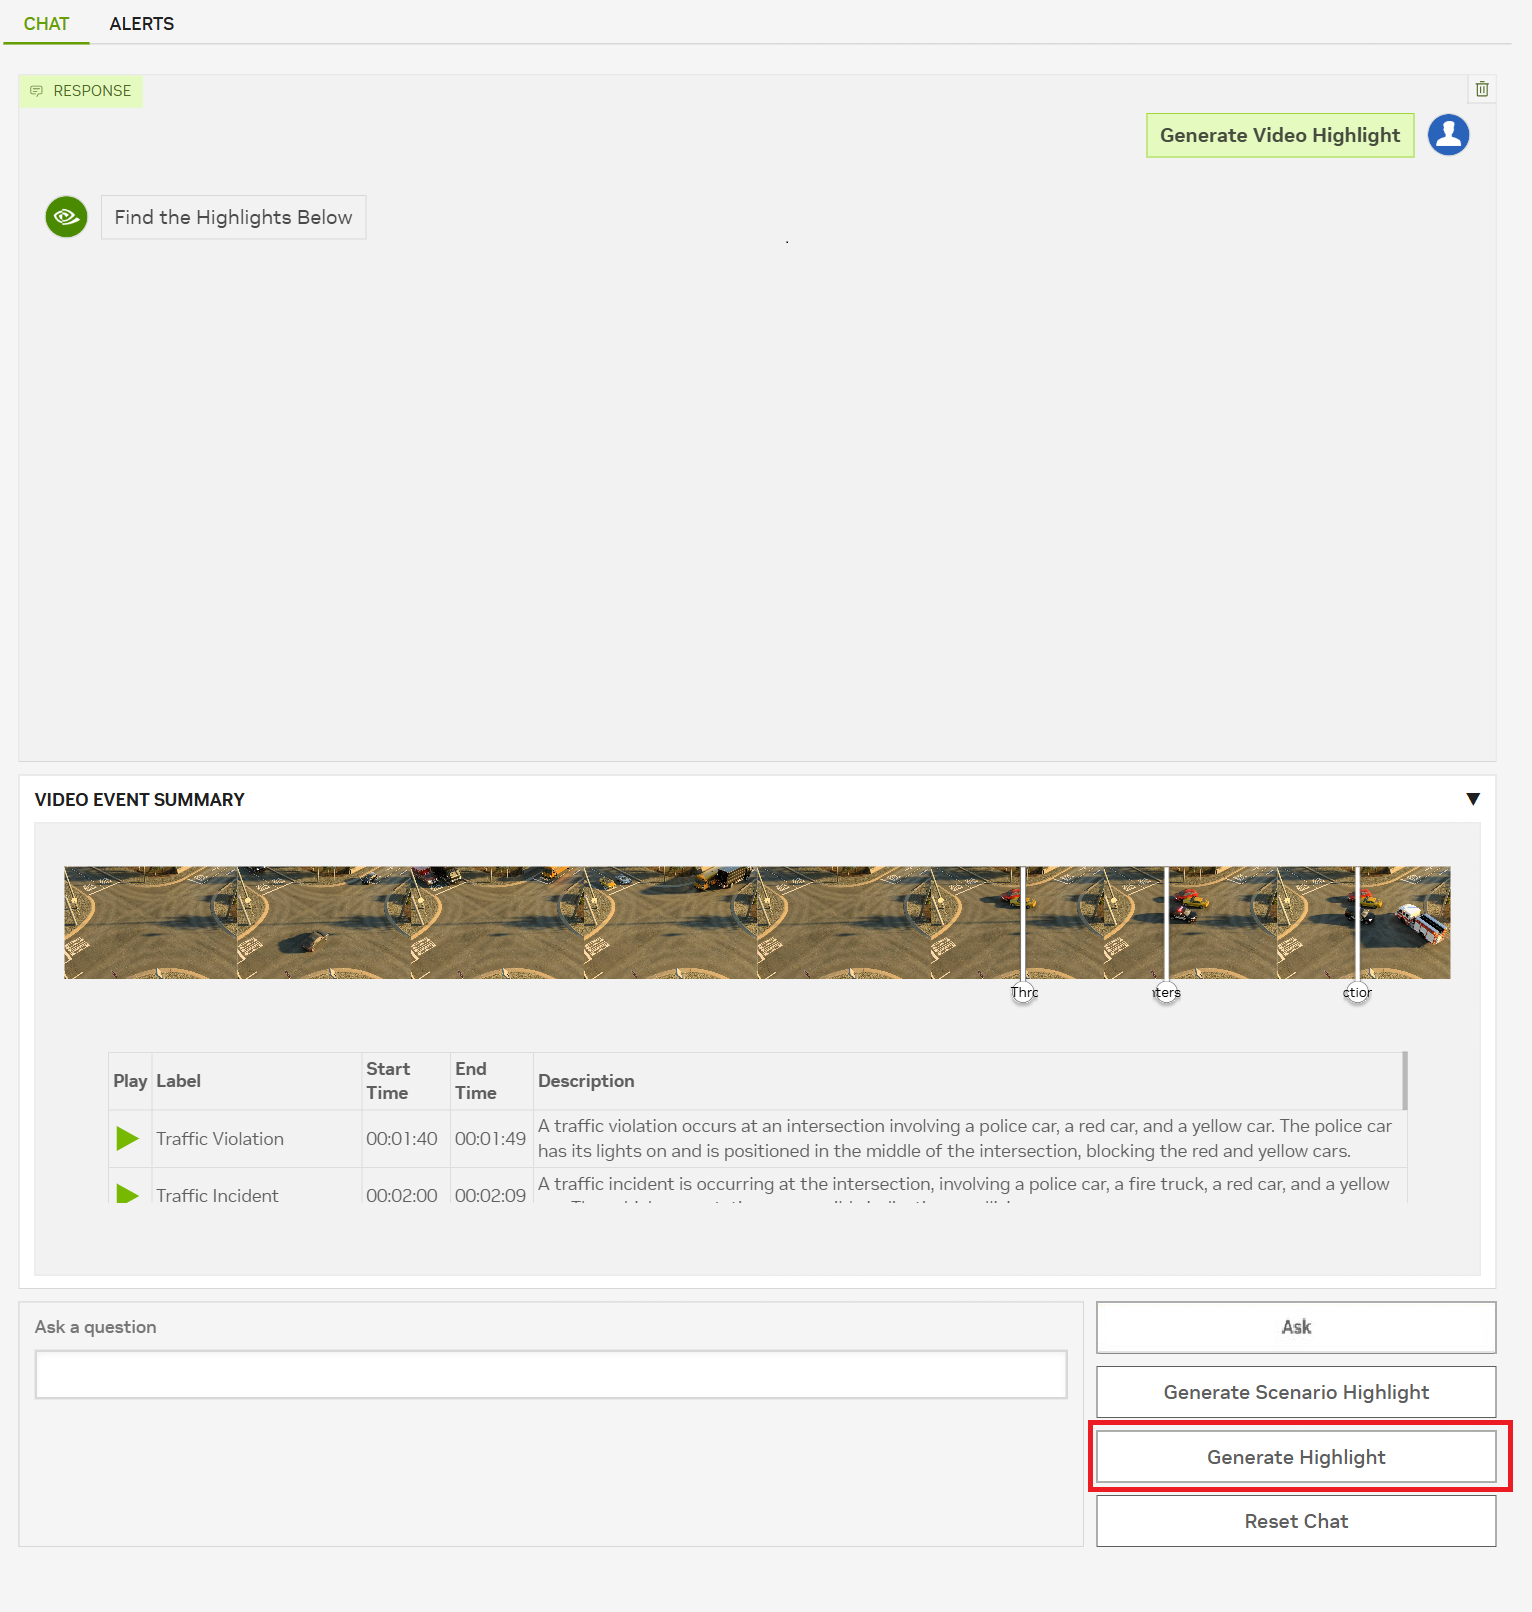
After summarization is complete, click on Generate Highlight to generate highlights from the video file.
If you want to generate highlights of specific scenarios,
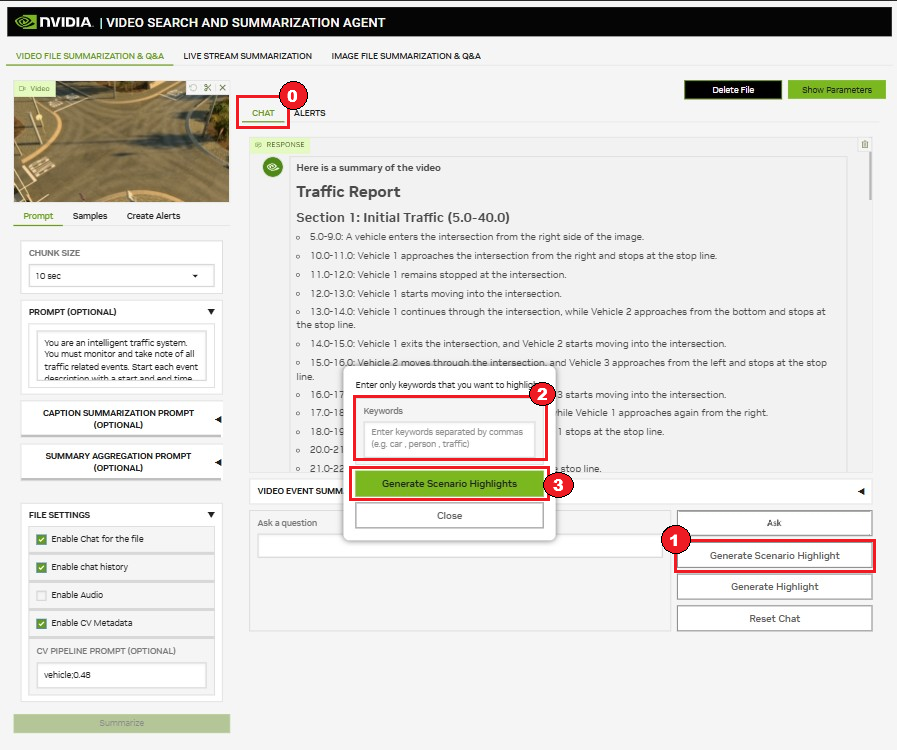
Go back to Chat.
Click on Generate Scenario Highlight.
You will observe a popup with a text box to enter the scenario keywords separated by commas. For example,
forklift,worker,ppe.Enter the scenario keywords and click on Generate Scenario Highlights.
Note
The scenario highlight generation is an experimental feature. It might fail if the LLM fails to generate a valid JSON response. Try again if it fails.
If you want to configure any parameters, click on Show Parameters and modify the available parameters.
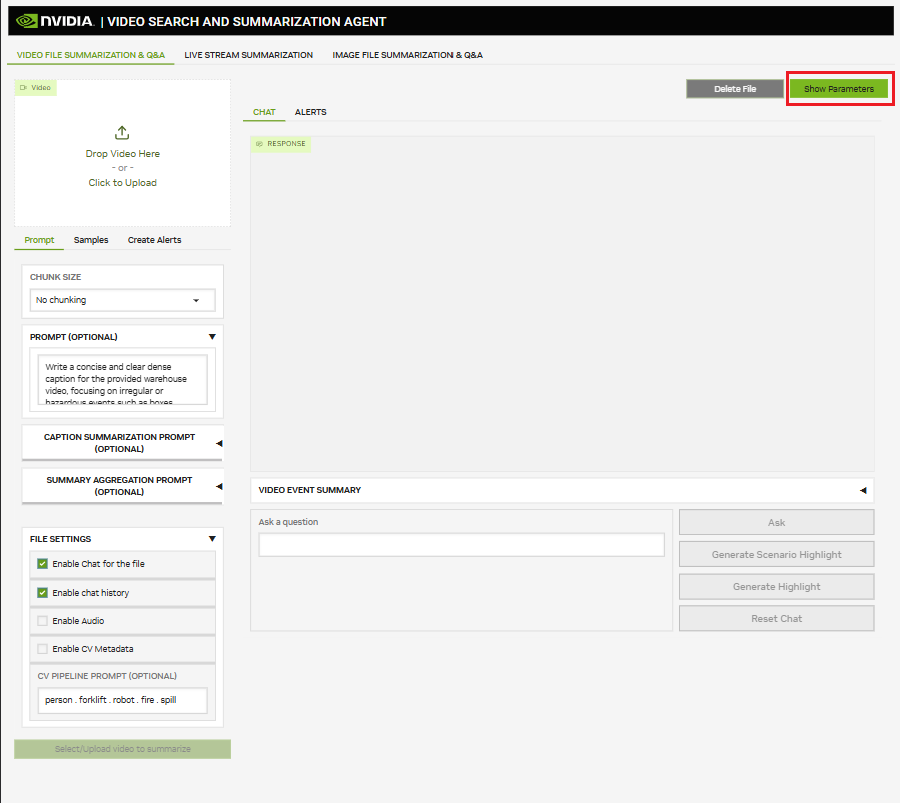
It will show the available parameters and their descriptions as shown below:
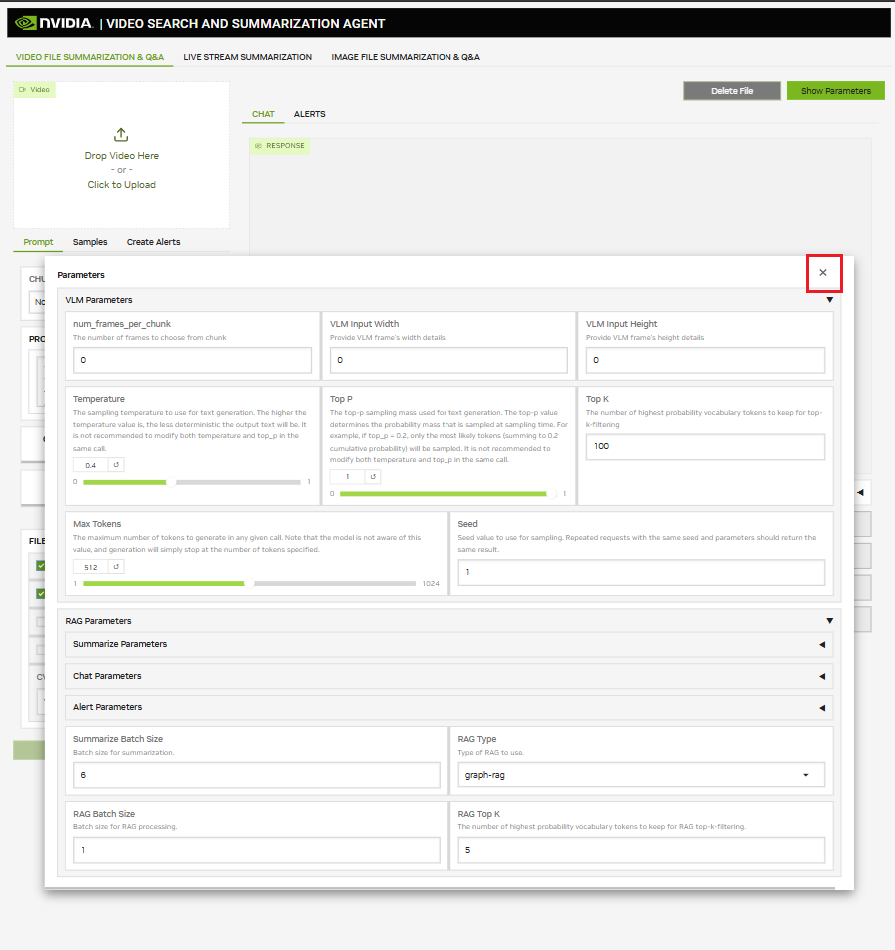
Configure any parameters that you want and click on close icon at top right of the pop up.
If you want to delete the session and start fresh, click on Delete File button.
Note
The Stop/Delete File button is only activated after the summarization is complete.
Image Summarization, Q&A, and Alerts#
Image summarization is similar to Video summarization except the Image Summarization and Q&A tab must be chosen.
Note
The default prompts in use are for warehouse videos. Refer to more examples here: Examples Refer to Tuning Prompts for more info on tuning prompts.
File types supported: jpg and png.
The following image shows the image file summarization and Q&A page of the UI. To get started, follow these steps:
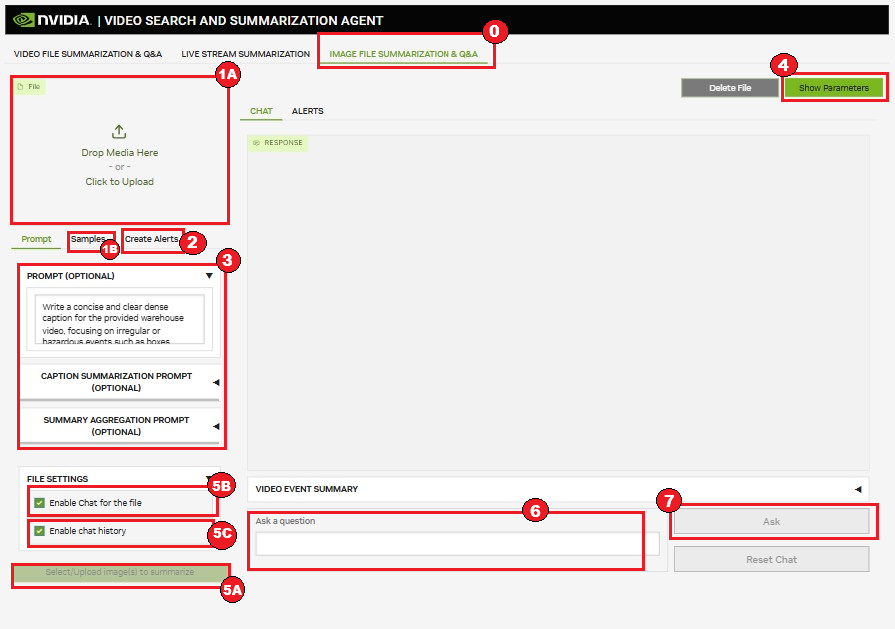
Make sure the Image File Summarization & Q&A tab is selected.
Either:
Upload images. You can also upload multiple images at a time.
Select images from the Sample Tab.
Click on multiple images to add them one-by-one to the list of input images for data processing.
(Optional) Refer to Add Alerts to Image File Summarization.
Set VLM prompt and summarization prompts for CA-RAG. Refer to Tuning Prompts for more details on the prompts.
Adjust the VLM parameters by clicking on Show Parameters and modifying the available parameters (Optional).
Select one of the following actions:
Click Summarize to start summarization only.
Click Chat to enable Q&A after summarization.
(Optional) Check Enable chat history checkbox to preserve the context of the Q&A session. Q&A will take into account the conversation history.
The buttons are enabled after a image is selected or uploaded.
If chat was chosen, enter a question after the summary is generated
Click on Ask to send the query.
Add Alerts to Image File Summarization#
For adding alerts to Image File Summarization, use the following steps:
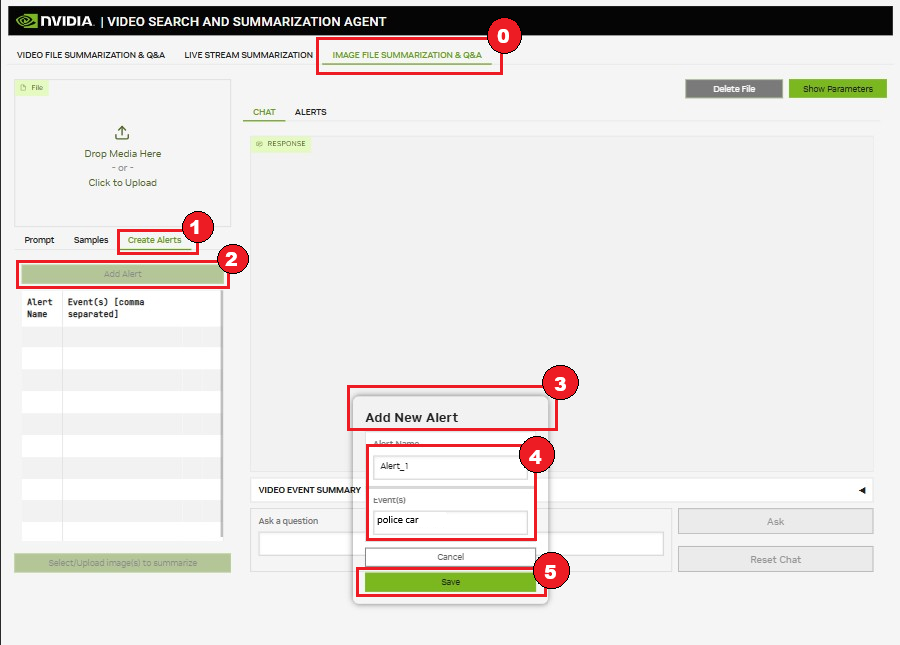
Make sure the Image File Summarization & Q&A tab is selected.
Click Create Alerts.
Then click on Add Alert.
This will open a popup Add New Alert.
Enter the alert name and the events to alert on.
Click on Save to save the alert.
Note
The UI does not support adding, removing, or modifying alerts for image file summarization after the summarization is started.
Live Stream Summarization, Alerts, and Q&A#
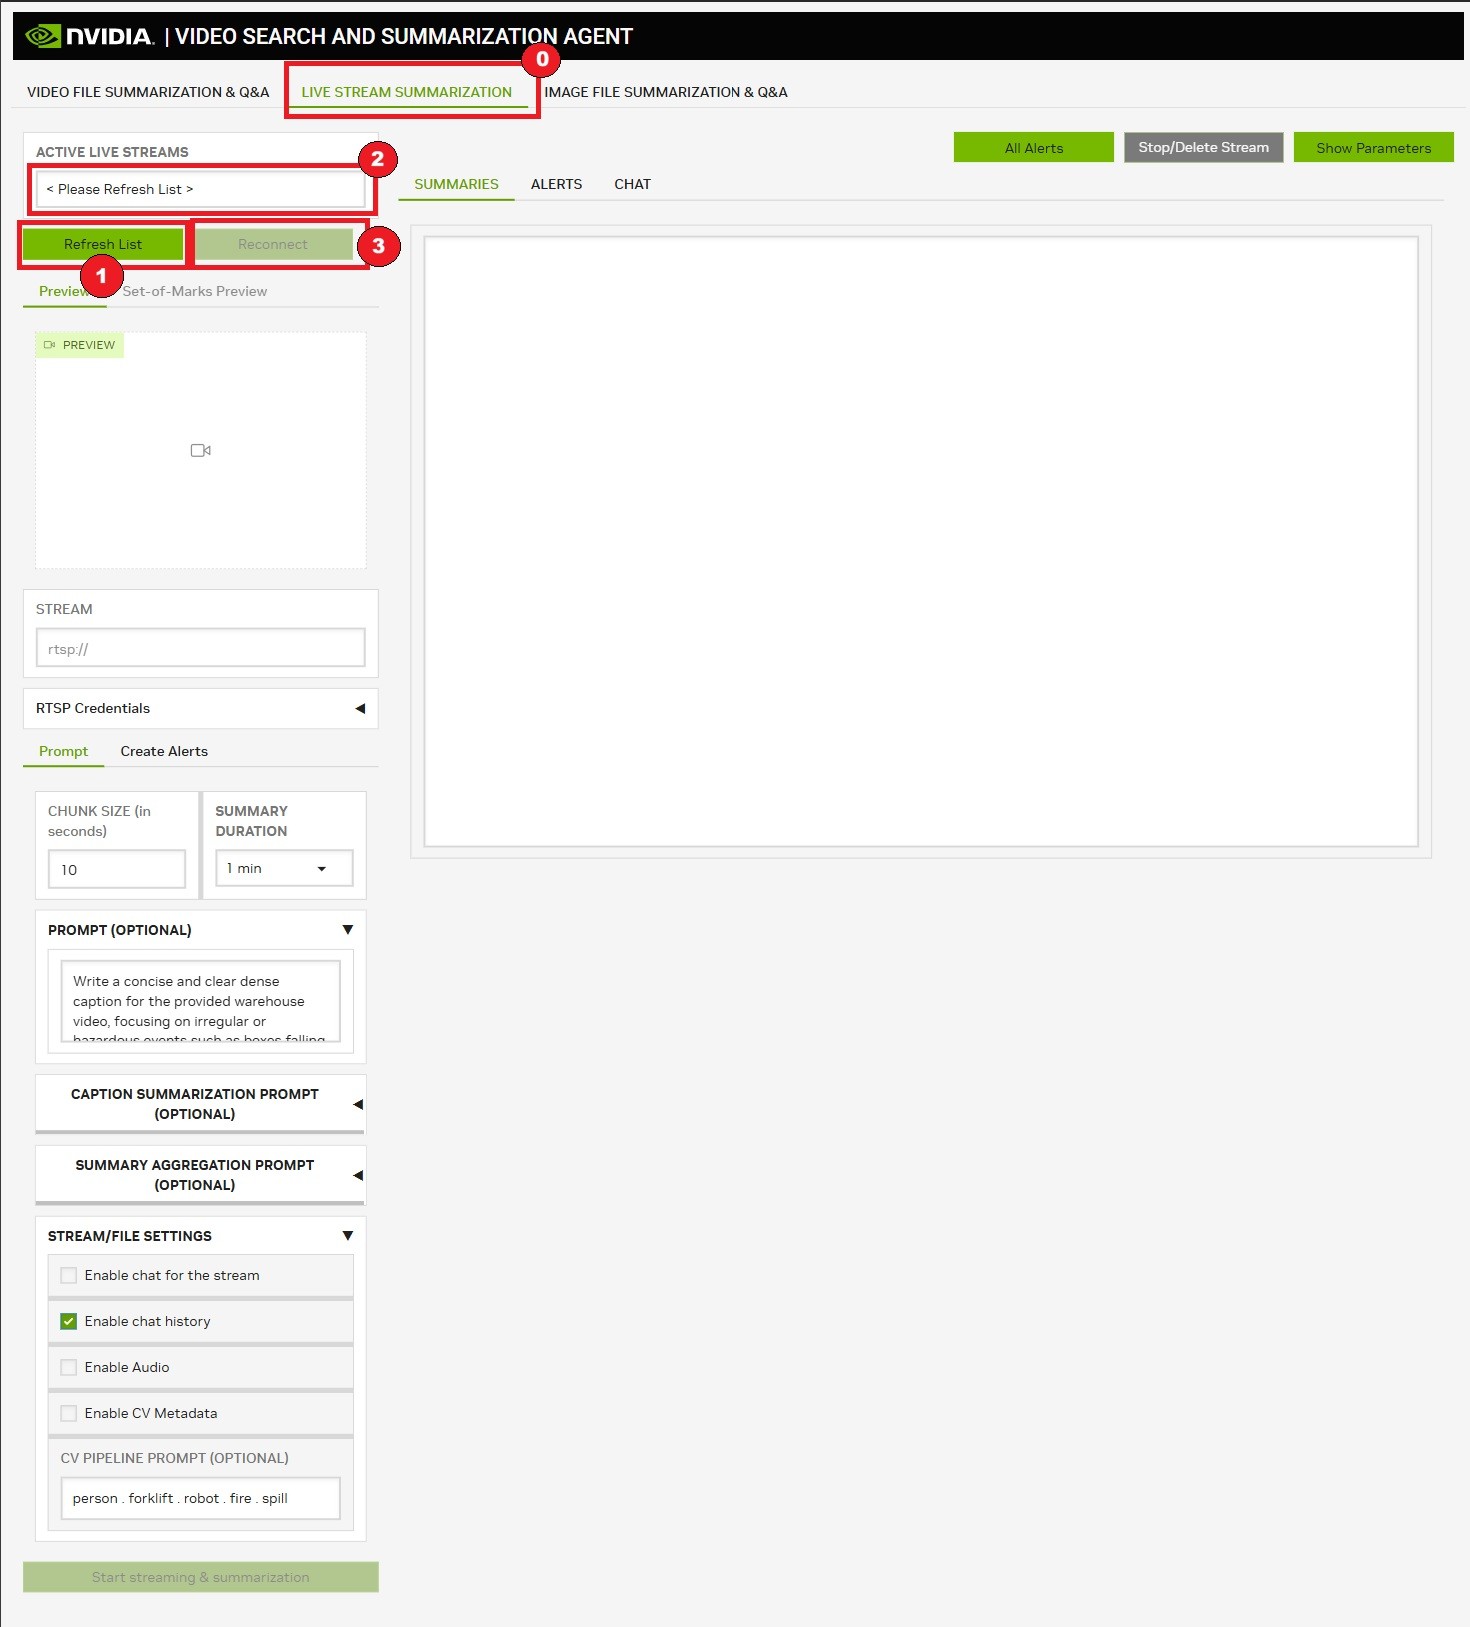
The following image shows the live stream page of the UI. It also supports Q&A and alerts for live streams.
Note
Support RTSP URLs with h264/h265 video and Opus/Vorbis audio codecs.

To start summarization, use the following:
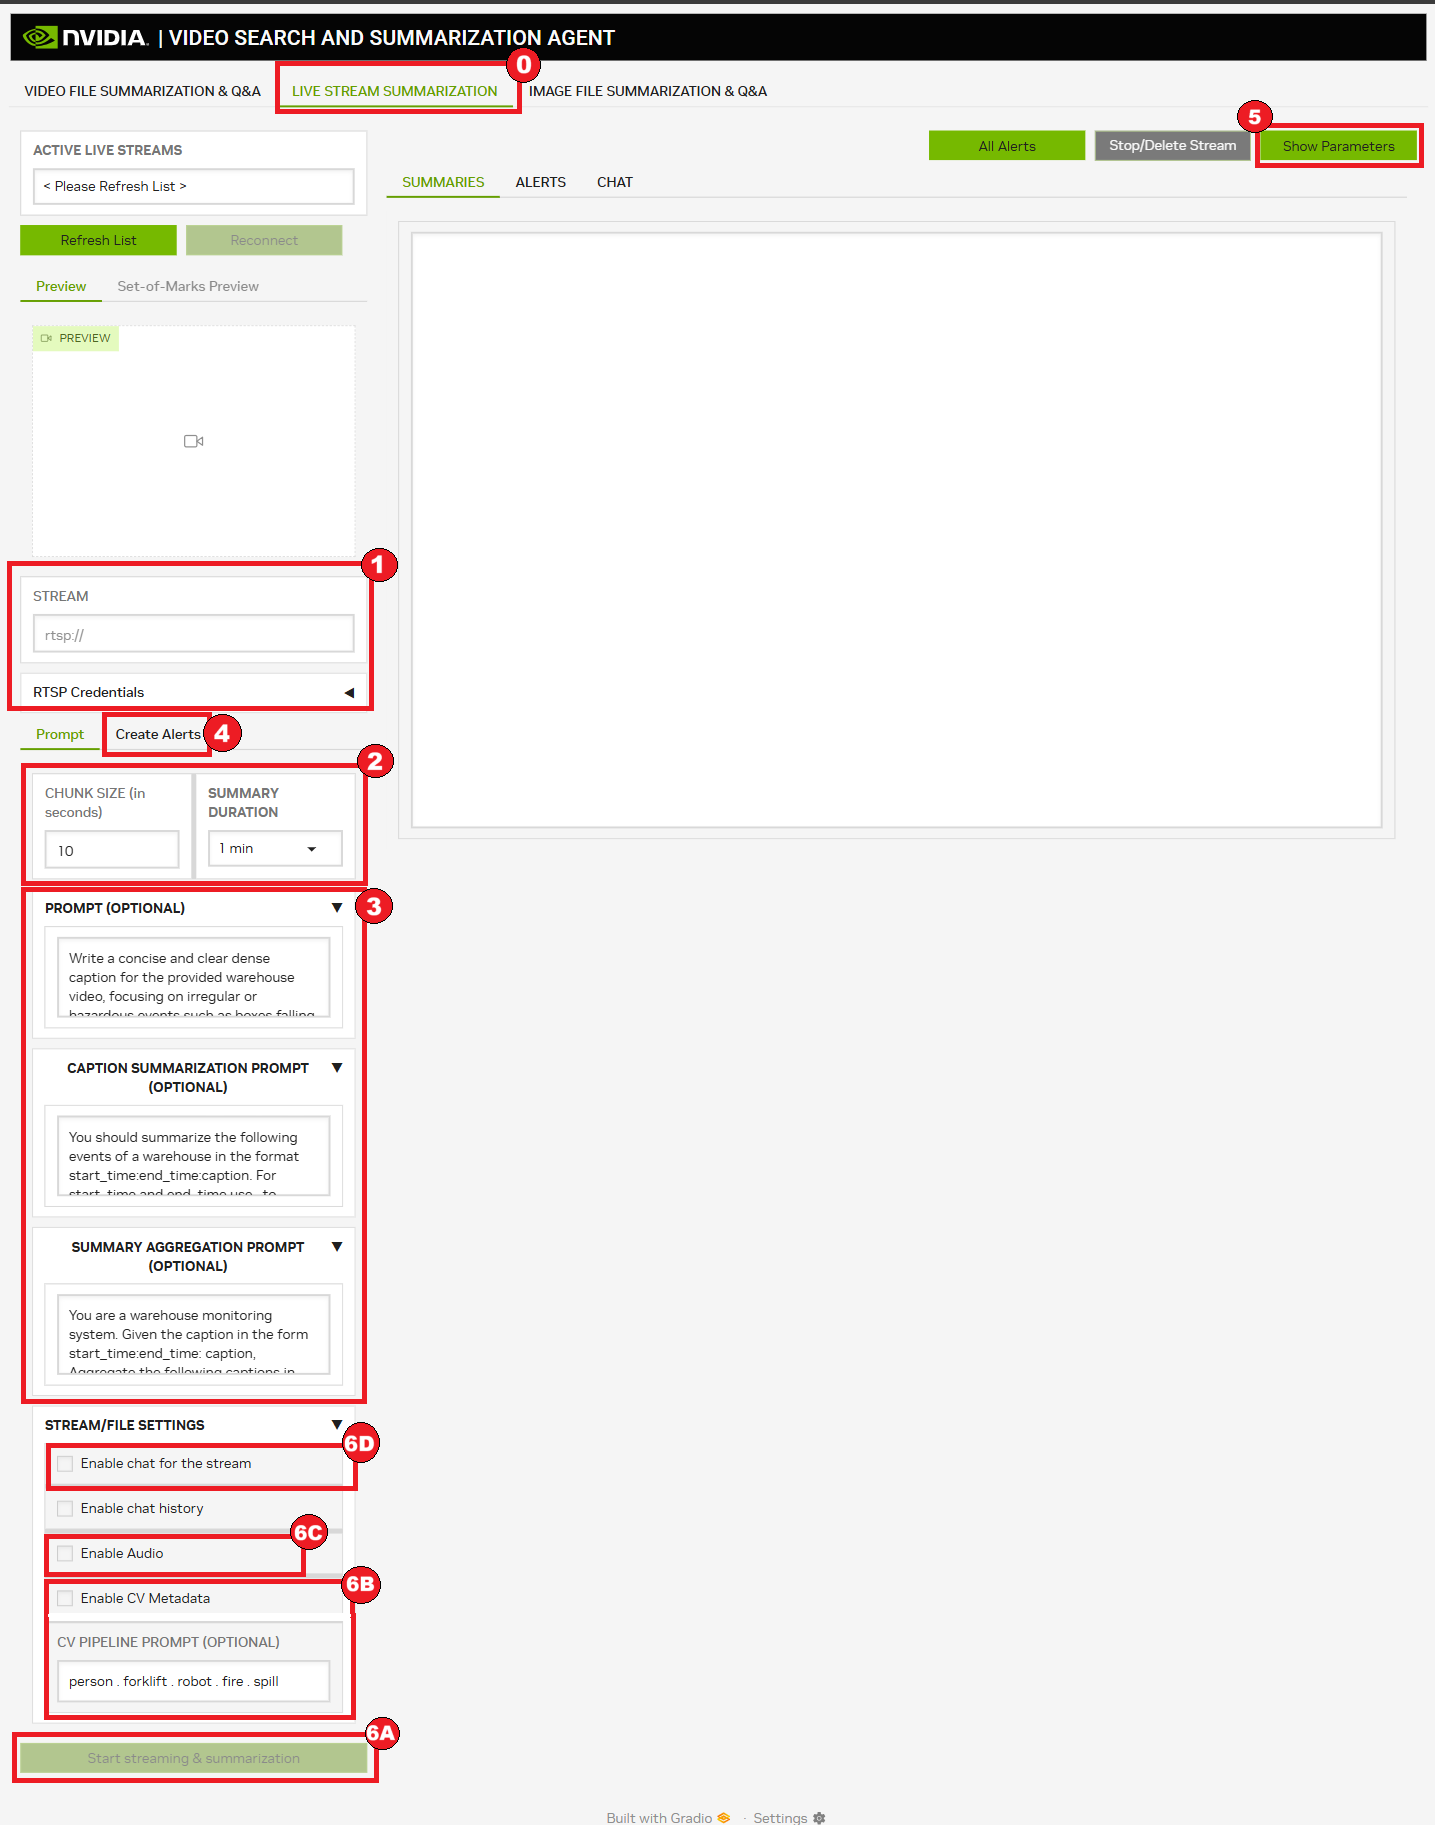
Make sure the Live Stream Summarization tab is selected.
Enter a valid RTSP Live Stream URL. Optionally, enter credentials for the RTSP stream.
Select the Chunk Size and Summary Duration from the drop down list.
(Optional) Set VLM prompt and the summarization prompts for CA-RAG. Refer to Tuning Prompts for more details on the prompts.
(Optional) Refer to Add Alerts to Live Stream Summarization.
(Optional) Adjust the parameters by clicking on Show Parameters and modifying the available parameters.
Select one or both of the following:
Click Start streaming & summarize to start summarization. The button gets enabled after the RTSP URL is entered.
(Optional) Check Enable CV Metadata checkbox to enable CV metadata generation. Modify the prompt to detect specific objects.
(Optional) Check Enable Audio checkbox to enable audio transcript generation.
(Optional) Select Enable Chat to enable Q&A on the stream.
Note
The audio and CVrelated configurations are hidden by default. Audio / CV pipeline needs to be enabled for the options to show.
After the server starts processing the stream, the UI displays a message Waiting for first summary. The first summary is available after approximately summary duration plus a few seconds depending on the summary duration, model, and GPU being used.
Summaries for consecutive summary duration periods are appended one below the other. Newest one being at the bottom.
If additional codecs are enabled, the UI will also show the live-stream preview and the Set-of-Marks preview (if CV pipeline is enabled). Only video is shown in the live-stream and Set-of-Marks preview.
The Set-of-marks preview only shows the frames sampled for VLM and therefore will run at a much lower framerate. Additionally, it is delayed by 2 * chunk duration seconds.
Note
The live-stream preview and Set-of-marks preview are alpha features.
Live Stream Summarization can be stopped by clicking Stop/Delete Stream.
If any alerts were configured and detected, they are visible under the Alerts tab.
If you want to set alerts on multiple live streams, you can open a second browser tab to the VSS UI and follow the same steps to connect an additional stream and set new alerts. Both tabs will show alert output for their respective stream.
To do Q&A (if Enable Chat was chosen):
Go back to Chat.
Enter a question in the text box.
Click Ask.
Verify that the answer is visible in the Chat window after the request is processed.
Note
The summarization requests will keep running on the server side until the live-stream reaches end-of-stream, even if the browser window is closed or refreshed. Delete the live-stream to stop the summarization request.
Reconnecting to Live Stream Summarization#
For live streams, even if the client disconnects, summarization keeps happening in the VSS server. To reconnect to the live stream and get the latest updates after being disconnected, use the following steps:
Make sure the Live Stream Summarization tab is selected.
Click Refresh List.
After the list is refreshed, select the active stream from the drop down.
Click Reconnect. The button is enabled after a stream is selected from the drop-down.
Add Alerts to Live Stream Summarization#
For adding live stream alerts, use the following steps:
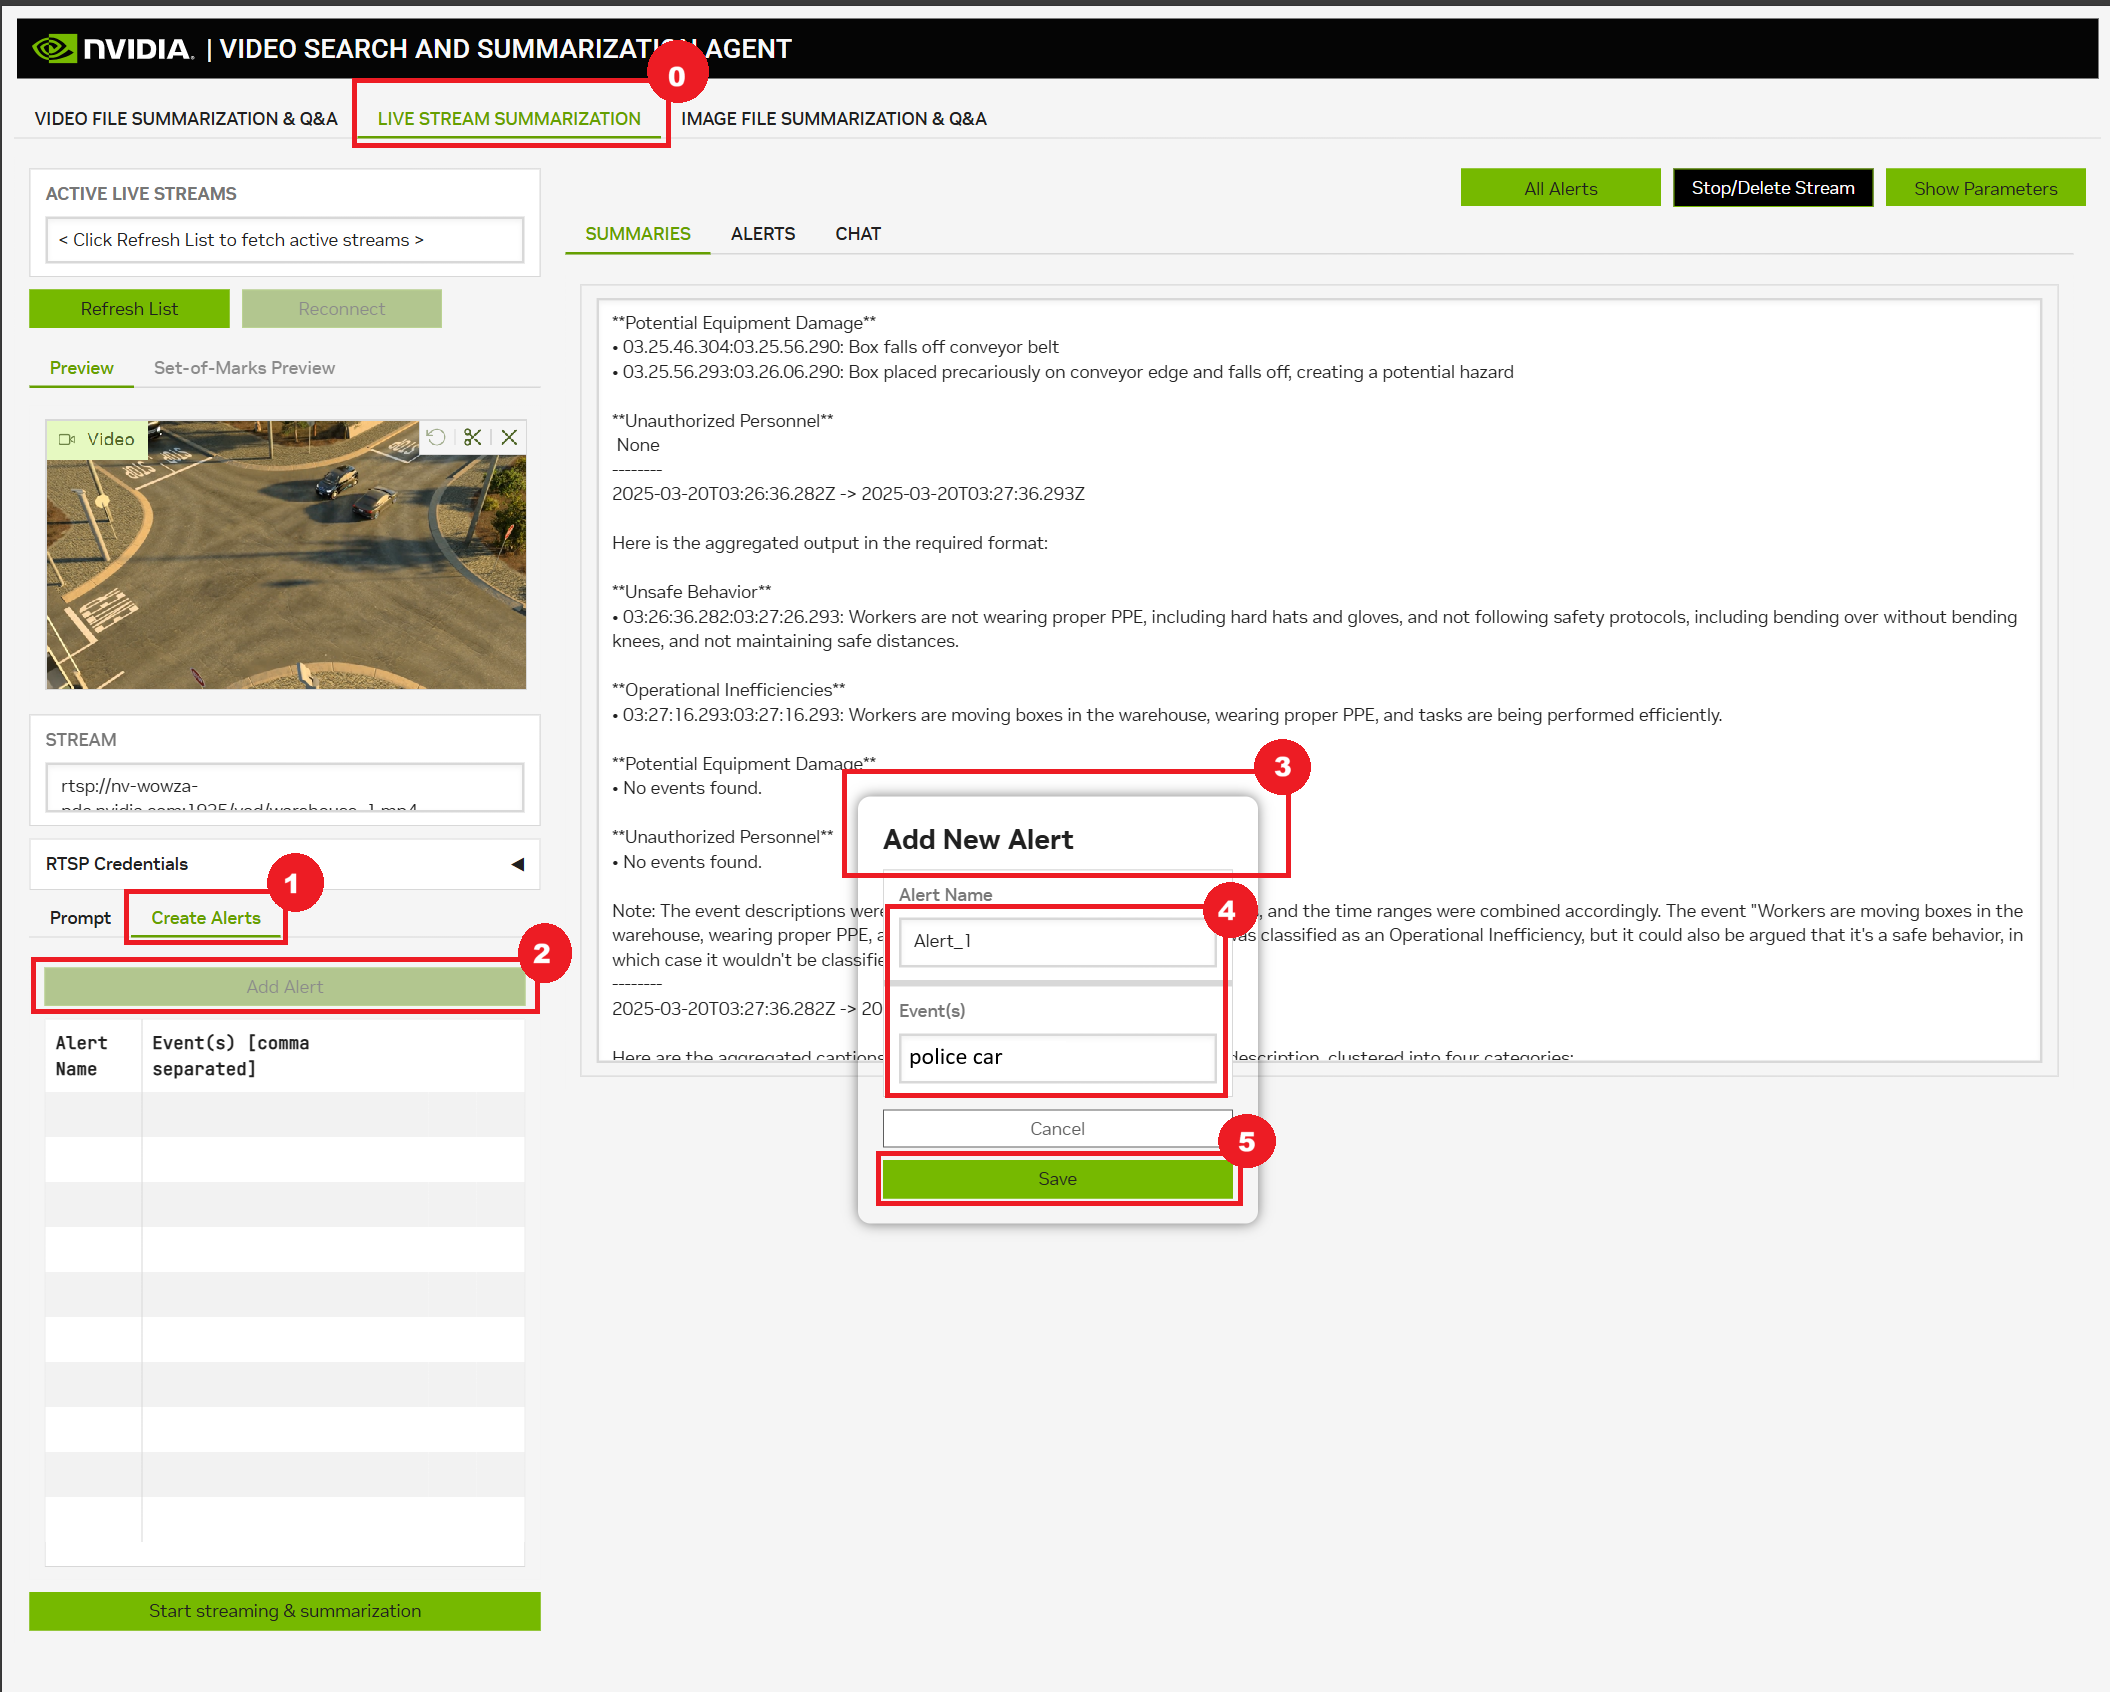
Make sure the Live Stream Summarization tab is selected.
Click Create Alerts.
Then click on Add Alert.
This will open a popup Add New Alert.
Enter the alert name and the events to alert on.
Click on Save to save the alert.
Note
The UI does not support adding, removing, or modifying alerts for live streams after the summarization is started.
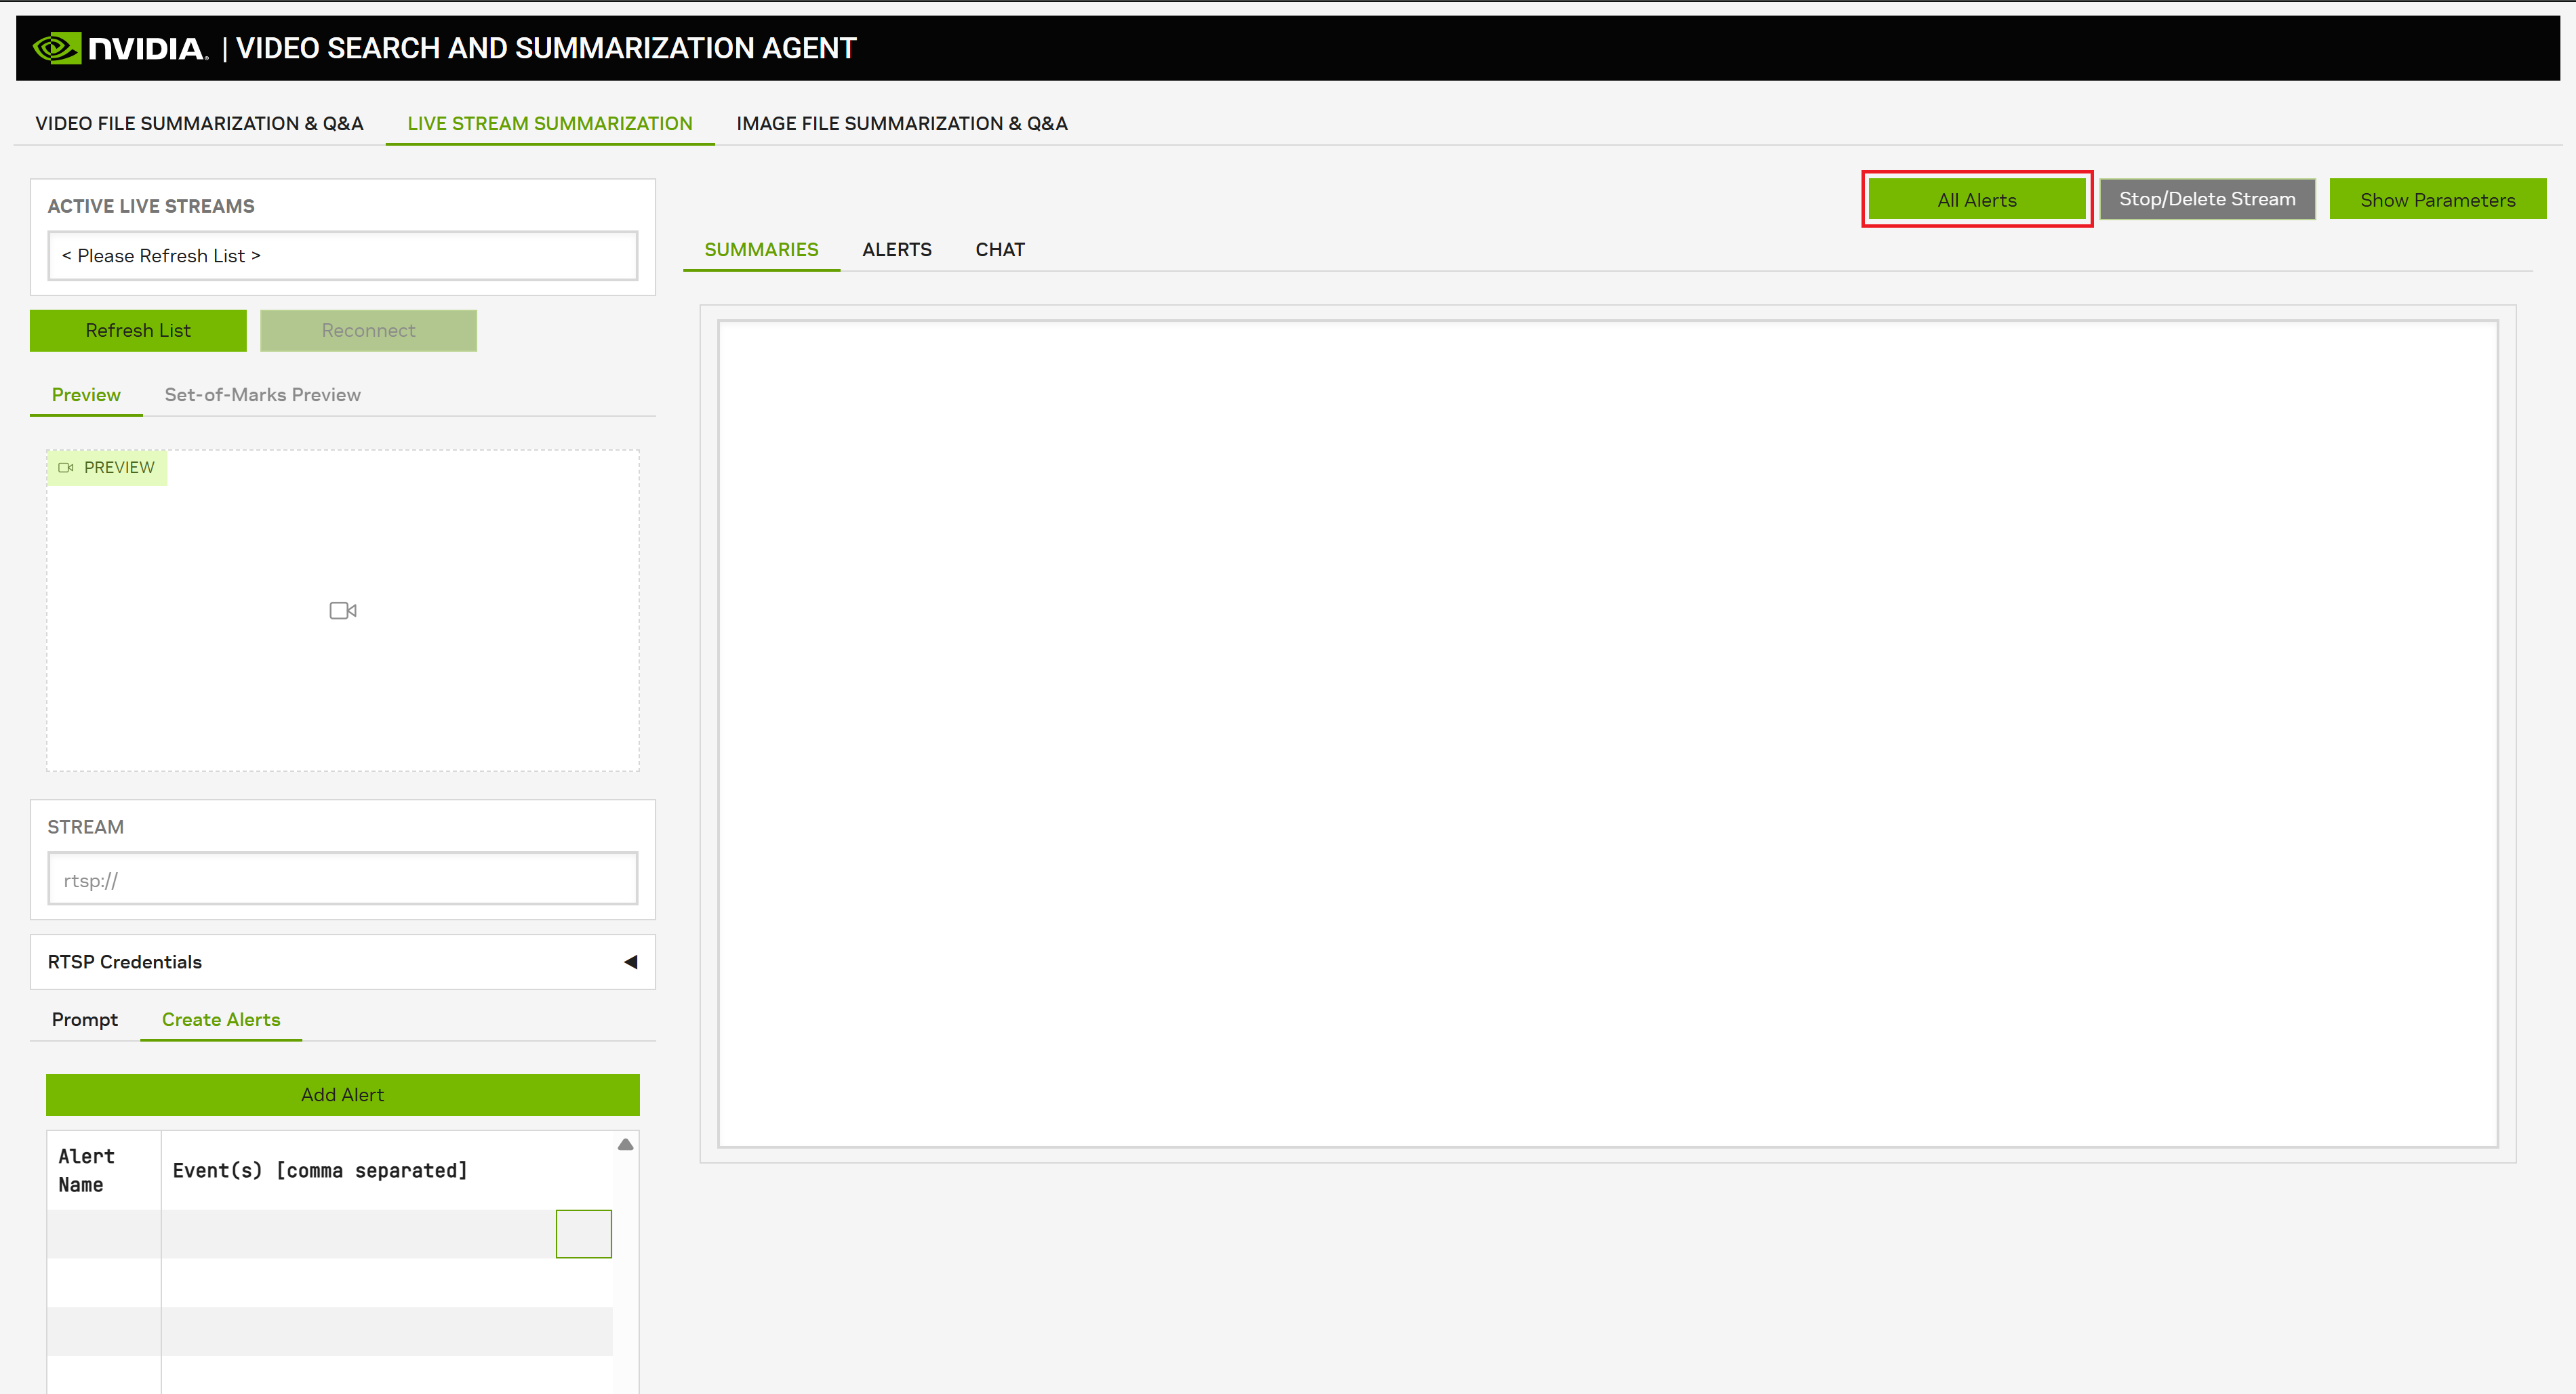
View All Alerts of Live Stream#
To view live stream alerts, click on All Alerts:
View Set-of-Marks Preview Video for Live Stream#
To view set-of-marks preview video for live stream, follow below steps:
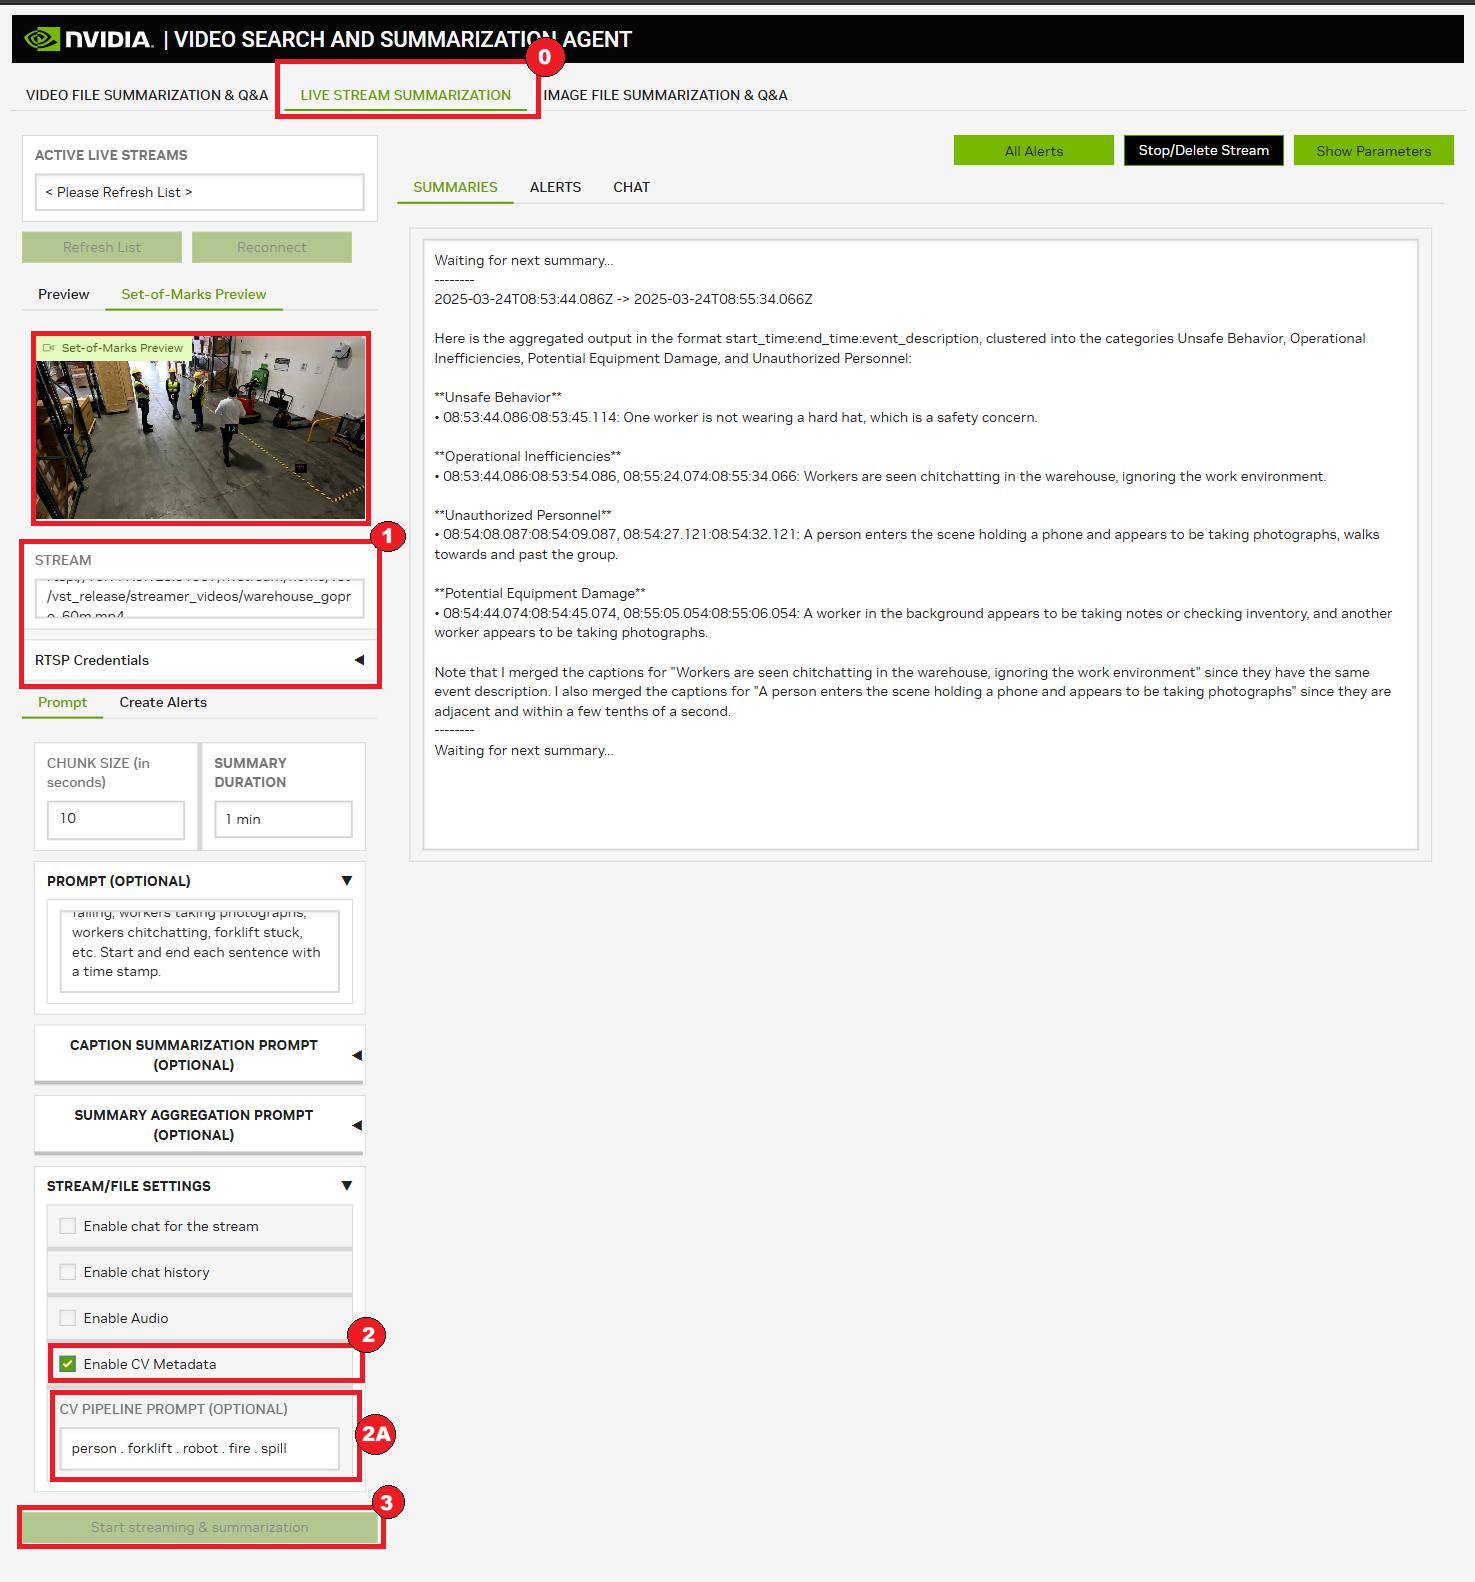
Make sure the Live Stream Summarization tab is selected.
Enter a valid RTSP Live Stream URL. Optionally, enter credentials for the RTSP stream.
Then click on Enable CV Metadata checkbox.
(Optional) Modify the CV PIPELINE PROMPT to detect specific objects.
Click on Start streaming & summarize and you will observe Set-of-Marks preview video under Set-of-Marks Preview tab.
Note
The Set-of-marks preview only shows the frames sampled for VLM and therefore will run at a much lower framerate. Additionally, it is delayed by 2 * chunk duration seconds. This requires additional codecs to be installed additional codecs .
Multi-Stream and Concurrent Requests#
VSS supports multi-stream and concurrent requests. With Gradio UI, this can be achieved by:
Opening multiple instances of the UI application in different browser tabs.
Running summarization and chat on different videos, images, or live-streams.
Note
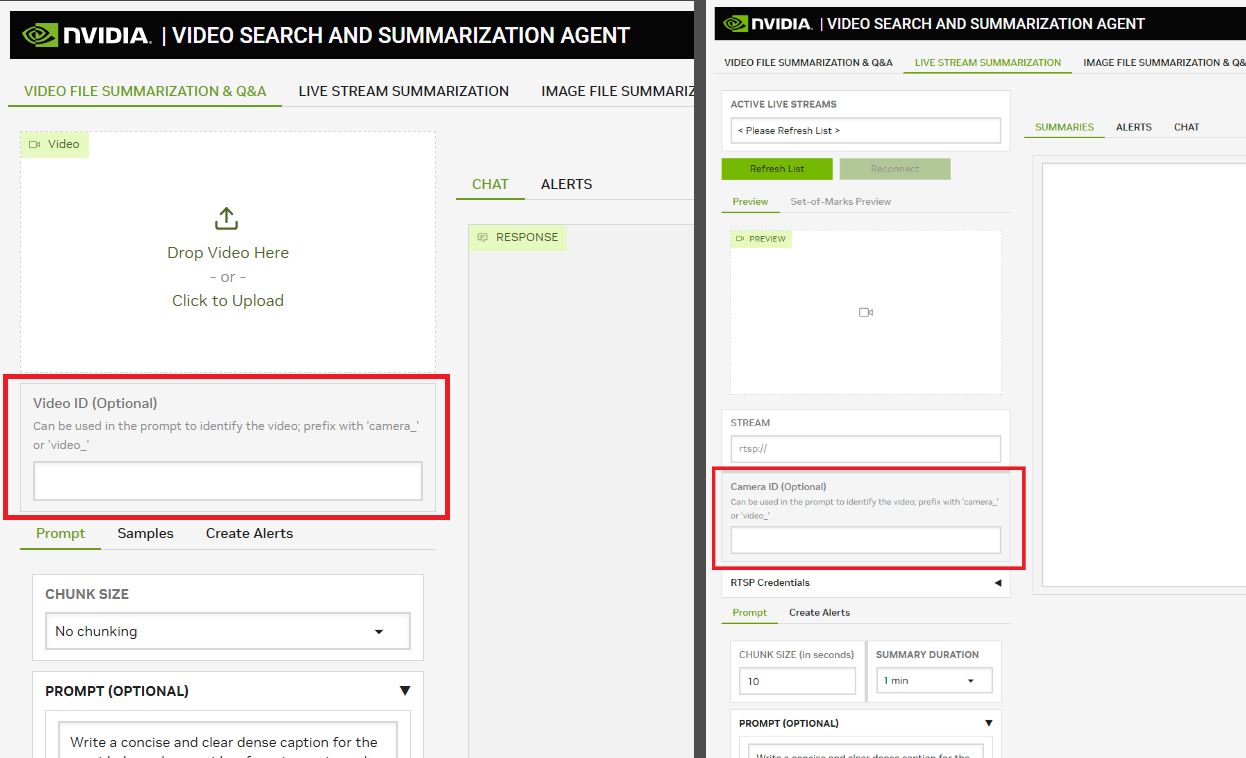
The Gradio UI now offers a ‘Video ID’ field and ‘Camera ID’ field to identify a video / live-stream among multiple streams.