VSS Event Reviewer#
The VSS event reviewer feature allows VSS to be used as an intelligent add on to any computer vision pipeline. This feature can be used to review outputs of a computer vision pipeline to generate low latency alerts and provide additional insights. The alerts are generated by directly prompting the VLM to answer a set of yes/no questions. Along with the alerts, longer dense captions and Q&A can be done to gain further insights.
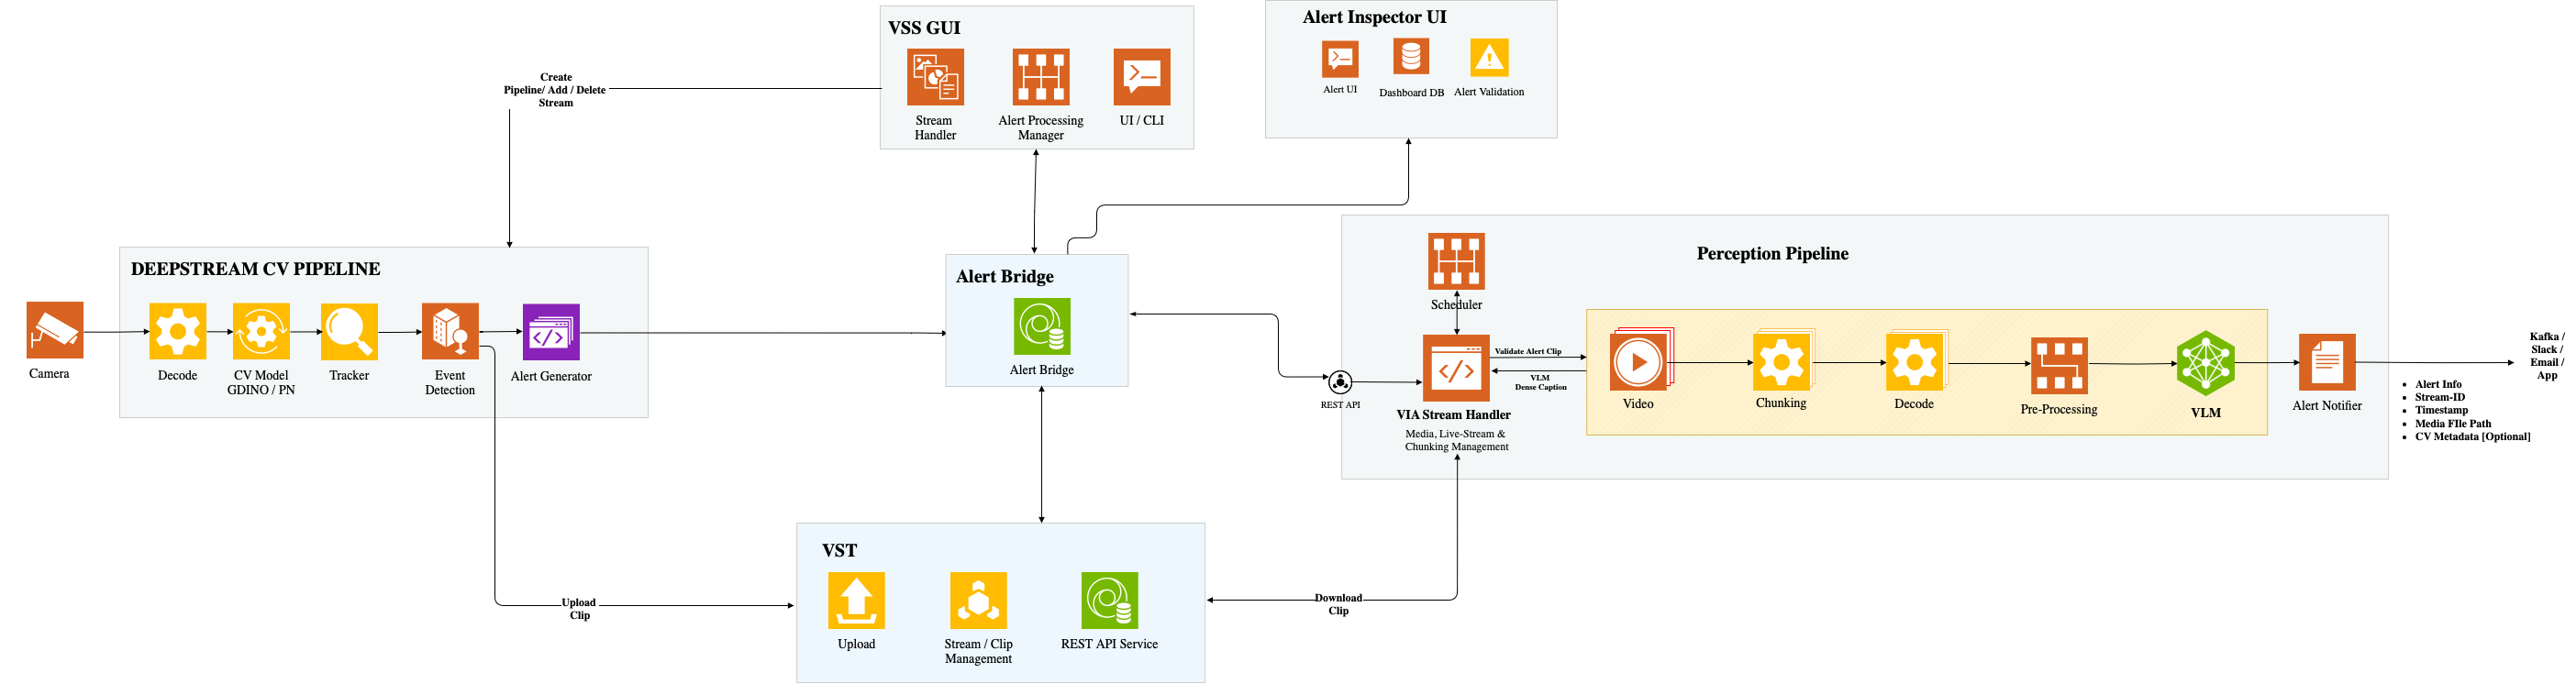
Based on metadata generated by a computer vision pipeline such as classifications, detections, or segmentations are used to find clips of interest within a livestream or video file. The short video clips generated from a computer vision pipeline can be sent to VSS for verification through the Alert Bridge. VSS uses a Vision Language Model (VLM) to analyze the video clip against a specific prompt to determine if the detected event is valid and requires attention. The final validation result is sent to the VSS Alert Inspector UI tab for the user to review and take appropriate action if needed. The alert output can also be integrated into custom applications.
To experience this feature, a sample computer vision pipeline is provided to detect events in the video stream. You can configure the application using Computer Vision Pipeline Manager UI to add video streams and set alert prompts for the events in the UI itself.
Event Reviewer Workflow#
Using VSS for event reviewing follows a structured 6-step workflow to detect, process, and validate alerts:
Computer Vision Pipeline Manager UI configures CV Pipeline: The Computer Vision Pipeline Manager UI configures the CV pipeline to add video streams along with CV parameters required to detect the events in the video stream. User can set alert prompts for the events in the UI itself.
Alert detected in CV pipeline: The Computer Vision pipeline continuously monitors video streams and detects potential events or anomalies using pre-trained models like Grounding DINO. The clips are generated in the CV pipeline and sent to the Alert Bridge and Video Storage Toolkit for management.
Clip, Metadata, and Alert are sent to the Alert Bridge: The Alert Bridge component monitors for incoming alerts and captures the associated video clip and metadata when an event is detected.
Alert Bridge sends Clip, Metadata, and Prompt to the VLM Pipeline: Once an alert is received, the Alert Bridge forwards the video clip, associated metadata, and alert prompts to the Perception Pipeline for processing.
Perception Pipeline processes the clip using the VLM along with a prompt to validate an alert: The Perception Pipeline uses a Vision Language Model (VLM) to analyze the video clip against a specific prompt to determine if the detected event is valid and requires attention.
Alert validation is sent to the Alert Inspector UI: The final validation result is sent to the graphical user interface, where operators can review the alert and take appropriate action if needed. User can click on the chat button on the alert and can perform additional queries on the alert.
Prerequisites#
Set up the prerequisites as mentioned in Docker Compose Prerequisites. A valid NGC API key is required to deploy the VSS Event Reviewer. Refer to Obtain NGC API Key for more information.
Note
Kubernetes deployment is not currently supported.
Starting the Deployment#
Clone the Video Search and Summarization blueprint repository:
# clone the Video Search and Summarization blueprint repository
git clone https://github.com/NVIDIA-AI-Blueprints/video-search-and-summarization.git
cd video-search-and-summarization/
Use NGC API key from section Obtain NGC API Key. Update
NGC_API_KEYenvironment variable in.envfile to a valid key.
Important
For Jetson Thor and DGX Spark, the following cache cleaner script must be run in the background to avoid memory errors when launching VSS.
# In another terminal, start the cache cleaner script.
# Alternatively, append " &" to the end of the command to run it in the background.
sudo sh deploy/scripts/sys_cache_cleaner.sh
Start VSS with Event Verification:
# change directory to VSS Event Reviewer deployment
cd deploy/docker/event_reviewer

# Create a network for the VSS Event Reviewer deployment
docker network create vss-shared-network

# When upgrading from older versions of VSS, remove the VST volume data
rm -rf vst/vst_volume/*

# Start VSS Event Reviewer which starts the Alert Bridge, VLM Pipeline, Alert Inspector UI and Video Storage Toolkit
# For X86 / Jetson Thor
ALERT_REVIEW_MEDIA_BASE_DIR=/tmp/alert-media-dir docker compose up -d

# For DGX Spark and GH200/GB200 SBSA platforms
IS_SBSA=1 ALERT_REVIEW_MEDIA_BASE_DIR=/tmp/alert-media-dir docker compose up -d
Once the deployment is up, the VSS UI to view alerts will be available at http://<host_ip>:7860
Note
For DGX Spark, Q&A for the event reviewer may need some tuning. Export VLM_DEFAULT_NUM_FRAMES_PER_CHUNK=8 before starting the event reviewer deployment.
This deployment will bring up two additional components to enable VSS to connect to a computer vision pipeline.
Video Storage Toolkit (VST)
Alert Bridge
Shutdown VSS Event Review Service
When all tests done, user can shutdown the service by the following cmdline
# change directory to VSS Event Reviewer deployment
cd deploy/docker/event_reviewer

ALERT_REVIEW_MEDIA_BASE_DIR=/tmp/alert-media-dir docker compose down
Connecting a Computer Vision Pipeline#
Connecting your computer vision pipeline to VSS has three main steps:
CV Pipeline Output
Ensure your computer vision pipeline is setup to output short clips of interest from an input video stream. For example, a detection pipeline can be built with DeepStream to output mp4 files of an incoming RTSP stream only when specific objects are detected in the stream.
Send Clips to VST
VST is a video management system with a REST API based interface that allows you to upload videos and receive a unique ID. Once your computer vision pipeline has output a clip of interest, it can be posted to VST through the storage endpoint.
metadata={
        "eventInfo": "object detected",
        "timestamp": int(time.time()), #timestamp in epoch value as UINT64
        "streamName": "input_stream",
        "sensorId": "sensor_id",
        }


form_data={
        "mediaFilePath": "/path/to/clip",
        "metaDataFilePath": "/path/to/cv_metadata"
        "metadata": json.dumps(metadata)
        }

response = requests.post(http://0.0.0.0:32000/api/v1/storage/file, data=form_data)
video_id = response.json()["id"]
Send Alerts to Alert Bridge
Once the video clip is posted to VST and you have received an ID, the next step is to post a request to the Alert bridge to specify the alert prompts for VSS to process.
# Build VLM parameters
vlm_params = {
    "prompt": "Is the person wearing a hard hat? Please answer with only 'yes' or 'no'.",
    "system_prompt": "You are a helpful assistant. Answer the user's question. Answer in yes or no only.",
    "max_tokens": 1,
    "temperature": 0.3,
    "top_p": 0.3,
    "top_k": 40,
    "seed": 42  # Set to a valid integer instead of None
}

# Build VSS parameters
vss_params = {
    "vlmParams": vlm_params,
    "enable_caption": True,
    "cv_metadata_overlay": True
}

payload = {
    "id": str(uuid.uuid4()),
    "version": "1.0",
    "@timestamp": datetime.now(timezone.utc).strftime("%Y-%m-%dT%H:%M:%SZ"),
    "sensorId": "sensor_id",
    "videoPath": "/path/to/clip",
    "vst_id": vst_id,
    "alert": {
        "severity": "MEDIUM",
        "status": "VERIFICATION_PENDING",
        "type": alert_type,
        "description": f"Hardhat verification",
    },
    "event": {
        "type": event_type,
        "description": f"Hardhat verification"
    },
    "confidence": 1,
    "cvMetadataPath": "/path/to/cv_metadata",
    "vssParams": vss_params,
    "metaLabels": [
        {"key": "prompt_index", "value": 1},
        {"key": "prompt_text", "value": "Is the person wearing a hard hat? Please answer with only 'yes' or 'no'." },
        {"key": "enable_reasoning", "value": str(False)}
    ],
    }

response = requests.post("http://0.0.0.0:32000/api/v1/storage/file/api/v1/alerts", json=payload)
Once the request has been sent to the Alert Bridge, it will handle calling the VSS /reviewAlert endpoint to process the video clip and prompt.
See the Alert Bridge section for more details.
Sample Computer Vision Example#
An example computer vision pipeline with VST and Alert Bridge integration is provided on GitHub. Once VSS has been deployed following the steps above, you can deploy the sample computer vision pipeline to see the full workflow in action.
The CV Event Detection Pipeline source code along with instructions to build and run the pipeline is present in the examples/cv-event-detector directory
of the Video Search and Summarization repository.
Quickstart
# change directory to example of CV detector
cd examples/cv-event-detector

# Start CV detector and CV UI containers
# For X86
ALERT_REVIEW_MEDIA_BASE_DIR=/tmp/alert-media-dir docker compose up -d

# For Jetson Thor
ALERT_REVIEW_MEDIA_BASE_DIR=/tmp/alert-media-dir docker compose -f compose.yaml -f compose.thor.yaml up -d

# For DGX Spark and GH200/GB200 SBSA platforms
IS_SBSA=1 ALERT_REVIEW_MEDIA_BASE_DIR=/tmp/alert-media-dir docker compose up -d
Shutdown CV Sample Containers
User can shutdown the service by the following cmdline
# change directory to example of CV detector
cd examples/cv-event-detector

ALERT_REVIEW_MEDIA_BASE_DIR=/tmp/alert-media-dir docker compose down
VSS Alert Inspector UI#
After the CV Pipeline processes videos and generates event clips,
the Alert Inspector UI provides a comprehensive interface for reviewing and managing events.
The Alert Inspector is available at http://<host_ip>:7860 and displays all events that have been processed by the VLM for review.
Main Interface Components
The Alert Inspector UI is organized into several key sections:
View Options: Toggle between different display modes
DASHBOARD: Tabular view of all events (default)
CHAT: Interactive chat interface for event queries
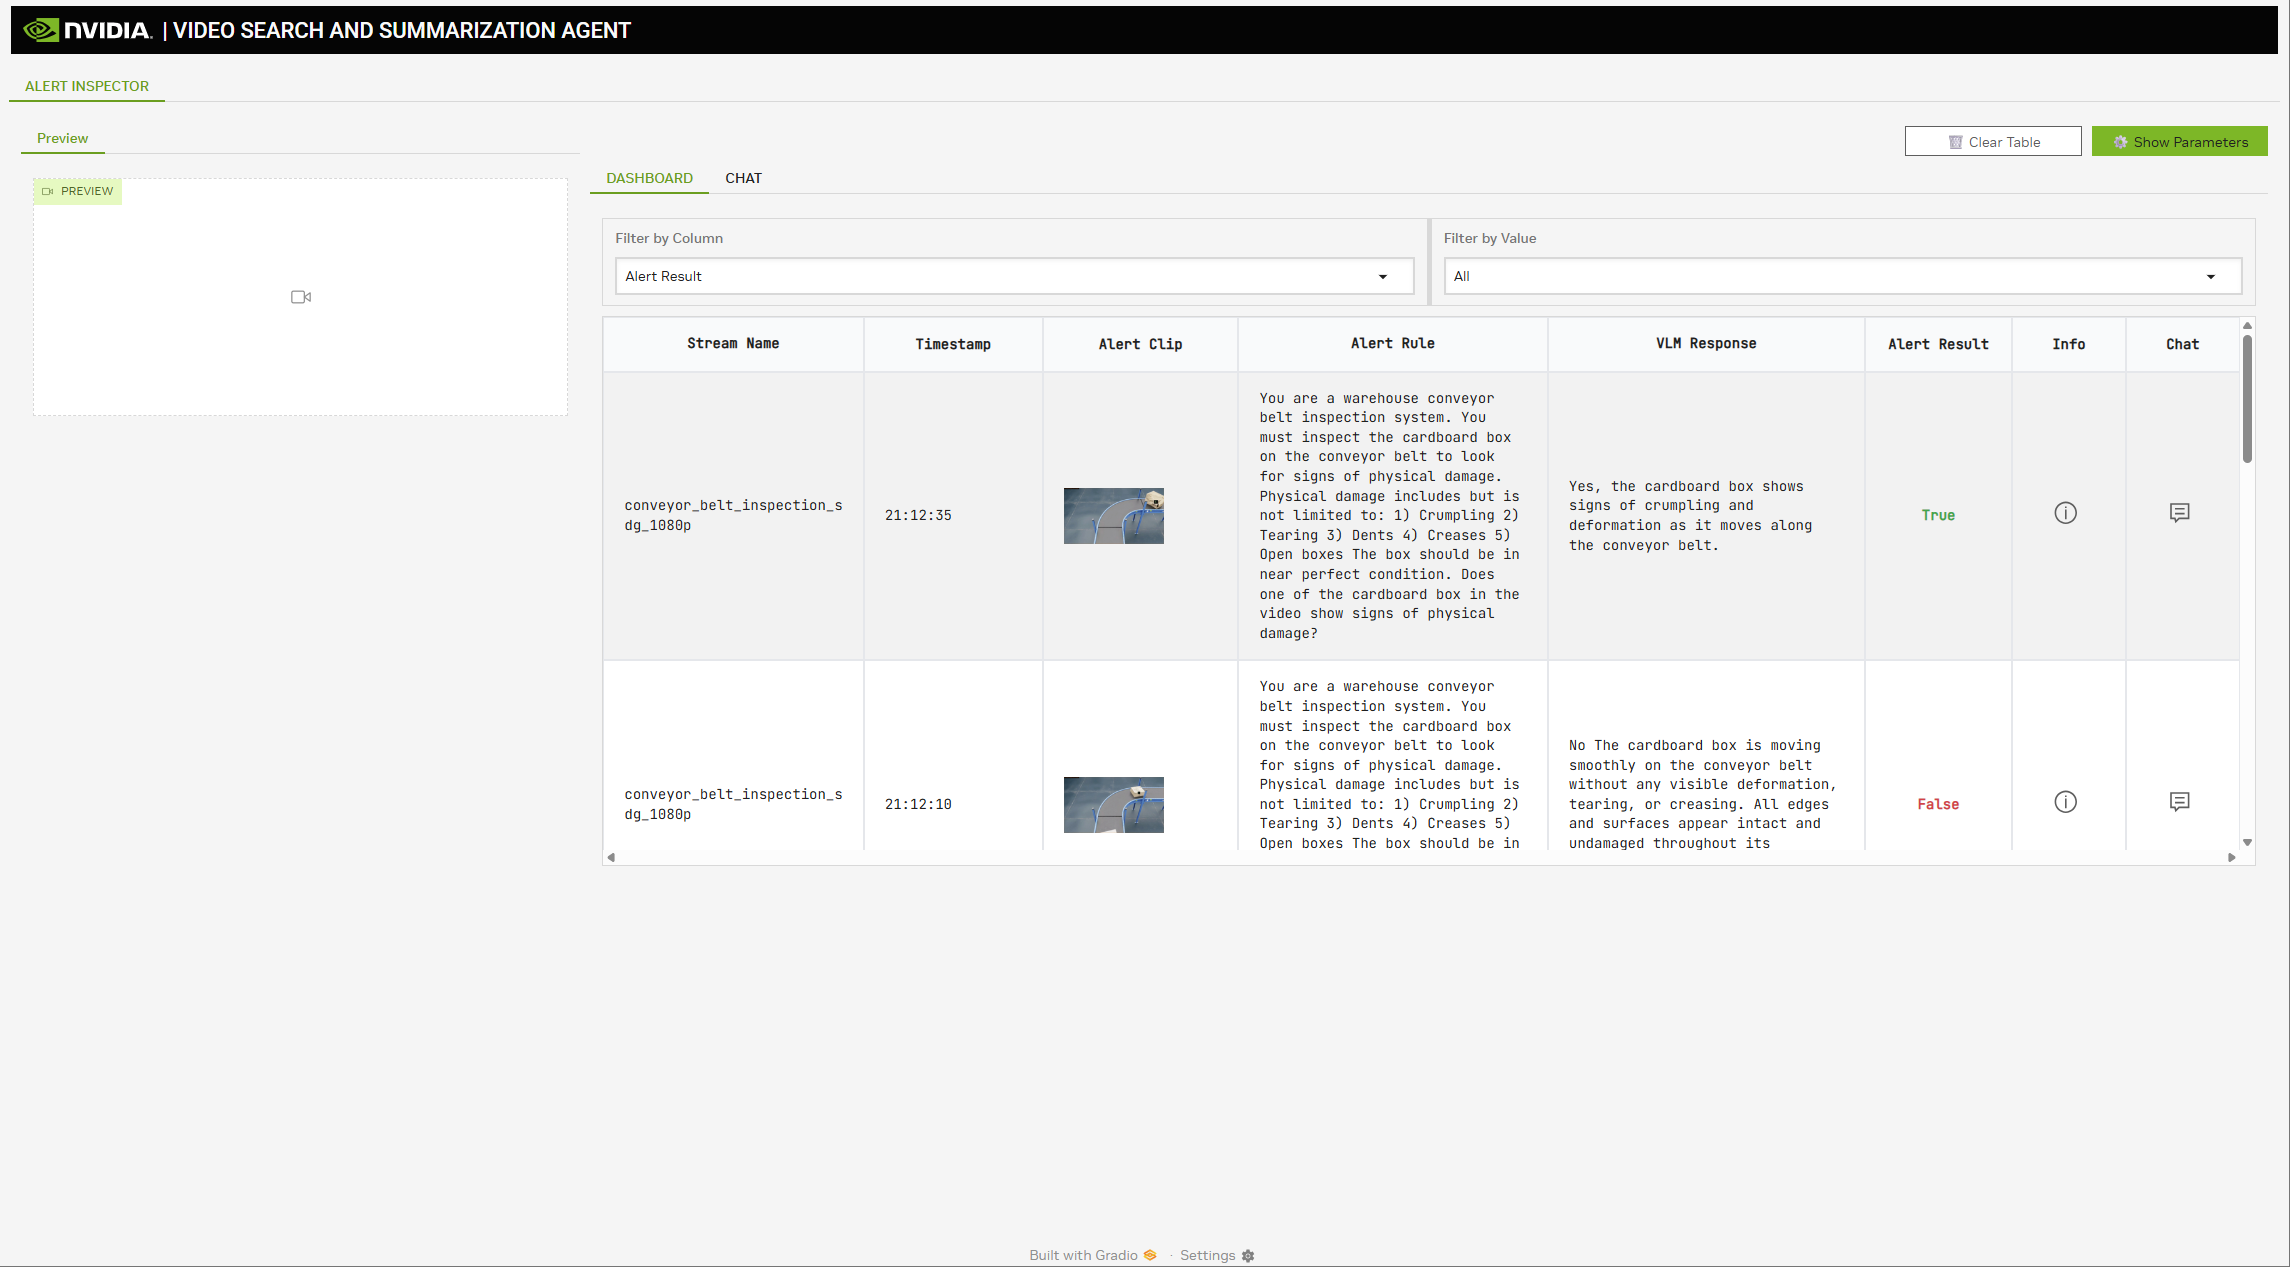
Dashboard View
The main dashboard displays a comprehensive table of all detected and reviewed events with the following columns:
Stream Name: Identifies the video source or file being processed
Example: “conveyor_belt_inspection_sdg_1080p”
Shows the original video file name or stream identifier
Timestamp: Shows when the event was detected in the video
Format: HH:MM:SS (for example, “09:34:18”, “09:33:41”)
Allows chronological tracking of events
Alert Clip: Visual preview of the detected event
Thumbnail image showing the frame where the event was detected
Provides immediate visual context for the alert
Alert Rule: Displays the alert prompt used by the VLM
Shows the complete prompt text used for event review
Example: “You are a warehouse conveyor belt inspection system. You must inspect the cardboard box on the conveyor belt to look for signs of physical damage…”
Helps understand what criteria were used for the review
VLM Response: Displays the VLM’s response to the alert prompt
Shows the VLM’s response to the alert prompt
Example: “A cardboard box is being inspected on a conveyor belt for physical damage.”
Helps understand the event context
Alert Result: Shows the VLM’s alert decision
True: Event reviewed as a genuine alert requiring attention (displayed in green)
False: Event determined to be a false positive (displayed in red)
Pending: Event is still being reviewed by the VLM (displayed in orange)
NA: Event summarized without review (displayed in bluish-gray)
Provides immediate status visibility for operators
Info: Additional information or metadata about the event
Includes details detailed information about the event in JSON format
Chat: Interactive option for each event
Chat button allows operators to ask follow-up questions about specific events
Video the video clip of the event
Filtering and Management
Filter by Column: Dropdown to select which column to filter by
Options include Alert Result, Stream Name.
Allows focused viewing of specific types of events
Filter by Value: Secondary filter to narrow down results
Can filter by “All”, “True”, “False”, “Pending” or “NA” for Alert Results
Enables quick separation of verified vs. false positive events
Clear Table: Option to reset the view and clear all displayed events
Show Parameters: Display additional configuration parameters for the event review system
Chat View
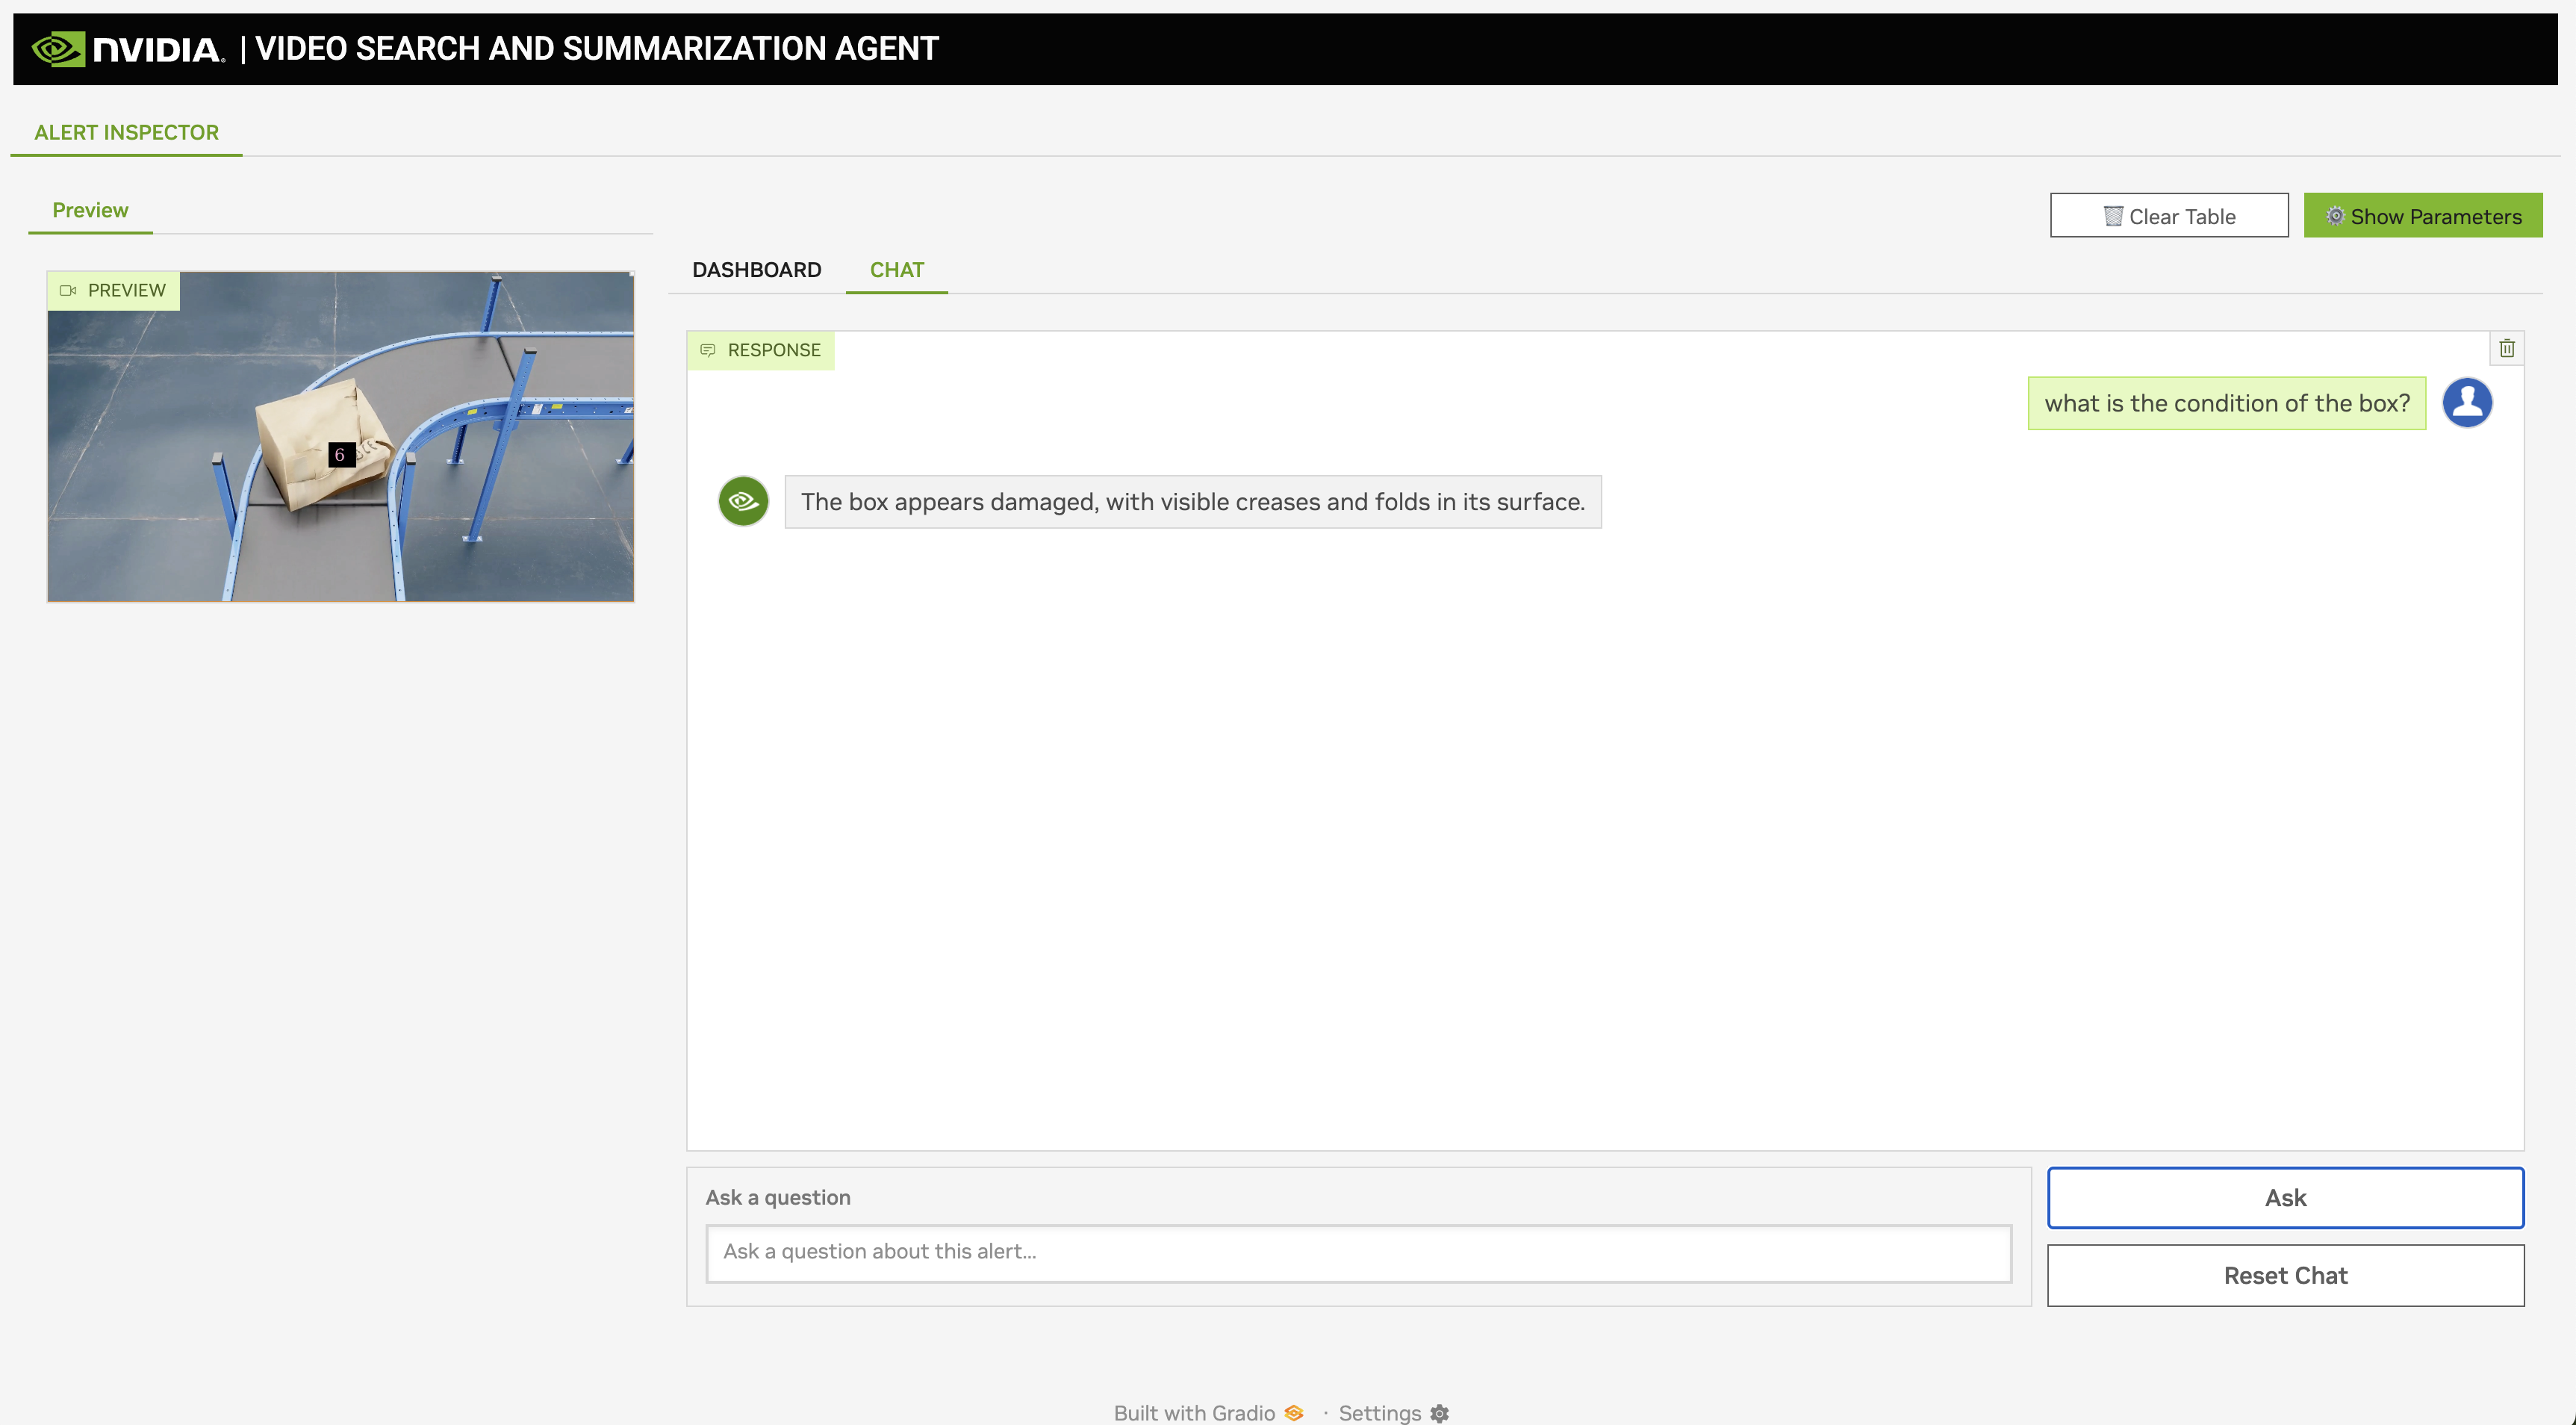
Chat Functionality and Video Preview
The Alert Inspector provides an interactive chat interface for detailed investigation of individual events:
Accessing Chat Mode
Switch to Chat View: Click on the “CHAT” tab to enter interactive mode
Event Selection: The chat interface focuses on a specific alert event for detailed analysis
Video Preview: Events are displayed with an integrated video player showing the detected alert clip
Video Preview Features
Integrated Video Player: Each alert displays as a playable video clip
Interactive Chat Interface
Question Input: Text field to “Ask a question about this alert…”
Natural language queries about the specific event
Context-aware responses based on the alert content
Examples: “What type of damage is visible?”, “Is this a valid alert?”, “Describe the object in detail”
Ask Button: Submit questions for VLM analysis of the specific alert
Reset Chat: Clear the conversation history and start fresh
Response Area: Displays VLM-generated responses to user queries
“RESPONSE” indicator shows when the system is providing answers
Detailed analysis based on the video content and alert context
Contextual information about the detected event
VST Storage Service#
The VST Storage Service is mainly responsible for storage related management tasks.
Upload videos to the storage service in pass-through mode
Get video file paths by unique ID or sensor ID from the storage service
The storage service is deployed as part of the VSS Event Verification deployment.
Upload the media clip to the VST storage service using VST upload API (for example,
POST /api/v1/storage/file).The consumer of the VST storage service can get video file paths by unique ID or sensor ID from the storage service (for example,
GET /api/v1/storage/file/path?id=<uniqueId>).
Submit a Video Clip to the VST Storage Service (REST)#
Endpoint: POST /api/v1/storage/file
Video clip details are provided in the HTTP request body encoded as JSON, conforming to the video clip schema outlined below.
Fields:
mediaFilePath(string) – Relative path to the video clip (required)metadataFilePath(string) – Path to the video clip metadata file (optional)metadata(object) – Metadata JSON object (required)
Example request:
{
  "mediaFilePath": "media/video.mp4",
  "metadataFilePath": "/media/video.json",
  "metadata": {
    "sensorId": "camera-001",
    "timestamp": 1715404800,
    "eventInfo": "object detected",
    "streamName": "camera-001"
  }
}
Response:
{
  "id": "6e0c5b4e-4d8c-4c2a-a5c2-3d9a8b4d2f1e",
  "bytes": 120000,
  "created_at": "2025-07-09T07:20:07.222Z",
  "fileName": "video.mp4",
  "sensorId": "camera-001",
  "filePath": "/videos/video.mp4"
}
Get a Video File Path by Unique ID (REST)#
Endpoint: GET /api/v1/storage/file/path?id=<uniqueId>&metadata=<boolean>
Response:
{
  "id": "alfur7-hdv53g-dhbcu-d923s",
  "mediaFilePath": "videos/video.mp4",
  "metadataFilePath": "/media/video.json",
  "metadata": {
    "sensorId": "camera-001",
    "timestamp": 1715404800,
    "eventInfo": "object detected",
    "streamName": "camera-001"
  }
}
Alert Bridge#
The Alert Bridge is designed as a modular, event-driven system that centralizes the ingestion, verification, and notification of alerts originating from different real-time video analytics or other intelligent video processing pipelines. While the current implementation is optimized for CV-based deployments, the architecture is intentionally generic and extensible to support other sources sending alerts using a designated schema. Use Alert Bridge to connect any computer vision pipeline to VSS for alert review:
Submit clips and metadata using a simple REST request
Apply prompts (stored or per-request) to guide verification
Receive responses real-time over WebSocket or in Redis streams
Speed iteration by updating prompts centrally without redeploying pipelines or changing input alerts
Simplify integration with a single REST submission and a WebSocket streams for consuming results
Remain portable by referencing media storage file paths or VST IDs to decouple storage and review
Alert Bridge uses Redis streams to store original alerts and VSS/VLM reviewed alerts, and prompts are stored in Redis JSON.
The following sections describe various aspects of using the Alert Bridge integrated with VSS for event verification:
Configuring and deploying the Alert Bridge service
Submitting alerts using the REST API along with the underlying schema
Receiving reviewed alert notifications over WebSocket
Configuring and managing prompts
Configuration and default settings
Consuming reviewed results over WebSocket
Deployment#
Alert Bridge is started as part of the VSS Event Verification deployment. Once running, access it via:
Base URL:
http://<host_ip>:9080(the port may differ based on your deployment)Or through the VSS Event Verification gateway if configured in your environment
The base Alert Bridge URL above can be used to submit alerts and manage prompts.
For deployment details, see the compose.yaml (service name: alert-bridge). The API port is controlled by the FASTAPI_PORT environment variable (default: 9080).
Note
Using Alert Bridge entails downloading and installing additional third-party open-source software projects. Review the license terms of these open-source projects before use.
Update configuration for your deployment needs:
Edit
config.yamlto set service endpoints, ports, event bridge settings, and logging.Optional: override defaults by providing a customized
alert_request_defaults.yamlfor optional alert parameters. A default is already included in the container; mount your customized file if you need different defaults, then re-deploy.
Configuration updates are optional. The default Alert Bridge configuration works for most use cases and can be used as-is.
Health Checks#
Use these endpoints to confirm the service is ready before sending alerts:
Basic service status
curl -s http://<host_ip>:9080/health | jq
Alert submission path health
curl -s http://<host_ip>:9080/api/v1/alerts/health | jq
WebSocket status
curl -s http://<host_ip>:9080/ws/health | jq
Submit an Alert (REST)#
Endpoint: POST /api/v1/alerts
Alert details are provided in the HTTP request body encoded as JSON, conforming to the alert schema outlined below.
Required fields:
id(string) – unique request identifier@timestamp(ISO 8601 string)sensor_id(string)video_path(string) – absolute or accessible path to the clipalert(object) –severity(LOW|MEDIUM|HIGH|CRITICAL),status(for example, REVIEW_PENDING),type,descriptionevent(object) –type,description
Optional fields:
vst_id(string) – storage identifier; when provided, the service may resolve the media path (deployment-dependent)vss_params(object) – processing parameters; defaults are applied if omittedcv_metadata_path(string),meta_labels(array),confidence(number),stream_name(string)
Example alert request:
{
  "id": "d026f829-9074-41d7-ada4-aad1aefc6a9f",
  "version": "1.0",
  "@timestamp": "2025-09-23T15:15:18Z",
  "sensor_id": "conveyor_belt_inspection_sdg_1080p",
  "video_path": "/tmp/alert-media-dir/conveyor_belt_inspection_sdg_1080p_2025-09-23T15-14-23.786620Z_st_53.167_end_78.200_clip_4.mp4",
  "vst_id": "e9de2940-b2a9-41bb-a70b-a2fef77aa8dd",
  "start_time": "53.167",
  "end_time": "78.200",
  "alert": {
    "severity": "MEDIUM",
    "status": "REVIEW_PENDING",
    "type": "object_detection",
    "description": "..."
  },
  "event": {
    "type": "video_analysis",
    "description": "..."
  },
  "confidence": 1,
  "cv_metadata_path": "conveyor_belt_inspection_sdg_1080p_2025-09-23T15-14-23.786620Z_st_53.167_end_78.200_clip_4.json",
  "vss_params": {
    "vlm_params": {
      "prompt": "...",
      "system_prompt": "...",
      "max_tokens": 50,
      "temperature": 0.3,
      "top_p": 0.3,
      "top_k": 40,
      "seed": 42
    },
    "chunk_overlap_duration": 0,
    "cv_metadata_overlay": false,
    "enable_reasoning": false,
    "do_verification": true,
    "debug": false
  },
  "meta_labels": [
    {
      "key": "prompt_index",
      "value": "0"
    },
    {
      "key": "prompt_text",
      "value": "..."
    },
    {
      "key": "enable_reasoning",
      "value": "False"
    }
  ]

}
Example 202 Accepted response:
{
  "status": "accepted",
  "id": "evt-12345-67890",
  "message": "Alert queued for processing",
  "timestamp": "2025-01-15T14:30:05Z"
}
Prompt Management#
Define prompts used with VSS invocation for each alert type. Manage prompts using REST.
Prompt types:
user: the primary instruction for how to review the alert. This must be provided either in the alert payload or pre-configured and stored for the alert type.system: optional context to guide behavior (tone, constraints, domain hints). Helpful but not required.
Endpoints:
Create:
POST /api/v1/promptsList all:
GET /api/v1/promptsGet by alert type:
GET /api/v1/prompts/{alert_type}Update:
PUT /api/v1/prompts/{alert_type}Delete:
DELETE /api/v1/prompts/{alert_type}Bulk create/update:
POST /api/v1/prompts/bulk
Create prompt (example):
{
  "alert_type": "PPE_CHECK",
  "prompt_type": "user",
  "prompt_text": "Is the person wearing a hard hat? Answer yes or no.",
  "description": "Hardhat review prompt"
}
Update prompt (example):
{
  "prompt_type": "user",
  "prompt_text": "Confirm hard hat presence only. Answer yes or no.",
  "description": "Tighter PPE check"
}
Precedence:
The prompt inside your alert request always takes precedence over stored prompts for that alert type.
Stored prompts are applied only when the request omits a prompt.
Alert Media Source Management#
The source for alert review can be:
Provided directly using
video_pathResolved from a media storage service using
vst_id
In the reference deployment, the VST storage service is used as the media storage service.
When
vst_idis provided, the service attempts to resolve the media file path from the VST storage service and overridesvideo_pathwith the resolved path.If resolution fails or the storage service is unavailable, processing continues using the provided
video_path.When both are present,
vst_idtakes precedence for path resolution;If configured,
ALERT_REVIEW_MEDIA_BASE_DIRis applied as a base directory for the resolved relative media path.
How vst_id is obtained:
Upload the alert media clip to the VST storage service using its storage API (for example,
POST /api/v1/storage/file). The response includes anidfield; use this value asvst_idwhen submitting the alert.In deployments using a storage service other than VST, provide the corresponding storage identifier as
vst_idand REST endpoint to get the media file path byvst_idasmedia_file_path_by_id_endpointin thevst_configsection of theconfig.yamlfile.
Default Parameters and Overrides#
Alert Bridge applies sensible defaults when fields are omitted so you can get started quickly. You can override any default by specifying the field in your request. Defaults are configurable for your deployment: use alert_request_defaults.yaml to set defaults for optional parameters. When optional fields are omitted in an alert, Alert Bridge will include the configured defaults on your behalf.
Note
About alert_request_defaults.yaml
A default copy is included in the Alert Bridge container; no action is required for the default deployment.
A copy is provided in the repository for your reference and customization.
To change defaults, edit your copy and mount it into the Alert Bridge container (preserving the filename), then re-deploy.
What is auto-filled:
VSS processing parameters (
vss_params): chunking, overlap, frame count, reasoning toggle, debug, and nested VLM parameters (such asmax_tokens,temperature,top_p,top_k,seed) are applied from deployment defaults when omitted.Request-level optional fields: if omitted, fields like
meta_labelsmay default to an empty list; others can remain unset.
Override order:
Values present in your alert request take highest precedence.
If the user prompt is omitted in the request, the stored user prompt for that alert type is applied (if configured).
If the system prompt is omitted, a stored system prompt may be applied; otherwise, it is optional and can be left unset.
Remaining missing parameters fall back to deployment defaults.
Tips:
Provide only what you need to change; defaults will fill the rest.
If you rely on stored prompts, omit the prompt in the request; if you include a prompt, it will be used.
Consume Reviewed Results (WebSocket)#
Subscribe to real-time events to receive reviewed outcomes programmatically.
For background on WebSockets, see MDN WebSockets API.
Endpoint:
ws://<host_ip>:9080/ws/alerts
Minimal client (browser/Node.js):
const ws = new WebSocket("ws://<host_ip>:9080/ws/alerts");
ws.onopen = () => console.log("connected");
ws.onmessage = (ev) => {
  // Messages include incoming alerts and reviewed results when available
  console.log("message", ev.data);
};
ws.onclose = () => console.log("closed");
Note
Expect messages both when an alert is received and when the reviewed result is produced.
Implement basic reconnect/backoff in production clients.
Example reviewed message (snippet):
{
  "id": "d026f829-9074-41d7-ada4-aad1aefc6a9f",
  "version": "1.0",
  "timestamp": "2025-09-23T15:15:18+00:00",
  "sensor_id": "conveyor_belt_inspection_sdg_1080p",
  "stream_name": "conveyor_belt_inspection_sdg_1080p",
  "video_path": "/tmp/alert-media-dir/conveyor_belt_inspection_sdg_1080p_2025-09-23T15-14-23.786620Z_st_53.167_end_78.200_clip_4.mp4",
  "cv_metadata_path": "/tmp/alert-media-dir/conveyor_belt_inspection_sdg_1080p_2025-09-23T15-14-23.786620Z_st_53.167_end_78.200_clip_4.json",
  "confidence": 1.0,
  "start_time": 53.167,
  "end_time": 78.2,
  "alert": {
    "severity": "MEDIUM",
    "status": "REVIEWED",
    "type": "object_detection",
    "description": "..."
  },
  "event": {
    "type": "video_analysis",
    "description": "..."
  },
  "result": {
    "status": "SUCCESS",
    "description": "No",
    "reasoning": "No reasoning available",
    "error_string": "",
    "verification_result": false,
    "confidence": null,
    "review_method": "VSS",
    "reviewed_by": "cosmos-reason2",
    "reviewed_at": "2025-09-23T15:15:20+00:00",
    "notes": "Alert auto-reviewed by VSS; confidence above threshold.",
    "input_prompt": "...",
    "debug": null
  },
  "meta_labels": [
    {
      "key": "prompt_index",
      "value": "0"
    },
    {
      "key": "prompt_text",
      "value": "..."
    },
    {
      "key": "enable_reasoning",
      "value": "False"
    }
  ]
}