Trusted Platform Module Replacement#
Caution
Static Sensitive Devices: Be sure to observe best practices for electrostatic discharge (ESD) protection. This includes making sure personnel and equipment are connected to a common ground, such as by wearing a wrist strap connected to the chassis ground, and placing components on static-free work surfaces.
Trusted Platform Module Replacement Overview#
This is a high-level overview of the procedure to replace the trusted platform module (TPM) on the NVIDIA DGX™ H100/H200 system.
If enabled, disable drive encryption.
Shut down the system.
Label all motherboard tray cables and unplug them.
Slide out the motherboard tray.
Remove the tray lid and the DIMM air baffle.
Lift the OSFP carrier module to access the TPM.
Replace the TPM on the motherboard.
Install the OSFP carrier module.
Install the DIMM air baffle and motherboard tray lid.
Slide the motherboard tray into the system.
Plug in all cables using the labels as a reference.
Power on the system.
If the data drives need to be protected, then enable encryption.
Prepare the System for Replacement#
If data drives are encrypted, the tpm2 OS package is installed, and the TPM is enabled in SBIOS, disable encryption:
sudo nv-disk-encrypt disable
Power down the system.
Remove the motherboard tray. Refer to Motherboard Tray - Removal and Installation for more information.
Remove the DIMM air baffle.
Replace the TPM Module#
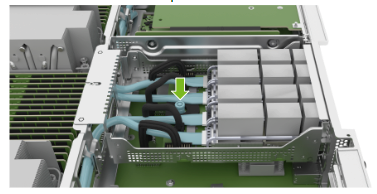
Locate the OSFP carrier module on the motherboard. Refer to the following figure:
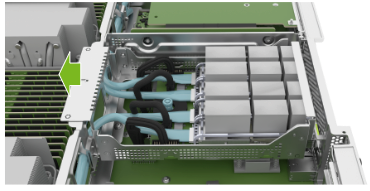
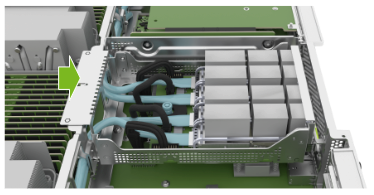
Move the OSFP carrier module toward the DIMMs, as shown in the following figure. Make sure the OSFP cages at the rear of the system do not interfere with the tray sheet metal before you tilt the carrier:
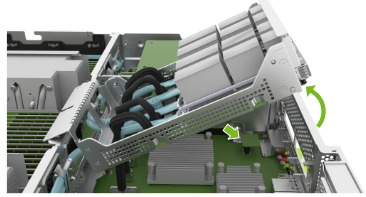
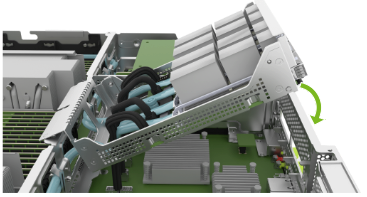
Rotate the OSFP carrier module to access the TPM, as shown in the following diagram:
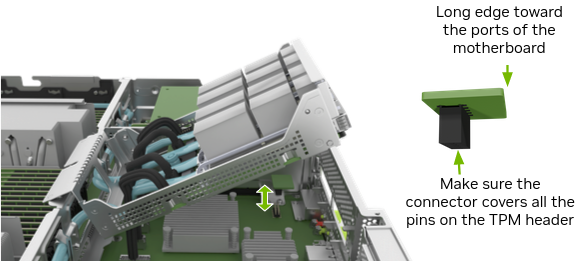
Replace the TPM. Make sure that you position the TPM in the same direction as the original.
Install OSFP Carrier Module#
Rotate the OSFP carrier module to return it to the original position. While you rotate the module, pull the module toward the DIMMs so that the ports do not interfere with the motherboard tray frame:
Move the OSFP carrier toward the outside of the tray so that the OSFP cages go through the openings in the motherboard tray frame:
Finalize TPM replacement#
Install the air baffles, close the motherboard, and install the tray in the chassis. Refer to Motherboard Tray - Removal and Installation for more information.
Plug in all cables.
Install all power cords.
Power on the system.
If data drives were encrypted, the tpm2 OS package is installed, and the TPM was enabled in SBIOS before the replacement, enable encryption:
sudo nv-disk-encrypt init -g -r -k <your vault password>
Use the
nvsmcommand to confirm the system is healthy:sudo nvsm show health