Emulated Devices
NVIDIA DOCA Emulated Devices
This document describes the ability of NVIDIA® BlueField® DPU to emulate and accelerate physical and virtual host functions.
NVIDIA mediated devices deliver flexibility in allowing to create accelerated devices without SR-IOV on the BlueField system. These mediated devices support NIC and RDMA and offer the same level of ASAP2 offloads as SR-IOV VFs. Mediates devices are supported using mlx5 sub-function acceleration technology.
Two sub-function devices are created on the BlueField device upon boot (one per port if the port is in switchdev mode) using commands from /etc/mellanox/mlnx-sf.conf:
            /sbin/mlnx-sf -a create -d 0000:03:00.0 -u 61a59715-aeec-42d5-be83-f8f42ba8b049 --mac 12:11:11:11:11:11
/sbin/mlnx-sf -a create -d 0000:03:00.1 -u 5b198182-1901-4c29-97a0-6623f3d02065 --mac 12:11:11:11:11:12
The help menu for mlnx-sf is presented below:
            Usage: mlnx-sf [ OPTIONS ]
OPTIONS:
-a, -action,    --action <action>               Perform action
    action:     { enable | create | configure | remove | show | set_max_mdevs | query_mdevs_num }

-d, -device,    --device <device>               PCI device <domain>:<bus>:<device>.<func> (E.g.: 0000:03:00.0)
-m, -max_mdevs, --max_mdevs <max mdevs number>  Set maximum number of MDEVs
-u, -uuid,      --uuid <uuid>                   UUID to create SF with
-M, -mac,       --mac <MAC>                     MAC to create SF with
-p, -permanent, --permanent [<conf file>]       Store configuration to be used after reboot and/or driver restart. Default (/etc/mellanox/mlnx-sf.conf).
-V, -version,   --version                       Display script version and exit
-D, -dryrun,    --dryrun                        Display commands only
-v, -verbose,   --verbose                       Run script in verbose mode (print out every step of execution)
-h, -help,      --help                          Display help

"/etc/mellanox/mlnx-sf.conf" can be updated manually or using "mlnx-sf" tool with "-p" parameter.
1.1. Related Configuration
Interface names are configured using the UDEV rule under /etc/udev/rules.d/82-net-setup-link.rules.
            SUBSYSTEM=="net", ACTION=="add", ATTR{phys_switch_id}!="", ATTR{phys_port_name}!="", \
        IMPORT{program}="/etc/infiniband/vf-net-link-name.sh $attr{phys_switch_id} $attr{phys_port_name}" \
        NAME="$env{NAME}", RUN+="/sbin/ethtool -L $env{NAME} combined 4"
# MDEV network interfaces
ACTION=="add", SUBSYSTEM=="net", DEVPATH=="/devices/pci0000:00/0000:00:00.0/0000:01:00.0/0000:02:02.0/0000:03:00.0/61a59715-aeec-42d5-be83-f8f42ba8b049/net/eth[0-9]", NAME="p0m0"
ACTION=="add", SUBSYSTEM=="net", DEVPATH=="/devices/pci0000:00/0000:00:00.0/0000:01:00.0/0000:02:02.0/0000:03:00.1/5b198182-1901-4c29-97a0-6623f3d02065/net/eth[0-9]", NAME="p1m0"
NVMe SNAP uses p0m0 as its default interface. See /etc/nvme_snap/sf1.conf.
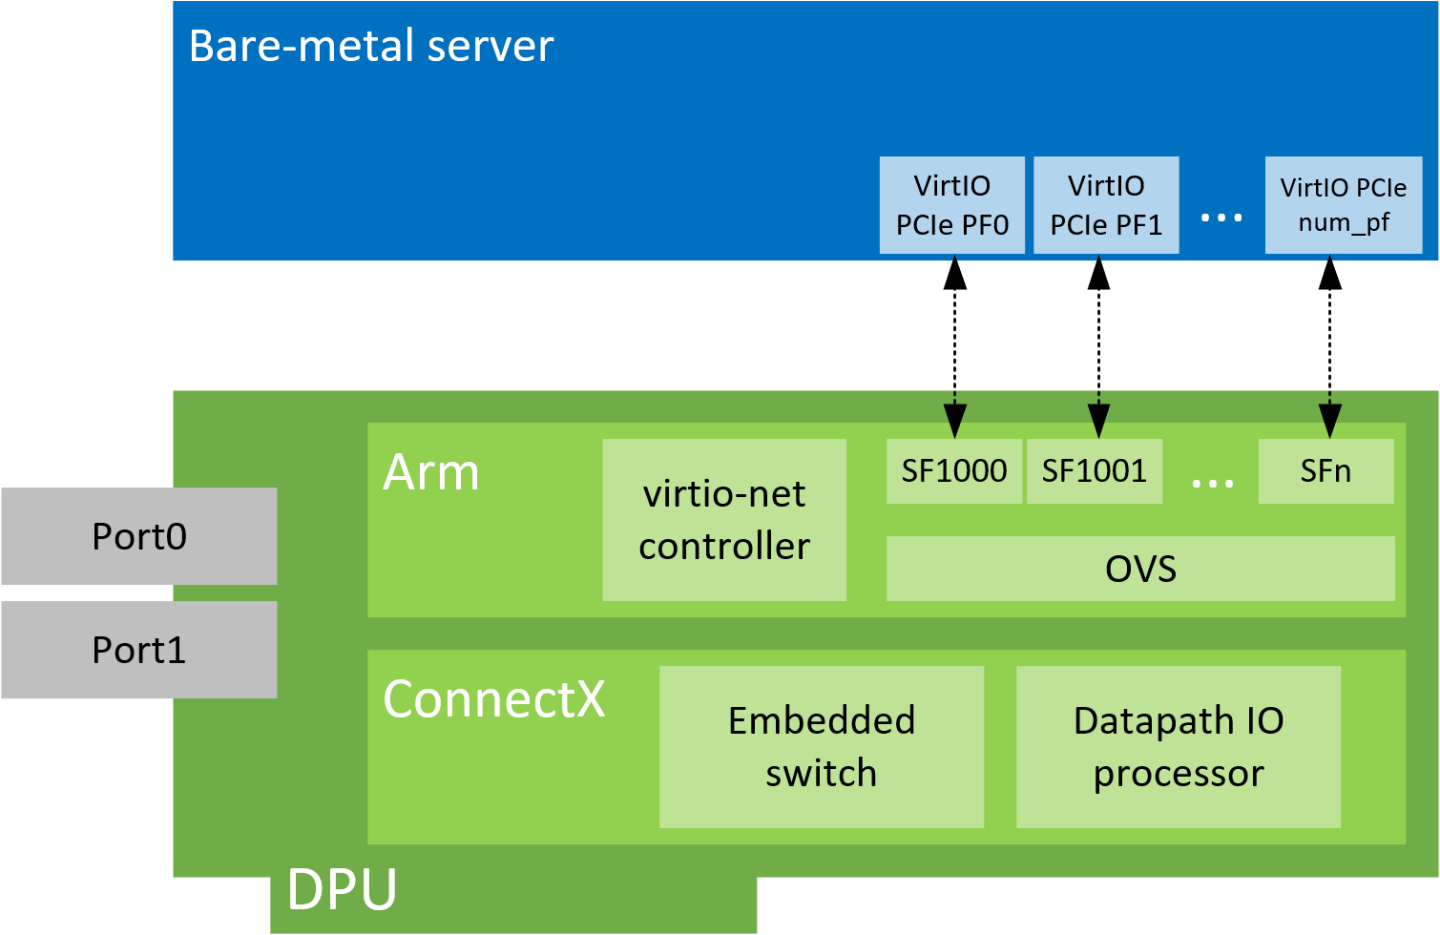
VirtIO emulated devices enables users to create VirtIO-net emulated PCIe devices in the system where the NVIDIA® BlueField®-2 DPU is connected. This is done by the virtio-net-controller software module present in the DPU. Virtio-net emulated devices allow users to hot plug up to 16 virtio-net PCIe PF Ethernet NIC devices or 504 virtio-net PCI VF Ethernet NIC devices in the host system where the DPU is plugged in.
Currently, only virtio specifications v1.0 and above are supported.
DPU software also enables users to create virtio block PCIe PF and SR-IOV PCIe VF devices. This is covered in the NVIDIA BlueField SNAP and virtio-blk SNAP Documentation.
2.1. VirtIO-net Controller
Virtio-net-controller is a systemd service running on the DPU, with a user interface frontend to communicate with the background service. An SF representor is created for each virtio-net device created on the host. Virtio-net controller only uses an SF number ≥1000.
It is important to note that since the controller provides hardware resources and ACKs the request from the host's VirtIO driver, in order to reboot the DPU and host OS, it is necessary to reboot the host OS first, and only then reboot the DPU.
SF representor name is determined by udev rules. The default name is in the format of <prefix><pf_num><sf_num>. For example: en3f0pf0sf1001.
2.1.1. SystemD Service
Controller systemd service is enabled by default and runs automatically if VIRTIO_NET_EMULATION_ENABLE is true from mlxconfig.
- To check controller service status, run:
systemctl status virtio-net-controller.service
- To reload the service, make sure to unload virtio-net/virtio-pcie drivers on host. Then run:
systemctl restart virtio-net-controller.service
- To monitor log output of the controller service, run:
journalctl -u virtio-net-controller
The controller service has an optional configuration file which allows users to customize several parameters. The configuration file should be defined on the DPU at the following path /opt/mellanox/mlnx_virtnet/virtnet.conf. This file will be read every time the controller starts. Dynamic change of virtnet.conf is not supported. It is defined as a JSON format configuration file. The currently supported options are:
ib_dev_p0– RDMA device (e.g.,mlx5_0) used to create SF on port 0. This port is the EMU manager whenis_lagis 0. Default value ismlx5_0.ib_dev_p1– RDMA device (e.g.,mlx5_1) used to create SF on port 1. Default value ismlx5_1.ib_dev_lag– RDMA LAG device (e.g.,mlx5_bond_0) used to create SF on LAG. Default value ismlx5_bond_0. This port is EMU manager whenis_lagis 1.ib_dev_lagandib_dev_p0/ib_dev_p1cannot be configured simultaneously.ib_dev_for_static_pf– the RDMA device (e.g, mlx5_0) which the static VirtIO PF is created onis_lag- whether or not LAG is used. Note that if LAG is used, make sure to use the correct IB dev for static PF.pf_mac– base MAC address for static PFs. MACs are automatically assigned with the following pattern:pf_mac→pf_0,pf_mac+1→pf_1, etc.Note:Note that the controller does not validate the MAC address (other than its length). The user must ensure MAC is valid and unique.
recovery– specifies whether recovery is enabled. If unspecified, recovery is enabled by default. To disable it, setrecoveryto 0.sf_pool_percent– determines the initial SF pool size as the percentage ofPF_TOTAL_SFofmlxconfig. Valid range: [0, 100]. For instance, if the value is 5, it means an SF pool with 5% ofPF_TOTAL_SFis created. 0 means no SF pool is reserved beforehand (default).Note:PF_TOTAL_SFis shared by all applications. User must ensure the percent request is guaranteed or else the controller will not be able to reserve the requested SFs resulting in failure.sf_pool_force_destroy– specifies whether to destroy the SF pool. When set to 1, the controller destroys the SF pool when stopped/restarted (and the SF pool is recreated ifsf_pool_percentis not 0 when starting), otherwise it does not. Default value is 0.
For example, the definition below has all static PFs using mlx5_0 (port 0) as the data path device in a non-lag configuration.
            {
  "ib_dev_p0": "mlx5_0",
  "ib_dev_p1": "mlx5_1",
  "ib_dev_for_static_pf": "mlx5_0",
  "is_lag": 0,
  "pf_mac": "00:11:22:33:44:55",
  "recovery": 1,
  "sf_pool_percent": 0,
  "sf_pool_force_destroy": 0
}
The following is an example for LAG configuration:
            {
  "ib_dev_lag": "mlx5_bond_0",
  "ib_dev_for_static_pf": "mlx5_bond_0",
  "is_lag": 1,
  "pf_mac": "00:11:22:33:44:55",
  "recovery": 1,
  "sf_pool_percent": 0,
  "sf_pool_force_destroy": 0
}
2.1.2. User Frontend
To communicate with the service, a user frontend program, virtnet, is installed on the DPU. Run the following command to check its usage:
            # virtnet -h
usage: virtnet [-h] [-v] {hotplug,unplug,list,query,modify,log} ...

Nvidia virtio-net-controller command line interface v1.0.9

positional arguments:
  {hotplug,unplug,list,query,modify,log}
                        ** Use -h for sub-command usage
    hotplug             hotplug virtnet device
    unplug              unplug virtnet device
    list                list all virtnet devices
    query               query all or individual virtnet device(s)
    modify              modify virtnet device
    log                 set log level

optional arguments:
  -h, --help            show this help message and exit
  -v, --version         show program's version number and exit
Note that each positional argument has its own help menu as well. For example:
            # virtnet log -h
usage: virtnet log [-h] -l {info,err,debug}
optional arguments:
  -h, --help            show this help message and exit
  -l {info,err,debug}, --level {info,err,debug}
                        log level: info/err/debug
To operate a particular device, either the VUID or device index can be used to locate the device. Both attributes can be fetched from command "virtnet list". For example, to modify the MAC of a specific VF, you may run either of the following commands:
# virtnet modify -p 0 –v 0 device -m 0C:C4:7A:FF:22:98
Or:
# virtnet modify -u <VUID-string> device -m 0C:C4:7A:FF:22:98
2.1.3. Controller Recovery
It is possible to recover the control and data planes if communications are interrupted so the original traffic can resume.
Recovery depends on the JSON files stored in /opt/mellanox/mlnx_virtnet/recovery where there is a file that corresponds to each device (either PF or VF). The following is an example of the data stored in these files:
            {
  "port_ib_dev": "mlx5_0",
  "pf_id": 0,
  "function_type": "pf",
  "bdf_raw": 26624,
  "device_type": "hotplug",
  "mac": "0c:c4:7a:ff:22:93",
  "pf_num": 0,
  "sf_num": 2000,
  "mq": 1
}
These files should not be modified under normal circumstances. However, if necessary, advanced users may tune settings to meet their requirements. Users are responsible for the validity of the recovery files and should only perform this when the controller is not running.
Controller recovery is enabled by default and does not need user configuration or intervention unless a system reset is needed or BlueField configuration is changed (i.e. any of the mlxconfig options PCI_SWITCH_EMULATION_NUM_PORT, VIRTIO_NET_EMULATION_NUM_VF, or VIRTIO_NET_EMULATION_NUM_PF). To this end, the files under /opt/mellanox/mlnx_virtnet/recovery must be deleted.
2.2. VirtIO-net PF Devices
This section covers managing virtio-net PCIe PF devices using virtio-net-controller.
2.2.1. VirtIO-net PF Device Configuration
- Run the following command on the DPU:
mlxconfig -d /dev/mst/mt41686_pciconf0 s INTERNAL_CPU_MODEL=1
- Add the following kernel boot parameters to the Linux boot arguments:
intel_iommu=on iommu=pt pci=realloc
- Cold reboot the host system.
- Apply the following configuration on the DPU:
            $ mst start

$ mlxconfig -d /dev/mst/mt41686_pciconf0 s PF_BAR2_ENABLE=0 PER_PF_NUM_SF=1

$ mlxconfig -d /dev/mst/mt41686_pciconf0 s \
PCI_SWITCH_EMULATION_ENABLE=1 \
PCI_SWITCH_EMULATION_NUM_PORT=16 \
VIRTIO_NET_EMULATION_ENABLE=1 \
VIRTIO_NET_EMULATION_NUM_VF=0 \
VIRTIO_NET_EMULATION_NUM_PF=0 \
VIRTIO_NET_EMULATION_NUM_MSIX=10 \
VIRTIO_NET_EMULATION_VENDOR_ID=0x1af4 \
VIRTIO_NET_EMULATION_DEVICE_ID=0x1041 \
VIRTIO_NET_EMULATION_CLASS_CODE=0x028000 \
ECPF_ESWITCH_MANAGER=1 \
ECPF_PAGE_SUPPLIER=1 \
SRIOV_EN=0 \
PF_SF_BAR_SIZE=10 \
PF_TOTAL_SF=64

$ mlxconfig -d /dev/mst/mt41686_pciconf0.1 s \
PF_SF_BAR_SIZE=10 \
PF_TOTAL_SF=64
- Cold reboot the host system a second time.
2.2.2. Creating Hotplug VirtIO-net PF Device
VirtIO emulated network PCIe devices are created and destroyed using virtio-net-controller application console. When this application is terminated, all created virtio-net emulated devices are hot unplugged.
- Create a hotplug virtio-net device. Run:
virtnet hotplug -i mlx5_0 -f 0x0 -m 0C:C4:7A:FF:22:93 -t 1500 -n 3 -s 1024
This creates one hotplug virtio-net device with MAC address 0C:C4:7A:FF:22:93, MTU 1500, and 3 VirtIO queues with a depth of 1024 entries. This device is uniquely identified by its index. This index is used to query and update device attributes. If the device is created successfully, an output appears similar to the following:Note:The maximum number of virtio-net queues is bound by the minimum of the following numbers:
VIRTIO_NET_EMULATION_NUM_MSIXfrom the commandmlxconfig -d <mst_dev> qmax_virtqfrom the commandvirtnet list
            {
  "bdf": "85:00.0",
  "vuid": "VNETS1D0F0",
  "id": 3,
  "sf_rep_net_device": "en3f0pf0sf2000",
  "mac": "0C:C4:7A:FF:22:93"
}
- Add the representor port of the device to the OVS bridge and bring it up. Run:
            ip link set dev en3f0pf0sf1001 up
ovs-vsctl add-port <bridge> en3f0pf0sf1001
Once steps 1-3 are completed, virtio-net device should be available in the host system.
- To query all the device configurations of virtio-net device that you created, run:
virtnet query –p 1
- To list all the virtio-net devices, run:
virtnet list
- To modify device attributes, for example, changing its MAC address, run:
virtnet modify -p 0 device -m 0C:C4:7A:FF:22:98
- Once usage is complete, to hot-unplug a VirtIO net device, run:
virtnet unplug -p 1
2.3. VirtIO-net SR-IOV VF Devices
This section covers managing virtio-net PCIe SR-IOV VF devices using virtio-net-controller.
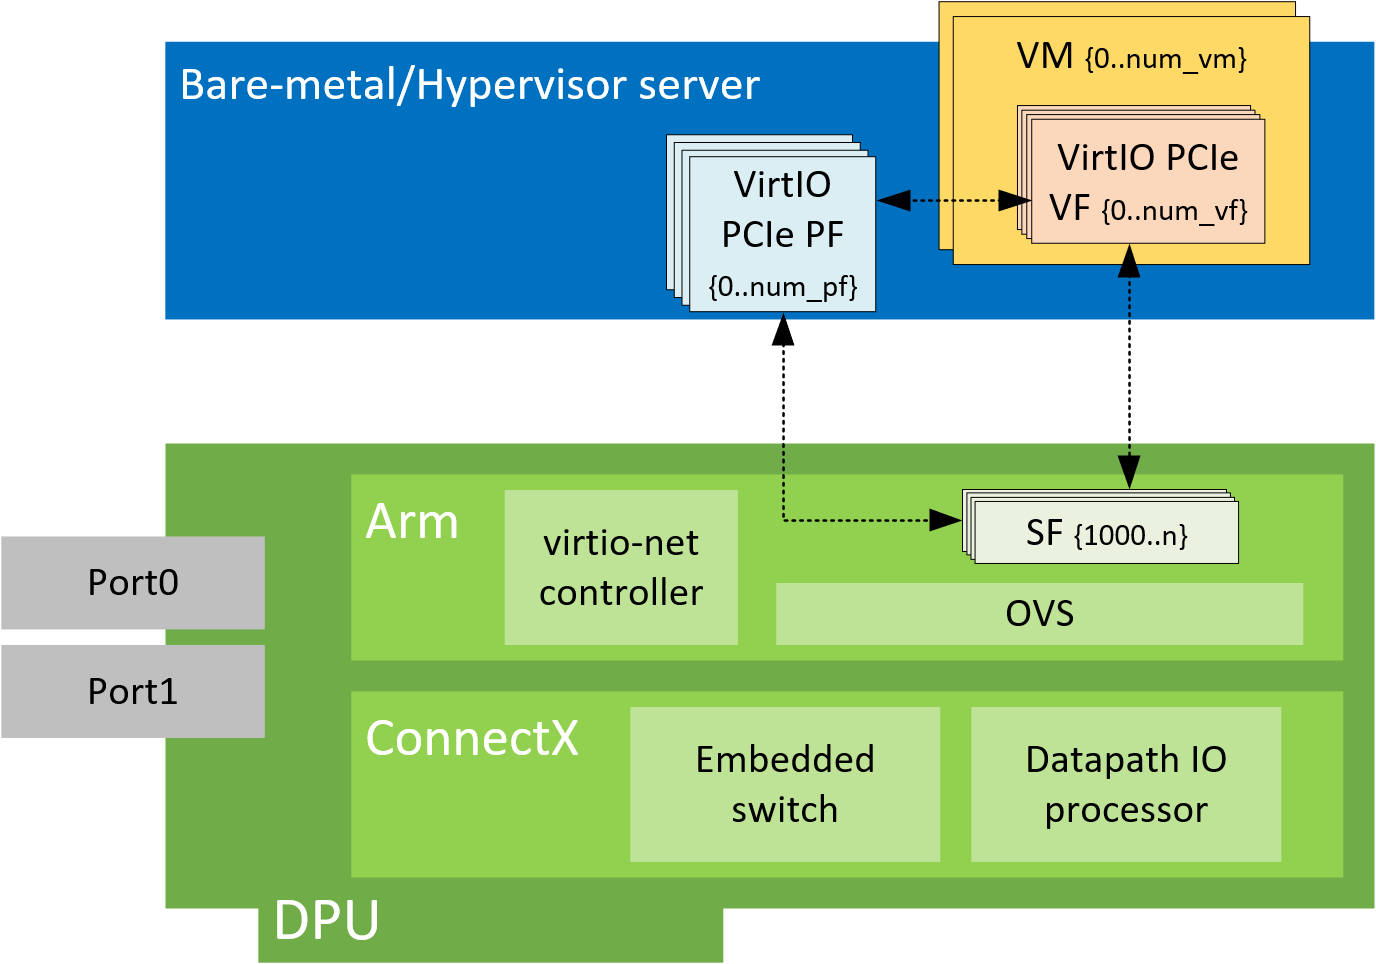
2.3.1. Virtio-net SR-IOV VF Device Configuration
Virtio-net SR-IOV VF is only supported with statically configured PF, hot-plugged PF is not currently supported.
- On the DPU, make sure virtio-net-controller service is enabled so that it starts automatically. Run:
systemctl status virtio-net-controller.service
- On the x86 host, enable SR-IOV. Please refer to MLNX_OFED documentation under Features Overview and Configuration > Virtualization > Single Root IO Virtualization (SR-IOV) > Setting Up SR-IOV for instructions on how to do that. Make sure the parameters
intel_iommu=on iommu=pt pci=reallocexist ingrub.conffile. - It is recommended to add
pci=assign-bussesto the boot command line when creating more than 127 VFs. Without this option, the following errors might appear from host and the virtio driver will not probe these devices.pci 0000:84:00.0: [1af4:1041] type 7f class 0xffffff pci 0000:84:00.0: unknown header type 7f, ignoring device
- Run the following command on the DPU:
mst start && mlxconfig -d /dev/mst/mt41686_pciconf0 s INTERNAL_CPU_MODEL=1
- Cold reboot the host system.
- Apply the following configuration on the DPU in three steps to support up to 125 VFs per PF (500 VFs in total).
-
mst start && mlxconfig -d /dev/mst/mt41686_pciconf0 s PF_BAR2_ENABLE=0 PER_PF_NUM_SF=1
-
            mlxconfig -d /dev/mst/mt41686_pciconf0 s \
PCI_SWITCH_EMULATION_ENABLE=1 \
PCI_SWITCH_EMULATION_NUM_PORT=16 \
VIRTIO_NET_EMULATION_ENABLE=1 \
VIRTIO_NET_EMULATION_NUM_VF=126 \
VIRTIO_NET_EMULATION_NUM_PF=4 \
VIRTIO_NET_EMULATION_NUM_MSIX=4 \
VIRTIO_NET_EMULATION_VENDOR_ID=0x1af4 \
VIRTIO_NET_EMULATION_DEVICE_ID=0x1041 \
VIRTIO_NET_EMULATION_CLASS_CODE=0x028000 \
ECPF_ESWITCH_MANAGER=1 \
ECPF_PAGE_SUPPLIER=1 \
SRIOV_EN=1 \
PF_SF_BAR_SIZE=8 \
PF_TOTAL_SF=508 \
NUM_OF_VFS=0
-
mlxconfig -d /dev/mst/mt41686_pciconf0.1 s PF_TOTAL_SF=1 PF_SF_BAR_SIZE=8
-
- Cold reboot the host system.
2.3.2. Creating Virtio-net SR-IOV VF Devices
The virtio-net-controller application console must be kept alive to maintain the functionality of the static PF and its VFs.
- On the host, make sure the static virtio network device presents. Run:
            # lspci | grep -i virtio
85:00.3 Network controller: Red Hat, Inc. Virtio network device
- On the host, make sure virtio_pci and virtio_net are loaded. Run:
# lsmod | grep virtio
            # ethtool -i p7p3
driver: virtio_net
version: 1.0.0
firmware-version:
expansion-rom-version:
bus-info: 0000:85:00.3
supports-statistics: no
supports-test: no
supports-eeprom-access: no
supports-register-dump: no
supports-priv-flags: no
- To create SR-IOV VF devices on the x86 host, run:
# echo 2 > /sys/bus/pci/drivers/virtio-pci/0000\:85\:00.3/sriov_numvfs
2 VFs should be created from the x86 host:Note:When the number of VFs created is high, SR-IOV enablement may take several minutes.
            # lspci | grep -i virt
85:00.3 Network controller: Red Hat, Inc. Virtio network device
85:04.5 Network controller: Red Hat, Inc. Virtio network device
85:04.6 Network controller: Red Hat, Inc. Virtio network device
- From the DPU virtio-net controller, run the following command to get VF information.
            # virnet list
{
    "vf_id": 0,
    "parent_pf_id": 0,
    "function_type": "VF",
    "vuid": "VNETS0D0F2VF1",
    "bdf": "83:00.6",
    "sf_num": 3000,
    "sf_parent_device": "mlx5_0",
    "sf_rep_net_device": "en3f0pf0sf3000",
    "sf_rep_net_ifindex": 19,
    "sf_rdma_device": "mlx5_7",
    "sf_vhca_id": "0x192",
    "msix_config_vector": "0x0",
    "num_msix": 10,
    "max_queues": 4,
    "max_queues_size": 256,
    "net_mac": "5A:94:07:04:F6:1C",
    "net_mtu": 1500
},
You may use the pci-bdf to match the PF/VF on the x86 host to the information showing on DPU.
To query all the device configurations of the virtio-net device of that VF, run:
$ virtnet query -p 0 -v 0
Add the corresponding SF representor to the OVS bridge and bring it up. Run:# ovs-vsctl add-port <bridge> en3f0pf0sf1004 # ip link set dev en3f0pf0sf1004 up
Now the VF should be functional.Note:When port MTU (p0/p1 of the DPU) is changed after the controller is started, you must restart controller service. It is not recommended to use jumbo MTUs because that may lead to performance degradation.
- To destroy SR-IOV VF devices on the host, run:
# echo 0 > /sys/bus/pci/drivers/virtio-pci/0000\:85\:00.3/sriov_numvfs
Note:When the command returns from the host OS, it does not necessarily mean the controller finished its operations. Look at controller log from the DPU and make sure you see a log like below before removing VirtIO kernel modules or recreate VFs.
# virtio-net-controller[3544]: [INFO] virtnet.c:617:virtnet_device_vfs_unload: PF(0): Unload (4) VFs finished
Once VFs are destroyed, created SFs from the DPU side are not destroyed but are saved into the SF pool to be reused later.
Notice
This document is provided for information purposes only and shall not be regarded as a warranty of a certain functionality, condition, or quality of a product. NVIDIA Corporation nor any of its direct or indirect subsidiaries and affiliates (collectively: “NVIDIA”) make no representations or warranties, expressed or implied, as to the accuracy or completeness of the information contained in this document and assume no responsibility for any errors contained herein. NVIDIA shall have no liability for the consequences or use of such information or for any infringement of patents or other rights of third parties that may result from its use. This document is not a commitment to develop, release, or deliver any Material (defined below), code, or functionality.
NVIDIA reserves the right to make corrections, modifications, enhancements, improvements, and any other changes to this document, at any time without notice.
Customer should obtain the latest relevant information before placing orders and should verify that such information is current and complete.
NVIDIA products are sold subject to the NVIDIA standard terms and conditions of sale supplied at the time of order acknowledgement, unless otherwise agreed in an individual sales agreement signed by authorized representatives of NVIDIA and customer (“Terms of Sale”). NVIDIA hereby expressly objects to applying any customer general terms and conditions with regards to the purchase of the NVIDIA product referenced in this document. No contractual obligations are formed either directly or indirectly by this document.
NVIDIA products are not designed, authorized, or warranted to be suitable for use in medical, military, aircraft, space, or life support equipment, nor in applications where failure or malfunction of the NVIDIA product can reasonably be expected to result in personal injury, death, or property or environmental damage. NVIDIA accepts no liability for inclusion and/or use of NVIDIA products in such equipment or applications and therefore such inclusion and/or use is at customer’s own risk.
NVIDIA makes no representation or warranty that products based on this document will be suitable for any specified use. Testing of all parameters of each product is not necessarily performed by NVIDIA. It is customer’s sole responsibility to evaluate and determine the applicability of any information contained in this document, ensure the product is suitable and fit for the application planned by customer, and perform the necessary testing for the application in order to avoid a default of the application or the product. Weaknesses in customer’s product designs may affect the quality and reliability of the NVIDIA product and may result in additional or different conditions and/or requirements beyond those contained in this document. NVIDIA accepts no liability related to any default, damage, costs, or problem which may be based on or attributable to: (i) the use of the NVIDIA product in any manner that is contrary to this document or (ii) customer product designs.
No license, either expressed or implied, is granted under any NVIDIA patent right, copyright, or other NVIDIA intellectual property right under this document. Information published by NVIDIA regarding third-party products or services does not constitute a license from NVIDIA to use such products or services or a warranty or endorsement thereof. Use of such information may require a license from a third party under the patents or other intellectual property rights of the third party, or a license from NVIDIA under the patents or other intellectual property rights of NVIDIA.
Reproduction of information in this document is permissible only if approved in advance by NVIDIA in writing, reproduced without alteration and in full compliance with all applicable export laws and regulations, and accompanied by all associated conditions, limitations, and notices.
THIS DOCUMENT AND ALL NVIDIA DESIGN SPECIFICATIONS, REFERENCE BOARDS, FILES, DRAWINGS, DIAGNOSTICS, LISTS, AND OTHER DOCUMENTS (TOGETHER AND SEPARATELY, “MATERIALS”) ARE BEING PROVIDED “AS IS.” NVIDIA MAKES NO WARRANTIES, EXPRESSED, IMPLIED, STATUTORY, OR OTHERWISE WITH RESPECT TO THE MATERIALS, AND EXPRESSLY DISCLAIMS ALL IMPLIED WARRANTIES OF NONINFRINGEMENT, MERCHANTABILITY, AND FITNESS FOR A PARTICULAR PURPOSE. TO THE EXTENT NOT PROHIBITED BY LAW, IN NO EVENT WILL NVIDIA BE LIABLE FOR ANY DAMAGES, INCLUDING WITHOUT LIMITATION ANY DIRECT, INDIRECT, SPECIAL, INCIDENTAL, PUNITIVE, OR CONSEQUENTIAL DAMAGES, HOWEVER CAUSED AND REGARDLESS OF THE THEORY OF LIABILITY, ARISING OUT OF ANY USE OF THIS DOCUMENT, EVEN IF NVIDIA HAS BEEN ADVISED OF THE POSSIBILITY OF SUCH DAMAGES. Notwithstanding any damages that customer might incur for any reason whatsoever, NVIDIA’s aggregate and cumulative liability towards customer for the products described herein shall be limited in accordance with the Terms of Sale for the product.
Trademarks
NVIDIA, the NVIDIA logo, and Mellanox are trademarks and/or registered trademarks of Mellanox Technologies Ltd. and/or NVIDIA Corporation in the U.S. and in other countries. The registered trademark Linux® is used pursuant to a sublicense from the Linux Foundation, the exclusive licensee of Linus Torvalds, owner of the mark on a world¬wide basis. Other company and product names may be trademarks of the respective companies with which they are associated.
Copyright
© 2022 NVIDIA Corporation & affiliates. All rights reserved.