Examples#
4T4R Scheduler Performance Test#
cuMAC contains a testbench (/opt/nvidia/cuBB/cuMAC/examples/multiCellSchedulerUeSelection) for performing
simplified system-level simulations to evaluate the performance of the 4T4R scheduler algorithm implementations.
For each simulation, the testbench runs for a given number of contiguous time slots, and in each slot executes scheduling algorithms sequentially in the following order:
UE selection > PRG allocation > layer selection > MCS selection.
The parameter setup for the simulation is configured using the file /opt/nvidia/cuBB/cuMAC/examples/parameters.h.
Parameters like the simulation duration numSimChnRlz, the number of cells numCellConst, and the number of gNB/UE antennas nBsAntConst / nUeAntConst,
among others, can be adjusted in this file to meet the specific simulation requirements.
KPIs such as the sum cell throughput, per-UE throughput, and proportional fairness metrics can be obtained from the simulations for analyzing the scheduler algorithms’ performance.
This testbench supports running different 4T4R scheduler algorithms on GPU and CPU, e.g., a multi-cell scheduler running on GPU versus a single-cell scheduler running on CPU.
It enables the comparison of different algorithms’ performance through a single simulation run.
An example figure with the cell sum throughput curves of the multi-cell and single-cell schedulers is provided below:
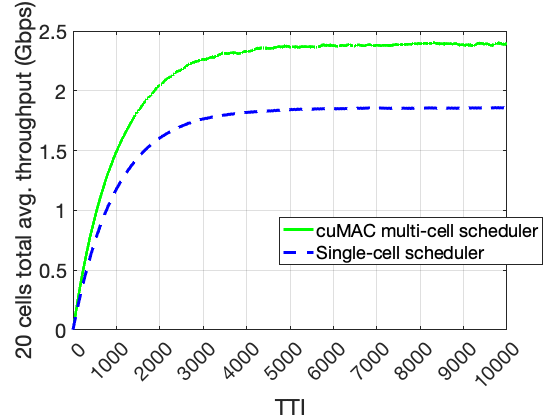
Cell sum throughput curves comparison: multi-cell scheduler vs. single-cell scheduler#
This testbench can be also used to validate the GPU/CUDA algorithm implementations against the CPU C++ versions of the same algorithm. This can be done by configuring the same scheduler algorithm for both GPU and CPU in the simulation. At the end of the simulation, the gaps between the GPU and CPU performance curves are evaluated. The testbench returns 0 (success) if the performance curve gaps are less than the tolerance threshold; otherwise, it returns 1 (failure).
After building cuMAC, use the following command to check input arguments of the testbench:
./opt/nvidia/cuBB/build/cuMAC/examples/multiCellSchedulerUeSelection/multiCellSchedulerUeSelection -h
The testbench currently supports three channel models in the system simulations: a time-correlated Rayleigh fading model, a GPU-accelerated TDL channel model, and a GPU-accelerated CDL channel model.
Use the input argument -f <0/1/2/3/4> to specify the desired channel model:
-f 0for Rayleigh fading-f 1for TDL channel model with CFR on PRBG-f 2for TDL channel model with CFR on PRBG and SC-f 3for CDL channel model with CFR on PRBG-f 4for CDL channel model with CFR on PRBG and SC
Note that currently only CFR on PRBG is used in cuMAC scheduler. It’s recommended to use -f <0/1/3> for the system simulation. The use of -f <2/4> is reserved for future developments. Since the data volume of CFR on SC is much larger than that of CFR on PRBG, it will cost additional GPU memory.
To run system simulation with the DL/UL scheduler pipeline:
Configure simulation parameters in the
/opt/nvidia/cuBB/cuMAC/examples/parameters.hfile.Build cuMAC within the cuBB container.
Run simulation with the DL/UL scheduler pipeline:
./opt/nvidia/cuBB/build/cuMAC/examples/multiCellSchedulerUeSelection/multiCellSchedulerUeSelection -d [0 or 1 for DL/UL] -f [0/1/2/3/4 for channel model] -b [0 or 1 for CPU algorithm choice] -p [0 or 1 for FP32/FP16 on GPU]
Passing criteria:
Performance curves achieved by GPU and CPU scheduler implementations should match: testbench returns 0 (PASS) or 1 (FAIL)
Two types of performance curves are considered:
Sum throughput of all cells
CDF of per-UE throughput
cuMAC Test Vector Generation#
cuMAC supports the generation of HDF5 test vectors using the multiCellSchedulerUeSelection system simulation testbench.
Each test vector contains parameters and data arrays defined in the cuMAC API structures (/opt/nvidia/cuBB/cuMAC/src/api.h):
cumacCellGrpUeStatus, cumacCellGrpPrms, and cumacSchdSol.
When a simulation with the testbench is completed (after a configured number of time slots), a HDF5 test vector file is created, with data collected from the last simulated slot.
A number of pre-generated test vectors are located in the /opt/nvidia/cuBB/cuMAC/testVectors directory.
To enable the test vector generation, use the input argument -t 1 with the multiCellSchedulerUeSelection testbench along with other input arguments.
For example:
Generate a DL test vector:
./opt/nvidia/cuBB/build/cuMAC/examples/multiCellSchedulerUeSelection/multiCellSchedulerUeSelection -t 1
Generate a UL test vector:
./opt/nvidia/cuBB/build/cuMAC/examples/multiCellSchedulerUeSelection/multiCellSchedulerUeSelection -d 0 -t 1
Test Vector Loading Test#
cuMAC has a testbench (/opt/nvidia/cuBB/cuMAC/examples/tvLoadingTest) to load pre-generated HDF5 test vectors and call the DL/UL scheduler modules/pipeline to compute scheduling solutions based on the input data contained in the test vector.
This testbench can be used to verify the implementation correctness of GPU/CUDA scheduler algorithms by comparing the solutions computed from both GPU and CPU versions of the same algorithms.
Basically, given the same input data from a test vector, GPU and CPU
implementations of the same scheduler algorithms should produce the same
output solution.
Two types of tests are supported:
Per DL/UL scheduler module test: UE selection, PRG allocation, layer selection, and MCS selection
Complete DL/UL scheduler pipeline test
After building cumac, use the following command to check input arguments of the testbench:
./opt/nvidia/cuBB/build/cuMAC/examples/tvLoadingTest/tvLoadingTest -h
Per scheduler module tests:
DL UE selection:
./opt/nvidia/cuBB/build/cuMAC/examples/tvLoadingTest/tvLoadingTest -i [path to TV] -g 2 -d 1 -m 01000
DL PRG allocation:
./opt/nvidia/cuBB/build/cuMAC/examples/tvLoadingTest/tvLoadingTest -i [path to TV] -g 2 -d 1 -m 00100
DL layer selection:
./opt/nvidia/cuBB/build/cuMAC/examples/tvLoadingTest/tvLoadingTest -i [path to TV] -g 2 -d 1 -m 00010
DL MCS selection:
./opt/nvidia/cuBB/build/cuMAC/examples/tvLoadingTest/tvLoadingTest -i [path to TV] -g 2 -d 1 -m 00001
UL scheduler modules can be tested by setting input argument:
-d 0
Complete DL/UL scheduler pipeline tests
DL/UL scheduler modules executed sequentially: UE selection > PRG allocation > layer selection > MCS selection
DL scheduler pipeline:
./opt/nvidia/cuBB/build/cuMAC/examples/tvLoadingTest/tvLoadingTest -i [path to TV] -g 2 -d 1 -m 01111
UL scheduler pipeline:
./opt/nvidia/cuBB/build/cuMAC/examples/tvLoadingTest/tvLoadingTest -i [path to TV] -g 2 -d 0 -m 01111
Passing criteria:
Solutions computed by CPU and GPU should match exactly: testbench returns 0 (PASS) or 1 (FAIL)
DRL MCS Selection Test#
Aerial cuMAC introduced a new DRL-based MCS selection module that can be used
as part of the 4T4R multi-cell scheduler (to replace the basic OLLA algorithm for MCS selection).
A testbench designed for testing the DRL MCS selection module is available under /opt/nvidia/cuBB/cuMAC/examples/ml/drlMcsSelection.
Along with the testbench, there is a pre-trained neural network for MCS selection inference saved in a model.onnx file
under /opt/nvidia/cuBB/cuMAC/examples/ml/trainedModels and a number of pre-generated HDF5 test vectors under /opt/nvidia/cuBB/cuMAC/examples/ml/testVectors/drlMcsSelection.
To check all supported input arguments to this testbench, use the following command:
./opt/nvidia/cuBB/build/cuMAC/examples/ml/drlMcsSelection/drlMcsSelection -h.
For a test run of the testbench using the test vectors, use the following command: ./opt/nvidia/cuBB/build/cuMAC/examples/ml/drlMcsSelection/drlMcsSelection -i [path to /opt/nvidia/cuBB/cuMAC/examples/ml/testVectors/drlMcsSelection] -m [path to /opt/nvidia/cuBB/cuMAC/examples/ml/trainedModels/model.onnx] -g [GPU device index].
If the test passes, the following messages will be printed at the end of the program:
...

Test based on the provided HDF5 test vectors

=========================================
Event queue lengths: (UE 0, 49) (UE 1, 49) (UE 2, 49) (UE 3, 49) (UE 4, 49) (UE 5, 49)

=========================================
Start per time slot processing:
=========================================
Testing complete
PASSED!
For a test run without test vectors (using the default test scenario setup), use the following command: ./opt/nvidia/cuBB/build/cuMAC/examples/ml/drlMcsSelection/drlMcsSelection -m [path to /opt/nvidia/cuBB/cuMAC/examples/ml/trainedModels/model.onnx] -g [GPU device index].
If the test passes, the following messages will be printed at the end of the program:
...

=========================================
Event queue lengths: (UE 0, 61) (UE 1, 61) (UE 2, 61) (UE 3, 61) (UE 4, 61) (UE 5, 61)


=========================================
Start per time slot processing:
Slot #0 - selected MCS: (UE 0, 0) (UE 1, 0) (UE 2, 0) (UE 3, 0) (UE 4, 0) (UE 5, 0)
Slot #27 - selected MCS: (UE 0, 0) (UE 1, 0) (UE 2, 0) (UE 3, 0) (UE 4, 0) (UE 5, 0)
Slot #56 - selected MCS: (UE 0, 3) (UE 1, 0) (UE 2, 1) (UE 3, 2) (UE 4, 3) (UE 5, 0)

...
=========================================
Testing complete
PASSED!
64T64R MU-MIMO Scheduler Test#
A testbench for the cuMAC CUDA-based 64T64R MU-MIMO scheduler implementation is available under /opt/nvidia/cuBB/cuMAC/examples/multiCellMuMimoScheduler.
This testbench is used to verify the correctness of MU-MIMO scheduling solutions computed by the cuMAC 64T64R MU-MIMO scheduler implementation.
To check input arguments of this testbench, use the following command:
./opt/nvidia/cuBB/build/cuMAC/examples/multiCellMuMimoScheduler/multiCellMuMimoScheduler -h.
(Note: The input argument -a is currently not supported.)
This testbench currently supports testing using either a simple Rayleigh fading channel model or a GPU-accelerated 3GPP 38.901 channel model.
To perform a test run, follow the steps below:
Build cuMAC within the cuBB container.
Configure test parameters in the following YAML file:
/opt/nvidia/cuBB/cuMAC/examples/multiCellMuMimoScheduler/config.yaml.Run the MU-MIMO scheduler test using the following command:
./opt/nvidia/cuBB/build/cuMAC/examples/multiCellMuMimoScheduler/multiCellMuMimoScheduler.
When a test passes, logging output similar to the following will be displayed:
cuMAC 64T64R MU-MIMO scheduler pipeline test: Running on GPU device 0 (total devices: 1)
Successfully loaded channel configuration: fading_type = 1
Loaded config parameters
Setup channel: Using SLS channel model with embedded configuration
SLS channel model initialized successfully with embedded configuration
UE sorting setup executed
UE grouping setup executed
Beamforming setup executed
MCS selection setup executed
UE sorting run executed
UE grouping run executed
Beamforming run executed
MCS selection run executed
Cell #0: 2 UE groups scheduled
   UE group #0: 8 UEs, startPrg = 0, endPrg = 35, total number of layers = 16
      UE IDs: 0 1 2 3 4 5 6 7
      MCS: 0 0 0 0 0 0 0 0
      Number of layers: 2 2 2 2 2 2 2 2
      nSCID: 0 0 0 0 1 1 1 1
   UE group #1: 8 UEs, startPrg = 36, endPrg = 67, total number of layers = 16
      UE IDs: 8 9 10 11 12 13 14 15
      MCS: 0 0 0 0 0 0 0 0
      Number of layers: 2 2 2 2 2 2 2 2
      nSCID: 0 0 0 0 1 1 1 1
Cell #1: 2 UE groups scheduled
   UE group #0: 8 UEs, startPrg = 0, endPrg = 35, total number of layers = 16
      UE IDs: 64 65 66 67 68 69 70 71
      MCS: 0 0 0 0 0 0 0 0
      Number of layers: 2 2 2 2 2 2 2 2
      nSCID: 0 0 0 0 1 1 1 1
   UE group #1: 8 UEs, startPrg = 36, endPrg = 67, total number of layers = 16
      UE IDs: 72 73 74 75 76 77 78 79
      MCS: 0 0 0 0 0 0 0 0
      Number of layers: 2 2 2 2 2 2 2 2
      nSCID: 0 0 0 0 1 1 1 1
Cell #2: 2 UE groups scheduled
   UE group #0: 8 UEs, startPrg = 0, endPrg = 35, total number of layers = 16
      UE IDs: 128 129 130 131 132 133 134 135
      MCS: 0 0 0 0 0 0 0 0
      Number of layers: 2 2 2 2 2 2 2 2
      nSCID: 0 0 0 0 1 1 1 1
   UE group #1: 8 UEs, startPrg = 36, endPrg = 67, total number of layers = 16
      UE IDs: 136 137 138 139 140 141 142 143
      MCS: 0 0 0 0 0 0 0 0
      Number of layers: 2 2 2 2 2 2 2 2
      nSCID: 0 0 0 0 1 1 1 1
Cell #3: 2 UE groups scheduled
   UE group #0: 8 UEs, startPrg = 0, endPrg = 35, total number of layers = 16
      UE IDs: 192 193 194 195 196 197 198 199
      MCS: 0 0 0 0 0 0 0 0
      Number of layers: 2 2 2 2 2 2 2 2
      nSCID: 0 0 0 0 1 1 1 1
   UE group #1: 8 UEs, startPrg = 36, endPrg = 67, total number of layers = 16
      UE IDs: 200 201 202 203 204 205 206 207
      MCS: 0 0 0 0 0 0 0 0
      Number of layers: 2 2 2 2 2 2 2 2
      nSCID: 0 0 0 0 1 1 1 1
Cell #4: 2 UE groups scheduled
   UE group #0: 8 UEs, startPrg = 0, endPrg = 35, total number of layers = 16
      UE IDs: 256 257 258 259 260 261 262 263
      MCS: 0 0 0 0 0 0 0 0
      Number of layers: 2 2 2 2 2 2 2 2
      nSCID: 0 0 0 0 1 1 1 1
   UE group #1: 8 UEs, startPrg = 36, endPrg = 67, total number of layers = 16
      UE IDs: 264 265 266 267 268 269 270 271
      MCS: 0 0 0 0 0 0 0 0
      Number of layers: 2 2 2 2 2 2 2 2
      nSCID: 0 0 0 0 1 1 1 1
Cell #5: 2 UE groups scheduled
   UE group #0: 8 UEs, startPrg = 0, endPrg = 35, total number of layers = 16
      UE IDs: 320 321 322 323 324 325 326 327
      MCS: 0 0 0 0 0 0 0 0
      Number of layers: 2 2 2 2 2 2 2 2
      nSCID: 0 0 0 0 1 1 1 1
   UE group #1: 8 UEs, startPrg = 36, endPrg = 67, total number of layers = 16
      UE IDs: 328 329 330 331 332 333 334 335
      MCS: 0 0 0 0 0 0 0 0
      Number of layers: 2 2 2 2 2 2 2 2
      nSCID: 0 0 0 0 1 1 1 1
Summary - cuMAC multi-cell MU-MIMO scheduler simulation test: PASS
When the testbench returns, the computed MU-MIMO scheduling solutions are saved in a result HDF5 file, e.g., under default configuration, TV_cumac_result_64T64R_6PC_DL.h5.