M.2 NVMe Boot Drive Replacement#
M.2 NVMe Boot Drive Replacement Overview#
This is a high-level overview of the procedure to replace a boot drive.
With the help of NVIDIA Enterprise Support, determine which M.2 drive needs to be replaced.
Get replacement from NVIDIA Enterprise Support.
Power down the system.
Label all cables and unplug them from the motherboard tray.
Slide motherboard out until it locks in place.
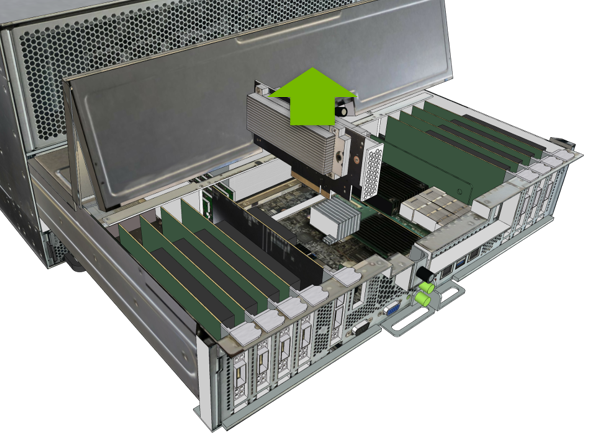
Open rear compartment and pull out the M.2 riser card with both M.2 disks attached.
Replace the failed M.2 device on the riser card.
Install the M.2 riser card with both M.2 disks.
Close the rear motherboard compartment and then slide the motherboard back into the system.
Plug in all cables using the labels as a reference.
Power on the system.
Confirm the M.2 RAID 1 mirror is synchronizing.
Ship back the failed unit to NVIDIA Enterprise Support using the packaging provided.
Identifying the Failed M.2 NVMe#
The DGX A100 system automatically sets the failed M.2 drive offline when it detects the failure.
Identify which of the M.2 drives has failed (nvme0n1 or nvme1n1).
$ sudo nvsm show health
You can confirm this by issuing the following.
$ sudo mdadm -D /dev/md0
Normally, the output would show both drives (nvme0 and nvme1) in an active sync state. The following example output shows only
nvme1in active sync, indicating thatnvme0n1is the failed drive.Number Major Minor RaidDevice State 0 259 2 0 active sync /dev/nvme1n1p2 - 0 0 1 removed
Make a note of the device name for the failed drive (nvme0 or nvme1) and the device name for the good drive (nvme0 or nvme1).
You will need this information when rebuilding the RAID 1 array after replacing the drive.
Obtain the replacement from NVIDIA Enterprise Support.
Replacing the M.2 NVMe Drive#
Before attempting to replace one of the M.2 NVMe drives, be sure to have performed the following:
Determined the location ID of the faulty M.2 NVMe drive.
Obtained the replacement M.2 NVMe drive and have saved the packaging for use when returning the faulty drive.
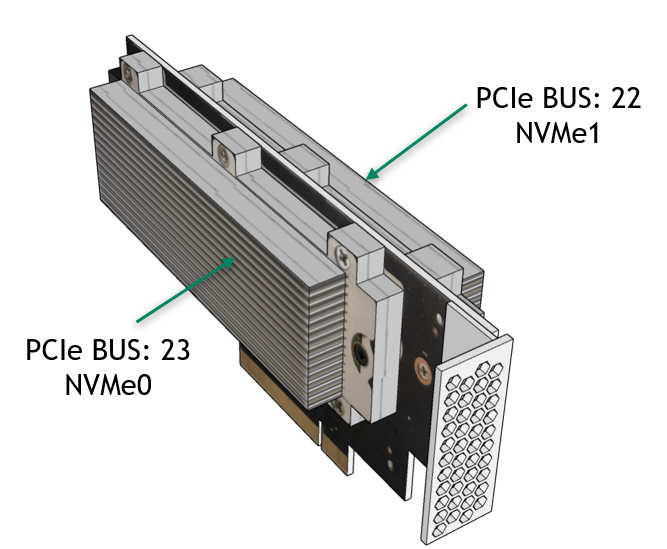
M.2 NVMe Drives:
40GB model
PCIe Bus: 22 -> /dev/nvme1
PCIe Bus: 23 -> /dev/nvme2
80GB model
PCIe Bus: 22 -> /dev/nvme2
PCIe Bus: 23 -> /dev/nvme3
Caution
Static Sensitive Devices: - Be sure to observe best practices for electrostatic discharge (ESD) protection. This includes making sure personnel and equipment are connected to a common ground, such as by wearing a wrist strap connected to the chassis ground, and placing components on static-free work surfaces.
Back up any critical data to a network shared volume or some other means of backup.
If not already done, mark the drive as failed, then remove the failed drive from the array by issuing the following (replacing X with the failed drive identifier - 0 or 1).
$ sudo mdadm --manage /dev/md0 --fail /dev/nvme<X>n1
$ sudo mdadm --manage /dev/md0 --remove /dev/nvme<X>n1
Power down the system.
Label all network, monitor, and USB cables connected to the motherboard tray for easy identification when reconnecting.
Unplug all power cords, and all network, monitor, and USB cables.
Remove the motherboard tray.
Refer to the instructions in the section Accessing the Motherboard Tray.
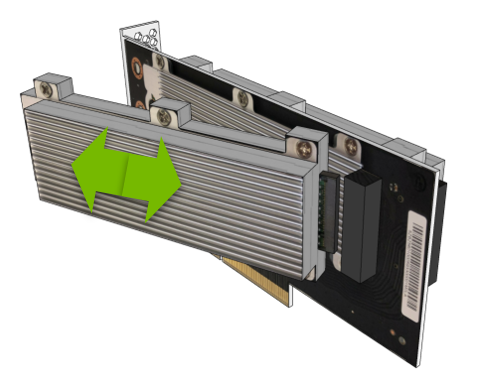
Remove the M.2 riser card from the motherboard tray by lifting the riser assembly.
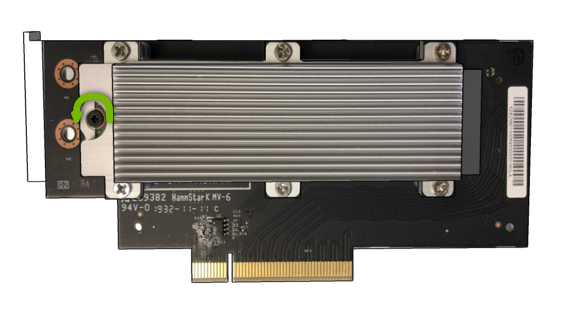
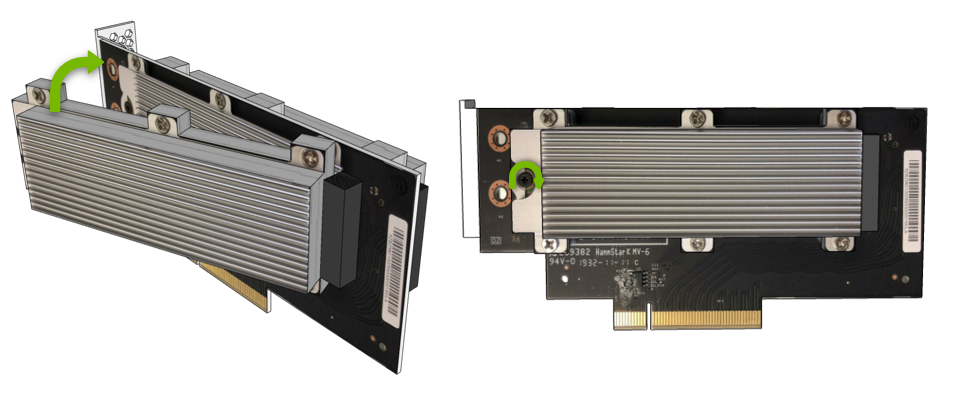
Identify the failed M.2 module and remove it from the riser card.
Determine the location of the drive to remove.
Using a Phillips #1 screwdriver, loosen the black screw that secures the drive in place.
Note
The screw is not a captive screw and can drop. Be careful when loosening the screw to avoid dropping and losing the screw.
Carefully lift the M.2 drive away from the riser.
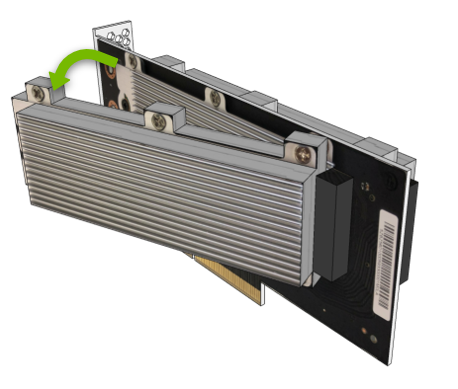
Pull the drive to disconnect from the connector on the riser board, then insert the new drive into the connector on the riser board.
Place the drive against the card and secure by tightening the screw using a Phillips #1 screwdriver.
Install the assembled module on the motherboard by inserting the riser card in its slot.
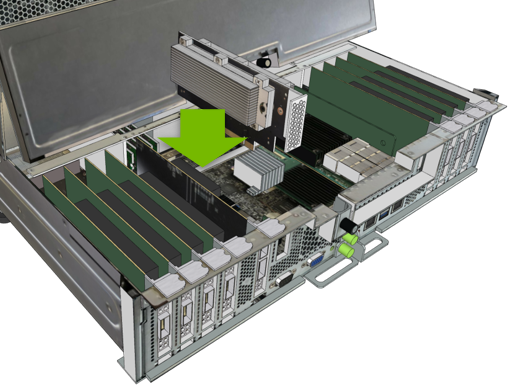
Close the motherboard tray lid and then install the motherboard tray.
Refer to the instructions in the section Replacing the Motherboard Tray.
Connect all the cables to the motherboard tray, connect all power cords, then power on the system.
Rebuild the RAID 1 array according to the instruction in the section Rebuilding the Boot Drive RAID 1 Volume.
Rebuilding the Boot Drive RAID 1 Volume#
After replacing a faulty M.2 OS drive, you must rebuild the RAID 1 array.
If you have not already done so, boot the DGX A100 system and log in.
Rebuild the boot drive mirror.
In the following steps, replace X with the number that corresponds to the replaced drive. If you did not note this information when identifying the failed drive, then follow the instructions in the first step of Identifying the Failed M.2 NVMe.
Start the rebuild process.
$ sudo nvsm start /systems/localhost/storage/volumes/md0/rebuild/
Enter the device name of the spare (replaced) drive when prompted - either nvme0n1 or nvme1n1, depending on which drive was replaced.
PROMPT: In order to rebuild this volume, a spare drive
        is required. Please specify the spare drive to
        use to rebuild md0.
Name of spare drive for md0 rebuild (CTRL-C to cancel): nvmeXn1
WARNING: Once the volume rebuild process is started, the
         process cannot be stopped.
Start RAID-1 rebuild on md0? [y/n] y
After entering y at the prompt to start the RAID 1 rebuild, the “Initiating rebuild …” message appears.
/systems/localhost/storage/volumes/md0/rebuild started at 2018-10-12
15:27:26.525187
Initiating RAID-1 rebuild on volume md0...
  0.0% [\                              ]
After about 30 seconds, the “Rebuilding RAID-1 …” message should appear.
/systems/localhost/storage/volumes/md0/rebuild started at 2018-10-12
15:27:26.525187
Rebuilding RAID-1 rebuild on volume md0...
  31.0% [=============/                         ]
If this message remains at “Initiating RAID-1 rebuild” for more than 30 seconds, then there is a problem with the rebuild process. In this case, make sure the name of the replacement drive is correct and try again.
The RAID 1 rebuild process should take about 1 hour to complete.
Make sure that the drive firmware is up to date, Refer to the DGX A100 firmware release notes for information on the latest firmware for the M.2 NVMe drive.
Returning the NVMe Drive#
Use the packaging from the new drive and follow the instructions that came with the package to ship the old drive back to NVIDIA Enterprise Support.
Note
If your organization has purchased a media retention policy, you may be able to keep failed drives for destruction. Check with NVIDIA Enterprise Support on the status of the policy for specifics.