

NVCA Configuration
This page documents NVCA configuration options that apply to NGC-managed and Helm-managed deployment modes. Where the configuration steps differ per mode, instructions are provided for each.
For mode-specific lifecycle operations (registration, upgrades, deregistration), see:
- NGC-Managed Clusters for clusters managed through the NGC UI
- Helm-Managed Clusters for clusters managed through Helm values
This page is being populated incrementally. Additional configuration topics (network policies, manual instance configuration, feature flag management, node selection, and more) will be consolidated here in future updates.
Advanced Settings
Some of the options below are supported only on Cluster Agent Versions 2.50.0 or higher. If you are upgrading from an older version,
you must Edit Cluster Configuration from Settings page and enter the cluster specific configuration and hit Save and continue
as soon as the version 2.50.0 or higher is selected from View Update Instructions
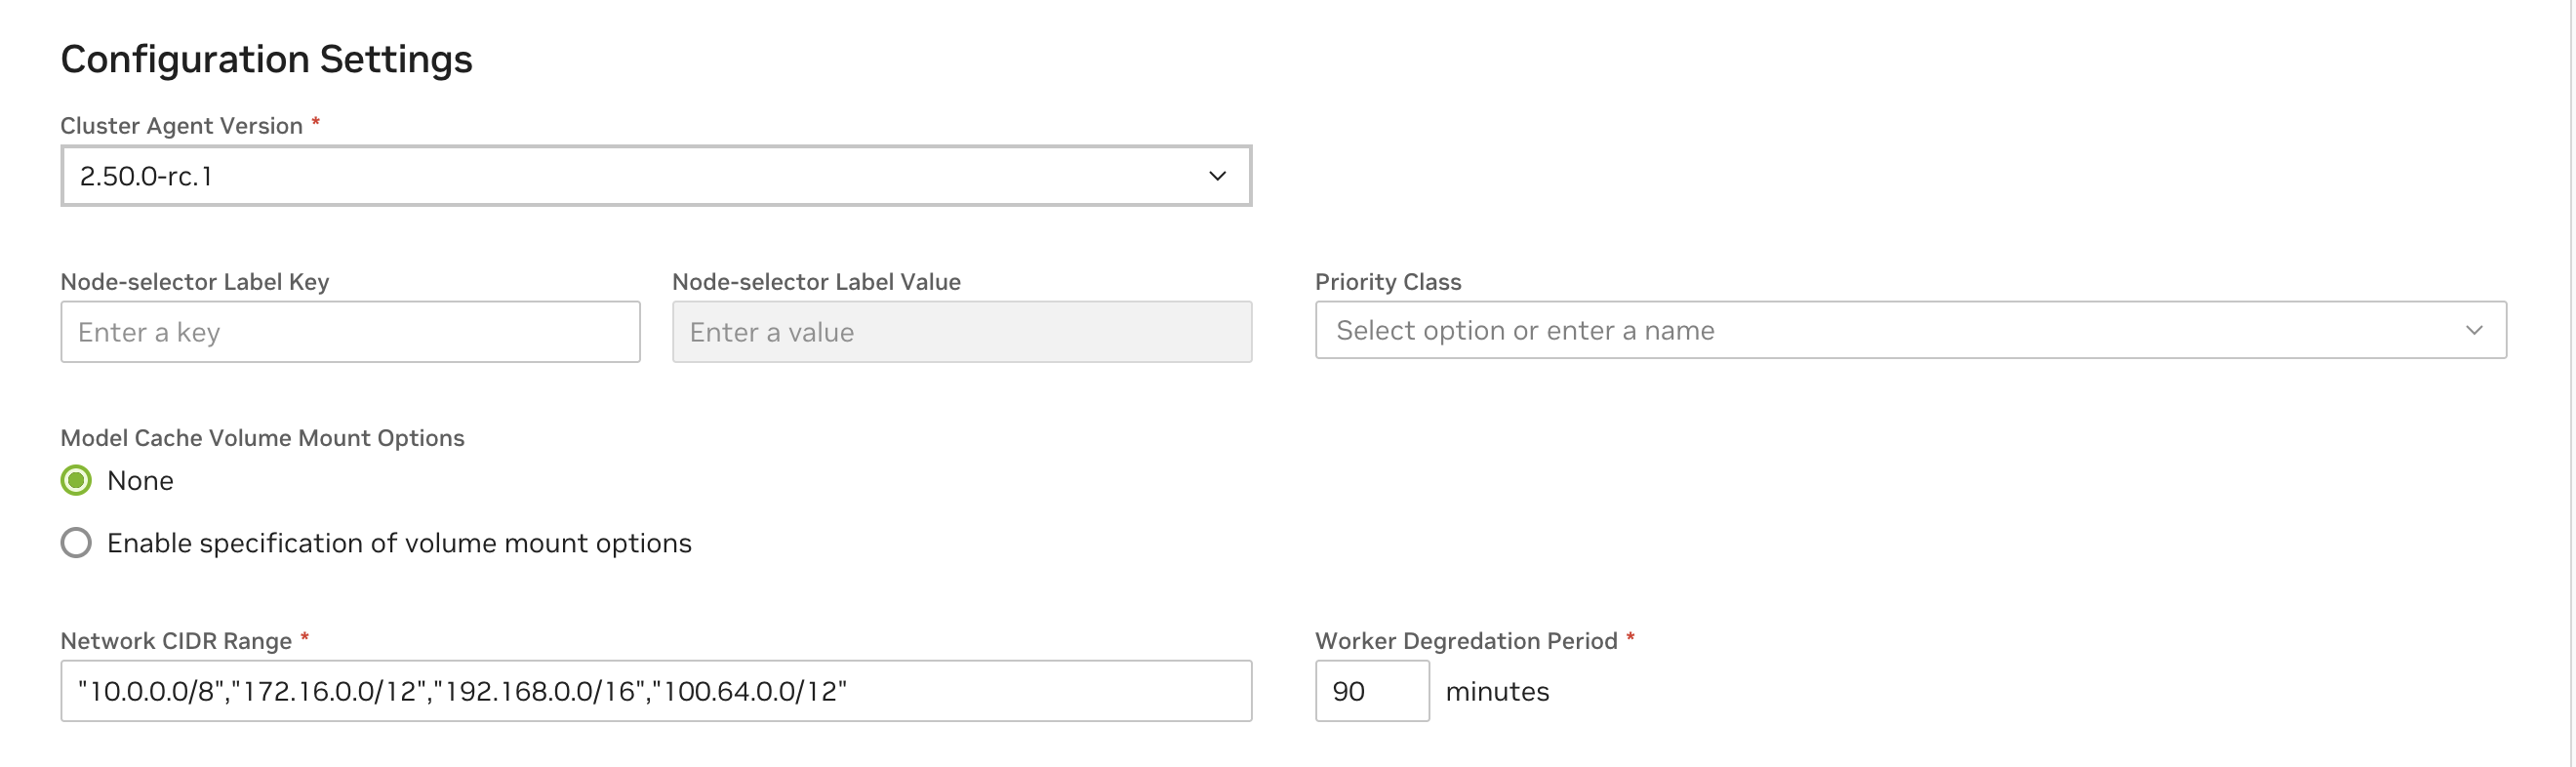
See below for descriptions of all capability options in the “Advanced Settings” section of the cluster configuration.
Cluster Features
Cluster Features allow enabling specific features on the cluster. Note that for customer-managed clusters (registered via the Cluster Agent) Dynamic GPU Discovery is enabled by default. For NVIDIA managed clusters, Collect Function Logs is also enabled by default.

See below for descriptions of all cluster features in the cluster configuration.
Removing the Dynamic GPU Discovery will require manual instance configuration. See Manual Instance Configuration.
Caching Support
Enabling caching for models, resources and containers is recommended for optimal performance. You must create StorageClass configurations for caching within your cluster to fully enable “Caching Support” with the Cluster Agent. See examples below.
Caching is not supported for Multi-Node Helm functions. If you attempt to deploy a Multi-Node Helm function with Caching Support enabled, the deployment will fail.
Caching is also currently not supported for AWS EKS.
StorageClass Configurations in GCP
GCP currently allows only 10 VM’s to mount a Persistent Volume in Read-Only mode.
StorageClass Configurations in Azure
StorageClass Configurations in Oracle Cloud
Apply the StorageClass Configurations
Save the StorageClass template to files nvcf-sc.yaml and nvcf-cc-sc.yaml and apply them as:
Override the Default Mount Options for Cache Volumes
Supported in Cluster Agent Versions 2.45.21 or higher
Please note this is a Post NVCA Install Operation and needs careful consideration to ensure there are no volume corruptions. Use with caution.
Cluster Agent with caching support by default will enable linux mount-options with ro,norecovery,nouuid.
If the CSI Driver in the cluster doesn’t support mount options then you may apply the following command on the cluster to disable the mount options
If you want to update the mount-options to a different value for example: ro,norecovery. You may use the following command. Replace these options with desired value as dictated by CSI Driver Volume Mount Options.
Account-Isolated Clusters
Supported in Cluster Agent Versions 2.49.0 or higher
Clusters with the AccountIsolation attribute have enhanced isolation between workloads, ensuring that function and task instances run on nodes isolated by NCAId. This is particularly important for customers with strict security requirements or those who want to ensure complete separation of workloads at the account level.
In Account Isolated mode, the cluster might be inefficient in GPU utilization if workloads are not designed to utilize the full capacity of the isolated nodes. While toggling this attribute, the cluster workloads also have to be drained using CordonAndDrainMaintenance mode to effectively re-balance the workloads as the attribute will not be applied retroactively.
NVLink-optimized Clusters
Clusters with MNNVL GPUs like GB200 can run multi-node workloads that require inter-GPU data transfer with large performance improvements when properly configured. The Cluster Agent can be directed to configure multi-node workloads with their own ComputeDomains automatically to optimize inter-GPU connections.
Additional prerequisites:
- The NVIDIA GPU DRA driver must be installed.
- The
NVLinkOptimizedcluster attribute must be added during cluster registration.
In NVLink-optimized mode, the NVIDIA GPU DRA driver currently limits one GPU-enabled Pod to a node. To optimally utilize these clusters, GPU-enabled Pods should request a full Node’s worth of GPUs. For example, Nodes in GB200 clusters have 4 GPUs each so all containers and all GPU-enabled Pods in a workload must request nvidia.com/gpu’s that sum to 4.
Kata Container-Isolated Workloads
Clusters that have this attribute run all function/task Pods in Kata Containers without exception.
Additional cluster restrictions to be aware of:
-
Pod containers must at least have resource
limitsdefined forcpuandmemory. If unset, runtime behavior is undefined. -
Object count limits are configured for resource fairness in these clusters:
- ConfigMaps: 20
- Secrets: 20
- Services: 20
- Pods: 100
- Jobs: 10
- CronJobs: 10
- Deployments: 10
- ReplicaSets: 10
- StatefulSets: 10
Network Configuration
The network policies described in this section are only enforced if your cluster’s Container Network Interface (CNI) supports Kubernetes Network Policies. Common CNIs that support network policies include:
- Calico
- Cilium
- Weave Net
- Antrea
If your cluster uses a CNI that doesn’t support network policies, the security controls described below will not be enforced, and pods will be able to communicate with each other without restrictions. This could lead to security vulnerabilities.
The NVCA operator requires outbound network connectivity to pull images, charts, and report logs and metrics. During installation, the operator pre-configures the nvca-namespace-networkpolicies configmap with the following network policies:
Key Network Requirements
- Kubernetes API Access
- NVCA requires access to the Kubernetes API
- Consult your cloud provider’s documentation (e.g., Azure, AWS, GCP) for the Kubernetes API endpoint
- Container Registry and NVCF Control Plane Access
-
Access to
nvcr.ioandhelm.ngc.nvidia.comis required to pull container images, resources, and helm charts. -
NVCA requires access to NVIDIA control plane services for coordination of functions and task deployments and invocation, this includes:
connect.pnats.nvcf.nvidia.comgrpc.api.nvcf.nvidia.com*.api.nvcf.nvidia.comsqs.*.amazonaws.comspot.gdn.nvidia.comess.ngc.nvidia.comapi.ngc.nvidia.com
- Monitoring and Logging
- If your environment requires advanced monitoring or logging (e.g., sending logs to external endpoints), ensure your cluster’s NetworkPolicy or firewall rules allow egress to the required monitoring/logging domains
Network Policy Customization via ConfigMap
The NVCA operator pre-configures the nvca-namespace-networkpolicies configmap during installation. If you need to customize these policies for your cluster, you can use a configmap to override the default policies.
To customize a network policy:
- Create a configmap with your custom network policy, for example:
- Apply the configmap:
- Verify the changes:
You should see a message indicating successful patching:
configmap patched successfully
The changes will be applied to the nvcf-backend namespace and will be used for all new namespaces’ network policies. The network policies will also be updated across all helm chart namespaces.
Network Policy Customization via clusterNetworkCIDRs Flag
You can customize the allow-egress-internet-no-internal-no-api policy with helm, by adding on the networkPolicy.clusterNetworkCIDRs flag. For example:
This command will override the default k8s networking CIDRs specified in the allow-egress-internet-no-internal-no-api with your input.
Advanced: Additional Configuration Options
CSI Volume Mount Options
The NVIDIA Cluster Agent supports customizing CSI volume mount options for caching. This allows you to configure specific mount options for the CSI volumes used in your cluster.
CSI volume mount options configuration is an experimental feature and may be subject to change in future releases.
To configure CSI volume mount options:
- Get the NVCF cluster name:
- View current mount options configuration:
- Set mount options (example):
- Verify the changes:
The default mount options are:
ro: Read-only mountnorecovery: Skip journal recoverynouuid: Ignore filesystem UUID
You can modify these options based on your specific requirements. The configuration will be applied to all CSI volumes created by the NVIDIA Cluster Agent for caching purposes.
Node Selection for Cloud Functions
By default, the cluster agent uses all nodes discovered with GPU resources to schedule Cloud Functions and there are no additional configuration required.
In order to limit the nodes that can run Cloud Functions, you may use nvca.nvcf.nvidia.io/schedule=true label on the specific nodes.
If there are no nodes in the cluster with the nvca.nvcf.nvidia.io/schedule=true label set, the cluster agent will switch to the default behavior of using all nodes with GPUs.
For example, to mark specific nodes as schedulable in a cluster:
To mark a single node from the above set as unschedulable for nvcf workloads, you can unlabel using:
GPU Product Name Override
The NVIDIA Cluster Agent supports GPU product name override via node label. This is useful for customers who want to use a custom product name or override the default GPU product name.
For example, to set the GPU product name for a node, use the following command:
Note: The GPU Product Name Override via node labeling only takes effect when there are no pre-existing active instances in the cluster. If active instances already exist with the original GPU instance types, the override will not be applied.
Managing Feature Flags
The NVIDIA Cluster Agent supports various feature flags that can be enabled or disabled to customize its behavior. The following are some commonly used feature flags:
Setting Feature Flags at Install Time
Feature flags can be set during the initial NVCA Operator installation through Helm values. The mechanism differs by deployment mode.
Self-Managed (Standalone Helm)
Set selfManaged.featureGateValues in your values file. The chart default is
["DynamicGPUDiscovery"].
In the values file:
Or via --set during install:
The --set flag replaces the entire list. You must include all desired flags,
not just the new one.
To update flags on an existing installation, run helm upgrade with the updated values
file or --set:
Helmfile (Self-Hosted)
The Helmfile deployment uses the same selfManaged.featureGateValues chart value. By
default, the helmfile does not set this field, so the chart default
["DynamicGPUDiscovery"] applies.
To override, add featureGateValues to the worker release values in
helmfile.d/03-worker.yaml.gotmpl:
Alternatively, set it in an environment-specific values file (e.g.,
environments/<env>.yaml) under the same key path, which avoids editing the shared
helmfile template.
After changing, run helmfile --selector release-group=workers sync to apply.
Helm-Managed
Set helmManaged.featureGateValues in your values or via --set during
helm upgrade. The chart default is [] (NGC controls flags by default).
The --set flag replaces the entire list. Include all desired flags in every
helm upgrade command, or use a persistent values file to avoid accidentally
dropping flags.
NGC-Managed
Feature flags for NGC-managed clusters are controlled through the NGC UI under Cluster Configuration > Features. No Helm values are required.
To manage flags outside the UI, see the Modifying Feature Flags at Runtime section below.
Verifying Feature Flags
After installing or upgrading, verify the active feature flags:
The NVCA agent pod command-line args also reflect the active flags:
Modifying Feature Flags at Runtime
For NGC-managed and Helm-managed clusters, feature flags can also be modified at runtime by
patching the NVCFBackend resource directly. This is useful for quick changes without running
a helm upgrade.
For self-managed (standalone or helmfile) clusters, prefer helm upgrade with updated
values to change feature flags. Direct patches to the NVCFBackend will be overwritten on
the next Helm upgrade.
- Get the NVCF cluster name:
- View current feature flags:
- Patch the feature flags. Note that this will override all feature flags.
When modifying feature flags, you must preserve any existing feature flags you want to keep. The patch command will override all feature flags, so you need to include all desired feature flags in the value array.
As an alternative to the patch command, you can also modify the feature flags using the edit command:
- Verify the changes:
Enable Helm Shared Storage
The NVIDIA Cluster Agent supports shared storage for Helm charts through the SMB CSI driver. This feature is required for enabling Helm-based tasks in your cluster.
The Helm shared storage feature must be enabled before you can use Helm-based tasks in your cluster. This feature provides the necessary storage infrastructure for Helm chart operations.
When enabling the Helm shared storage feature flag, you must preserve any existing feature flags. The patch command will override all feature flags, so you need to include all desired feature flags in the value array. If you already have other feature flags enabled, you should include them along with “HelmSharedStorage” in the value array.
- First, install the SMB CSI driver using Helm:
- Get the NVCF cluster name:
- Enable the Helm shared storage feature flag:
- Verify that the feature flag is enabled:
Agent Config Merging
The NVIDIA Cluster Agent supports merging custom configuration into the generated NVCA config
via the agentConfig.mergeConfig Helm value. This allows you to override or extend NVCA
runtime settings without modifying the operator’s config generation logic.
When agentConfig.mergeConfig is set, the Helm chart creates a ConfigMap called
agent-config-merge containing the provided YAML. This ConfigMap is mounted into the NVCA
pod and merged with the generated config at runtime.
Example values.yaml:
Apply via Helm:
Or include it in a values file passed to helm upgrade -f values.yaml.
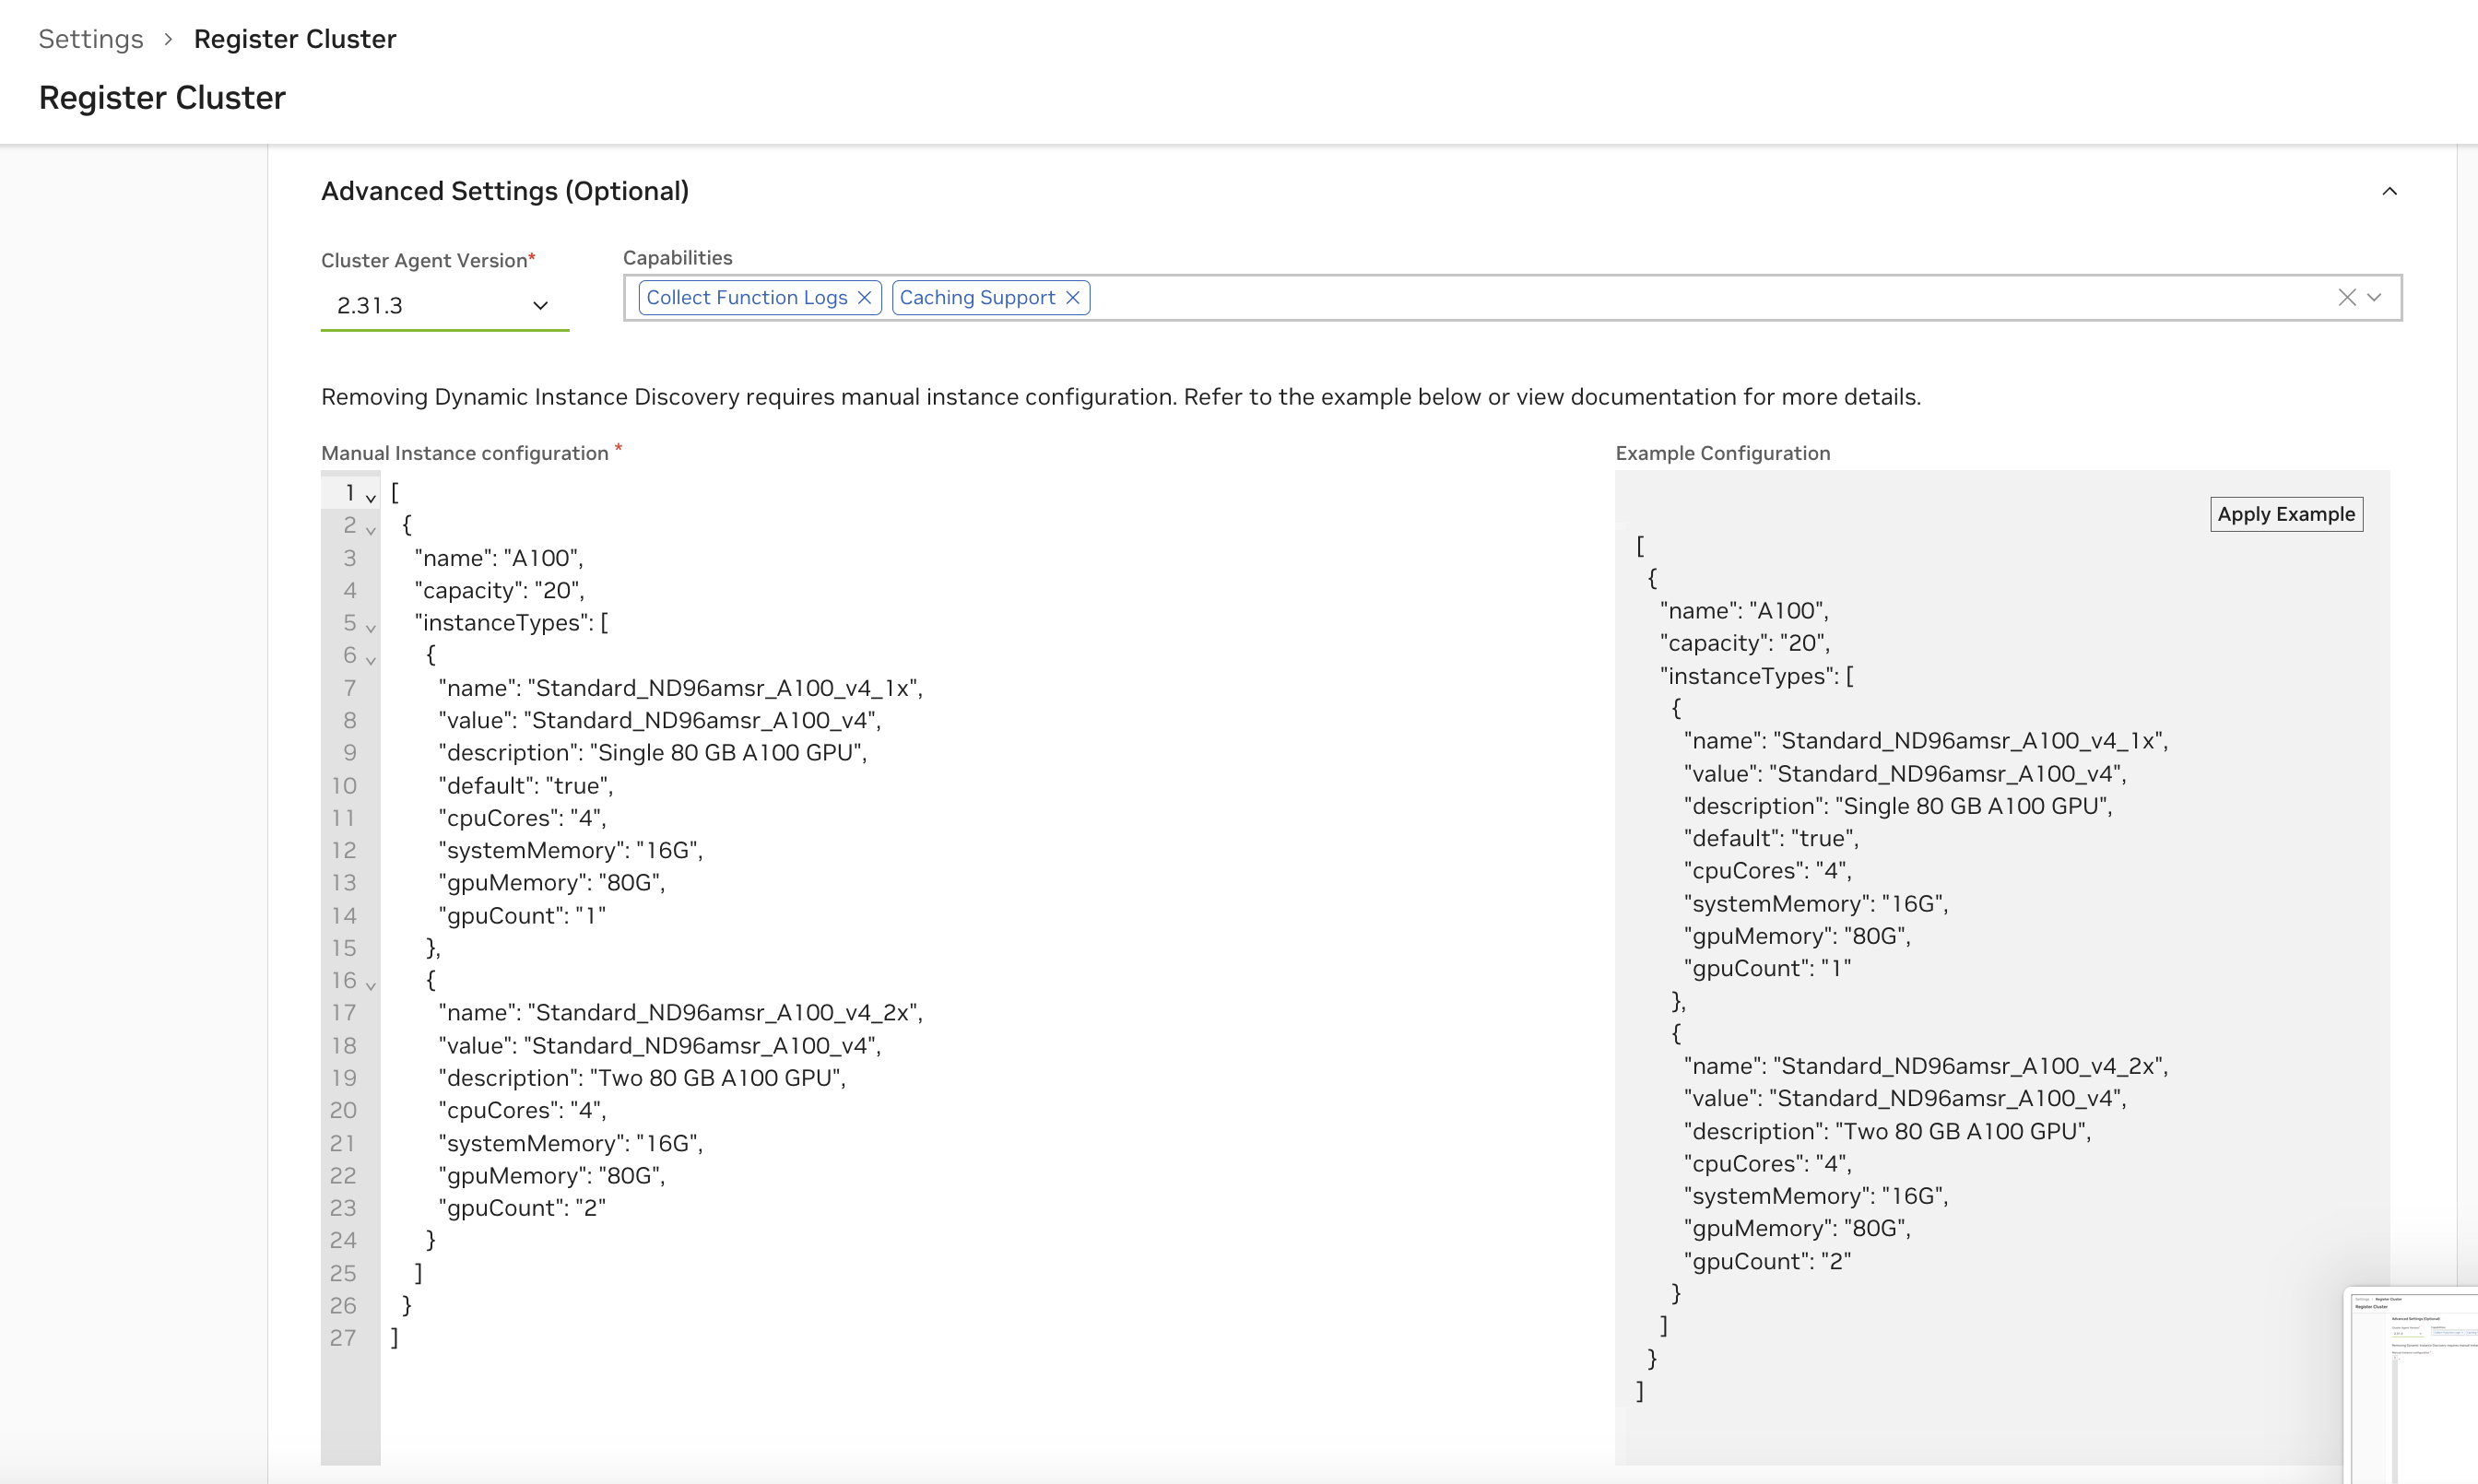
Manual Instance Configuration
It is highly recommended to rely on Dynamic GPU Discovery (and therefore the NVIDIA GPU Operator), as manual instance configuration is error-prone.
This type of configuration is only necessary when the cluster cloud provider does not support the NVIDIA GPU Operator.
Manual instance configuration allows you to disable Dynamic GPU Discovery and instead provide a static list of instance types that NVCA will register with the NVCF control plane. This is useful when:
- You have a known, fixed set of GPU configurations
- Dynamic GPU discovery isn’t working correctly for your environment
- You want to control exactly which instance types are available
By default, NVCA uses Dynamic GPU Discovery to automatically detect GPUs on cluster nodes and register appropriate instance types. When this is disabled, NVCA instead reads a static GPU configuration from a ConfigMap.
NGC-managed clusters: You can also configure manual instances through the NGC UI by unchecking “Dynamic GPU Discovery” in the Cluster Features section during registration or reconfiguration. The UI will present a configuration editor.
Prerequisites
- A working NVCF cluster with
nvca-operatorinstalled - Access to modify Helm values for
nvca-operator - Since you are not using the GPU Operator, you must ensure each GPU node has the instance-type label that matches the “value” field in your manual configuration:
For example, if your configuration specifies "value": "OCI.GPU.A10", you would label the node with:
Step 1: Create the GPU Configuration JSON
Create a JSON file defining your GPU types and instance configurations. The configuration is an array of GPU types, each containing an array of instance types.
Example Configuration (gpu-config.json):
Step 2: Base64 Encode the Configuration
The GPU configuration must be Base64-encoded for the Helm values. Use the following command:
On macOS, use base64 without the -w 0 flag:
Step 3: Configure Helm Values
Update your nvca-operator Helm values to disable Dynamic GPU Discovery and provide the manual configuration. The values path depends on your cluster source mode.
Self-Managed (self-hosted NVCF)
For self-hosted deployments where ngcConfig.clusterSource is self-managed, use the selfManaged values:
Example values.yaml:
By default selfManaged.featureGateValues is ["DynamicGPUDiscovery"]. Set it to an empty list ([]) to disable dynamic discovery and use your manual configuration instead.
Helm-Managed (cloud NVCF)
For cloud-managed deployments where ngcConfig.clusterSource is helm-managed, use the helmManaged values:
Example values.yaml:
For helm-managed, the feature gate is disabled by prefixing with - (i.e. "-DynamicGPUDiscovery"). For self-managed, set the list to [] instead.
Step 4: Install or Upgrade the Operator
Apply the configuration using Helm:
If you are using the NVCF self-hosted Helmfile, add your values file as an entry in the nvca-operator release values: list and run helmfile sync or helmfile apply instead.
Configuration Fields Reference
GPU Type Fields:
Instance Type Fields:
Verification
After applying the configuration, verify that NVCA is using the static configuration:
- Check the NVCFBackend resource:
Look for -DynamicGPUDiscovery in the feature gates and verify the GPU configuration is present.
- Check the nvca-config ConfigMap:
The gpus key should contain your JSON configuration.
- Check NVCA logs for registration:
Troubleshooting
Configuration Not Applied:
- Verify Dynamic GPU Discovery is disabled in the feature gate values
- Ensure the Base64 encoding is correct and doesn’t contain line breaks
- Check that the JSON is valid before encoding
Invalid JSON Format:
- Validate your JSON using a JSON validator before encoding
- Ensure all required fields are present
- Check that numeric values (
cpuCores,gpuCount) are not quoted as strings
Memory/Storage Format Errors:
Memory and storage values must use valid Kubernetes quantity format:
- Valid:
"28G","128Gi","1Ti","512Mi" - Invalid:
"28GB","128 Gi","1TB"
Use G or Gi for gigabytes, T or Ti for terabytes. The i suffix indicates binary units (1024-based).
Cloud Provider-Specific Notes
Oracle Cloud Infrastructure (OCI)
When using Oracle Container Engine for Kubernetes (OKE), ensure that:
- Your compute nodes and GPU nodes are in the same availability domain
- This is required for proper network connectivity between the NVIDIA Cluster Agent and GPU nodes
- Flannel CNI is the current recommended and validated CNI vs OCI native CNI for OKE cluster networking.
AWS
When using AWS EKS, note that the following limitations exist:
- Caching is currently not supported