Advanced Configuration#
Understanding Roles and Overlays#
What is a Role?
A role is a task that can be performed by a node. By assigning a role to a node, an administrator activates the functionality that the role represents on that node. In the context of PRS:
PRS::Server- Enables the node to run the PRS daemon and manage PDs.PRS::Client- Enables the node to be managed by PRS and participate in PDs.
Roles can have parameters that influence their behavior. For example, the PRS::Client role includes parameters for static power usage and power limits.
What is a Configuration Overlay?
A configuration overlay assigns roles to groups of nodes. Multiple overlays can be assigned to a node, and the overlay with the highest priority determines which role assignment is actually used. In PRS:
prs-server- A configuration overlay that assigns thePRS::Serverrole to head nodes or dedicated PRS serversprs-client- A configuration overlay that assigns thePRS::Clientrole to compute nodes requiring power management
Role Assignment Priority System
Configuration overlays can have priorities from 0-1000 (except 250 and 750, which are reserved). The actual role assignment used depends on priority:
Priority 750: Reserved for direct node-level role assignment (highest priority)
Priority 500: Default priority for configuration overlays
Priority 250: Reserved for category-level role assignment (lowest priority)
Priority -1: Configuration overlay is ignored
Higher priority assignments override lower ones. For example, a role assigned directly to a node (750) overrides an overlay assignment (500)
How PRS Uses Roles and Overlays
The
prs-serveroverlay assigns thePRS::Serverrole to designated nodes (typically head nodes)The
prs-clientoverlay assigns thePRS::Clientrole to compute nodes requiring power managementNodes can receive role assignments from multiple sources (category, overlay, or direct assignment), with priority determining which takes effect
Direct node assignment (priority 750) can override overlay assignments when custom parameters are needed
This priority-based system allows both broad configuration management and fine-tuned per-node customization when needed.
Configuring PRS Server#
PRS server runs on one or two head nodes (in HA configurations), with configuration done at the overlay/role level. The prs-server configuration overlay assigns the PRS::Server role to the head node(s).
Configuring the PRS::Server Role#
The PRS::Server role assigned by the prs-server overlay defines the PRS daemon behavior and PD management. All configuration is accessed through:
configurationoverlay[prs-server]->roles[PRS::Server]
Viewing and Modifying Role Parameters:
To view all current settings for the PRS server role:
cmsh -c "configurationoverlay use prs-server ; roles ; use PRS::Server ; show"
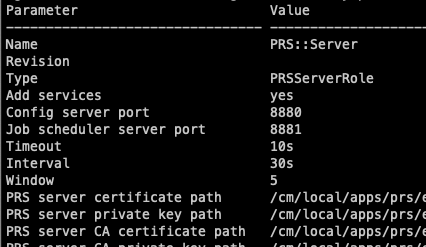
This displays parameters such as ports, certificate paths, control loop timing, and PD assignments. Example output:
To get a specific parameter value:
cmsh -c "configurationoverlay use prs-server ; roles ; use PRS::Server ; get <parameter>"
Example:
cmsh -c "configurationoverlay use prs-server ; roles ; use PRS::Server ; get Interval"
To set a parameter:
cmsh -c "configurationoverlay use prs-server ; roles ; use PRS::Server ; set <parameter> <value>"
Example:
cmsh -c "configurationoverlay use prs-server ; roles ; use PRS::Server ; set Interval 10; commit"
Note
Since PRS servers on head nodes share the same configuration, all settings are done at the overlay/role level. Node-specific configuration is not needed for the PRS server.
PDs Management#
PDs were created during PRS installation based on your selected grouping strategy:
row: One PD per row of racks
rack: One PD per rack (e.g.,
rack001,rack002)all: Single PD for the entire cluster
others: Additional custom grouping strategies
Configuring and Managing PDs#
View existing PDs:
To see all PDs created during installation:
cmsh -c "configurationoverlay use prs-server ; roles ; use PRS::Server ; domains ; list"
This will show domains like rack001, rack002, etc., if you chose “group by rack” during installation.
Set power budget for an existing PD:
To modify the power budget of an existing PD:
cmsh -c "configurationoverlay use prs-server ; roles; use PRS::Server ; domains ; use <domain-name> ; set powerbudget <budget> ; commit"
Example:
cmsh -c "configurationoverlay use prs-server ; roles; use PRS::Server ; domains ; use rack001 ; set powerbudget 5000; commit"
This sets the power budget for rack001 to 5000 watts (assuming rack001 was created during installation when “group by rack” was selected).
Add new PD:
In addition to the PDs created during installation, you can add new ones:
cmsh -c "configurationoverlay use prs-server ; roles; use PRS::Server ; domains ; add <domain-name> ; set powerbudget <budget> ; set powerdrawfactor 1.0 ; commit"
Delete PD:
cmsh -c "configurationoverlay use prs-server ; roles; use PRS::Server ; domains ; remove <domain-name>; commit"
Managing PD Lifecycle: Start, Stop, and Status#
Once PDs are defined, administrators can monitor and control their runtime behavior using cmsh. This includes checking the operational status of PRS components and manually starting or stopping specific PDs.
Viewing PRS server and PD status:
To check the current status of the PRS control loop, job scheduler server, and PD activity:
cmsh -c "configurationoverlay use prs-server ; roles ; use PRS::Server ; domains ; status"
The output looks similar to:
{
  "config server": {
    "last update string": "2025-05-12 09:53:50 CEST",
    "last update timestamp": 1747036430,
    "start time string": "2025-05-12 09:53:50 CEST",
    "start time timestamp": 1747036430,
    "update count": 2
  },
  "controller": {
    "control loop count": 148,
    "general error msg": "",
    "last control loop string": "2025-05-12 11:08:52 CEST",
    "last control loop timestamp": 1747040932,
    "start time string": "2025-05-12 09:53:50 CEST",
    "start time timestamp": 1747036430,
    "unresponsive nodes": []
  },
  "job scheduler server": {
    "start time timestamp": 1747036430,
    "start time string": "2025-05-12 09:53:50 CEST",
    "last update timestamp": 1747040932,
    "last update string": "2025-05-12 11:08:52 CEST",
    "job start count": 2,
    "job finish count": 1
  },
  "domains": {
    "rack001": {
      "status": "running",
      "hero_job_max_nodes": 6,
      "job_max_nodes": 9
    },
    "rack002": {
      "status": "running",
      "hero_job_max_nodes": 4,
      "job_max_nodes": 8
    }
  }
}
Starting or stopping PDs
PRS allows administrators to manually control PD operation.
Stop a PD:
When a PD is stopped, PRS no longer updates power limits for nodes in that PD. The last power limits set by PRS remain in effect until changed by another mechanism or manually reset.
cmsh -c "configurationoverlay use prs-server ; roles ; use PRS::Server ; domains ; stop <domain-name>"
Start a PD:
Starting a PD resumes PRS power management for all nodes in that domain, allowing PRS to dynamically adjust power limits based on workload demands.
cmsh -c "configurationoverlay use prs-server ; roles ; use PRS::Server ; domains ; start <domain-name>"
Configuring PRS Client#
BCM automatically detects hardware capabilities and configures appropriate power parameters for PRS-managed nodes. This automatic configuration includes CPU and GPU power limits, as well as device indices and types. Additional parameters, such as node static power and static down power, are set by the user during installation through the wizard. Most deployments run seamlessly with this automatic configuration. However, for special requirements, administrators can manually adjust the configuration using the following techniques.
Two manual configuration levels are available:
Add Nodes with Auto-Detection - Add nodes/categories to the
prs-clientoverlay to use auto-detected settingsOverride with Custom Values (for special requirements) - Replace auto-detected parameters with custom values for specific nodes
Note
A node must first be added to the prs-client overlay (level 1) to be managed by PRS. Its parameters are read-only at the overlay level. To customize these values, use level 2 to assign parameters directly to the node.
Level 1: Add Nodes with Auto-Detection#
The prs-client configuration overlay assigns the PRS::Client role to nodes for PRS management.
Warning
PRS does not have protection mechanisms when modifying node or category assignments. Avoid running heavy workloads during these operations and adjust PD budgets accordingly when adding or removing nodes.
Node Management:
# List nodes in overlay
cmsh -c "configurationoverlay use prs-client ; get nodes"

# Add node to overlay
cmsh -c "configurationoverlay use prs-client ; append nodes <node-id> ; commit"

# Remove node from overlay
cmsh -c "configurationoverlay use prs-client ; removefrom nodes <node-id> ; commit"
Category Management:
Note
In BCM, a category is a logical group of nodes that share common properties or configurations (e.g., “gpu-nodes”, “compute-nodes”). When you assign a configuration overlay to a category, all nodes in that category inherit the configuration.
# List categories in overlay
cmsh -c "configurationoverlay use prs-client ; get categories"

# Add category to overlay
cmsh -c "configurationoverlay use prs-client ; append categories <category-id> ; commit"

# Remove category from overlay
cmsh -c "configurationoverlay use prs-client ; removefrom categories <category-id> ; commit"
Viewing Auto-Configured Parameters#
What BCM Auto-Configures:
CPU/GPU power limits
Device indices and types
Note
These parameters are view-only at the role level. To override any auto-configured values, you must assign the PRS::Client role directly to specific nodes (see Node-Specific Configuration below).
Viewing the Effective Configuration:
To inspect the configured parameters that PRS is using, check the following file on the head node:
cat /var/spool/cmd/nvidia-prs.json
Example:
{
  "domains": {
    "rack001": {
      "attrs": {
        "power_budget": 10000.0,
        "power_budget_model": "SCALAR",
        "power_draw_factor": 1.0,
        "power_draw_model": "LINEAR"
      },
      "nodes": [
        "node001",
        "node002",
        "node003",
        "node004"
      ]
    }
  },
  "nodes": {
    "node001": {
      "attrs": {
        "static": 800,
        "static_down": 50,
        "uuid": "50735d90-cdba-4c62-9c17-f6fd33b4874d"
      },
      "devices": {
        "gpu0": {
          "attrs": {
            "index": 0,
            "power_max": 300,
            "power_min": 150,
            "type": "gpu"
          }
        }
      }
    }
  },
  "profiles": {}
}
Level 2: Override with Custom Values#
In exceptional cases where parameters need adjustment for specific nodes, administrators can manually modify the configuration by assigning the PRS::Client role directly to individual nodes with custom parameters.
When Node-Specific Configuration Might Be Needed:
Hardware with non-standard power characteristics
Experimental or prototype hardware
Nodes requiring special power limits for specific workloads
Troubleshooting or testing scenarios
Warning
Node-specific configuration is rarely required. BCM’s automatic hardware detection handles most scenarios correctly. Only use direct assignment when you have specific requirements that differ from the auto-detected values.
# Assign custom configuration to a specific node
cmsh -c "device use <node-name> ; roles ; assign prs::client ; use prs::client ; set staticpowerusage <static_power> ; set staticpowerusagedown <static_power_down> ; set mincpupowerlimit <min_cpu_power> ; set maxcpupowerlimit <max_cpu_power> ; set mingpupowerlimit <min_gpu_power> ; set maxgpupowerlimit <max_gpu_power> ; commit"

# View the role configuration
cmsh -c "device use <node-name> ; roles ; use prs::client ; show"

# Remove role from the node
cmsh -c "device use <node-name> ; roles ; unassign prs::client; commit"