Mission Control Software Stack#
Cluster Management#
NVIDIA Mission Control leverages NVIDIA Base Command Manager (BCM) for foundational cluster-management tasks such as provisioning compute nodes, configuring software images, assigning roles, and general cluster administration.
This guide assumes that administrators have prior familiarity with BCM, including interacting using the cmsh command-line interface and the Base View graphical user interface (GUI).
For detailed instructions on provisioning nodes, managing software images, role assignments, and using cmsh, please refer directly to the relevant chapters in the BCM Administrator Guide, including:
Base View Web GUI (Section 2.4)
Using the Cluster Management Shell (
cmsh) (Section 2.5)Cluster Management Daemon (Section 2.6)
Provisioning and Node Management (Section 5)
Using An External LDAP Server (Section 6.3)
Software Image Management (Section 11)
Day-to-day Administration (Section 14)
Administrators unfamiliar with these concepts or BCM workflows should first consult the BCM Administrator Guide before proceeding with NVIDIA Mission Control-specific configurations detailed later in this manual.
User Management#
Through BCM, users and groups for the cluster are managed in a single system model. In other words, managing users and groups in BCM automatically handles changes across the cluster.
Out of the box, BCM runs its own LDAP service to help manage users and groups. This centralized LDAP service runs on the head nodes of the BCM managed cluster.
Additionally, It is possible to integrate an external LDAP server for authentication services instead of the one provided by BCM, but that is not covered here. Please refer to the BCM Admin Manual for those details.
Using the Base View GUI to Manage Users and Groups#
BCM’s Base View interface provides a comprehensive frontend for managing users and groups of the system.
Within Base View, follow the navigation path Identity-Management > Users to manage users.
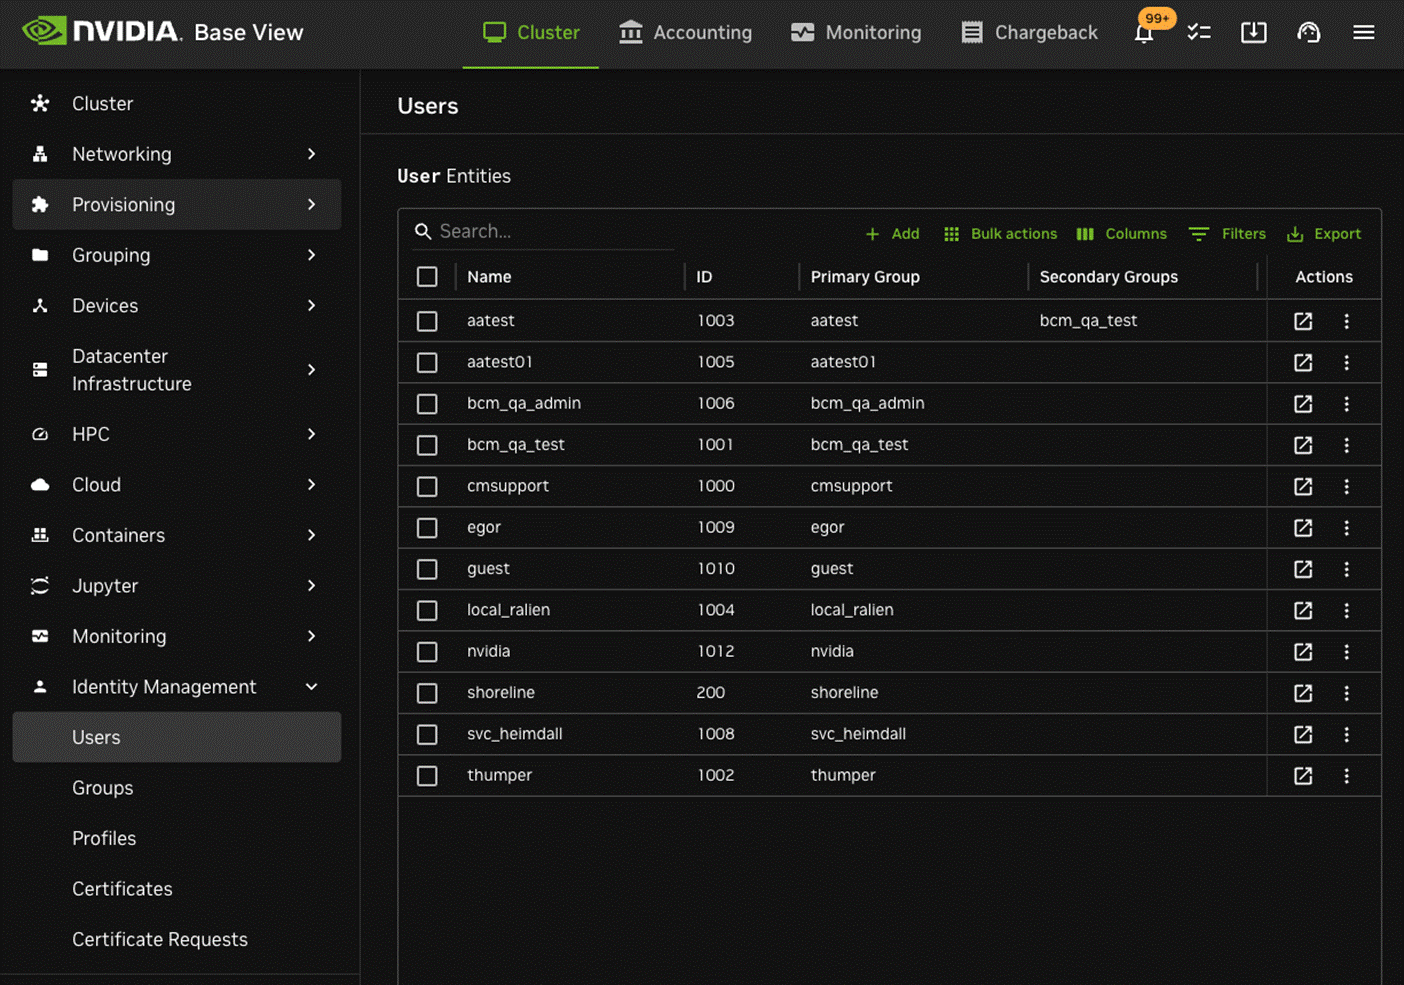
Additionally, follow the navigation path Identity-Management > Groups to manage groups.
In the Users window, there are various options for managing users.
The ADD button allows users to be added. When adding a user, many options are available to be set:
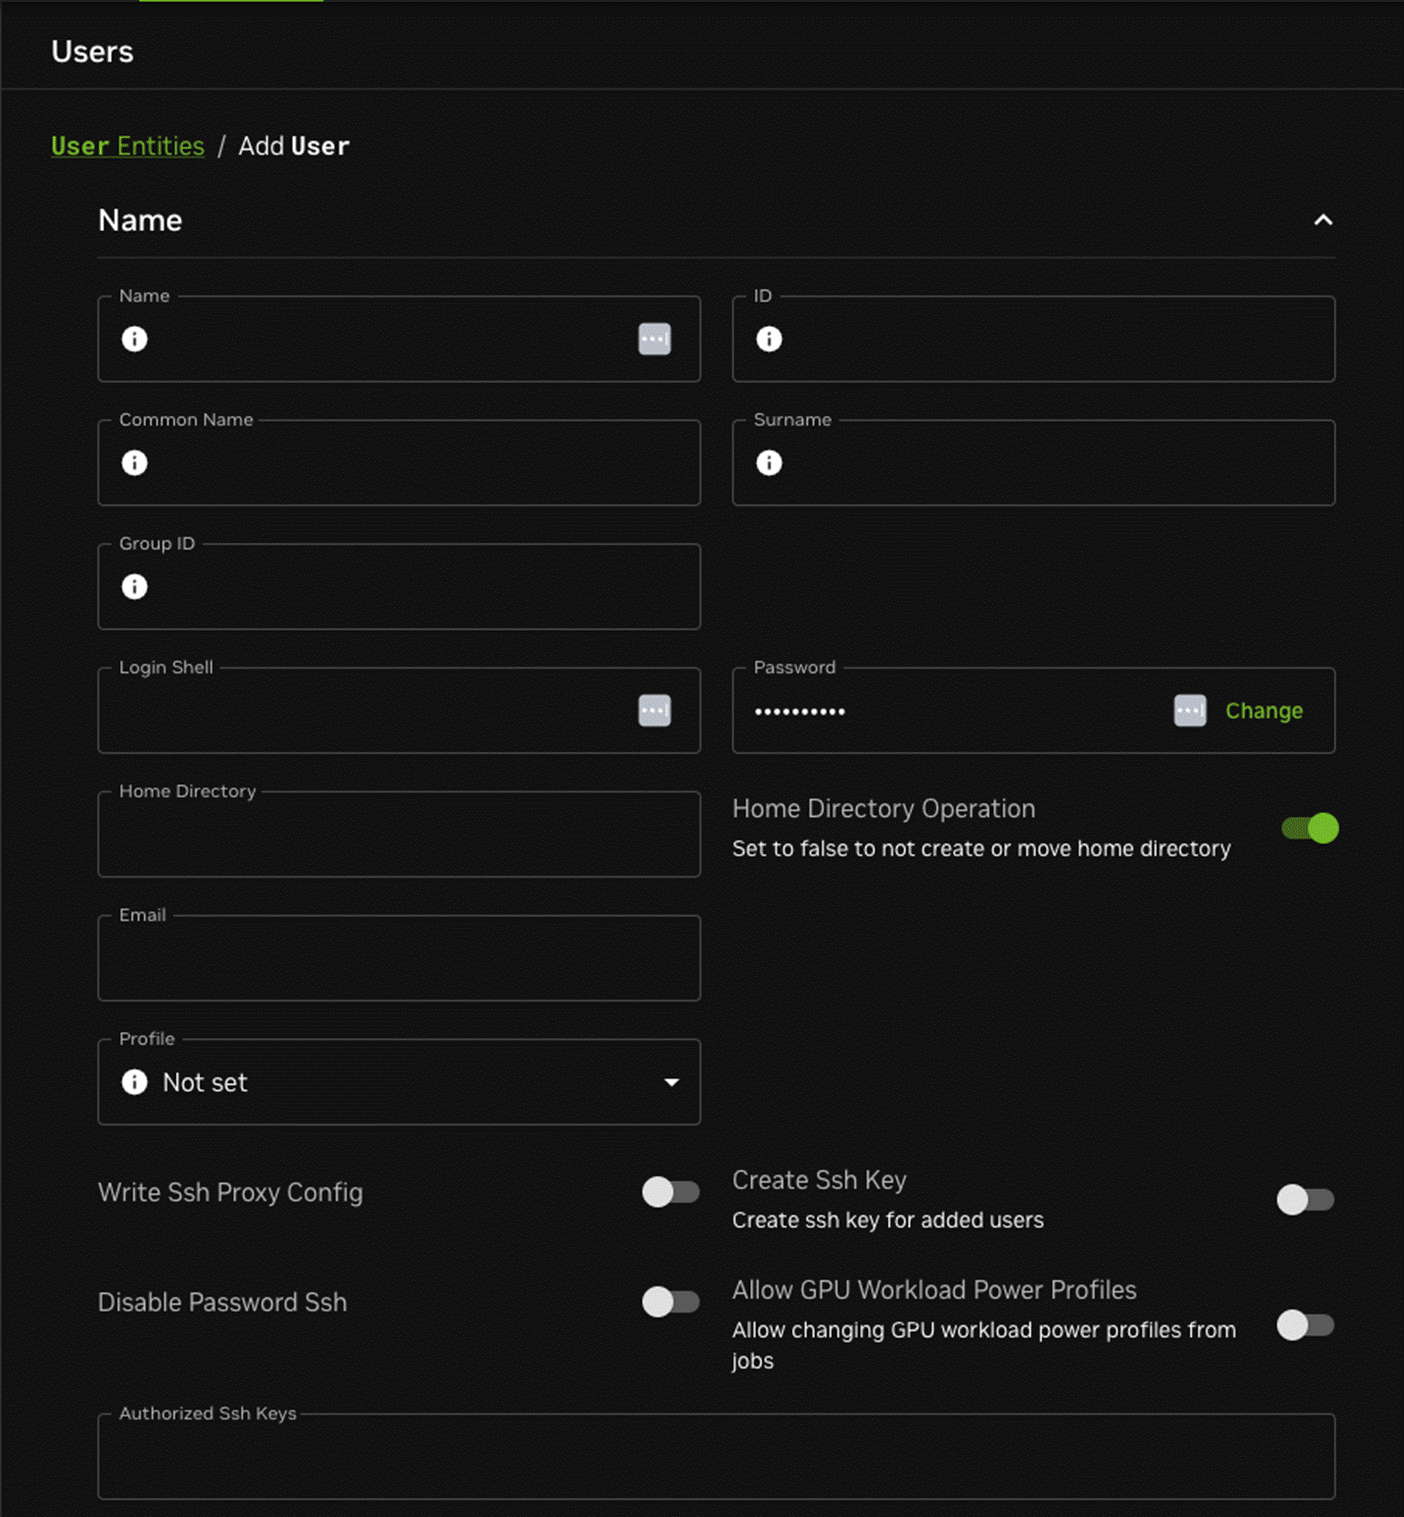
These may also be edited at a later time by selecting specific users in the Identity Management > Users window.
It is important to note these points when creating users:
User and group ID numbers are automatically assigned from
UIDandGID1000onward.A home directory is created and a login shell is set. Users with unset passwords cannot log in.
Group management is handled similarly to user management. There are clickable group objects that show up, similar to the user entries, and the management functions are the same.
Using the BCM CLI (CMSH) to Manage Users and Groups#
Using cmsh or Base View to manage users and groups will provide the same results. The only difference is that one path is a CLI and the other is a GUI.
In order to use cmsh, start a cmsh session on the BCM head node and then enter user management mode.
root@bcm-headnode-01:~# cmsh
[bcm-headnode-01]% user
[bcm-headnode-01->user]%
From here, type help and look at the specific ==user== section of the output to see all the available options:
================================= user =================================
add ........................... Create and use a user
append ........................ Append value(s) to user property
checkaccess ................... Check project manager access
clear ......................... Clear specific user property
clone ......................... Clone and use a user
commit ........................ Commit local changes
foreach ....................... Execute a set of commands on several users
format ........................ Modify or view current list format
get ........................... Get specific user property
list .......................... List overview
projectmanager ................ Enter project manager submode
projectmanageroverview ........ Project manager overview
range ......................... Set a range of several users to execute future commands on
refresh ....................... Revert local changes
remove ........................ Remove a user
removefrom .................... Remove value(s) from user property
set ........................... Set user properties
show .......................... Show user properties
sort .......................... Modify or view current list sort order
swap .......................... Swap uuid names of two user
undefine ...................... Undefine specific user property
use ........................... Use the specified user
usedby ........................ List all entities which depend on this user
validate ...................... Remote validate a user
Adding a user is as simple as using the add function:
[bcm-headnode-01->user]% add ophelia
[bcm-headnode-01->user*[ophelia*]]% show
Parameter                        Value
-----------------------------------  ------------------------------------------------
Accounts
Managees
Name                             ophelia
Primary group
Revision
Secondary groups
ID
Common name
Surname
Group ID
Login shell
Password                         < not set >
Home directory
Home directory operation         yes
Email
Profile
Write ssh proxy config           no
Create ssh key                   no
Disable password ssh             no
Allow GPU workload power profiles no
Authorized ssh keys              <0B>
Shadow min                       0
Shadow max                       999999
Shadow warning                   7
Shadow inactive                  0
Last change                      1969/12/31
Expiration date                  2037/12/31
Project manager                  <submode>
Notes                            <0B>
At this point we have not committed the user ophelia yet. We used the add function and the show function. This is why you see empty fields for certain properties.
Whenever any changes are made using cmsh, it is important to remember to commit them or else they will not go into effect.
Now commit the user ophelia to the LDAP database and show the user again:
[bcm-headnode-01->user*[ophelia*]]% commit
[bcm-headnode-01->user[ophelia]]% show
Parameter                        Value
-----------------------------------  ------------------------------------------------
Accounts
Managees
Name                             ophelia
Primary group                    1011
Revision
Secondary groups
ID                               1007
Common name                      ophelia
Surname                          ophelia
Group ID                         1011
Login shell                      /bin/bash
Password                         ********
Home directory                   /home/ophelia
Home directory operation         yes
Email
Profile
Write ssh proxy config           no
Create ssh key                   no
Disable password ssh             no
Allow GPU workload power profiles no
Authorized ssh keys              <0B>
Shadow min                       0
Shadow max                       999999
Shadow warning                   7
Shadow inactive                  0
Last change                      2025/5/13
Expiration date                  2037/12/31
Project manager                  <submode>
Notes                            <0B>
We now see properties like we would expect. Removing a user is as simple as running remove Ophelia in the user mode prompt of cmsh:
[bcm-headnode-01->user[ophelia]]% remove ophelia
[bcm-headnode-01->user*]% commit
Successfully removed 1 Users
Successfully committed 0 Users
In the Slurm Workload Management section of this document we will go through how you can add users or groups to a Slurm Partition.
Integrating External LDAP#
BCM installations deploy and use internal LDAP infrastructure by default. It’s common however to have a requirement to use existing LDAP infrastructure to support an existing authentication model, allowing users to use existing credentials in a BCM managed environment.
BCM can support this through the use of software packages like sssd and krb5.
There are two options in which to support this:
Installation and configuration using a custom software image.
Installation and configuration using BCM’s common configuration feature and setting of
authenticationserverat the device or category level.
The BCM admin manual covers the general configuration changes needed.
Common Configuration#
Installation and Configuration Flow#
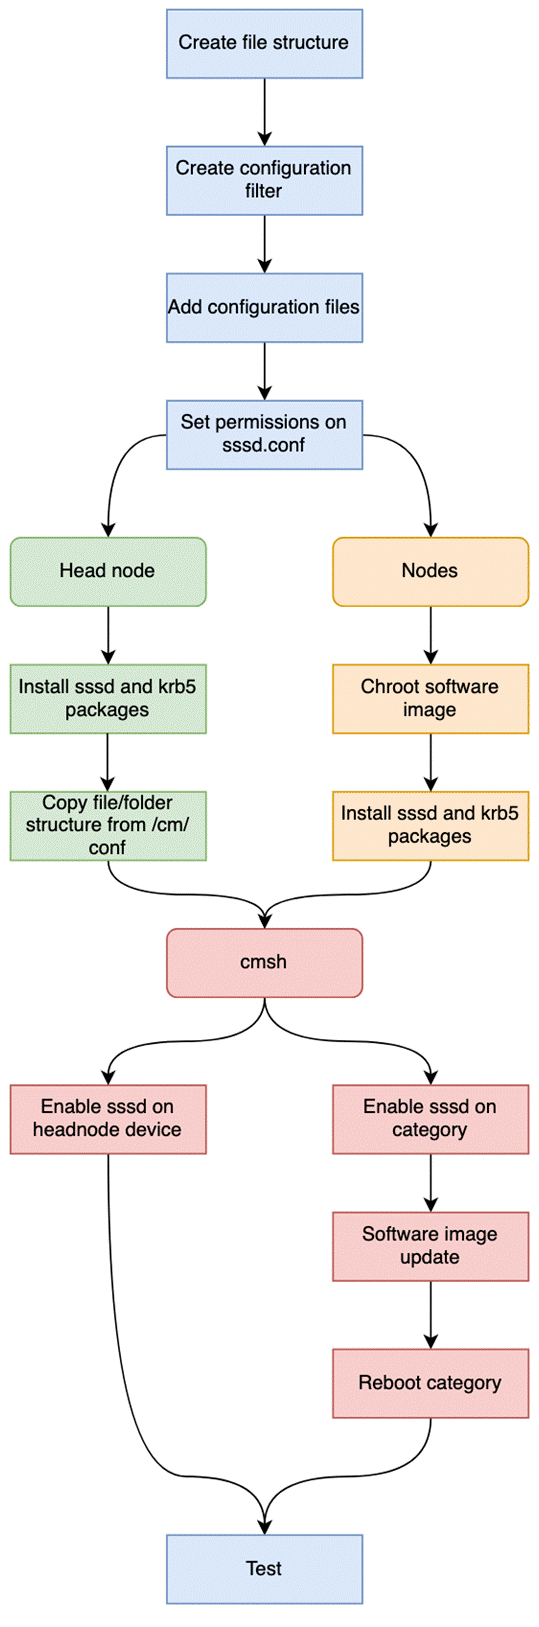
Creating folder structures expected by BCM#
mkdir -vp /cm/conf/all/001-cluster-ldap/etc/{pam.d,sssd}
mkdir -v /cm/conf/all/001-cluster-ldap/etc/sssd/conf.d
mkdir -vp /cm/conf/all/001-cluster-ldap/var/lib/sss/{db,pipes}
mkdir -vp /cm/conf/all/001-cluster-ldap/var/lib/sss/pipes/private
Configuration Rule Matcher#
BCM uses this rule to match a category that is later defined in cmsh.
echo "category=sssd" >> /cm/conf/all/001-cluster-ldap/cm-config.match
File/Folder Structure#
The file/folder structure is as follows:
/cm/conf/
└── 001-cluster-ldap
    ├── cm-config.match
    ├── etc
    │   ├── krb5.conf
    │   ├── nsswitch.conf
    │   ├── pam.d
    │   │   ├── password-auth-ac
    │   │   └── system-auth-ac
    │   └── sssd
    │       └── conf.d
    │           └── sssd.conf
    └── var
        └── lib
            └── sss
                ├── db
                └── pipes
                    └── private
File permissions#
With these all set, we need to fix permissions for sssd.conf, otherwise this will fail when starting the service.
chown root:root /cm/conf/all/001-cluster-ldap/etc/sssd/conf.d/sssd.conf
chmod 600 /cm/conf/all/001-cluster-ldap/etc/sssd/conf.d/sssd.conf
Package installation#
Head node#
apt-get update; DEBIAN_FRONTEND=noninteractive apt install -y sssd sssd-tools krb5-user
Nodes#
cm-chroot-sw-img /cm/images/sssd-image
apt-get update; DEBIAN_FRONTEND=noninteractive apt install -y sssd sssd-tools krb5-user
systemctl enable sssd
Enable sssd through BCM#
Head node#
Copying the existing file structure and configuration files to their respective locations and finally enabling sssd.
rsync -av /cm/conf/all/001-cluster-ldap/etc /
cmsh -c "device; foreach -t headnode (set authenticationservice sssd; commit)"
Nodes#
We’ll assign devices in our cluster to a category where we’ll enable the sssd service.
Set categories on devices
cmsh -c "device; foreach -n node004..node006 (set category sssd; commit)"
Apply authenticationservice to category.
cmsh -c "category; use sssd; set authenticationservice sssd; commit"
Software image update.
cmsh -c "device; imageupdate -w -c sssd"
Reboot category.
cmsh -c "device; foreach -c sssd (reboot)"
Validate external LDAP is working#
Using pdsh to run getent against an external LDAP user.
pdsh -g category=sssd 'getent passwd janedoe' | dshbak -c
----------------
node[004-006]
----------------
janedoe:*:86753:30:Jane Doe:/home/janedoe:/bin/bash
Using ldapsearch to query membership of an external LDAP user
ldapsearch -xLLL -H ldap://ldap.company.com -b "uid=janedoe,ou=people,dc=comapny,dc=com" -x memberOf
dn: uid=janedoe,ou=people,dc=company,dc=com
memberOf: cn=colorado-engineer,ou=groups,dc=comapny,dc=com
memberOf: cn=colorado-admin,ou=groups,dc=comapny,dc=com