Additional Configuration (Optional)
Configure general settings in the conf/gv.cfg file.
When running UFM in HA mode, the gv.cfg file is replicated to the standby server.
Enabling SHARP Aggregation Manager
SHARP Aggregation Manager is disabled by default. To enable it, set:
            [Sharp]
sharp_enabled = true
Upon startup of UFM or SHARP Aggregation Manager, UFM will resend all existing tenant allocations to SHARP AM.
Running UFM in Monitoring Mode
monitoring_mode = yes
For more information, see Running the UFM Software in Monitoring Mode.
Enabling Predefined Groups
enable_predefined_groups = true
By default, pre-defined groups are enabled. In very large-scale fabrics, pre-defined groups can be disabled in order to allow faster startup of UFM.
Enabling Multi-NIC Host Grouping
multinic_host_enabled = true
Upon first installation of UFM 6.4.1 and above, multi-NIC host grouping is enabled by default. However, if a user is upgrading from an older version, then this feature will be disabled for them.
It is recommended to set the value of this parameter before running UFM for the first time.
Defining Node Description Black-List
Node descriptions from the black-list should not be used for Multi-NIC grouping.
During the process of host reboot or initialization/bringup, the majority of HCAs receive a default label rather than an actual, real description. To prevent the formation of incorrect multi-NIC groups based on these default labels, this feature offers the option to establish a blacklist containing possible node descriptions that should be avoided when grouping Multi-NIC HCAs during host startup. Once a legitimate node description is assigned to the host, the HCAs are organized into multi-NIC hosts based on their respective descriptions. It is recommended to configure this parameter before initiating the UFM for the first time.
For instance, nodes initially identified with descriptions listed in the exclude_multinic_desc will not be initially included in Multi-NIC host groups until they obtain an updated, genuine node description.
Modify the exclude_multinic_desc parameter in the cv.fg file:
exclude_multinic_desc = localhost,generic_name_1,generic_name_2
Running UFM Over IPv6 Network Protocol
The default multicast address is configured to an IPv4 address. To run over IPv6, this must be changed to the following in section UFMAgent of gv.cfg.
            [UFMAgent]
...
# if ufmagent works in ipv6 please set this multicast address to FF05:0:0:0:0:0:0:15F
mcast_addr = FF05:0:0:0:0:0:0:15F
Adding SM Plugin (e.g. lossymgr) to event_plugin_name Option
The following options allow users to set the SM plugin options via the UFM configuration. Once SM is started by UFM, it will start the SM plugin with the specified options.
            # Event plugin name(s)
event_plugin_name osmufmpi lossymgr
Add the plug-in options file to the event_plugin_options option:
            # Options string that would be passed to the plugin(s)
event_plugin_options --lossy_mgr -f <lossy-mgr-options-file-name>
These plug-in parameters are copied to the opensm.conf file in Management mode only.
Multi-port SM
SM can use up to eight-port interfaces for fabric configuration. These interfaces can be provided via /opt/ufm/conf/gv.cfg. The users can specify multiple IPoIB interfaces or bond interfaces in /opt/ufm/conf/gv.cfg, subsequently, the UFM translates them to GUIDs and adds them to the SM configuration file (/opt/ufm/conf/opensm/opensm.conf). If users specify more than eight interfaces, the extra interfaces are ignored.
            [Server]

# disabled (default) | enabled (configure opensm with multiple GUIDs) | ha_enabled (configure multiport SM with high availability)
 multi_port_sm = disabled
 # When enabling multi_port_sm, specify here the additional fabric interfaces for OpenSM conf
 # Example: ib1,ib2,ib5 (OpenSM will support the first 8 GUIDs where first GUID will
 # be extracted the fabric_interface, and remaining GUIDs from additional_fabric_interfaces
 additional_fabric_interfaces =
UFM treats bonds as a group of IPoIB interfaces. So, for example, if bond0 consists of the interfaces ib4 and ib8, then expect to see GUIDs for ib4 and ib8 in opensm.conf.
Duplicate interface names are ignored (e.g. ib1,ib1,ib1,ib2,ib1 = ib1,ib2).
Configuring UDP Buffer
This section is relevant only in cases where telemetry_provider=ibpm. (By default, telemetry_provider=telemetry).
To work with large-scale fabrics, users should set the set_udp_buffer flag under the [IBPM] section to "yes" for the UFM to set the buffer size (default is "no").
            # By deafult, UFM does not set the UDP buffer size. For large scale fabrics
# it is recommended to increase the buffer size to 4MB (4194304 bits).
set_udp_buffer = yes
# UDP buffer size
udp_buffer_size = 4194304
Virtualization
This allows for supporting virtual ports in UFM.
            [Virtualization]
# By enabling this flag, UFM will discover all the virtual ports assigned for all hypervisors in the fabric
enable = false
# Interval for checking whether any virtual ports were changed in the fabric
interval = 60
Static SM LID
Users may configure a specific value for the SM LID so that the UFM SM uses it upon UFM startup.
            [SubnetManager]
# 1- Zero value (Default): Disable static SM LID functionality and allow the SM to run with any LID.
#    Example: sm_lid=0
# 2- Non-zero value: Enable static SM LID functionality so SM will use this LID upon UFM startup.
sm_lid=0
To configure an external SM (UFM server running in sm_only mode), users must manually configure the opensm.conf file (/opt/ufm/conf/opensm/opensm.conf) and align the value of master_sm_lid to the value used for sm_lid in gv.cfg on the main UFM server.
Configuring Log Rotation
This section enables setting up the log files rotate policy. By default, log rotation runs once a day by cron scheduler.
            [logrotate]
#max_files specifies the number of times to rotate a file before it is deleted (this definition will be applied to
#SM and SHARP Aggregation Manager logs, running in the scope of UFM).
#A count of 0 (zero) means no copies are retained. A count of 15 means fifteen copies are retained (default is 15)
max_files = 15
#With max_size, the log file is rotated when the specified size is reached (this definition will be applied to
#SM and SHARP Aggregation Manager logs, running in the scope of UFM). Size may be specified in bytes (default),
#kilobytes (for example: 100k), or megabytes (for example: 10M). if not specified logs will be rotated once a day.
max_size = 3
Configuring UFM Logging
The [Logging] section in the gv.cfg enables setting the UFM logging configurations.
|
Field |
Default Value |
Value Options |
Description |
|
level |
WARNING |
CRITICAL, ERROR, WARNING, INFO, DEBUG |
The definition of the maub logging level for UFM components. |
|
smclient_level |
WARNING |
CRITICAL, ERROR, WARNING, INFO, DEBUG |
The logging level for SM client log messages |
|
event_log_level |
INFO |
CRITICAL, ERROR, WARNING, INFO, DEBUG |
The logging level for UFM events log messages |
|
rest_log_level |
INFO |
CRITICAL, ERROR, WARNING, INFO, DEBUG |
Logging level for REST API related log messages |
|
authentication_service_log_level |
INFO |
CRITICAL, ERROR, WARNING, INFO, DEBUG |
logging level for UFM authentication log messages |
|
log_dir |
/opt/ufm/files/log |
N/A |
It is possible to change the default path to the UFM log directory. The configured log_dir must have read, write and execute permission for ufmapp user (ufmapp group). In case of HA, UFM should be located in the directory which is replicated between the UFM master and standby servers. A change of the default UFM log directory may affect UFM dump creation and inclusion of UFM logs in dump. |
|
max_history_lines |
100000 |
N/A |
The maximum number of lines in log files to be shown in UI output for UFM logging. |
            [Logging]
# Optional logging levels: CRITICAL, ERROR, WARNING, INFO, DEBUG.
level = WARNING
smclient_level = WARNING
event_log_level = INFO
rest_log_level = INFO
authentication_service_log_level = INFO
# The configured log_dir must have read, write and execute permission for ufmapp user (ufmapp group).
log_dir = /opt/ufm/files/log
max_history_lines = 100000
Configuring Syslog
This configuration enables the UFM to send log messages to syslog, including remote syslog. The configuration described below is located in the [Logging] section of the gv.cfg file.
|
Field |
Default Value |
Value Options |
Description |
|
syslog |
false |
True or False |
Enables/disables UFM syslog option |
|
syslog_addr |
/dev/log # for remote rsyslog_hostname:514 |
N/A |
UFM syslog configuration (syslog_addr) For working with local syslog, set value to: /dev/log For working with external machine, set value to: host:port Important note: the default remote syslog server port is 514 As the UFM log messages could be sent to remote server, change the rsyslog configuration on the remote server The /etc/rsyslog.conf file should be edited and two sections should be uncommented as shown below: # Provides UDP syslog reception $ModLoad imudp $UDPServerRun 514 # Provides TCP syslog reception $ModLoad imtcp $InputTCPServerRun 514 Restart the remote syslog service, run: service rsyslog restart |
|
ufm_syslog |
false |
True or False |
Sets syslog option for main UFM process logging messages - False - Not to send. True: Send |
|
smclient_syslog |
false |
True or False |
Sets syslog option for OpenSM logging messages - False - Not to send. True: Send |
|
event_syslog |
false |
True or False |
Sets syslog option for events logging messages - False - Not to send. True: Send |
|
rest_syslog |
false |
True or False |
Sets syslog option for UFM REST API logging messages - False - Not to send. True: Send |
|
authentication_syslog |
false |
True or False |
Set syslog option for UFM authentication logging messages. False - Not to send. True: Send |
|
syslog_level |
WARNING |
CRITICAL, ERROR, WARNING, INFO, DEBUG |
Sets global syslog messages logging level. The syslog level is common for all the UFM components. The syslog level that is sent to syslog is the highest among the syslog level and component log level defined in the above section. |
|
syslog_facility |
LOG_USER |
LOG_KERN, LOG_USER, LOG_MAIL, LOG_DAEMON, LOG_AUTH, LOG_SYSLOG, LOG_LPR, LOG_NEWS, LOG_UUCP ,LOG_CRON, LOG_AUTHPRIV, LOG_FTP, LOG_NTP,LOG_SECURITY, LOG_CONSOLE, LOG_SOLCRON |
Includes the remote syslog package header value for log message facility. |
            syslog = false
#syslog configuration (syslog_addr)
# For working with local syslog, set value to: /dev/log
# For working with external machine, set value to: host:port
syslog_addr = /dev/log
# The configured log_dir must have read, write and execute permission for ufmapp user (ufmapp group).
log_dir = /opt/ufm/files/log
# Main ufm log.
ufm_syslog = false
smclient_syslog = false
event_syslog = false
rest_syslog = false
authentication_syslog = false
syslog_level = WARNING
# Syslog facility. By default - LOG_USER
#  possible facility codes: LOG_KERN,LOG_USER,LOG_MAIL,LOG_DAEMON,LOG_AUTH,LOG_SYSLOG,
#  LOG_LPR,LOG_NEWS,LOG_UUCP,LOG_CRON,LOG_AUTHPRIV,LOG_FTP, LOG_NTP,LOG_SECURITY,LOG_CONSOLE,LOG_SOLCRON
# for reference https://en.wikipedia.org/wiki/Syslog
syslog_facility = LOG_USER
Configuration Examples in gv.cfg
The following show examples of configuration settings in the gv.cfg file:
Polling interval for Fabric Dashboard information
ui_polling_interval = 30
[Optional] UFM Server local IP address resolution (by default, the UFM resolves the address by gethostip). UFM Web UI should have access to this address.
ws_address = <specific IP address>
HTTP/HTTPS Port Configuration
            # WebServices Protocol (http/https) and Port
ws_port = 8088
ws_protocol = http
Connection (port and protocol) between the UFM server and the APACHE server
            ws_protocol = <http or https>
ws_port = <port number>
For more information, see Launching a UFM Web UI Session.
SNMP get-community string for switches (fabric wide or per switch)
            # default snmp access point for all devices
[SNMP]
port = 161
gcommunity = public
Enhanced Event Management (Alarmed Devices Group)
            [Server]
auto_remove_from_alerted = yes
Log verbosity
            [Logging]
# optional logging levels
#CRITICAL, ERROR, WARNING, INFO, DEBUG
level = INFO
For more information, see "UFM Logs".
Settings for saving port counters to a CSV file
            [CSV]
write_interval = 60
ext_ports_only = no
For more information, see "Saving the Port Counters to a CSV File".
Max number of CSV files (UFM Advanced)
            [CSV]
max_files = 1
For more information, see "Saving Periodic Snapshots of the Fabric (Advanced License Only)".
WarningThe access credentials that are defined in the following sections of the conf/gv.cfg file are used only for initialization:
SSH_Server
SSH_Switch
TELNET
IPMI
SNMP
MLNX_OS
To modify these access credentials, use the UFM Web UI. For more information, see "Device Access".
Configuring the UFM communication protocol with MLNX-OS switches. The available protocols are:
http
https (default protocol for secure communication)
For configuring the UFM communication protocol after fresh installation and prior to the first run, set the MLNX-OS protocol as shown below.
Example:
            [MLNX_OS]
protocol = https
port = 443
Once UFM is started, all UFM communication with MLNX-OS switches will take place via the configured protocol.
For changing the UFM communication protocol while UFM is running, perform the following:
Set the desired protocol of MLNX-OS in the conf/gv.cfg file (as shown in the example above).
Restart UFM.
Update the MLNX-OS global access credentials configuration with the relevant protocol port. Refer to "Device Access" for help.
For the http protocol - default port is 80.
For the https protocol - default port is 443.Update the MLNX-OS access credentials with the relevant port in all managed switches that have a valid IP address.
Dynamic Telemetry
The management of dynamic telemetry instances involves the facilitation of user requests for the creation of multiple telemetry instances. As part of this process, the UFM enables users to establish new UFM Telemetry instances according to their preferred counters and configurations. These instances are not initiated by the UFM but rather are monitored for their operational status through the use of the UFM Telemetry bring-up tool
For more information on the supported REST APIs, please refer to UFM Dynamic Telemetry Instances REST API.
The configuration parameters can be found in the gv.cfg configuration file under the DynamicTelemetry section.
|
Name |
Description |
Default value |
|
max_instances |
Maximum number of simultaneous running UFM Telemetries. |
5 |
|
new_instance_delay |
Delay time between the start of two UFM Telemetry instances, in minutes. |
5 |
|
update_discovery_delay |
The time to wait before updating the discovery file of each telemetry instance if the fabric has changed, in minutes. |
10 |
|
endpoint_timeout |
Telemetry endpoint timeout, in seconds. |
5 |
|
bringup_timeout |
Telemetry bringup tool timeout, in seconds. |
60 |
|
initial_exposed_port |
Initial port for the available range of ports (range(initial_exposed_port, initial_exposed_port + max_instances)). |
9003 |
|
instances_sessions_compatibility_interval |
Every instances_sessions_compatibility_interval minutes the UFM verifies compliance between instances and sessions to avoid zombie sessions. if 0 is configured this process won't be activate |
10 |
SM Trap Handler Configuration
The SMTrap handler is the SOAP server that handles traps coming from OpenSM.
There are two configuration values related to this service:
osm_traps_debounce_interval – defines the period the service holds incoming traps
osm_traps_throttle_val – once osm_traps_debounce_interval elapses, the service transfers osm_traps_throttle_val to the Model Main
By default, the SM Trap Handler handles up to 1000 SM traps every 10 seconds.
CPU Affinity on UFM
This feature allows setting the CPU affinity for the major processes of the UFM (such as ModelMain, SM, SHARP, Telemetry).
In order to increase the UFM's efficiency, the number of context-switches is reduced. When each major CPU is isolated, users can decrease the number of context-switches, and the performance is optimized.
The CPU affinity of these major processes is configured in the following two levels:
Level 1- The major processes initiation.
Level 2- Preceding initiation of the model's main subprocesses which automatically uses the configuration used in level 1 and designates a CPU for each of the sub-processes.
According to user configuration, each process is assigned with affinity.
By default, this feature is disabled. In order to activate the feature, configure Is_cpu_affinity_enabled with true, check how many CPUs you have on the machine, and set the desired affinity for each process.
For example:
            [CPUAffinity]
Is_cpu_affinity_enabled=true
Model_main_cpu_affinity=1-4
Sm_cpu_affinity=5-13
SHARP_cpu_affinity=14-22
Telemetry_cpu_affinity=22-23
The format should be a comma-separated list of CPUs. For example: 0,3,7-11.
The ModelMain should have four cores, and up to five cores. The SM should have as many cores as you can assign. You should isolate between the ModelMain cores and the SM cores.
SHARP can be assigned with the same affinity as the SM. The telemetry should be assigned with three to four CPUs.
Quality of Service (QoS) Support
Infiniband Quality of Service (QoS) is disabled by default in the UFM SM configuration file.
To enable it and benefit from its capabilities, set the qos flag to TRUE in the /opt/ufm/files/conf/opensm/opensm.conf file.
Example:
            # Enable QoS setup
qos FALSE
The QoS parameters settings should be carefully reviewed before enablement of the qos flag. Especially, sl2vl and VL arbitration mappings should be correctly defined.
For information on Enhanced QoS, see Appendix – SM Activity Report.
UFM Failover to Another Port
When the UFM Server is connected by two or more InfiniBand ports to the fabric, you can configure UFM Subnet Manager failover to one of the other ports. When failure is detected on an InfiniBand port or link, failover occurs without stopping the UFM Server or other related UFM services, such as mysql, http, DRDB, and so on. This failover process prevents failure in a standalone setup, and preempts failover in a High Availability setup, thereby saving downtime and recovery.
Network Configuration for Failover to IB Port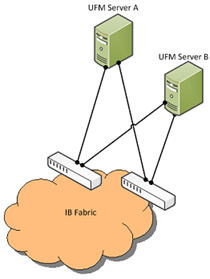
UFM SM failover is not relevant for Monitoring mode, because in this mode, UFM must be connected to the fabric over ib0 only.
To enable UFM failover to another port:
Configure bonding between the InfiniBand interfaces to be used for SM failover. In an HA setup, the UFM active server and the UFM standby server can be connected differently; but the bond name must be the same on both servers.
Set the value of fabric_interface to the bond name. using the /opt/ufm/scripts/change_fabric_config.sh command as described in Configuring General Settings in gv.cfg. If ufma_interface is configured for IPoIB, set it to the bond name as well. These changes will take effect only after a UFM restart. For example, if bond0 is configured on the ib0 and ib1 interfaces, in gv.cfg, set the parameter fabric_interface to bond0.
If IPoIB is used for UFM Agent, add bond to the ufma_interfaces list as well.
When failure is detected on an InfiniBand port or link, UFM initiates the give-up operation that is defined in the Health configuration file for OpenSM failure. By default:
UFM discovers the other ports in the specified bond and fails over to the first interface that is up (SM failover)
If no interface is up:
In an HA setup, UFM initiates UFM failover
In a standalone setup, UFM does nothing
If the failed link becomes active again, UFM will select this link for the SM only after SM restart.
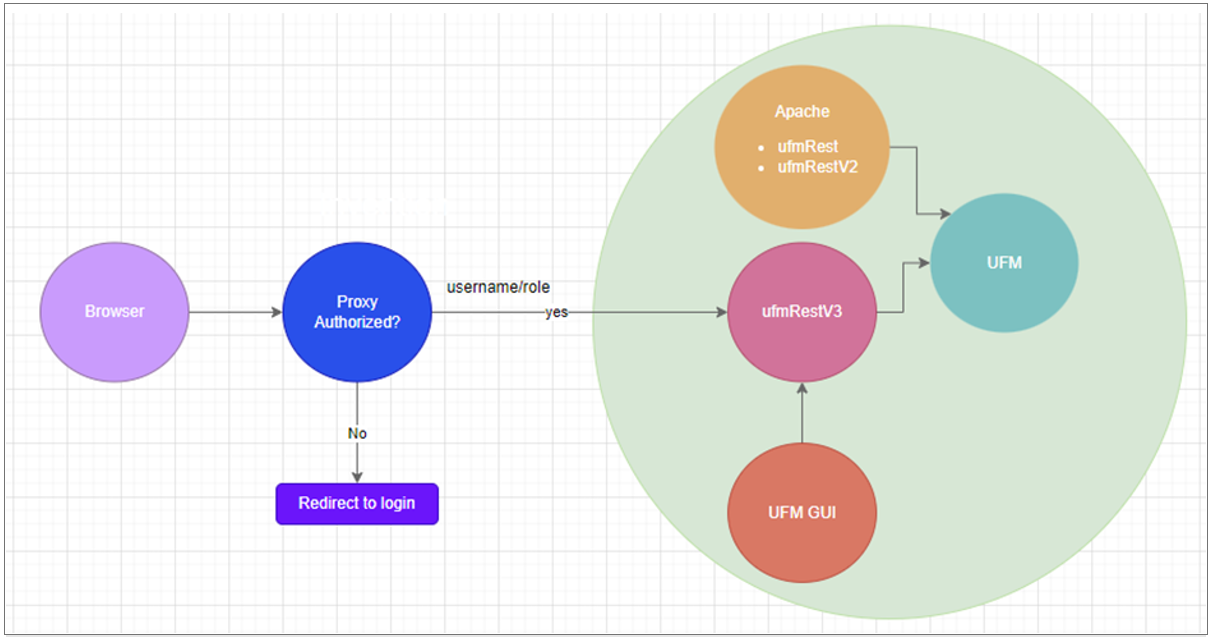
Delegating Authentication to a Proxy
To allow a custom user authentication, you can configure UFM to delegate the user authentication to a remote Proxy server. The remote Proxy server is written by the user, thus, allowing flexibility on deciding how the authentication is performed.
By default, the feature is disabled. To activate the feature, configure auth_proxy_enabled with true.
Proxy should use ufmRestV3 to send requests to UFM. The request header should contain a username and role. The available roles are System_Admin, Fabric_Admin, Fabric_Operator, and Monitoring_Only. If the request header is sent without a username or a role, it is rejected by the UFM.
For example:
            [AuthProxy]
# Defaults to false, but set to true to enable this feature
auth_proxy_enabled = true
# HTTP Header name that will contain the username
auth_proxy_header_name = X_WEBAUTH_USER
# HTTP Header name that will contain the user roles. The available roles are as follows: System_Admin, Fabric_Admin, Fabric_Operator, and Monitoring_Only
auth_proxy_header_role = X_WEBAUTH_ROLE

# Set to `true` to enable auto sign up of users who do not exist in UFM DB. Defaults to `true`.
auth_proxy_auto_sign_up = true
# Limit where auth proxy requests come from by configuring a list of IP addresses.
# This can be used to prevent users spoofing the X_WEBAUTH_USER header.
# This option is required
# Example `whitelist = 192.168.1.1, 192.168.1.0/24, 2001::23, 2001::0/120`
auth_proxy_whitelist =
The following chart describes the flow:
Configuring Partial Switch ASIC Failure Events
UFM can identify switch ASIC failure by detecting pre-defined portion of the switch ports, reported as unhealthy. By default, this portion threshold is set to 20% of the total switch ports. Thus, the UFM will trigger the partial switch ASIC event in case the number of unhealthy switch ports exceeds 20% of the total switch ports.
You can configure UFM t o control Partial Switch ASIC Failure events. To configure, you may use the gv.cfg file by updating the value of switch_asic_fault_threshold parameter under the UnhealthyPorts section. For an example, in case the switch has 32 ports, once 7 ports are detected as unhealthy ports, the UFM will trigger the partial switch ASIC event. Example:

Enabling Network Fast Recovery
To enable the Network Fast Recovery feature, ensure that all switches in the fabric use the following MLNX-OS/firmware versions:
MLNX-OS version 3.10.6004 and up
Quantum firmware versions:
Quantum FW v27.2010.6102 and up
Quantum2 FW v31.2010.6102 and up
Fast recovery is a switch-firmware based facility for isolation and mitigation of link-related issues. This system operates in a distributed manner, where each switch is programmed with a simple set of rule-based triggers and corresponding action protocols. These rules permit the switch to promptly react to substrandard links within its locality, responding at a very short reaction time - as little as approximately 100 milliseconds. The policy is provided and managed via the UFM & SM channel. Moreover, every autonomous action taken by a switch in the network is reported to the UFM.
The immediate reactions taken by the switch enable SHIELD and pFRN. These mechanisms collaborate to rectify routing within the proximity of the problematic link before it can disrupt transactions at the transport layer. Importantly, this process occurs rapidly, effectively limiting the spreading of congestion to a smaller segment of the network.
To use the Network Fast Recovery feature, you need to enable the designated trigger in the gv.cfg file. By doing this, you can specify which triggers the UFM will support.
As stated in the gv.cfg file, the feature is disabled by default and the below are the supported fields and options:
[NetworkFastRecovery]
is_fast_recovery_enabled = false
# This will be supported by the Network Fast Recovery.
network_fast_recovery_conditions = SWITCH_DECISION_CREDIT_WATCHDOG,SWITCH_DECISION_RAW_BER,SWITCH_DECISION_EFFECTIVE_BER,SWITCH_DECISION_SYMBOL_BER
|
Parameter |
Description |
|
SWITCH_DECISION_CREDIT_WATCHDOG |
TBD |
|
SWITCH_DECISION_RAW_BER |
|
|
SWITCH_DECISION_EFFECTIVE_BER |
|
|
SWITCH_DECISION_SYMBOL_BER |
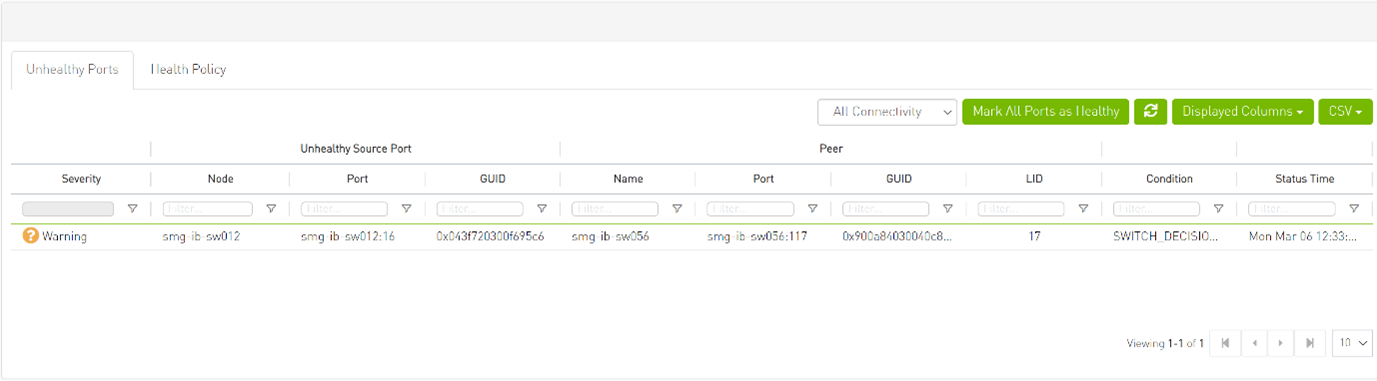
The "Unhealthy Ports" page provides visibility of these ports. If desired, the user can mark a port as healthy, triggering a restart of that specific port on the switch.
The trigger that initiated the isolation of ports can be viewed under the "Condition" column, as seen below.
Disabling Rest Roles Access Control
By default, the Rest Roles Access Control feature is enabled. It can be disabled by setting the roles_access_control_enabled flag to false:
            [RolesAccessControl]
roles_access_control_enabled = true
Enabling Kerberos Authentication
By default, Kerberos Authentication is disabled. To enable it, set the kerberos_auth_enabled flag to true. Additionally, provide the required configurations such as kerberos_cred_key_path, kerberos_use_local_name and kerberos_auto_sign_up.
            [KerberosAuth]
# This section responsible to manage kerberos authentication
# Set to true to enable the kerberos auth feature, and set to false to disable it. Default is false.
kerberos_auth_enabled = false
# The path of the keytab file containing credentials for GSSAPI authentication.
kerberos_cred_key_path = /etc/kadm5.keytab
# Set to true to configure the Apache server to map authenticated principal names (which represent different clients) to local usernames,
# and set to false to use the principle names as usernames. Default is true (this value will be reflected in the 'GssapiLocalName' directive in Apache).
kerberos_use_local_name = true
# Set to true to enable auto sign up of users who do not exist in UFM DB. Default is true.
kerberos_auto_sign_up = true
# The default role assigned to create users if they do not exist when 'kerberos_auto_sign_up' is set to true.
kerberos_default_role = System_Admin
kerberos_auth_enabled: By default, Kerberos authentication remains disabled. To activate it, the user must set this flag to 'true' and then restart UFM.
kerberos_cred_key_path: This specifies the path to the keytab file containing credentials for GSSAPI authentication.
kerberos_use_local_name: Set to true to configure the Apache server to map authenticated principal names (which represent different clients) to local usernames, and set to false to use the principal names as usernames. Default is true (this value will be reflected in the 'GssapiLocalName' directive in Apache).
kerberos_auto_signup: For successful authentication via Kerberos, the user must already exist within the UFM database, otherwise, the authentication will be refused by UFM. If this property is set to 'true,' UFM will create the non-existing users in the UFM DB.
kerberos_default_role: The default role is assigned to create users if they do not exist when 'kerberos_auto_sign_up' is set to true.
Finally, restart the UFM to use Kerberos authentication.
Enabling UFM Authentication Server
By default, UFM Authentication Server is inactive. To activate it, you need to set the "auth_service_enabled" parameter to 'true' and then restart the UFM service to initiate the authentication server. Additionally, you can use enable/disable flags for Basic, Session, and Token authentication:
            [AuthService]
auth_service_enabled = true
auth_service_interface = 127.0.0.1
auth_service_port = 8087 # the serving port for the authentication server
basic_auth_enabled = true
session_auth_enabled = true
token_auth_enabled = true
Enabling Azure AD Authentication
By default, Azure AD Authentication is disabled. To enable it, set the azure_auth_enabled flag to 'true'. Additionally, provide the required configurations from the Azure AD Application such as TENANT_ID, CLIENT_ID and CLIENT_SECRET which can be found under the "Overview" section of the registered application in the Azure portal. Finally, the UFM Authentication Server should be enabled to use the Azure AD Authentication.
            [AzureAuth]
azure_auth_enabled = false
# TENANT ID of app registration
TENANT_ID =
# Application (client) ID of app registration
CLIENT_ID =
# Application's generated client secret
CLIENT_SECRET =
Setting up telemetry deploys UFM Telemetry as bare metal on the same machine. Historical data is sent to SQLite database on the server and live data becomes available via UFM UI or REST API.
Enabling UFM Telemetry
The UFM Telemetry feature is enabled by default and the provider is the UFM Telemetry. The user may change the provider via flag in conf/gv.cfg
The user may also disable the History Telemetry feature in the same section.
            [Telemetry]
history_enabled=True
Changing UFM Telemetry Default Configuration
There is an option to configure parameters on a telemetry configuration file which takes effect after restarting the UFM or failover in HA mode.
The launch_ibdiagnet_config.ini default file is located under /opt/ufm/conf/telemetry_defaults and is copied to the telemetry configuration location ( (/opt/ufm/conf/telemetry) upon startup UFM.
All values taken from the default file take effect at the deployed configuration file except for the following:
Note that normally the user does not have to do anything and they get two pre-configured instances – one for low frequency and one for higher-frequency sampling of the network.
|
Value |
Description |
|
hca |
- |
|
scope_file |
- |
|
plugin_env_PROMETHEUS_ENDPOINT |
The port on which HTTP endpoint is configured |
|
plugin_env_PROMETHEUS_INDEXES |
Configures how data is indexed and stored in memory |
|
config_watch_enabled=true |
Configures network watcher to inform ibdiagnet that network topology has changed (as ibdiagnet lacks the ability to re-discover network changes) |
|
plugin_env_PROMETHEUS_CSET_DIR |
Specifies where the counterset files, which define the data to be retrieved and the corresponding counter names. |
|
num_iterations |
The number of iterations to run before ‘restarting’, i.e. rediscovering fabric. |
|
plugin_env_CLX_RESTART_FILE |
A file that is ‘touched’ to indicate that an ibdiagnet restart is necessary |
The following attributes are configurable via the gv.cfg:
sample_rate (gv.cfg → dashboard_interval) – only if manual_config is set to false
prometheus_port
Supporting Generic Counters Parsing and Display
As of UFM v6.11.0, UFM can support any numeric counters from the HTTP endpoint. The list of supported counters are fetched upon starting the UFM from all the endpoints that are configured.
Some of the implemented changes are as follows:
Counter naming – all counters naming convention is extracted from the HTTP endpoint. The default cset file is configured as follows:
“Infiniband_LinkIntegrityErrors=^LocalLinkIntegrityErrorsExtended$” to get this name to the UFM.
Counters received as floats should contain an "_f" suffix such as: Infiniband_CBW_f=^infiniband_CBW$Attribute units – To see units of a specific counter on the UI graphs, configure the cset file to have the counter returned as “counter_name_u_unit”.
Telemetry History:
The SQLite history table (/opt/ufm/files/sqlite/ufm_telemetry.db – telemetry_calculated), contains the new naming convention of the telemetry counters.In the case of an upgrade, all previous columns that were configured are renamed following the new naming convention, and then, the data is saved.if a new counter that is not in the table needs to be supported, the table is altered upon UFM start.
New counter/cset to fetch – if there is a new cset/counter that needs to be supported AFTER the UFM already started, preform system restart.
Created New API/UfmRestV2/telemetry/counters for the UI visualization. This API returns a dictionary containing the counters that the UFM supports, based on the fetched URLs and their units (if known).
Supporting Multiple Telemetry Instances Fetch
This functionality allows users to establish distinct Telemetry endpoints that are defined to their preferences.
Users have the flexibility to set the following aspects:
Specify a list of counters they wish to pull. This can be achieved by selecting from an existing, predefined counters set (cset file) or by defining a new one.
Set the interval at which the data should be pulled.
Upon initiating the Telemetry endpoint, users can access the designated URL to fetch the desired counter data.
To enable this feature, under the [Telemetry] section in gv.cfg,the flag named “additional_cset_url” holds the list of additional URLs to be fetched.
the URLs should be separated by “ “ (with a space) and should follow the following format: http://<IP>:<PORT>/csv/<CSET_NAME>. For example http://10.10.10.10:9001/csv/minimal http://10.10.10.10:9002/csv/test.
Only csv extensions are supported.
Each UFM Telemetry instance run by UFM can support multiple cset (counters set) in parallel.If the user would like to have a second cset file fetched by UFM and exposed by the same UFM Telemetry instance, the new cset file should be placed under /opt/ufm/files/conf/telemetry/prometheus_configs/cset/ and configured in gv.cfg to fetch its data as described above.
Secondary Telemetry
As a default configuration, a second UFM Telemetry instance runs, granting access to an extended set of counters that are not available in the default telemetry session. The default telemetry session is used for the UFM Web UI dashboard and user-defined telemetry views. These additional counters can be accessed via the following API endpoint: http://<UFM_IP>:9002/csv/xcset/low_freq_debug. It is important to note that these exposed counters are not accessible through UFM's REST APIs.All the configurations for the second telemetry can be found under /opt/ufm/files/conf/secondary_telemetry/, where the defaults are located under /opt/ufm/files/conf/secondary_telemetry_defaults/. The second telemetry instance also allows telemetry data to be exposed on disabled ports, although this feature can be disabled if desired.
The relevant flags in the gv.cfg file are as follows:
secondary_telemetry = true (To enable or disable the entire feature)
secondary_endpoint_port = 9002 (The endpoint's exposed port)
secondary_disabled_ports = true (If set to true, secondary telemetry will expose data on disabled ports)
secondary_slvl_support = false (if set to true, secondary telemetry will collect counters per slvl, the corresponding supported xcset can be found under /opt/ufm/files/conf/secondary_telemetry/prometheus_configs/cset/low_freq_debug_per_slvl.xcset)
The counters that are supported by default, collected, and exposed can be located in the directory /opt/ufm/files/conf/secondary_telemetry/prometheus_configs/cset/low_freq_debug_per_slvl.xcset.
For the list of secondary telemetry fields and available counters, please refer to Appendix – Secondary Telemetry Fields.
Secondary Telemetry Exposing IPv6 Counters
To allow the secondary telemetry instance to expose counters on its IPv6 interfaces, perform the following:
Change the following flag in the gv.cfg:
secondary_ip_bind_addr =
0:0:0:0:0:0:0:0Restart UFM telemetry or restart UFM.
Stopping Telemetry Endpoint Using CLI Command
To stop secondary telemetry endpoint only using the CLI you may run the following command:
/etc/init.d/ufmd ufm_telemetry_secondary_stop
Exposing Switch Aggregation Nodes Telemetry
To expose switches SHARP aggregation nodes telemetry, follow the below steps:
Configure the secondary telemetry instance. Run:
vi /opt/ufm/files/conf/secondary_telemetry_defaults/launch_ibdiagnet_config.ini
Set the following:
arg_16=--sharp --sharp_opt dsc
plugin_env_CLX_EXPORT_API_SKIP_SHARP_PM_COUNTERS=0
Add the wanted attributes to the default xcset or to a new one:
New xcset –
vi /opt/ufm/files/conf/secondary_telemetry/prometheus_configs/cset/<name
foryour choise>.xcsetAfter restarting, query curl http://<UFM_IP>:9002/csv/xcset/<chosen_name>
Existing xcset –
vi /opt/ufm/files/conf/secondary_telemetry/prometheus_configs/cset/low_freq_debug.xcset
Add the following attributes:
packet_sent
ack_packet_sent
retry_packet_sent
rnr_event
timeout_event
oos_nack_rcv
rnr_nack_rcv
packet_discard_transport
packet_discard_sharp
aeth_syndrome_ack_packet
hba_sharp_lookup
hba_received_pkts
hba_received_bytes
hba_sent_ack_packets
rcds_sent_packets
hba_sent_ack_bytes
rcds_send_bytes
hba_multi_packet_message_dropped_pkts
hba_multi_packet_message_dropped_bytes
Restart telemetry:
/etc/init.d/ufmd ufm_telemetry_stop
/etc/init.d/ufmd ufm_telemetry_start