Running UFM Server Software
Perform initial configuration.
Ensure that all ports used by the UFM server for internal and external communication are open and available. For the list of ports, see Used Ports.
You can run the UFM server software in the following modes:
Management
Monitoring
High Availability
High Availability with failover to an external SM
In Management or High Availability mode, ensure that all Subnet Managers in the fabric are disabled before running UFM. Any remaining active Subnet Managers will prevent UFM from running.
After installing, run the UFM Server by invoking:
systemctl start ufm-enterprise.service
/etc/init.d/ufmd - Available for backward compatibility.
Log files are located under /opt/ufm/files/log (the links to log files are in /opt/ufm/log).
On the Master server, run the UFM Server by invoking:
ufm_ha_cluster start
You can specify additional command options for the ufmha service.
ufm_ha_cluster Command Options
|
Command |
Description |
|
start |
Starts UFM HA cluster. |
|
stop |
Stops UFM HA cluster. |
|
failover |
Initiates failover (change mastership from local server to remote server). |
|
takeover |
Initiates takeover (change mastership from remote server to local server). |
|
status |
Shows current HA cluster status. |
|
cleanup |
Cleans the HA configurations on this node. |
|
help |
Displays help text. |
Run UFM in Monitoring mode while running concurrent instances of Subnet Manager on NVIDIA switches. Monitoring and event management capabilities are enabled in this mode. UFM non-monitoring features such as provisioning and performance optimization are disabled in this mode.
The following table describes whether features are enabled or disabled in Monitoring mode.
Features Enabled/Disabled in Monitoring Mode
|
Feature |
Enabled/Disabled in Monitoring Mode |
|
Fabric Discovery |
Enabled |
|
Topology Map |
Enabled |
|
Fabric Dashboard |
Enabled |
|
Fabric Monitoring |
Enabled |
|
Alerts and Thresholds (inc. SNMP traps) |
Enabled |
|
Fabric Logical Model |
Enabled |
|
Subnet Manager and plugins |
Disabled |
|
Subnet Manager Configuration |
Disabled |
|
Automatic Fabric Partitioning |
Disabled |
|
Central Device Management |
Disabled |
|
Quality of Service |
Disabled |
|
Failover (High Availability mode) |
Disabled |
|
Traffic Aware Routing Algorithm |
Disabled |
|
Device Management |
Disabled |
|
Integration with Schedulers |
Disabled |
|
Unhealthy Ports |
Disabled |
In Monitoring mode, UFM periodically discovers the fabric and updates the topology maps and database.
For Monitoring mode, connect UFM to the fabric using port ib0 only. The fabric must have a subnet manager (SM) running on it (on another UFM, HBSM, or switch SM).
When UFM is running in Monitoring mode, the internal OpenSM is not sensitive to changes in OpenSM configuration (opensm.conf).
When running in Monitoring mode, the following parameters are automatically
overwritten in the /opt/ufm/files/conf/opensm/opensm_mon.conf file on startup:
event_plugin_name osmufmpi
event_plugin_options --vendinfo -m 0
Any other configuration is not valid for Monitoring mode.
In the /opt/ufm/conf/gv.cfg configuration file:
Set monitoring_mode to yes
If required, change mon_mode_discovery_period (the default is 60 seconds)
Set reset_mode to no_reset
We recommend this setting when running multiple instances of UFM so that each port counter is not reset by different UFM instances. For more information, see Resetting Physical Port Counters.
2. Restart the UFM Server.
The Running mode is set to Monitoring, and the frequency of fabric discovery is updated according to the setting of mon_mode_discovery_period.
Note that a monitor icon will appear at the top of the navigation bar indicating that monitoring mode is enabled:
By default, UFM is configured to work with the secured HTTPS protocol.
After installation, the user can change the the Web Server configuration to communicate in secure (HTTPS) or non-secure (HTTP) protocol.
For changing the communication protocol, use the following parameter under the [Server] section in the gv.cfg file:
ws_protocol = https
Changes will take effect after restarting UFM.
For further information, please refer to the Launching a UFM Web UI Session available in the UFM Quick Start Guide.
UFM uses Apache as the main Web Server for client external access. The UFM uses an internal web server process to where the Apache forwards the incoming requests.
By default, the internal web server listens to the local host interface (127.0.0.1) on port 8000.
For changing the listening local interface or port, use the following parameters under the [Server] section in the gv.cfg file:
rest_interface = 127.0.0.1
rest_port = 8000
Changes will take effect after restarting UFM.
UFM User Authentication is based on standard Apache User Authentication. Each Web Service client application must authenticate against the UFM server to gain access to the system.
The UFM software comes with one predefined user:
Username: admin
Password: 123456
You can add, delete, or update users via User Management Tab.
The UFM Authentication Server, a centralized HTTP server, is responsible for managing various authentication methods supported by UFM.
Configurations of the UFM Authentication Server
The UFM Authentication Server is designed to be configurable and is initially turned off by default. This means that existing authentication methods are managed either by the native Apache functionality (such as Basic, Session, and Client Certificate authentication) or at the UFM level (including Token-Based authentication and Proxy Authentication).
Enabling the UFM Authentication Server provides a centralized service that oversees all supported authentication methods within a single service, consolidating them under a unified authentication API.
Apache utilizes the authentication server's APIs to determine a user's authentication status.
To enable the UFM Authentication Server, refer to Enabling UFM Authentication Server.
All activities of the UFM Authentication Server are logged in the authentication_service.log file, located at /opt/ufm/files/log.
Microsoft Azure Authentication is a service provided by Microsoft Azure, the cloud computing platform of Microsoft. It is designed to provide secure access control and authentication for applications and services hosted on Azure.
UFM supports Authentication using Azure Active Directory, and to do so, you need to follow the following steps:
Register UFM in Azure AD Portal
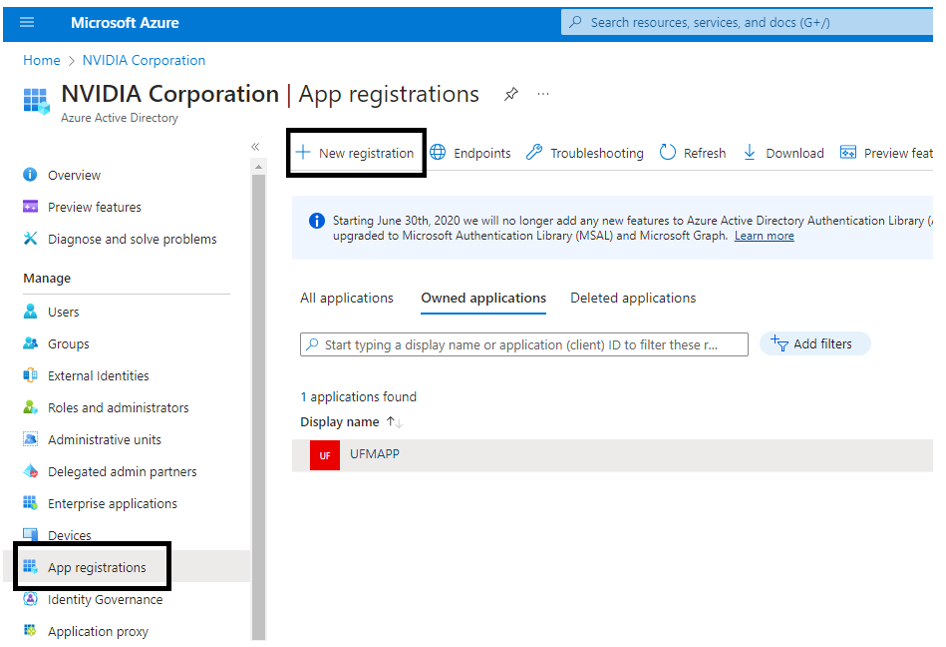
To log in via Azure, UFM must be registered in the Azure portal using the following steps:
Log in to Azure Portal, then click "Azure Active Directory" in the side menu.
If you have access to more than one tenant, select your account in the upper right. Set your session to the Azure AD tenant you wish to use.
Under "Manage" in the side menu, click App Registrations > New Registration.
Provide the application details:
Name: Enter a descriptive name.
Supported account types: Account types that are allowed to login and use the registered application.
- Redirect URL: select the app type Web, and Add the following redirect URL https://
/auth/login 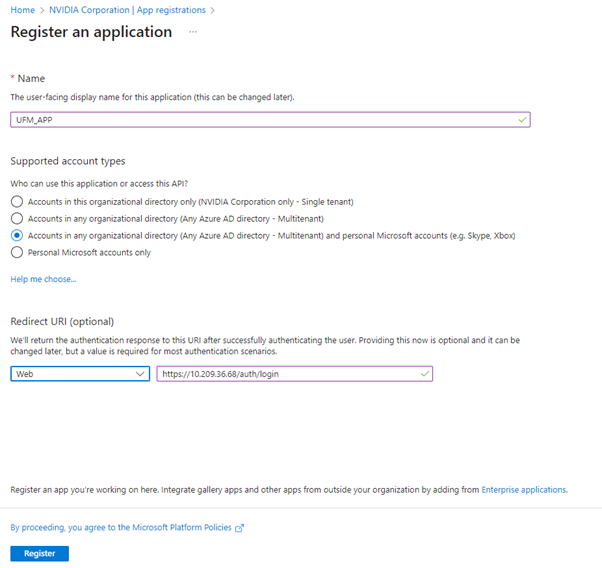
Then, click Register. The app’s Overview page opens.
Under Manage in the side menu, click Certificates & Secrets > New client secret.
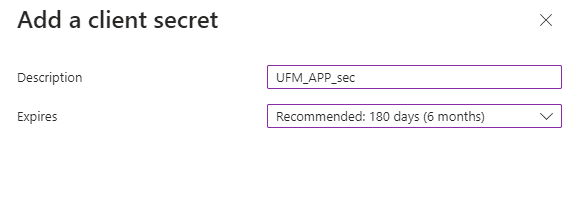
Provide a description for the client secret and set an expiration time, then click "Add."
Copy the client secret key value which will be needed to configure the UFM with Azure AD (Please note that the value of the generated secret will be hidden and will not be able to be copied/read after you leave the page.
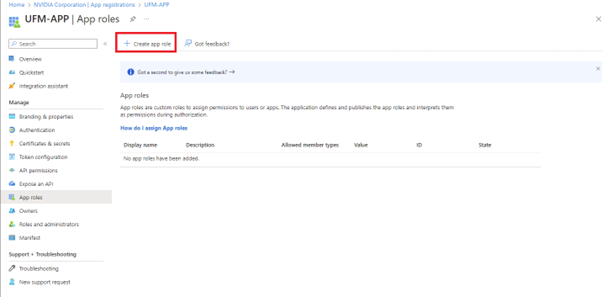
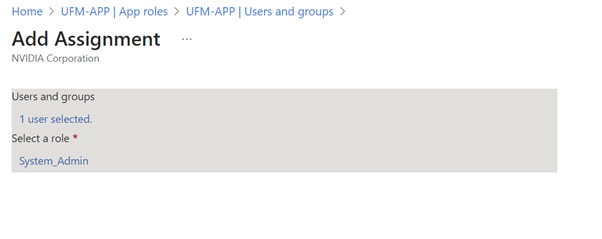
Under "Manage" in the side menu, click App roles > Create app role.
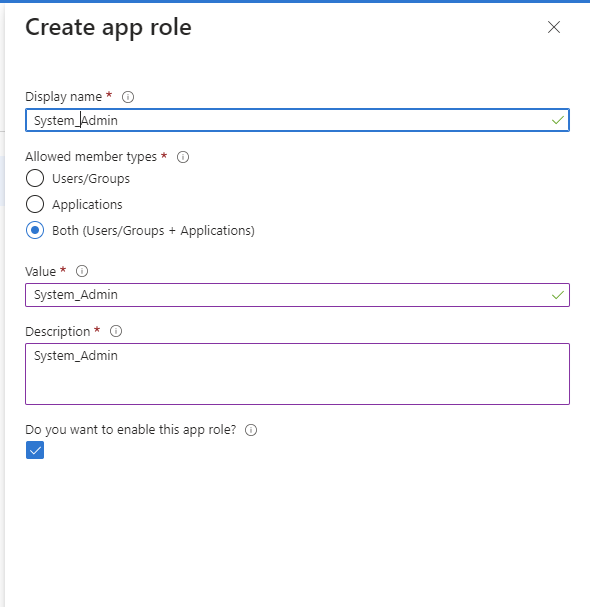
Provide the role details. Please note that the role value must be a valid UFM role; otherwise, the login will fail.
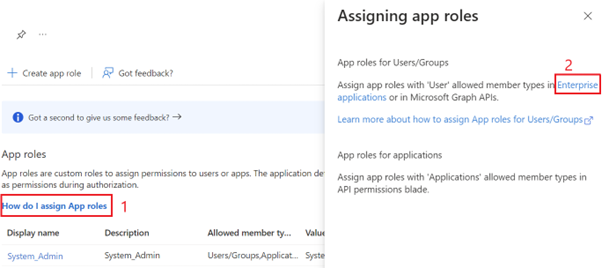
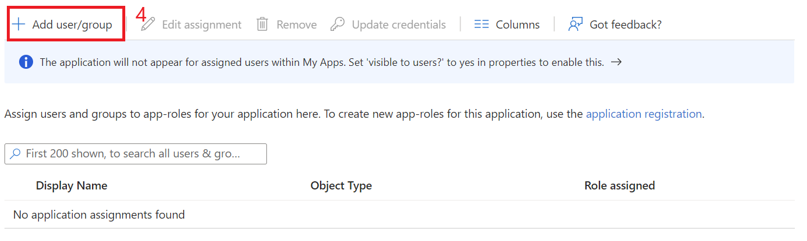
Assign the created role to the user. Follow the below steps:
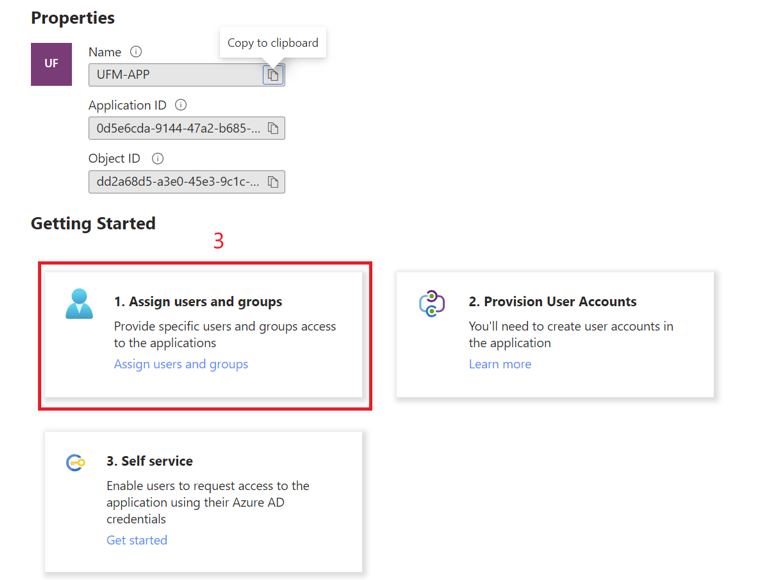
Click on "Overview" in the side menu to view the application information, such as tenant ID, client ID, and other details.
Enable Azure Authentication From UFM
Azure authentication is disabled by default. To enable it, please refer to Enabling Azure AD Authentication.
Azure Authentication Login Page
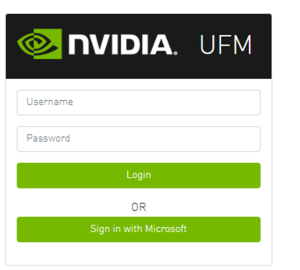
After enabling and configuring Azure AD authentication, an additional button will appear on the primary UFM login page labeled 'Sign In with Microsoft,' which will leads to the main Microsoft sign-in page:
Kerberos Authentication
Kerberos is a network authentication protocol designed to provide strong authentication for client-server applications by using secret-key cryptography.
The Kerberos protocol works on the basis of tickets, it helps ensure that communication between various entities in a network is secure. It uses symmetric-key cryptography, which means both the client and servers share secret keys for encrypting and decrypting communication.
To enable Kerberos Authentication, refer to Enabling Kerberos Authentication.
Setting Up Kerberos Server Machine
To set up a system as a Kerberos server, perform the following:
Install the required packages:
            #Redhat
sudo yum install krb5-libs krb5-server
# Ubuntu
sudo apt-get install krb5-kdc krb5-admin-server
Edit the Kerberos configuration file ‘/etc/krb5.conf’ to reflect your realm, domain and other settings:
            [libdefaults]
    default_realm = YOUR-REALM

[realms]
    YOUR-REALM = {
        kdc = your-kdc-server
        admin_server = your-admin-server
    }

[domain_realm]
    your-domain = YOUR-REALM
    your-domain = YOUR-REALM
Use the kdb5_util command to create the Kerberos database:
kdb5_util create -r YOUR-REALM -s
Add administrative principals:
Kadmin.local addprinc -randkey HTTP/YOUR-HOST-NAME
@YOUR-REALMStart KDC and Kadmin services:
            sudo systemctl start krb5kdc kadmin
sudo systemctl enable krb5kdc kadmin
Generate a keytab file. The keytab file contains the secret key for a principal and is used to authenticate the service.
kadmin.local ktadd -k /path/to/your-keytab-file HTTP/YOUR-HOST-NAME
@YOUR-REALMReplace /path/to/your-keytab-file with the actual path where you want to store the keytab file.
Setting Up Kerberos Client Machine
Follow the below steps to set up a system as a Kerberos client.
Install the required packages. When installing the UFM, the following packages will be installed as dependencies:
            #Redhat
krb5-libs krb5-workstation mod_auth_gssapi
# Ubuntu
krb5-config krb5-user libapache2-mod-auth-gssapi
Configure the /etc/krb5.conf file to reflect your realm, domain, local names map and other settings:
            [libdefaults]
    default_realm = YOUR-REALM

[realms]
    YOUR-REALM = {
        kdc = your-kdc-server
        admin_server = your-admin-server
        auth_to_local_names = {
            your-principle-name = your-local-user
        }

    }

[domain_realm]
    your-domain = YOUR-REALM
    your-domain = YOUR-REALM
Copy the keytab file from the Kerberos server to the machine where your service runs (the client). It is important to ensure that it is kept confidential.
Please ensure that the keytab file exists and that Apache has the necessary read permissions to access the keytab file; otherwise, Kerberos authentication will not function properly.Obtain a Kerberos ticket-granting ticket (TGT):
kinit -k -t /path/to/your-keytab-file HTTP/YOUR-HOST-NAME
@YOUR-REALMEnable Kerberos Authentication from UFM. Kerberos authentication is disabled by default. To enable it, please refer to Enabling Kerberos Authentication.
Test the Kerberos Authentication. You can use curl to test whether the user can authenticate to UFM REST APIs using Kerberos.
curl --negotiate -i -u : -k
'https://ufmc-eos01/ufmRestKrb/app/tokens'
UFM license is subscription-based featuring the following subscription options:
1-year subscription
3-year subscription
5-year subscription
Evaluation 30-day trial license
UFM will continue to support old license types, but they are no longer available to obtain.
2 months before the expiration of your subscription license, UFM will warn you that your license will expire soon. After the subscription expires, UFM will continue to work with the expired license for two months beyond its expiration.
During this extra two-month period, UFM will generate a critical alarm indicating that the UFM license has expired and that you need to renew your subscription. Failing to do so within that 2-month period activates UFM Limited Mode. Limited mode blocks all REST APIs and access to the UFM web UI.
UFM enables functionality based on the license that was purchased and installed. This license determines the functionality and the maximum allowed number of nodes in the fabric.
To renew your UFM subscription, purchase a new license and install the new license file by downloading the license file to a temp directory on the UFM master server and then copying the license file to /opt/ufm/files/licenses/ directory.
UFM may not detect new license files if downloaded directly to /opt/ufm/files/licenses. If UFM does not detect the new license file, a UFM restart may be required.
If several licenses are installed on the server (more than one license file exists under /opt/ufm/files/licenses/), UFM uses only the strongest license and takes into consideration the expiration date, and the managed device limits on it, regardless of any other licenses that may exist on the server.
For instructions on how to view your license, please refer to the UFM Quick Start Guide.
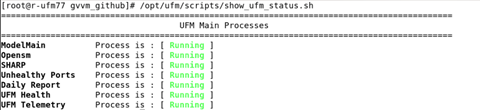
This functionality allows users to view the current status of main processes handled by the UFM.
To view the main UFM processes, run the script show_ufm_status.sh under the /opt/ufm/scripts.Example: /opt/ufm/scripts/show_ufm_status.sh
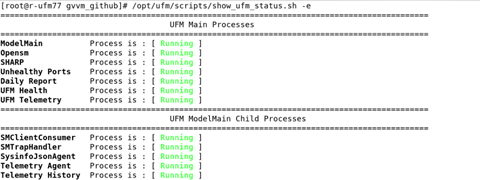
To view the UFM main and child processes, run the script show_ufm_status.sh with –e (extended_processes).
Example: /opt/ufm/scripts/show_ufm_status.sh -e