TAO Toolkit CV Inference Pipeline Quick Start Scripts
This page describes how to use the TAO Toolkit CV Inference Pipeline Quick Start Scripts after the Installation Prerequisites are installed.
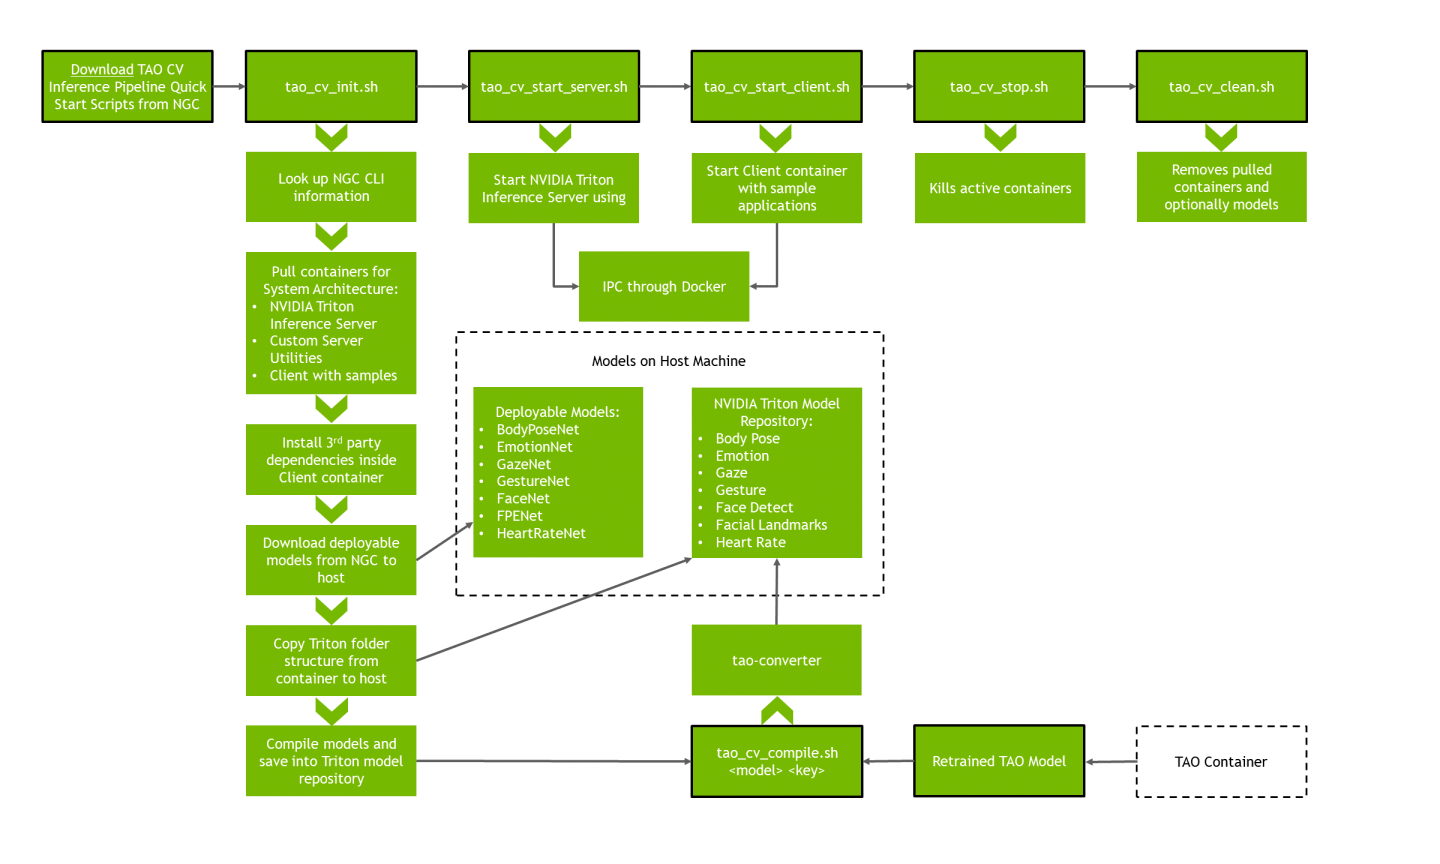
The Quick Start Scripts hide container downloads, updates, model compilation, and more. Here is a flow diagram of the Quick Start process:
First, navigate to the directory that houses the scripts and ensure that they are executable:
            cd scripts
chmod +x *.sh
All the scripts should be executed within this scripts directory.
These scripts will automatically pull containers and models for x86 or aarch64 (Jetson).
General configuration for the containers deployed using the Quick Start Scripts
can be viewed in the config.sh file.
By default, the configuration file is set to launch all available containers
on the supported GPU, which is selected automatically based on the system architecture.
If you would like to use a video handle, ensure your video device handle
(for example, /dev/video0) has been entered in config.sh to make it
discoverable to the relevant Client container.
Make note of the resolutions and FPS support for your video handle (e.g. using
the command v4l2-ctl --list-formats-ext).
Models are automatically downloaded to the host machine at the location
(absolute path) specified by the variable models_location inside the config.sh.
This location becomes important in the context of retraining and replacing the TensorRT models.
By default, deployable TAO models come encrypted with their own keys. The keys listed in the config are specific to these models and do not need to be modified unless a user wishes to work with retrained and re-encrypted TAO models.
The config.sh file contains a field to specify a volume mount for the sample
applications. This would be useful in the case of a user wanting to modify
applications and saving that new source to the host machine as opposed to the
container (which if exited can result in loss of modifications).
All of the configuration options are documented within the configuration file itself.
The NVIDIA Triton server will be listening/broadcasting on ports 8001
for gRPC, 8000 for HTTP, and 8002 for Triton metrics.
Run the following:
bash tao_cv_init.sh
The tao_cv_init.sh script will pull all the relevant containers and models
to the machine. It will also download specific 3rd party dependencies to our client
container.
Successful completion of this download will result in the following:
[INFO] Finished pulling containers and models
The script will then compile the TAO models into TensorRT models to deploy for the NVIDIA Triton Server. This step will take up to 10 minutes as it compiles all the TAO models for the Inference Pipeline. Upon successful completion, you will see the following:
[INFO] SUCCESS: Proceed to 'tao_cv_start_server.sh'
Run the following:
bash tao_cv_start_server.sh
This will launch the NVIDIA Triton Server for inference requests. To verify that the server has started correctly, you can check if the output shows the following:
            +----------------------------------+---------+-------------+
| Model                            | Version | Status      |
+----------------------------------+---------+-------------+
| bodypose_384x288_ensemble_tlt    | -       | READY       |
| bodypose_384x288_postprocess_tlt | 1       | READY       |
| bodypose_384x288_tlt             | 1       | READY       |
| emotionmlp_tlt                   | 1       | READY       |
| facedetect_ensemble_tlt          | 1       | READY       |
| facedetect_postprocess_tlt       | 1       | READY       |
| facedetect_tlt                   | 1       | READY       |
| faciallandmarks_tlt              | 1       | READY       |
| gaze_facegrid_tlt                | 1       | READY       |
| hcgesture_tlt                    | 1       | READY       |
| heartrate_two_branch_tlt         | 1       | READY       |
+----------------------------------+---------+-------------+

...

I0428 23:20:38.955865 1 grpc_server.cc:3979] Started GRPCInferenceService at 0.0.0.0:8001
I0428 23:20:38.957249 1 http_server.cc:2717] Started HTTPService at 0.0.0.0:8000
I0428 23:20:38.999728 1 http_server.cc:2736] Started Metrics Service at 0.0.0.0:8002
To stop the server, use ctrl-c in the relevant terminal.
Next, in another terminal, run the following:
bash tao_cv_start_client.sh
This will open an interactive container session with sample applications and all the necessary libraries. For more information regarding the Inference Pipeline sample applications, refer to Running and Building Sample Applications.
To stop active containers, run the following:
bash tao_cv_stop.sh
To clean your machine of containers and/or models that were downloaded at init, run and follow the prompts:
bash tao_cv_clean.sh
A utility script tao_cv_compile.sh is provided to simplify the deployment of
TAO models into the Inference Pipeline. The models are downloaded to the host
system in the models_location specified in config.sh. Simply replace the
default “deployable” model with the newly-trained ETAO model in the respective
tao_*/ folder while preserving the name, and run one of the commands in
the next section for the new model.
For ease of use, save the encoding key beforehand:
export ENCODING_KEY=<key>
Remember to rename the new TAO model to the default and already present model.
Default encoding keys for the original deployable TAO models exist in config.sh.
The NVIDIA Triton Server points to the models_location, so during the next
tao_cv_start_server.sh call, the newly deployed TensorRT model will serve
inferences.
Body Pose Estimation
Let us say we have a new body pose estimation TAO model that we would like to deploy for int8 or fp16 inference. Follow these steps to deploy it into the TAO Toolkit CV Inference Pipeline:
Stop the Triton Server using
ctrl-c.Enter the Quick Start Scripts folder, use
sourceonconfig.sh, and change directories into the model location:source config.sh pushd ${models_location}/bodyposenet_v${tao_model_version_bodypose}
Add the new TAO model in this folder and name it
model.etlt.(Optional) For int8 calibration, place the calibration file in this same folder and name it
calibration.bin.Change the directory back to the Quick Start scripts folder and run the following, which uses the
tao-converterto generate a TensorRT model that will work with the Inference Pipeline.Choose which command to execute based on the existence of the calibration file or preference. Since the width and height of BodyPoseNet is flexible, one can alter the defaults using the
-wand-hflags. Refer to Body Pose Estimation Configuration section for more details on further steps when modifying the default values.popd bash tao_cv_compile.sh -m bodypose_int8 -k $ENCODING_KEY -w 384 -h 288 bash tao_cv_compile.sh -m bodypose_fp16 -k $ENCODING_KEY -w 384 -h 288
This will automatically drop the TensorRT model into the Triton Server models location. Ensure that the conversion is successful.
Start the Triton Server again and ensure the startup is successful.
            +----------------------------------+---------+------------------------------------------+
| Model                            | Version | Status                                   |
+----------------------------------+---------+------------------------------------------+
| ...                              | ...     | ...                                      |
| bodypose_384x288_ensemble_tlt    | 1       | READY                                    |
| bodypose_384x288_postprocess_tlt | 1       | READY                                    |
| bodypose_384x288_tlt             | 1       | READY                                    |
| ...                              | ...     | ...                                      |
Note that this deployment will overwrite any previous model.plan that exists in this
folder in the model repository, and that this location is shared between the int8 and fp16 versions.
Body Pose Estimation Configuration
The BodyPoseNet TAO model can be converted with a wide set of width and height parameters. Refer to the training documentation for constraints.
Using the Quick Start script tao_cv_compile.sh, the width and height flags simplify this conversion
step. Let us say we want to have a smaller network input size of width = 320 and height = 224.
The first step is to copy the default configurations in Triton to their own folders with different shape for easier maintainability:
            source config.sh
pushd ${models_location}/triton_model_repository/repository
cp -r bodypose_384x288_ensemble_tlt bodypose_320x224_ensemble_tlt
cp -r bodypose_384x288_postprocess_tlt bodypose_320x224_postprocess_tlt
cp -r bodypose_384x288_tlt bodypose_320x224_tlt
Next, we must modify the config.pbtxt files for these newly created Triton folders:
Use a text editor to modify the ensemble config with a simple find-and-replace of the default width and height:
            sed -i 's/384/320/g' bodypose_320x224_ensemble_tlt/config.pbtxt
sed -i 's/288/224/g' bodypose_320x224_ensemble_tlt/config.pbtxt
If you would like to perform this manually, the following would need the substitutions:
The name of the model
The input shape, which should be [Height, Width, Channel]
The ensemble schedule for the TensorRT model name
The ensemble schedule for the postprocess model name
Use a text editor to modify the TensorRT config, using a simple find-and-replace for the default width and height and a manual update for the output shapes.
            sed -i 's/384/320/g' bodypose_320x224_tlt/config.pbtxt
sed -i 's/288/224/g' bodypose_320x224_tlt/config.pbtxt
If you would like to perform this manually, the following would need the substitutions:
The name of the model
The input shape, which should be [Height, Width, Channel]
Next, you need to perform the manual calculation of the output dimensions:
vim bodypose_320x224_tlt/config.pbtxt
The network output
conv2d_transpose_1/BiasAdd:0will have dimension[Network_Input_Height/2, Network_Input_Width/2, 38]. The network outputheatmap_out/BiasAdd:0will have dimension[Network_Input_Height/8, Network_Input_Width/8, 19].This would become
[224/2, 320/2, 38]and[224/8, 320/8, 19]respectively. The final configuration is[112, 160, 38]and[28, 40, 19]respectively.Use a text editor to modify the postprocess config, using a simple find-and-replace for the default width and height and a manual update for the input shapes.
            sed -i 's/384/320/g' bodypose_320x224_postprocess_tlt/config.pbtxt
sed -i 's/288/224/g' bodypose_320x224_postprocess_tlt/config.pbtxt
If you would like to perform this manually, the following would need the substitutions:
The name of the model
Next, you need to perform the same manual calculation for the postprocess input dimensions.
vim bodypose_320x224_postprocess_tlt/config.pbtxt
The dimensions for the input
input_pafmapcorrespond to the previousconv2d_transpose_1/BiasAdd:0. The dimensions for the inputinput_heatmapcorrespond to the previousheatmap_out/BiasAdd:0. The input dimensions would look like the following:input [ { name: "input_pafmap" data_type: TYPE_FP32 dims: [112, 160, 38] }, { name: "input_heatmap" data_type: TYPE_FP32 dims: [28, 40, 19] } ]
With the configuration for Triton complete, you can move on to compiling the model.
Assuming you have trained a model and obtained a calibration file per the prior instructions, you can compile the model as follows:
            popd
bash tao_cv_compile.sh -m bodypose_int8 -k $ENCODING_KEY -w 320 -h 224
This will automatically populate a directory bodypose_320x224_tlt/1/model.plan in the ${models_location}.
You can start the Triton Server. You should see the desired models ready for inference:
            +----------------------------------+---------+------------------------------------------+
| Model                            | Version | Status                                   |
+----------------------------------+---------+------------------------------------------+
| ...                              | ...     | ...                                      |
| bodypose_320x224_ensemble_tlt    | 1       | READY                                    |
| bodypose_320x224_postprocess_tlt | 1       | READY                                    |
| bodypose_320x224_tlt             | 1       | READY                                    |
| ...                              | ...     | ...                                      |
Lastly, before running the sample application with this newly shaped model, you must modify a configuration file in the client container. Refer to the section Running the Body Pose Estimation Sample for more details.
Emotion
Follow these steps deploy a new emotion TAO model into the TAO Toolkit CV Inference Pipeline:
Stop the Triton Server using
ctrl-c.Enter the Quick Start Scripts folder, use
sourceonconfig.sh, and change directories into the model location:source config.sh pushd ${models_location}/emotionnet_v${tao_model_version_emotion}
Replace the default TAO model in this location and rename it so that the new TAO model will be named “model.etlt”.
Run the following script, which uses
tao-converterto generate a TensorRT model that will work with the Inference Pipeline:popd bash tao_cv_compile.sh -m emotion -k $ENCODING_KEY
This will automatically drop the TensorRT model into the Triton Server model location. Ensure that the conversion is successful.
Start the Triton Server again and ensure the startup is successful.
Face Detect (Pruned and Quantized)
Let us say we have a new face detect pruned and quantized TAO model to deploy for int8 inference. Follow these steps to deploy it into the TAO Toolkit CV Inference Pipeline:
Stop the Triton Server using
ctrl-c.Enter the Quick Start Scripts folder, use
sourceonconfig.sh, and change directories into the model location:source config.sh pushd ${models_location}/facenet_v${tao_model_version_facedetect_int8}
Replace the default TAO model in this location and rename it so that the new TAO model will be named
model.etlt.Replace the default TAO calibration file in this location and rename the new calibration file to “int8_calibration.txt”.
Change directory back to the Quick Start Scripts folder and run the following script, which uses
tao-converterto generate a TensorRT model that will work with the Inference Pipeline:popd bash tao_cv_compile.sh -m facedetect_int8 -k $ENCODING_KEY
This will automatically drop the TensorRT model into the Triton Server models location. Ensure that the conversion is successful.
Start the Triton Server again and ensure the startup is successful.
Note that this deployment will overwrite any previous model.plan that exists in the model repository,
and that this location is shared with the pruned-only Face Detect version.
Face Detect (Pruned)
Let us say we have a new face detect TAO model that is pruned only, and we would like to deploy it for fp16 inference. Follow these steps to deploy it into the TAO Toolkit CV Inference Pipeline:
Stop the Triton Server using
ctrl-c.Enter the Quick Start Scripts folder, use
sourceonconfig.sh, and change directories into the model location:source config.sh pushd ${models_location}/facenet_v${tao_model_version_facedetect_fp16}
Replace the default TAO model in this location and rename the new TAO model to
model.etlt.Change directory back to the Quick Start Scripts folder and run the following script, which uses
tao-converterto generate a TensorRT model that will work with the Inference Pipeline:popd bash tao_cv_compile.sh -m facedetect_fp16 -k $ENCODING_KEY
This will automatically drop the TensorRT model into the Triton Server models location. Ensure that the conversion is successful.
Start the Triton Server again and ensure the startup is successful.
Note that this deployment will overwrite any previous model.plan that exists in the model repository,
and that this location is shared with the pruned and quantized Face Detect version.
Facial Landmarks
Follow these steps to deploy a facial landmarks TAO model into the TAO Toolkit CV Inference Pipeline:
Stop the Triton Server using
ctrl-c.Enter the Quick Start Scripts folder, use
sourceonconfig.sh, and change directories into the model location:source config.sh pushd ${models_location}/fpenet_v${tao_model_version_faciallandmarks}
Replace the default TAO model in this location and rename the new TAO model to
model.etlt.Run the following script, which uses
tao-converterto generate a TensorRT model that will work with the Inference Pipeline:popd bash tao_cv_compile.sh -m faciallandmarks -k $ENCODING_KEY
This will automatically drop the TensorRT model into the Triton Server models location. Ensure that the conversion is successful.
By default, the TAO Toolkit CV Inference Pipeline assumes 80 landmarks from the TensorRT model.
For example, for a newly trained TAO model with 68 output landmarks,
you must modify the Triton configuration at ${models_location}/triton_model_repository/faciallandmarks_tlt/config.pbtxt.
Ensure that both outputs (not inputs) are changed to 68 (or the corresponding output of the new model).
Start the Triton Server again and ensure startup is successful.
Gaze
Follow these steps to deploy a new gaze TAO model into the TAO Toolkit CV Inference Pipeline:
Stop the Triton Server using
ctrl-c.Enter the Quick Start Scripts folder, use
sourceonconfig.sh, and change directories into the model location:source config.sh pushd ${models_location}/gazenet_v${tao_model_version_gaze}
Replace the default TAO model in this location and rename the new TAO model to
model.etlt.Run the following script, which uses
tao-converterto generate a TensorRT model that will work with the Inference Pipeline:popd bash tao_cv_compile.sh -m gaze -k $ENCODING_KEY
This will automatically drop the TensorRT model into the Triton Server models location. Ensure that the conversion is successful.
Start the Triton Server again and ensure the startup is successful.
Gesture
Follow these steps to deploy a new gesture TAO model into the TAO Toolkit CV Inference Pipeline:
Stop the Triton Server using
ctrl-c.Enter the Quick Start Scripts folder, use
sourceonconfig.sh, and change directories into the model location:source config.sh pushd ${models_location}/gesturenet_v${tao_model_version_gesture}
Replace the default TAO model in this location and rename the new TAO model to
model.etlt.Run the following script, which uses
tao-converterto generate a TensorRT model that will work with the Inference Pipeline:popd bash tao_cv_compile.sh -m gesture -k $ENCODING_KEY
This will automatically drop the TensorRT model into the Triton Server model location. Ensure that the conversion is successful.
We can start the Triton Server again and ensure the startup is successful.
Heart Rate
Follow these steps to deploy a new heart rate TAO model into the TAO Toolkit CV Inference Pipeline:
Stop the Triton Server by using
ctrl-c.Enter the Quick Start Scripts folder, use
sourceonconfig.sh, and change directories into the model location:source config.sh pushd ${models_location}/heartratenet_v${tao_model_version_heartrate}
Replace the default TAO model in this location and rename the new TAO model to
model.etlt.Run the following script, which uses
tao-converterto generate a TensorRT model that will work with the Inference Pipeline:popd bash tao_cv_compile.sh -m heartrate -k $ENCODING_KEY
This will automatically drop the TensorRT model into the Triton Server model location. Ensure that the conversion is successful.
Start the Triton Server again and ensure the startup is successful.