Tutorial: Brain Segmentation PyTorch
This tutorial shows how to import and use a PyTorch model in AIAA with Triton backend.
Follow Running AIAA to start your server.
Follow Convert PyTorch trained network to convert the example PyTorch model.
Write your own transforms that are missing from
Clara Train APIBelow are two specific transforms that you need for this tutorial. Put them inside a file called “transforms.py” and put that inside/workspace/lib/You can also download the file here:transforms.py.
            import logging
import numpy as np
import cv2

class MyLabelNPSqueeze(object):
  def __init__(self, label_in='model', label_out='model', dtype='uint8'):
    self.key_label_in = label_in
    self.key_label_out = label_out
    self.dtype = dtype

  def __call__(self, data):
    logger = logging.getLogger(self.__class__.__name__)

    label = data[self.key_label_in]
    logger.debug('Input Label Shape:{}'.format(label.shape))

    label = np.squeeze(label).astype(self.dtype)
    logger.debug('Output Label Shape:{}'.format(label.shape))

    data[self.key_label_out] = label
    return data

class MyOpenCVWriter(object):
  def __init__(self, image_in='model'):
    self.key_image_in = image_in

  def __call__(self, output_file, data):
    logger = logging.getLogger(self.__class__.__name__)
    # convert 0-1 back to 0-255
    image = data[self.key_image_in] * 255

    logger.debug('Saving Image{}to:{}'.format(image.shape, output_file))
    cv2.imwrite(output_file, image)
    return output_file
Prepare your configuration:
Now you have models and transforms ready, you should write a config.json file for AIAA to understand. Open a file named segmentation_2d_brain.json and write your configuration as follows. You can also download it here: segmentation_2d_brain.json.
            {
  "version": "3",
  "type": "segmentation",
  "labels": [
    "brain"
  ],
  "description": "2D segmentation training and evaluation examples to identify and segment the brain based on Unet model given in https://pytorch.org/hub/mateuszbuda_brain-segmentation-pytorch_unet/",
  "pre_transforms": [
    {
      "name": "LoadPng",
      "args": {
        "fields": "image"
      }
    },
    {
      "name": "ConvertToChannelsFirst",
      "args": {
        "fields": "image"
      }
    },
    {
      "name": "NormalizeNonzeroIntensities",
      "args": {
        "fields": "image"
      }
    }
  ],
  "inference": {
    "image": "image",
    "name" : "TRTISInference",
    "args": {
      "batch_size": 1
    },
    "node_mapping": {
      "INPUT__0": "image",
      "OUTPUT__0": "model"
    },
    "trtis": {
      "platform": "pytorch_libtorch",
      "max_batch_size": 1,
      "input": [
        {
          "name": "INPUT__0",
          "data_type": "TYPE_FP32",
          "dims": [3, 256, 256]
        }
      ],
      "output": [
        {
          "name": "OUTPUT__0",
          "data_type": "TYPE_FP32",
          "dims": [1, 256, 256]
        }
      ],
      "instance_group": [
        {
          "count": 1,
          "gpus": [ 0 ],
          "kind": "KIND_AUTO"
        }
      ]
    }
  },
  "post_transforms": [
    {
      "name":  "ThresholdValues",
      "args": {
        "fields": "model",
        "threshold": 0.5,
        "dtype": "uint8"
      }
    },
    {
      "name": "MyLabelNPSqueeze",
      "path": "transforms.MyLabelNPSqueeze",
      "args": {
        "label_in": "model",
        "label_out": "model"
      }
    }
  ],
  "writer": {
    "name": "MyOpenCVWriter",
    "path": "transforms.MyOpenCVWriter",
    "args": {
      "image_in": "model"
    }
  }
}
Upload the model:
Use the command below to load it in AIAA.
            # Import Model
curl -X PUT "http://127.0.0.1:$LOCAL_PORT/admin/model/segmentation_2d_brain" \
     -F "config=@segmentation_2d_brain.json;type=application/json" \
     -F "data=@unet.pt"
Call the APIs:
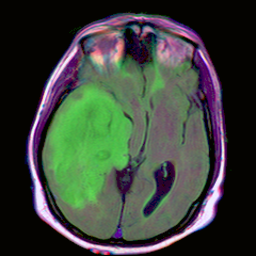
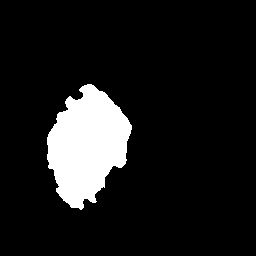
Now the model is loaded in AIAA and ready to serve. Type following commands in your linux machine and the result will be stored as result.png.
            # download example
wget https://github.com/mateuszbuda/brain-segmentation-pytorch/raw/master/assets/TCGA_CS_4944.png

# call segmentation API
curl -v -X POST "http://127.0.0.1:$LOCAL_PORT/v1/segmentation?model=segmentation_2d_brain&output=image" \
     -H "accept: multipart/form-data" \
     -H "Content-Type: multipart/form-data" \
     -F "params={}" \
     -F "image=@TCGA_CS_4944.png" \
     -o result.png
Verify the result. The input image is on the left while the result is on the right.