Developer Guide
NVIDIA DOCA Developer Guide
This document details the recommended steps to set up an NVIDIA DOCA development environment.
This guide is intended for software developers aiming to modify existing NVIDIA® DOCA applications or develop their own DOCA-based software.
For steps to install DOCA on NVIDIA® BlueField® DPU, refer to the NVIDIA DOCA Installation Guide for Linux. This guide focuses on the recommended flow for developing DOCA-based software, and will target the following environments:
- BlueField DPU is accessible and can be used during the development and testing process
- Working within a development container
- BlueField DPU is inaccessible, and the development happens on the host or on a different server
- Cross-compilation from the host
- Working within a development container on top of QEMU running on the host
It is recommended to follow the former case, leveraging the DPU during the development and testing process.
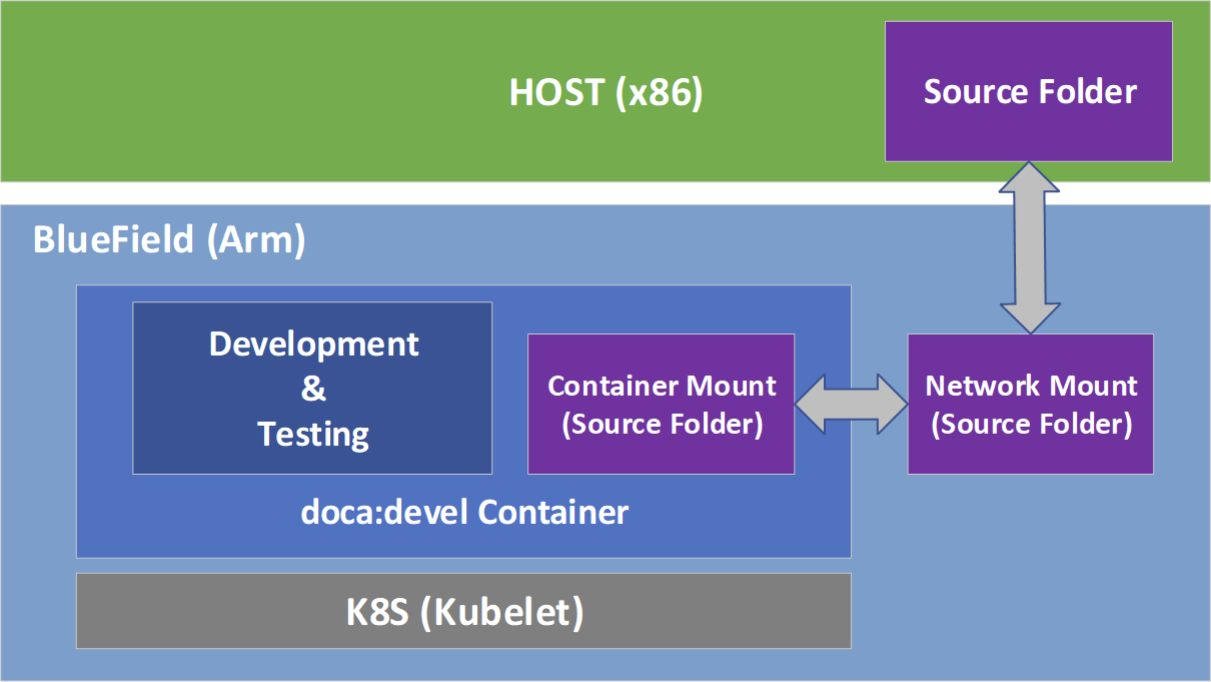
This guide recommends using DOCA's development container during the development process, whether it is on the DPU or on the host. Deploying development containers allows multiple developers to work simultaneously on the same device (host or DPU) in an isolated manner and even across multiple different DOCA SDK versions. This can allow multiple developers to work on the DPU itself, for example, without the need to have a dedicated DPU per developer.
Another benefit of this container-based approach is that the development container allows developers to create and test their DOCA-based software in a user-friendly environment that comes pre-shipped with a set of handy development tools. The development container is focused on improving the development experience and is designed for that purpose, whereas the BlueField software is meant to be an efficient runtime environment for DOCA products.
2.1. Setup
A DOCA development container is created as part of the DOCA base image containers and it is recommended that it is deployed on top of the DPU. The doca:devel container supports multiple deployment techniques and may be found on NGC. The complete instructions for deploying the DOCA container on the DPU can be found under the "DOCA Development Containers" section in the NVIDIA DOCA Container Deployment Guide.
The development container supports multiple deployment techniques. Refer to the "DOCA Development Containers" section in the NVIDIA DOCA Container Deployment Guide for more information.
The development container allows developers to develop and test their DOCA-based software in a developer-friendly environment that comes pre-shipped with a set of handy development tools. In contrast to the BlueField OS that is meant to be an efficient runtime environment for DOCA products, the development container is focused on improving the development experience and is designed for that purpose.
2.2. Development
It is recommended to do the development within the doca:devel container.
That said, some developers prefer different integrated development environments (IDEs) or development tools, and sometimes will prefer working using a graphical IDE, at least until it is time to compile the code. As such, the recommendation is to mount a network share to the DPU (refer to NVIDIA DOCA DPU CLI for more information) and mount it to the container as well.
While in a docker-based deployment this is straightforward, in the Kubernetes-based deployment it requires updating the "hostPath" field in the container's .yaml file:
            …
- mountPath: /doca_devel
  name: input-output
resources:
…
# Shared host <-> container folder (directory shared with the hosting DPU)
- name: input-output
  hostPath:
    path: /tmp/doca_devel  # This field should point at the desired directory
    type: DirectoryOrCreate
The container's .yaml file is sensitive to indentations. Please make sure to use only spaces (''), and to keep each indentation level at a width of 2 space characters.
Having the same code folder accessible from the IDE and the container helps prevent edge cases where the compilation fails due to a typo in the code, but the typo is only fixed locally within the container and not propagated to the main source folder.
2.3. Testing
The container is marked as "privileged", hence it can directly access the HW capabilities of the BlueField DPU. This means that once the tested program compiles successfully, it can be directly tested from within the container without the need to copy it to the DPU and running it there.
2.4. Publishing
Once the program passes the testing phase, it should be prepared for deployment. While some proof-of-concept (POC) programs are just copied "as-is" in their binary form, most deployments will probably be in the form of a package (.deb/.rpm) or a container.
Construction of the binary package can be done as-is inside the current doca:devel container, or as part of a CI pipeline that will leverage the same development container as part of it.
For the construction of a container to ship the developed software, it is recommended to use a multi-staged build that ships the software on top of the runtime-oriented DOCA base images:
- doca:base-rt – Slim DOCA runtime environment
- doca:full-rt – Full DOCA runtime environment similar to the BlueField image
The runtime DOCA base images, alongside more details about their structure, can be found under the same NGC page that hosts the doca:devel image.
For a multi-staged build, it is recommended to compile the software inside the doca:devel container, and later copy it to one of the runtime container images. All relevant images must be pulled directly from NGC (using docker pull) to the container registry of the DPU.
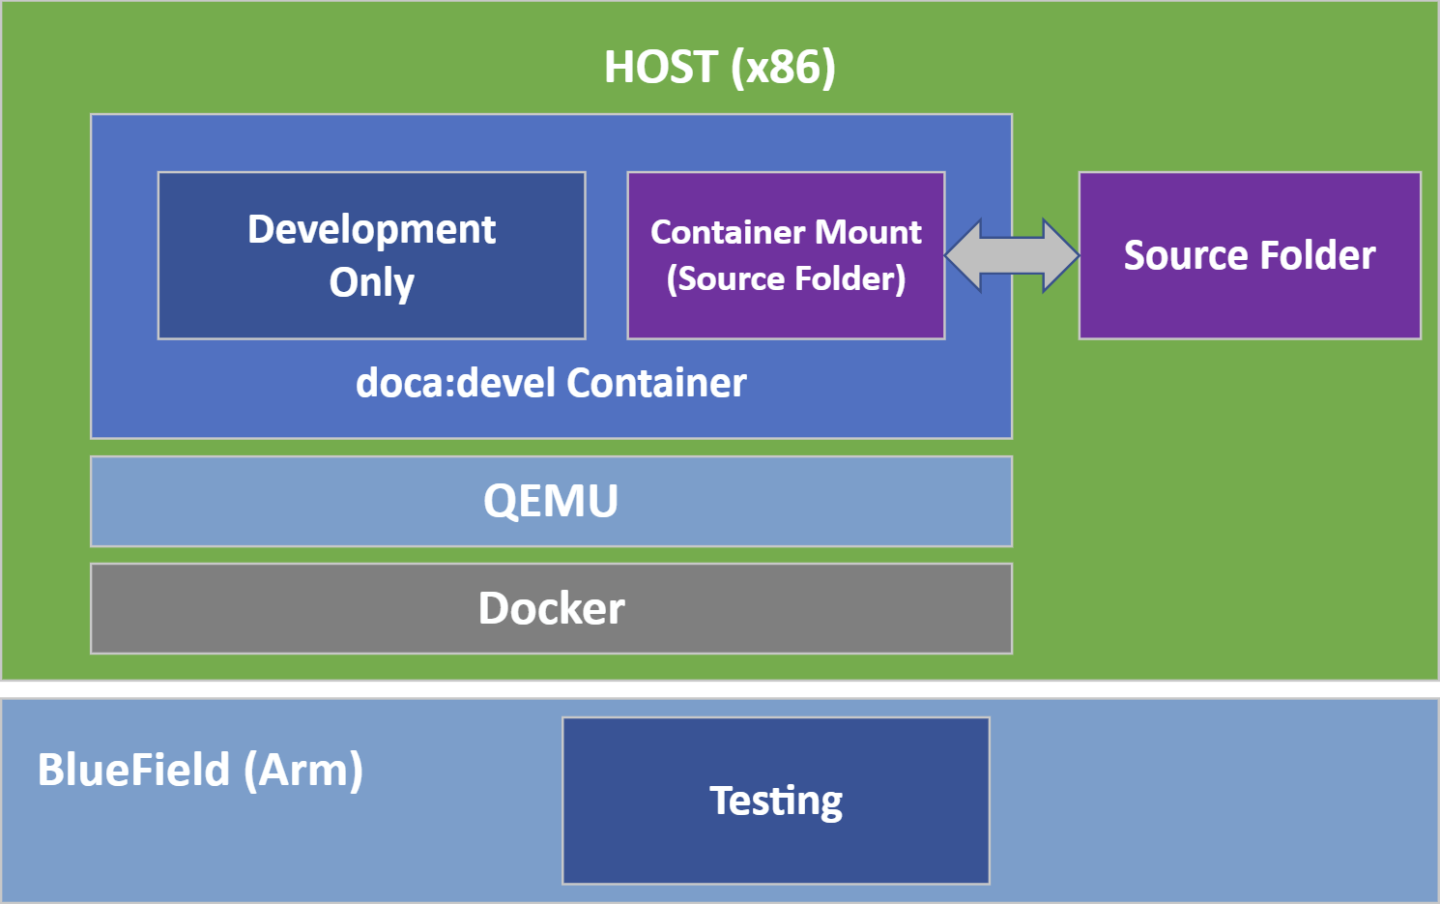
If the development process needs to be done without access to a BlueField DPU, the recommendation is to use a QEMU-based deployment of a container on top of a regular x86 server. The development container for the host will be the same doca:devel image we mentioned previously.
3.1. Setup
- Make sure Docker is installed on your host. Run:
docker version
If it is not installed, visit the official Install Docker Engine webpage for installation instructions.
- Install QEMU on the host.
Note:
This step is for x86 hosts only. If you are working on an aarch64 host, move to the next step.
- For an Ubuntu host, run:
            sudo apt-get install qemu binfmt-support qemu-user-static
sudo docker run --rm --privileged multiarch/qemu-user-static --reset -p yes
- For a CentOS/RHEL 7.x host, run:
            sudo yum install epel-release
sudo yum install qemu-system-arm
- For a CentOS 8.0/8.2 host, run:
            sudo yum install epel-release
sudo yum install qemu-kvm
- For a Fedora host, run:
sudo yum install qemu-system-aarch64
- For an Ubuntu host, run:
- If you are using CentOS or Fedora on the host, verify if
qemu-aarch64.confexists. Run:$ cat /etc/binfmt.d/qemu-aarch64.conf
echo ":qemu-aarch64:M::\x7fELF\x02\x01\x01\x00\x00\x00\x00\x00\x00\x00\x00\x00\x02\x00\xb7:\xff\xff\xff\xff\xff\xff\xff\xfc\xff\xff\xff\xff\xff\xff\xff\xff\xfe\xff\xff:/usr/bin/qemu-aarch64-static:" > /etc/binfmt.d/qemu-aarch64.conf
- If you are using CentOS or Fedora on the host, restart system binfmt. Run:
$ sudo systemctl restart systemd-binfmt
- To load and execute the development container, refer to the "Docker Deployment" section of the NVIDIA DOCA Container Deployment Guide.
3.2. Development
Much like the development phase using a BlueField DPU, it is recommended to develop within the container running on top of QEMU.
3.3. Testing
While the compilation can be performed on top of the container, testing the compiled software must be done on top of a BlueField DPU. This is because the QEMU environment emulates an aarch64 architecture, but it does not emulate the hardware devices present on the BlueField DPU. Therefore, the tested program will not be able to access the devices needed for its successful execution, thus mandating that the testing is done on top of a physical DPU.
Make sure that the DOCA version used for compilation is the same as the version installed on the DPU used for testing.
3.4. Publishing
The publishing process is identical to the publishing process when using a BlueField DPU.
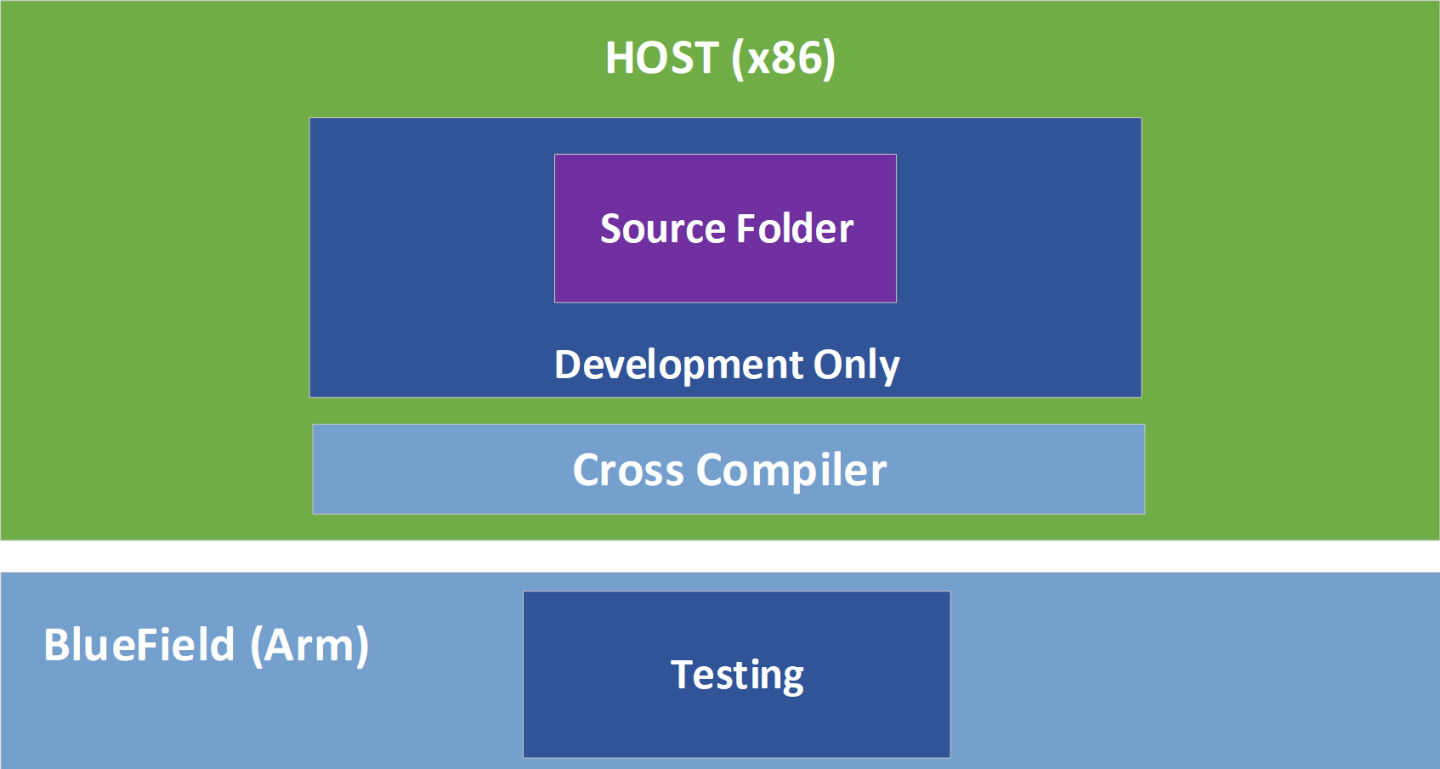
In a typical setup, developers prefer to work on a familiar host since compilation is often significantly faster there. Therefore, developers may work on their host while cross-compiling their project to the DPU's Arm architecture.
4.1. Setup
- Install Docker and QEMU your host. See steps 1-4 under section Setup.
- Download the
doca-crosscomponent as described in NVIDIA DOCA Installation Guide for Linux and unpack it under the/rootdirectory. Inside this directory one can find:-
arm64_armv8_linux_gcc– cross file containing specific information about the cross compiler and the host machine -
DOCA_cross.sh– script which handles all the required dependencies and pre-installations steps - A
.txtfile used by the script
-
- To load the development container, refer to section "Docker Deployment" of the NVIDIA DOCA Container Deployment Guide.
Note:
It is important to ensure that the same DOCA version is used in the development container and the DOCA metapackages installed on the host.
- Start running the container using the container's image ID while mapping the
doca-crossdirectory to the container's/doca_develdirectory:sudo docker run -v /root/doca-cross/:/doca_devel --privileged -it -e container=docker <image_id>
Now the shell will be redirected to be within the container.
- Run the preparation script to copy all the Arm dependencies required for DOCA's cross compilation. The script will be in the mapped directory named
doca_devel.(container) /# cd doca_devel/ (container) /doca_devel# ./DOCA_cross.sh
- Exit the container and run the same script from the host side:
(host) /root/doca-cross# ./DOCA_cross.sh
The
/root/doca-crossdirectory is now fully configured and prepared for cross-compilation against DOCA. - Update the environment variables to point at the linaro cross-compiler:
export PATH=${PATH}:/opt/gcc-linaro/<linaro_version_dir>/aarch64-linux-gnu/bin:/opt/gcc-linaro/<linaro_version_dir>/bin
Everything is set up and the cross-compilation can now be used.
Note:Make sure to update the command according to the Linaro version installed by the script in the previous step.
<linaro_version_dir>can be found under/opt/gcc-linaro/.Note:Cross-compilation requires Meson version ≥0.61.2 to be installed on the host. This is already provided as part of DOCA's installation.
4.2. DOCA and CUDA Setup
- To cross-compile DOCA and CUDA applications, you must install CUDA Toolkit 1.6:
- The first toolkit installation is for x86 architecture. Select
x86_64. - The second toolkit installation is for Arm. Select
arm64-sbsaand thencross. - Select your host operating system, architecture, OS distribution, and version and select the installation type. It is recommended to use the deb (local) type.
- The first toolkit installation is for x86 architecture. Select
- Execute the following exports:
            export CPATH=/usr/local/cuda/targets/sbsa-linux/include:$CPATH
export LD_LIBRARY_PATH=/usr/local/cuda/targets/sbsa-linux/lib:$LD_LIBRARY_PATH
export PATH=/usr/local/cuda/bin:/usr/local/cuda-11.6/bin:$PATH
- Verify the
mesonversion is at least 0.61.2.Everything is set up and the cross-compilation can now be used.
4.3. Development
It is recommended to develop normally while remembering to compile using the cross-compilation configuration file arm64_armv8_linux_gcc which can be found under the doca-cross directory.
The following is an example procedure for cross-compiling DOCA applications from the host and to the Arm architecture:
- Enable the meson cross-compilation option in
/opt/mellanox/doca/applications/meson_options.txtby settingenable_cross_compilation_to_dputotrue. - Cross-compile the DOCA applications:
            /opt/mellanox/doca/applications # meson cross-build --cross-file /root/doca-cross/arm64_armv8_linux_gcc
/opt/mellanox/doca/applications # ninja -C cross-build
The cross-compiled binaries are created under the
cross-builddirectory. - Cross-compile the DOCA and CUDA application:
- Set flag for GPU-enabled cross-compilation,
enable_gpu_support, in/opt/mellanox/doca/applications/meson_options.txttotrue. - Run the compilation command as follows:
            /opt/mellanox/doca/applications # meson cross-build --cross-file /root/doca-cross/arm64_armv8_linux_gcc -Dcuda_ccbindir=aarch64-linux-gnu-g++
/opt/mellanox/doca/applications # ninja -C cross-build
The cross-compiled binaries are created under the
cross-builddirectory.
- Set flag for GPU-enabled cross-compilation,
Due to the system's use of the PKG_CONFIG_PATH environment variable, it is crucial that the cross file include the following:
            [built-in options]
pkg_config_path = ''
This definition, already provided as part of the supplied cross file, guarantees that meson does not accidently use the build system's environment variable during the cross build.
4.4. Testing
While the compilation can be performed on top of the host, testing the compiled software must be done on top of a BlueField-2 DPU. This is because the tested program is not able to access the devices needed for its successful execution, which mandates that the testing is performed on top of a physical DPU.
Make sure that the DOCA version used for compilation is the same as the version installed on the DPU used for testing.
4.5. Publishing
The publishing process is identical to the publishing process when using a BlueField DPU.
Notice
This document is provided for information purposes only and shall not be regarded as a warranty of a certain functionality, condition, or quality of a product. NVIDIA Corporation nor any of its direct or indirect subsidiaries and affiliates (collectively: “NVIDIA”) make no representations or warranties, expressed or implied, as to the accuracy or completeness of the information contained in this document and assume no responsibility for any errors contained herein. NVIDIA shall have no liability for the consequences or use of such information or for any infringement of patents or other rights of third parties that may result from its use. This document is not a commitment to develop, release, or deliver any Material (defined below), code, or functionality.
NVIDIA reserves the right to make corrections, modifications, enhancements, improvements, and any other changes to this document, at any time without notice.
Customer should obtain the latest relevant information before placing orders and should verify that such information is current and complete.
NVIDIA products are sold subject to the NVIDIA standard terms and conditions of sale supplied at the time of order acknowledgement, unless otherwise agreed in an individual sales agreement signed by authorized representatives of NVIDIA and customer (“Terms of Sale”). NVIDIA hereby expressly objects to applying any customer general terms and conditions with regards to the purchase of the NVIDIA product referenced in this document. No contractual obligations are formed either directly or indirectly by this document.
NVIDIA products are not designed, authorized, or warranted to be suitable for use in medical, military, aircraft, space, or life support equipment, nor in applications where failure or malfunction of the NVIDIA product can reasonably be expected to result in personal injury, death, or property or environmental damage. NVIDIA accepts no liability for inclusion and/or use of NVIDIA products in such equipment or applications and therefore such inclusion and/or use is at customer’s own risk.
NVIDIA makes no representation or warranty that products based on this document will be suitable for any specified use. Testing of all parameters of each product is not necessarily performed by NVIDIA. It is customer’s sole responsibility to evaluate and determine the applicability of any information contained in this document, ensure the product is suitable and fit for the application planned by customer, and perform the necessary testing for the application in order to avoid a default of the application or the product. Weaknesses in customer’s product designs may affect the quality and reliability of the NVIDIA product and may result in additional or different conditions and/or requirements beyond those contained in this document. NVIDIA accepts no liability related to any default, damage, costs, or problem which may be based on or attributable to: (i) the use of the NVIDIA product in any manner that is contrary to this document or (ii) customer product designs.
No license, either expressed or implied, is granted under any NVIDIA patent right, copyright, or other NVIDIA intellectual property right under this document. Information published by NVIDIA regarding third-party products or services does not constitute a license from NVIDIA to use such products or services or a warranty or endorsement thereof. Use of such information may require a license from a third party under the patents or other intellectual property rights of the third party, or a license from NVIDIA under the patents or other intellectual property rights of NVIDIA.
Reproduction of information in this document is permissible only if approved in advance by NVIDIA in writing, reproduced without alteration and in full compliance with all applicable export laws and regulations, and accompanied by all associated conditions, limitations, and notices.
THIS DOCUMENT AND ALL NVIDIA DESIGN SPECIFICATIONS, REFERENCE BOARDS, FILES, DRAWINGS, DIAGNOSTICS, LISTS, AND OTHER DOCUMENTS (TOGETHER AND SEPARATELY, “MATERIALS”) ARE BEING PROVIDED “AS IS.” NVIDIA MAKES NO WARRANTIES, EXPRESSED, IMPLIED, STATUTORY, OR OTHERWISE WITH RESPECT TO THE MATERIALS, AND EXPRESSLY DISCLAIMS ALL IMPLIED WARRANTIES OF NONINFRINGEMENT, MERCHANTABILITY, AND FITNESS FOR A PARTICULAR PURPOSE. TO THE EXTENT NOT PROHIBITED BY LAW, IN NO EVENT WILL NVIDIA BE LIABLE FOR ANY DAMAGES, INCLUDING WITHOUT LIMITATION ANY DIRECT, INDIRECT, SPECIAL, INCIDENTAL, PUNITIVE, OR CONSEQUENTIAL DAMAGES, HOWEVER CAUSED AND REGARDLESS OF THE THEORY OF LIABILITY, ARISING OUT OF ANY USE OF THIS DOCUMENT, EVEN IF NVIDIA HAS BEEN ADVISED OF THE POSSIBILITY OF SUCH DAMAGES. Notwithstanding any damages that customer might incur for any reason whatsoever, NVIDIA’s aggregate and cumulative liability towards customer for the products described herein shall be limited in accordance with the Terms of Sale for the product.
Trademarks
NVIDIA, the NVIDIA logo, and Mellanox are trademarks and/or registered trademarks of Mellanox Technologies Ltd. and/or NVIDIA Corporation in the U.S. and in other countries. The registered trademark Linux® is used pursuant to a sublicense from the Linux Foundation, the exclusive licensee of Linus Torvalds, owner of the mark on a world¬wide basis. Other company and product names may be trademarks of the respective companies with which they are associated.
Copyright
© 2022 NVIDIA Corporation & affiliates. All rights reserved.