Virtual Functions
NVIDIA DOCA Virtual Functions User Guide
This document provides an overview and configuration of virtual functions for NVIDIA® BlueField® DPU and demonstrates a use case for running the DOCA Applications over the host.
Single root IO virtualization (SR-IOV) is a technology that allows a physical PCIe device to present itself multiple times through the PCIe bus. This technology enables multiple virtual instances of the device with separate resources. NVIDIA adapters are able to expose virtual instances or functions (VFs) for each port individually. These virtual functions can then be provisioned separately.
Each VF can be seen as an additional device connected to the physical interface or function (PF). It shares the same resources with the PF, and its number of ports equals those of the PF.
SR-IOV is commonly used in conjunction with an SR-IOV-enabled hypervisor to provide virtual machines direct hardware access to network resources, thereby increasing its performance.
There are several benefits to running applications on the host. For example, one may want to utilize a strong and high-resource host machine, or to start DOCA integration on the host before offloading it to the BlueField DPU.
The configuration in this document allows the entire application to run on the host's memory, while utilizing the HW accelerators on BlueField (e.g., using RegEx the accelerator on BlueField via a daemon running on it).
When VFs are enabled on the host, VF representors are visible on the Arm side which can be bridged to corresponding PF representors (e.g., the uplink representor and the host representor). This allows the application to only scan traffic forwarded to the VFs as configured by the user and to behave as a simple "bump-on-the-wire". DOCA installed on the host allows access to the hardware capabilities of the BlueField DPU without comprising features such as the stateful table (SFT) which uses HW offload and additional HW steering elements embedded inside the eSwitch.
Running applications on the host and using the RegEx accelerator on the BlueField requires enabling the RegEx engine.
To run all the reference applications over the host, you must install the host DOCA package. Refer to NVIDIA DOCA Installation Guide for Linux for more information on host installation. VFs must be configured as trusted for the hardware jump action to work as intended. The following steps configure "trusted" mode for VFs:
- Delete all existing VFs/SFs.
- To delete all VFs on a PF run the following on the host:
$ echo 0 > /sys/class/net/<physical_function>/device/sriov_numvfs
$ echo 0 > /sys/class/net/ens1f0/device/sriov_numvfs
- Refer to Scalable Function Setup Guide for instructions on deleting SFs.
- To delete all VFs on a PF run the following on the host:
- Stop the main driver on the host:
/etc/init.d/openibd stop
- Before creating the VFs, set them to "trusted" mode on the device by running the following commands on the Arm side.
- Setting VFs on port 0:
$ mlxreg -d /dev/mst/mt41686_pciconf0 --reg_id 0xc007 --reg_len 0x40 --indexes "0x0.0:32=0x80000000" --yes --set "0x4.0:32=0x1"
- Setting VFs on port 1:
$ mlxreg -d /dev/mst/mt41686_pciconf0.1 --reg_id 0xc007 --reg_len 0x40 --indexes "0x0.0:32=0x80000000" --yes --set "0x4.0:32=0x1"
Note:These commands set trusted mode for all created VFs/SFs after their execution on Arm.
Note:Setting trusted mode should be performed once per reboot.
- Setting VFs on port 0:
- Restart the main driver on the host by running the following command:
/etc/init.d/openibd restart
- Enable SR-IOV. Run:
host$ mlxconfig -y -d /dev/mst/mt41686_pciconf0 s SRIOV_EN=1
- Set number of VFs. Run:
host$ mlxconfig -y -d /dev/mst/mt41686_pciconf0 s NUM_OF_VFS=X
Note:Requires power cycle.
host$ echo X > /sys/class/net/<physical_function>/device/sriov_numvfs
            host $ mlxconfig -y -d /dev/mst/mt41686_pciconf0 s NUM_OF_VFS=2
host $ reboot
host $ echo 2 > /sys/class/net/ens1f0/device/sriov_numvfs
After enabling VF, the representor appears on the DPU. The function itself is seen at the host.
- To verify that the VFs have been created. Run:
            $ lspci | grep Mellanox
05:00.0 Ethernet controller: Mellanox Technologies Device a2d6
05:00.1 Ethernet controller: Mellanox Technologies Device a2d6
05:00.2 DMA controller: Mellanox Technologies Device c2d3
05:00.3 Ethernet controller: Mellanox Technologies MT28850
05:00.4 Ethernet controller: Mellanox Technologies MT28850
Note:2 new virtual Ethernet devices are created in this example.
The following steps are required only if the application utilizes the RegEx engine:
- Stop the driver on the host. Run:
host$ sudo /etc/init.d/openibd stop
- On the Arm, start the driver. Run:
dpu$ sudo /etc/init.d/openibd start
- On the Arm, enable RegEx (only if the application requires it). Run:
dpu$ echo 1 > /sys/class/net/p0/smart_nic/pf/regex_en
- On the Arm, add 200 huge pages. Run:
            dpu$ current_huge=$(cat /sys/kernel/mm/hugepages/hugepages-2048kB/nr_hugepages)
dpu$ sudo echo $((200 + current_huge)) > /sys/kernel/mm/hugepages/hugepages-2048kB/nr_hugepages
- On the Arm, start mlx RegEx. Run:
dpu$ systemctl start mlx-regex
Note:If it has not been set before, the previous value of huge pages should be 2048 or higher (depending on the number of cores).
- Verify that the service is running. Run:
dpu$ systemctl status mlx-regex
- The host can now run RegEx. Run:
host$ sudo /etc/init.d/openibd start
Running DPDK over the host requires configuring huge pages.
By default, a DPDK application initializes all the cores of the device. This is usually unnecessary and may even cause unforeseeable issues. It is recommended to limit the number of cores, especially when using an AMD-based system, to 16 cores using the -c flag when running DPDK.
The following is a CLI example for running a reference application over the host using VF:
./opt/mellanox/doca/applications/**/bin/*executable* -a "pci address VF0" -a "pci address VF1" -c 0xff -- "application flags"
The following is a topology example for running the application over the host.
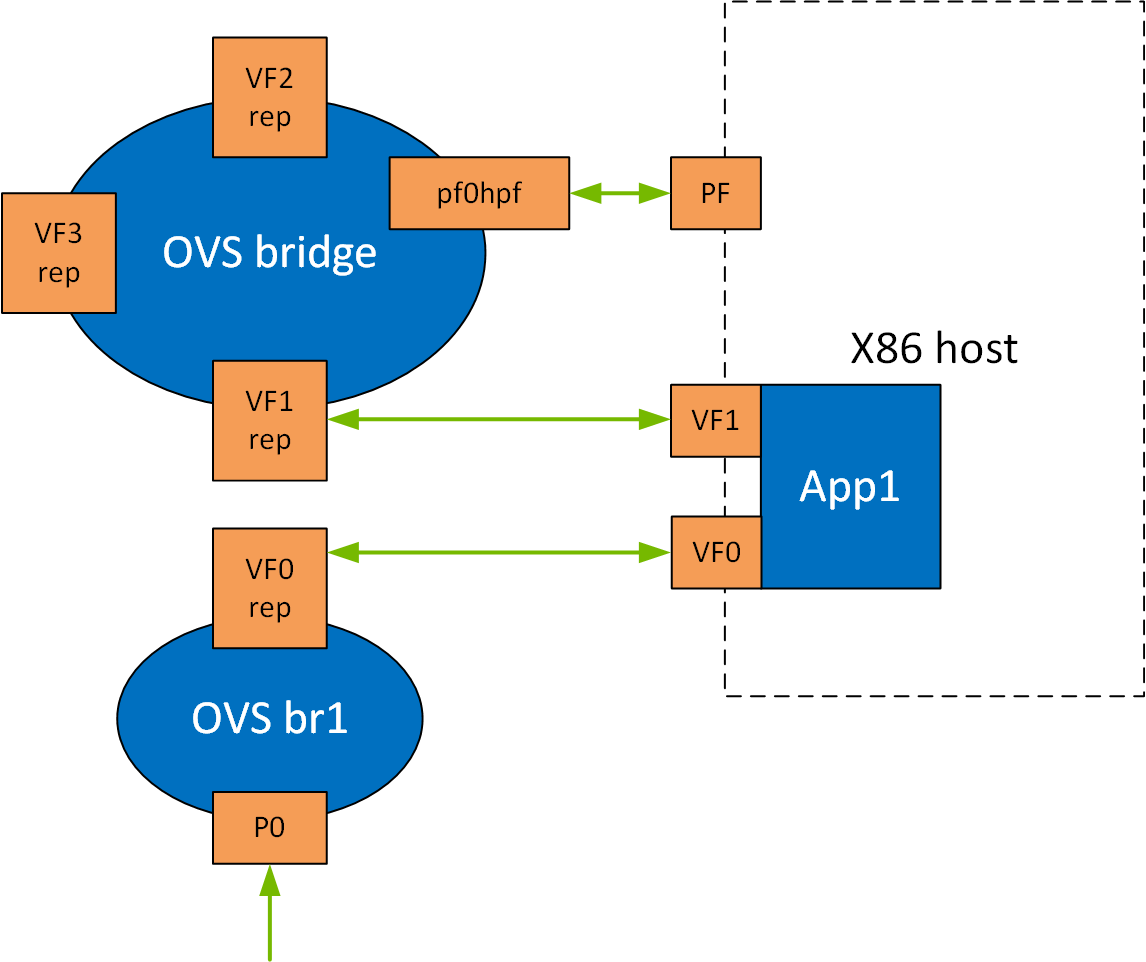
Configure the OVS on BlueField as follows:
            Bridge ovsbr1
    Port ovsbr1
        Interface ovsbr1
            type: internal
    Port pf0hpf
        Interface pf0hpf
    Port pf0vf1
        Interface pf0vf1
Bridge vf_br
    Port p0
        Interface p0
    Port vf_br
        Interface vf_br
            type: internal
    Port pf0vf0
        Interface pf0vf0
When enabling a new VF over the host, VF representors are created on the Arm side. The first OVS bridge connects the uplink connection (p0) to the new VF representor (pf0vf0), and the second bridge connects the second VF representor (pf0vf1) to the host representors (pf0phf). On the host, the 2 PCIe addresses of the newly created function must be initialized when running the applications.
When traffic is received (e.g., from the uplink), the following occurs:
- Traffic is received over
p0. - Traffic is forwarded to
pf0vf0. - Application "listens" to
pf0vf0andpf0vf1and can, therefore, acquire the traffic frompf0vf0, inspect it, and forward topf0vf1. - Traffic is forwarded from
pf0vf1topf0hpf.
The following steps are required only when running DOCA applications, such as Simple Fwd VNF, on a ConnectX-6 Dx adapter card.
- Set trust level for all VFs. Run:
host# mlxreg -d /dev/mst/mt4125_pciconf0 --reg_name VHCA_TRUST_LEVEL --yes --set "all_vhca=0x1,trust_level=0x1"
- Create X VFs (X being the required number of VFs) and run the following to turn on trusted mode for the created VFs:
echo ON | tee /sys/class/net/enp1s0f0np0/device/sriov/X/trust
            echo ON | tee /sys/class/net/enp1s0f0np0/device/sriov/0/trust
echo ON | tee /sys/class/net/enp1s0f0np0/device/sriov/1/trust
Notice
This document is provided for information purposes only and shall not be regarded as a warranty of a certain functionality, condition, or quality of a product. NVIDIA Corporation nor any of its direct or indirect subsidiaries and affiliates (collectively: “NVIDIA”) make no representations or warranties, expressed or implied, as to the accuracy or completeness of the information contained in this document and assume no responsibility for any errors contained herein. NVIDIA shall have no liability for the consequences or use of such information or for any infringement of patents or other rights of third parties that may result from its use. This document is not a commitment to develop, release, or deliver any Material (defined below), code, or functionality.
NVIDIA reserves the right to make corrections, modifications, enhancements, improvements, and any other changes to this document, at any time without notice.
Customer should obtain the latest relevant information before placing orders and should verify that such information is current and complete.
NVIDIA products are sold subject to the NVIDIA standard terms and conditions of sale supplied at the time of order acknowledgement, unless otherwise agreed in an individual sales agreement signed by authorized representatives of NVIDIA and customer (“Terms of Sale”). NVIDIA hereby expressly objects to applying any customer general terms and conditions with regards to the purchase of the NVIDIA product referenced in this document. No contractual obligations are formed either directly or indirectly by this document.
NVIDIA products are not designed, authorized, or warranted to be suitable for use in medical, military, aircraft, space, or life support equipment, nor in applications where failure or malfunction of the NVIDIA product can reasonably be expected to result in personal injury, death, or property or environmental damage. NVIDIA accepts no liability for inclusion and/or use of NVIDIA products in such equipment or applications and therefore such inclusion and/or use is at customer’s own risk.
NVIDIA makes no representation or warranty that products based on this document will be suitable for any specified use. Testing of all parameters of each product is not necessarily performed by NVIDIA. It is customer’s sole responsibility to evaluate and determine the applicability of any information contained in this document, ensure the product is suitable and fit for the application planned by customer, and perform the necessary testing for the application in order to avoid a default of the application or the product. Weaknesses in customer’s product designs may affect the quality and reliability of the NVIDIA product and may result in additional or different conditions and/or requirements beyond those contained in this document. NVIDIA accepts no liability related to any default, damage, costs, or problem which may be based on or attributable to: (i) the use of the NVIDIA product in any manner that is contrary to this document or (ii) customer product designs.
No license, either expressed or implied, is granted under any NVIDIA patent right, copyright, or other NVIDIA intellectual property right under this document. Information published by NVIDIA regarding third-party products or services does not constitute a license from NVIDIA to use such products or services or a warranty or endorsement thereof. Use of such information may require a license from a third party under the patents or other intellectual property rights of the third party, or a license from NVIDIA under the patents or other intellectual property rights of NVIDIA.
Reproduction of information in this document is permissible only if approved in advance by NVIDIA in writing, reproduced without alteration and in full compliance with all applicable export laws and regulations, and accompanied by all associated conditions, limitations, and notices.
THIS DOCUMENT AND ALL NVIDIA DESIGN SPECIFICATIONS, REFERENCE BOARDS, FILES, DRAWINGS, DIAGNOSTICS, LISTS, AND OTHER DOCUMENTS (TOGETHER AND SEPARATELY, “MATERIALS”) ARE BEING PROVIDED “AS IS.” NVIDIA MAKES NO WARRANTIES, EXPRESSED, IMPLIED, STATUTORY, OR OTHERWISE WITH RESPECT TO THE MATERIALS, AND EXPRESSLY DISCLAIMS ALL IMPLIED WARRANTIES OF NONINFRINGEMENT, MERCHANTABILITY, AND FITNESS FOR A PARTICULAR PURPOSE. TO THE EXTENT NOT PROHIBITED BY LAW, IN NO EVENT WILL NVIDIA BE LIABLE FOR ANY DAMAGES, INCLUDING WITHOUT LIMITATION ANY DIRECT, INDIRECT, SPECIAL, INCIDENTAL, PUNITIVE, OR CONSEQUENTIAL DAMAGES, HOWEVER CAUSED AND REGARDLESS OF THE THEORY OF LIABILITY, ARISING OUT OF ANY USE OF THIS DOCUMENT, EVEN IF NVIDIA HAS BEEN ADVISED OF THE POSSIBILITY OF SUCH DAMAGES. Notwithstanding any damages that customer might incur for any reason whatsoever, NVIDIA’s aggregate and cumulative liability towards customer for the products described herein shall be limited in accordance with the Terms of Sale for the product.
Trademarks
NVIDIA, the NVIDIA logo, and Mellanox are trademarks and/or registered trademarks of Mellanox Technologies Ltd. and/or NVIDIA Corporation in the U.S. and in other countries. The registered trademark Linux® is used pursuant to a sublicense from the Linux Foundation, the exclusive licensee of Linus Torvalds, owner of the mark on a world¬wide basis. Other company and product names may be trademarks of the respective companies with which they are associated.
Copyright
© 2022 NVIDIA Corporation & affiliates. All rights reserved.