vSwitch and Representors Model
NVIDIA DOCA vSwitch and Representors Model
This document provides information on the control of the NVIDIA® BlueField® DPU embedded switch and representation of the host network functions.
This model is only applicable when the DPU is operating ECPF ownership mode.
BlueField uses netdev representors to map each one of the host side physical and virtual functions:
- Serve as the tunnel to pass traffic for the virtual switch or application running on the Arm cores to the relevant physical function (PF) or virtual function (VF) on the Arm side.
- Serve as the channel to configure the embedded switch with rules to the corresponding represented function.
Those representors are used as the virtual ports being connected to OVS or any other virtual switch running on the Arm cores.
When in ECPF ownership mode, we see 2 representors for each one of the DPU’s network ports: one for the uplink, and another one for the host side PF (the PF representor created even if the PF is not probed on the host side). For each one of the VFs created on the host side a corresponding representor would be created on the Arm side. The naming convention for the representors is as follows:
-
Uplink representors: p<port_number>
-
PF representors: pf<port_number>hpf
-
VF representors: pf<port_number>vf<function_number>
The diagram below shows the mapping of between the PCI functions exposed on the host side and the representors. For the sake of simplicity, we show a single port model (duplicated for the second port).
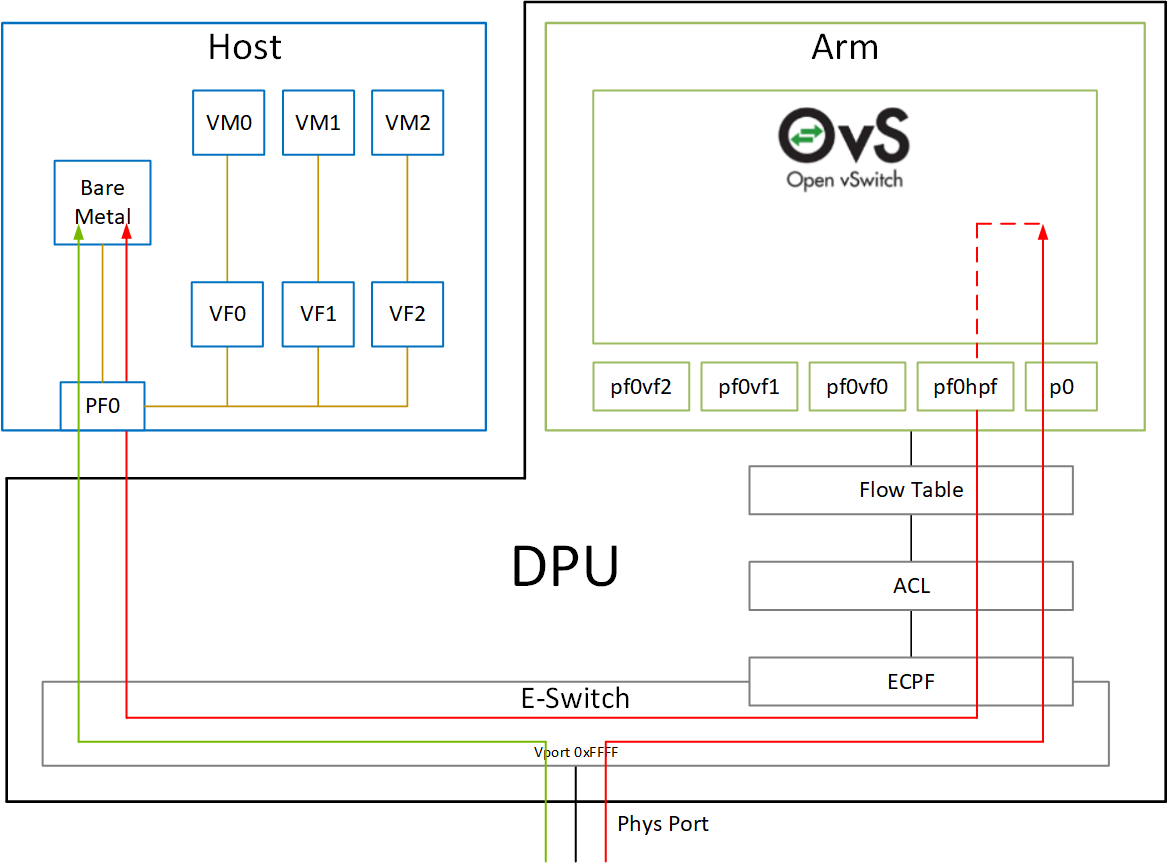
The red arrow demonstrates a packet flow through the representors, while the green arrow demonstrates the packet flow when steering rules are offloaded to the embedded switch. More details on that are available in the switch offload section.
For general information on OVS offload using ASAP² direct, please refer to the MLNX_OFED documentation under OVS Offload Using ASAP² Direct.
ASAP² is only supported in embedded (SmartNIC) mode.
NVIDIA® BlueField® supports ASAP² technology. It utilizes the representors mentioned in the previous section. BlueField SW package includes OVS installation which already supports ASAP². The virtual switch running on the Arm cores allows us to pass all the traffic to and from the host functions through the Arm cores while performing all the operations supported by OVS. ASAP2 allows us to offload the datapath by programming the NIC embedded switch and avoiding the need to pass every packet through the Arm cores. The control plane remains the same as working with standard OVS.
OVS bridges are created by default upon first boot of the DPU after BFB installation. If manual configuration of the default settings for the OVS bridge is desired, run:
            systemctl start openvswitch-switch.service
ovs-vsctl add-port ovsbr1 p0
ovs-vsctl add-port ovsbr1 pf0hpf
ovs-vsctl add-port ovsbr2 p1
ovs-vsctl add-port ovsbr2 pf1hpf
To verify successful bridging:
            $ ovs-vsctl show
9f635bd1-a9fd-4f30-9bdc-b3fa21f8940a
    Bridge ovsbr2
        Port ovsbr2
            Interface ovsbr2
                type: internal
        Port p1
            Interface p1
        Port pf1sf0
            Interface en3f1pf1sf0
        Port pf1hpf
            Interface pf1hpf
    Bridge ovsbr1
        Port pf0hpf
            Interface pf0hpf
        Port p0
            Interface p0
        Port ovsbr1
            Interface ovsbr1
                type: internal
        Port pf0sf0
            Interface en3f0pf0sf0
    ovs_version: "2.14.1"
The host is now connected to the network.
3.1. Verifying Host Connection on Linux
When the DPU is connected to another DPU on another machine, manually assign IP addresses with the same subnet to both ends of the connection.
- Assuming the link is connected to p3p1 on the other host, run:
$ ifconfig p3p1 192.168.200.1/24 up
- On the host which the DPU is connected to, run:
$ ifconfig p4p2 192.168.200.2/24 up
- Have one ping the other. This is an example of the DPU pinging the host:
$ ping 192.168.200.1
3.2. Verifying Host Connection on Linux
There are two SFs configured on the BlueFIeld-2 device, enp3s0f0s0 and enp3s0f1s0, and their representors are part of the built-in bridge. These interfaces will get IP addresses from the DHCP server if it is present. Otherwise it is possible to configure IP address from the host. It is possible to access BlueField via the SF netdev interfaces.
For example:
- Verify the default OVS configuration. Run:
            # ovs-vsctl show
5668f9a6-6b93-49cf-a72a-14fd64b4c82b
    Bridge ovsbr1
        Port pf0hpf
            Interface pf0hpf
        Port ovsbr1
            Interface ovsbr1
                type: internal
        Port p0
            Interface p0
        Port en3f0pf0sf0
            Interface en3f0pf0sf0
    Bridge ovsbr2
        Port en3f1pf1sf0
            Interface en3f1pf1sf0
        Port ovsbr2
            Interface ovsbr2
                type: internal
        Port pf1hpf
            Interface pf1hpf
        Port p1
            Interface p1
    ovs_version: "2.14.1"
- Verify whether the SF netdev received an IP address from the DHCP server. If not, assign a static IP. Run:
            # ifconfig enp3s0f0s0
enp3s0f0s0: flags=4163<UP,BROADCAST,RUNNING,MULTICAST>  mtu 1500
        inet 192.168.200.125  netmask 255.255.255.0  broadcast 192.168.200.255
        inet6 fe80::8e:bcff:fe36:19bc  prefixlen 64  scopeid 0x20<link>
        ether 02:8e:bc:36:19:bc  txqueuelen 1000  (Ethernet)
        RX packets 3730  bytes 1217558 (1.1 MiB)
        RX errors 0  dropped 0  overruns 0  frame 0
        TX packets 22  bytes 2220 (2.1 KiB)
        TX errors 0  dropped 0 overruns 0  carrier 0  collisions 0
- Verify the connection of the configured IP address. Run:
            # ping 192.168.200.25 -c 5
PING 192.168.200.25 (192.168.200.25) 56(84) bytes of data.
64 bytes from 192.168.200.25: icmp_seq=1 ttl=64 time=0.228 ms
64 bytes from 192.168.200.25: icmp_seq=2 ttl=64 time=0.175 ms
64 bytes from 192.168.200.25: icmp_seq=3 ttl=64 time=0.232 ms
64 bytes from 192.168.200.25: icmp_seq=4 ttl=64 time=0.174 ms
64 bytes from 192.168.200.25: icmp_seq=5 ttl=64 time=0.168 ms

--- 192.168.200.25 ping statistics ---
5 packets transmitted, 5 received, 0% packet loss, time 91ms
rtt min/avg/max/mdev = 0.168/0.195/0.232/0.031 ms
3.3. Verifying Host Connection on Windows
Set IP address on the Windows side for the RShim or Physical network adapter, please run the following command in Command Prompt:
PS C:\Users\Administrator> New-NetIPAddress -InterfaceAlias "Ethernet 16" -IPAddress "192.168.100.1" -PrefixLength 22
To get the interface name, please run the following command in Command Prompt:
PS C:\Users\Administrator> Get-NetAdapter
Output should give us the interface name that matches the description (e.g. Mellanox BlueField Management Network Adapter).
            Ethernet 2          Mellanox ConnectX-4 Lx Ethernet Adapter      6 Not Present  24-8A-07-0D-E8-1D
Ethernet 6          Mellanox ConnectX-4 Lx Ethernet Ad...#2     23 Not Present  24-8A-07-0D-E8-1C
Ethernet 16         Mellanox BlueField Management Netw...#2     15 Up           CA-FE-01-CA-FE-02
Once IP address is set, Have one ping the other.
            C:\Windows\system32>ping 192.168.100.2

Pinging 192.168.100.2 with 32 bytes of data:
Reply from 192.168.100.2: bytes=32 time=148ms TTL=64
Reply from 192.168.100.2: bytes=32 time=152ms TTL=64
Reply from 192.168.100.2: bytes=32 time=158ms TTL=64
Reply from 192.168.100.2: bytes=32 time=158ms TTL=64
3.4. Enabling OVS HW Offloading
OVS HW offloading is set by default by the /sbin/mlnx_bf_configure script upon first boot after installation.
- Enable TC offload on the relevant interfaces. Run:
$ ethtool -K <PF> hw-tc-offload on
- To enable the HW offload run the following commands (restarting OVS is required after enabling the HW offload):
            $ ovs-vsctl set Open_vSwitch . Other_config:hw-offload=true
$ systemctl restart openvswitch
- To show OVS configuration:
            $ ovs-dpctl show
system@ovs-system:
  lookups: hit:0 missed:0 lost:0
  flows: 0
  masks: hit:0 total:0 hit/pkt:0.00
  port 0: ovs-system (internal)
  port 1: armbr1 (internal)
  port 2: p0
  port 3: pf0hpf
  port 4: pf0vf0
  port 5: pf0vf1
  port 6: pf0vf2
At this point OVS would automatically try to offload all the rules.
- To see all the rules that are added to the OVS datapath:
$ ovs-appctl dpctl/dump-flows
- To see the rules that are offloaded to the HW:
$ ovs-appctl dpctl/dump-flows type=offloaded
3.5. Configuring DPDK and Running TestPMD
- Configure hugepages. Run:
sudo echo 1024 > /sys/kernel/mm/hugepages/hugepages-2048kB/nr_hugepages
- Run testpmd.
- For Ubuntu/Debian:
env LD_LIBRARY_PATH=/opt/mellanox/dpdk/lib/aarch64-linux-gnu /opt/mellanox/dpdk/bin/dpdk-testpmd -w 03:00.0,representor=[0,65535] --socket-mem=1024 -- --total-num-mbufs=131000 -i -a
- For CentOS:
env LD_LIBRARY_PATH=/opt/mellanox/dpdk/lib64/ /opt/mellanox/dpdk/bin/dpdk-testpmd -w 03:00.0,representor=[0,65535] --socket-mem=1024 -- --total-num-mbufs=131000 -i -a
- For Ubuntu/Debian:
For a detailed procedure, refer to the article Configuring DPDK and Running testpmd on BlueField-2.
3.6. Flow Statistics and Aging
The aging timeout of OVS is given in milliseconds and can be configured by running the following command:
$ ovs-vsctl set Open_vSwitch . other_config:max-idle=30000
3.7. Enabling OVS-DPDK Hardware Offload
- Remove previously configured ovs-bridges. Run:
ovs-vsctl del-br <bridge-name>
Issue the command
obs-vsctl showto see already configured OVS bridges. - Enable the Open vSwitch service. Run:
systemctl start openvswitch
- Enable hardware offload (disabled by default). Run:
            ovs-vsctl --no-wait set Open_vSwitch . other_config:dpdk-init=true
ovs-vsctl --no-wait set Open_vSwitch . other_config:hw-offload=true
- Configure the DPDK whitelist. Run:
ovs-vsctl set Open_vSwitch . other_config:dpdk-extra="-w 0000:03:00.0,representor=[0,65535],dv_flow_en=1,dv_xmeta_en=1,sys_mem_en=1"
- Create OVS-DPDK bridge. Run:
ovs-vsctl add-br br0-ovs -- set Bridge br0-ovs datapath_type=netdev -- br-set-external-id br0-ovs bridge-id br0-ovs -- set bridge br0-ovs fail-mode=standalone
- Add PF to OVS. Run:
ovs-vsctl add-port br0-ovs p0 -- set Interface p0 type=dpdk options:dpdk-devargs=0000:03:00.0
- Add representor to OVS. Run:
            ovs-vsctl add-port br0-ovs pf0vf0 -- set Interface pf0vf0 type=dpdk options:dpdk-devargs=0000:03:00.0,representor=[0]
ovs-vsctl add-port br0-ovs pf0hpf -- set Interface pf0hpf type=dpdk options:dpdk-devargs=0000:03:00.0,representor=[65535]
- Restart the Open vSwitch service. This step is required for HW offload changes to take effect.
- For CentOS, run:
systemctl restart openvswitch
- For Debian/Ubuntu, run:
systemctl restart openvswitch-switch
- For CentOS, run:
For a reference setup configuration for BlueField-2 devices, please refer to the community post "Configuring OVS-DPDK Offload with BlueField-2".
3.8. Connection Tracking Offload
This feature enables tracking connections and storing information about the state of these connections. When used with OVS, the DPU can offload connection tracking, so that traffic of established connections bypasses the kernel and goes directly to hardware.
Both source NAT (SNAT) and destination NAT (DNAT) are supported with connection tracking offload.
3.8.1. Configuring Connection Tracking Offload
This section provides an example of configuring OVS to offload all IP connections of host PF0.
- Enable OVS HW offloading.
- Create OVS connection tracking bridge. Run:
$ ovs-vsctl add-br ctBr
- Add p0 and pf0hpf to the bridge. Run:
            $ ovs-vsctl add-port ctBr p0
$ ovs-vsctl add-port ctBr pf0hpf
- Configure ARP packets to behave normally. Packets which do not comply are routed to table1. Run:
            $ ovs-ofctl add-flow ctBr "table=0,arp,action=normal"
$ ovs-ofctl add-flow ctBr "table=0,ip,ct_state=-trk,action=ct(table=1)"
- Configure RoCEv2 packets to behave normally. RoCEv2 packets follow UDP port 4791 and a different source port in each direction of the connection. RoCE traffic is not supported by CT. In order to run RoCE from the host add the following line before
ovs-ofctl add-flow ctBr "table=0,ip,ct_state=-trk,action=ct(table=1)":$ ovs-ofctl add-flow ctBr table=0,udp,tp_dst=4791,action=normal
This rule allows RoCEv2 UDP packets to skip connection tracking rules.
- Configure the new established flows to be admitted to the connection tracking bridge and to then behave normally. Run:
$ ovs-ofctl add-flow ctBr "table=1,priority=1,ip,ct_state=+trk+new,action=ct(commit),normal"
- Set already established flows to behave normally. Run:
$ ovs-ofctl add-flow ctBr "table=1,priority=1,ip,ct_state=+trk+est,action=normal"
3.8.2. Connection Tracking With NAT
This section provides an example of configuring OVS to offload all IP connections of host PF0, and performing source network address translation (SNAT). The server host sends traffic via source IP from 2.2.2.1 to 1.1.1.2 on another host. Arm performs SNAT and changes the source IP to 1.1.1.16. Note that static ARP or route table must be configured to find that route.
- Configure untracked IP packets to do nat. Run:
ovs-ofctl add-flow ctBr "table=0,ip,ct_state=-trk,action=ct(table=1,nat)"
- Configure new established flows to do SNAT, and change source IP to 1.1.1.16. Run:
ovs-ofctl add-flow ctBr "table=1,in_port=pf0hpf,ip,ct_state=+trk+new,action=ct(commit,nat(src=1.1.1.16)), p0"
- Configure already established flows act normal. Run:
ovs-ofctl add-flow ctBr "table=1,ip,ct_state=+trk+est,action=normal"
            $ cat /proc/net/nf_conntrack
ipv4     2 tcp      6 src=2.2.2.1 dst=1.1.1.2 sport=34541 dport=5001 src=1.1.1.2 dst=1.1.1.16 sport=5001 dport=34541 [OFFLOAD] mark=0 zone=1 use=3
3.8.3. Querying Connection Tracking Offload Status
Start traffic on PF0 from the server host (e.g. iperf) with an external network. Note that only established connections can be offloaded. TCP should have already finished the handshake, UDP should have gotten the reply.
ICMP is not currently supported.
To check if specific connections are offloaded from Arm, run:
$ cat /proc/net/nf_conntrack
The following is example output of offloaded TCP connection:
ipv4 2 tcp 6 src=1.1.1.2 dst=1.1.1.3 sport=51888 dport=5001 src=1.1.1.3 dst=1.1.1.2 sport=5001 dport=51888 [HW_OFFLOAD] mark=0 zone=0 use=3
3.8.4. Performance Tune Based on Traffic Pattern
Offloaded flows (including connection tracking) are added to virtual switch FDB flow tables. FDB tables have a set of flow groups. Each flow group saves the same traffic pattern flows. For example, for connection tracking offloaded flow, TCP and UDP are different traffic patterns which end up in two different flow groups.
A flow group has a limited size to save flow entries. By default, the driver has 4 big FDB flow groups. Each of these big flow groups can save at most 4000000/(4+1)=800k different 5-tuple flow entries. For scenarios with more than 4 traffic patterns, the driver provides a module parameter (num_of_groups) to allow customization and performance tune.
The size of each big flow groups can be calculated according to formula: size = 4000000/(num_of_groups+1)
To change the number of big FDB flow groups, run:
$ echo <num_of_groups> > /sys/module/mlx5_core/parameters/num_of_groups
The change takes effect immediately if there is no flow inside the FDB table (no traffic running and all offloaded flows are aged out), and it can be dynamically changed without reloading the driver.
If there are residual offloaded flows when changing this parameter, then the new configuration only takes effect after all flows age out.
3.8.5. Connection Tracking Aging
Aside from the aging of OVS, connection tracking offload has its own aging mechanism with a default aging time of 30 seconds.
3.8.6. Maximum Tracked Connections
The maximum number for tracked offloaded connections is limited to 1M by default.
The OS has a default setting of maximum tracked connections which may be configured by running:
$ /sbin/sysctl -w net.netfilter.nf_conntrack_max=1000000
This changes the maximum tracked connections (both offloaded and non-offloaded) setting to 1 million. The following option specifies the limit on the number of offloaded connections. For example:
# devlink dev param set pci/${pci_dev} name ct_max_offloaded_conns value $max cmode runtime
This value is set to 1 million by default from BlueFiled. Users may choose a different number by using the devlink command.
Make sure net.netfilter.nf_conntrack_tcp_be_liberal=1 when using connection tracking.
3.9. Offloading VLANs
OVS enables VF traffic to be tagged by the virtual switch.
For the BlueField DPU, the OVS can add VLAN tag (VLAN push) to all the packets sent by a network interface running on the host (either PF or VF) and strip the VLAN tag (VLAN pop) from the traffic going from the wire to that interface. Here we operate in Virtual Switch Tagging (VST) mode. This means that the host/VM interface is unaware of the VLAN tagging. Those rules can also be offloaded to the HW embedded switch.
To configure OVS to push/pop VLAN you need to add the tag=$TAG section for the OVS command line that adds the representor ports. So if you want to tag all the traffic of VF0 with VLAN ID 52, you should use the following command when adding its representor to the bridge:
$ ovs-vsctl add-port armbr1 pf0vf0 tag=52
If the virtual port is already connected to the bridge prior to configuring VLAN, you would need to remove it first:
$ ovs-vsctl del-port pf0vf0
In this scenario all the traffic being sent by VF 0 will have the same VLAN tag. We could set a VLAN tag by flow when using the TC interface, this is explained in section Using TC Interface to Configure Offload Rules.
3.10. VXLAN Tunneling Offload
VXLAN tunnels are created on the Arm side and attached to the OVS. VXLAN decapsulation/encapsulation behavior is similar to normal VXLAN behavior, including over hw_offload=true.
To allow VXLAN encapsulation, the uplink representor (p0) should have an MTU value at least 50 bytes greater than that of the host PF/VF.
3.10.1. Configuring VXLAN Tunnel
- Consider
p0to be the local VXLAN tunnel interface (or VTEP).Note:To be consistent with the examples below, it is assumed that
p0is configured with a 1.1.1.1 IPv4 address. - Remove
p0from any OVS bridge. - Build a VXLAN tunnel over OVS arm-ovs. Run:
            ovs-vsctl add-br arm-ovs -- add-port arm-ovs vxlan11 -- set interface vxlan11 type=vxlan
options:local_ip=1.1.1.1 options:remote_ip=1.1.1.2 options:key=100
options:dst_port=4789
- Connect any host representor for which VXLAN is desired (e.g.,
pf0hpf) to the same arm-ovs. - Configure the MTU of the VTEP (
pf0) used by VXLAN to at least 50 bytes larger than VXLAN-REP MTU.
At this point, the host is unaware of any VXLAN operations done by the DPU's OVS. If the remote end of the VXLAN tunnel is properly set, any network traffic traversing arm-ovs undergoes VXLAN encap/decap.
3.10.2. Querying OVS VXLAN hw_offload Rules
Run the following:
            ovs-appctl dpctl/dump-flows type=offloaded
in_port(2),eth(src=ae:fd:f3:31:7e:7b,dst=a2:fb:09:85:84:48),eth_type(0x0800), packets:1, bytes:98, used:0.900s, actions:set(tunnel(tun_id=0x64,src=1.1.1.1,dst=1.1.1.2,tp_dst=4789,flags(key))),3
tunnel(tun_id=0x64,src=1.1.1.2,dst=1.1.1.1,tp_dst=4789,flags(+key)),in_port(3),eth(src=a2:fb:09:85:84:48,dst=ae:fd:f3:31:7e:7b),eth_type(0x0800), packets:75, bytes:7350, used:0.900s, actions:2
For the host PF, in order for VXLAN to work properly with the default 1500 MTU, follow these steps.
- Disable host PF as the port owner from Arm. Run:
$ mlxprivhost -d /dev/mst/mt41682_pciconf0 --disable_port_owner r
- The MTU of the end points (pf0hpf in the example above) of the VXLAN tunnel must be smaller than the MTU of the tunnel interfaces (p0) to account for the size of the VXLAN headers. For example, you can set the MTU of P0 to 2000.
3.11. GRE Tunneling Offload
GRE tunnels are created on the Arm side and attached to the OVS. GRE decapsulation/encapsulation behavior is similar to normal GRE behavior, including over hw_offload=true.
To allow GRE encapsulation, the uplink representor (p0) should have an MTU value at least 50 bytes greater than that of the host PF/VF.
3.11.1. Configuring GRE Tunnel
- Consider
p0to be the local GRE tunnel interface.p0should not be attached to any OVS bridge.Note:To be consistent with the examples below, it is assumed that p0 is configured with a 1.1.1.1 IPv4 address and that the remote end of the tunnel is 1.1.1.2.
- Create an OVS bridge,
br0, with a GRE tunnel interface,gre0. Run:ovs-vsctl add-port br0 gre0 -- set interface gre0 type=gre options:local_ip=1.1.1.1 options:remote_ip=1.1.1.2 options:key=100
- Add
pf0hpftobr0.ovs-vsctl add-port br0 pf0hpf
At this point, any network traffic sent or received by the host's PF0 undergoes GRE processing inside the BlueField OS.
3.11.2. Querying OVS GRE hw_offload Rules
Run the following:
            ovs-appctl dpctl/dump-flows type=offloaded
recirc_id(0),in_port(3),eth(src=50:6b:4b:2f:0b:74,dst=de:d0:a3:63:0b:30),eth_type(0x0800),ipv4(frag=no), packets:878, bytes:122802, used:0.440s, actions:set(tunnel(tun_id=0x64,src=1.1.1.1,dst=1.1.1.2,ttl=64,flags(key))),2
tunnel(tun_id=0x64,src=1.1.1.1,dst=1.1.1.2,flags(+key)),recirc_id(0),in_port(2),eth(src=de:d0:a3:63:0b:30,dst=50:6b:4b:2f:0b:74),eth_type(0x0800),ipv4(frag=no), packets:995, bytes:97510, used:0.440s, actions:3
For the host PF, in order for GRE to work properly with the default 1500 MTU, follow these steps.
- Disable host PF as the port owner from Arm. Run:
$ mlxprivhost -d /dev/mst/mt41682_pciconf0 --disable_port_owner r
- The MTU of the end points (pf0hpf in the example above) of the GRE tunnel must be smaller than the MTU of the tunnel interfaces (p0) to account for the size of the GRE headers. For example, you can set the MTU of P0 to 2000.
3.12. GENEVE Tunneling Offload
GENEVE tunnels are created on the Arm side and attached to the OVS. GENEVE decapsulation/encapsulation behavior is similar to normal GENEVE behavior, including over hw_offload=true.
To allow GENEVE encapsulation, the uplink representor (p0) must have an MTU value at least 50 bytes greater than that of the host PF/VF.
3.12.1. Configuring GENEVE Tunnel
- Consider
p0to be the local GENEVE tunnel interface.p0should not be attached to any OVS bridge. - Create an OVS bridge,
br0, with a GENEVE tunnel interface,gnv0. Run:ovs-vsctl add-port br0 gnv0 -- set interface gnv0 type=geneve options:local_ip=1.1.1.1 options:remote_ip=1.1.1.2 options:key=100
- Add
pf0hpftobr0.ovs-vsctl add-port br0 pf0hpf
At this point, any network traffic sent or received by the host's PF0 undergoes GENEVE processing inside the BlueField OS.
Options are supported for GENEVE. For example, you may add option 0xea55 to tunnel metadata, run:
            ovs-ofctl add-tlv-map geneve_br "{class=0xffff,type=0x0,len=4}->tun_metadata0"
ovs-ofctl add-flow geneve_br ip,actions="set_field:0xea55->tun_metadata0",normal
For the host PF, in order for GENEVE to work properly with the default 1500 MTU, follow these steps.
- Disable host PF as the port owner from Arm. Run:
$ mlxprivhost -d /dev/mst/mt41682_pciconf0 --disable_port_owner r
- The MTU of the end points (pf0hpf in the example above) of the GENEVE tunnel must be smaller than the MTU of the tunnel interfaces (p0) to account for the size of the GENEVE headers. For example, you can set the MTU of P0 to 2000.
3.13. Using TC Interface to Configure Offload Rules
Offloading rules can also be added directly, and not just through OVS, using the tc utility. To enable TC ingress on all the representors (i.e., uplink, PF, and VF).
            $ tc qdisc add dev p0 ingress
$ tc qdisc add dev pf0hpf ingress
$ tc qdisc add dev pf0vf0 ingress
3.13.1. L2 Rules Example
The rule below drops all packets matching the given source and destination MAC addresses.
            $ tc filter add dev pf0hpf protocol ip parent ffff: \
      flower \
      skip_sw \
      dst_mac e4:11:22:11:4a:51 \
      src_mac e4:11:22:11:4a:50 \
      action drop
3.13.2. VLAN Rules Example
The following rules push VLAN ID 100 to packets sent from VF0 to the wire (and forward it through the uplink representor) and strip the VLAN when sending the packet to the VF.
            $ tc filter add dev pf0vf0 protocol 802.1Q parent ffff: \
        flower \
        skip_sw \
        dst_mac e4:11:22:11:4a:51 \
        src_mac e4:11:22:11:4a:50 \
        action vlan push id 100 \
        action mirred egress redirect dev p0

        $ tc filter add dev p0 protocol 802.1Q parent ffff: \
        flower \
        skip_sw \
        dst_mac e4:11:22:11:4a:51 \
        src_mac e4:11:22:11:4a:50 \
        vlan_ethtype 0x800 \
        vlan_id 100 \
        vlan_prio 0 \
        action vlan pop \
        action mirred egress redirect dev pf0vf0
3.13.3. VXLAN Encap/Decap Example
            $ tc filter add dev pf0vf0 protocol 0x806 parent ffff: \
      flower \
      skip_sw \
      dst_mac e4:11:22:11:4a:51 \
      src_mac e4:11:22:11:4a:50 \
      action tunnel_key set \
      src_ip 20.1.12.1 \
      dst_ip 20.1.11.1 \
      id 100 \
      action mirred egress redirect dev vxlan100

      $ tc filter add dev vxlan100 protocol 0x806 parent ffff: \
      flower \
      skip_sw \
      dst_mac e4:11:22:11:4a:51 \
      src_mac e4:11:22:11:4a:50 \
      enc_src_ip 20.1.11.1 \
      enc_dst_ip 20.1.12.1 \
      enc_key_id 100 \
      enc_dst_port 4789 \
      action tunnel_key unset \
      action mirred egress redirect dev pf0vf0
3.14. VirtIO Acceleration Through Hardware vDPA
For configuration procedure, please refer to the MLNX_OFED documentation under OVS Offload Using ASAP² Direct > VirtIO Acceleration through Hardware vDPA.
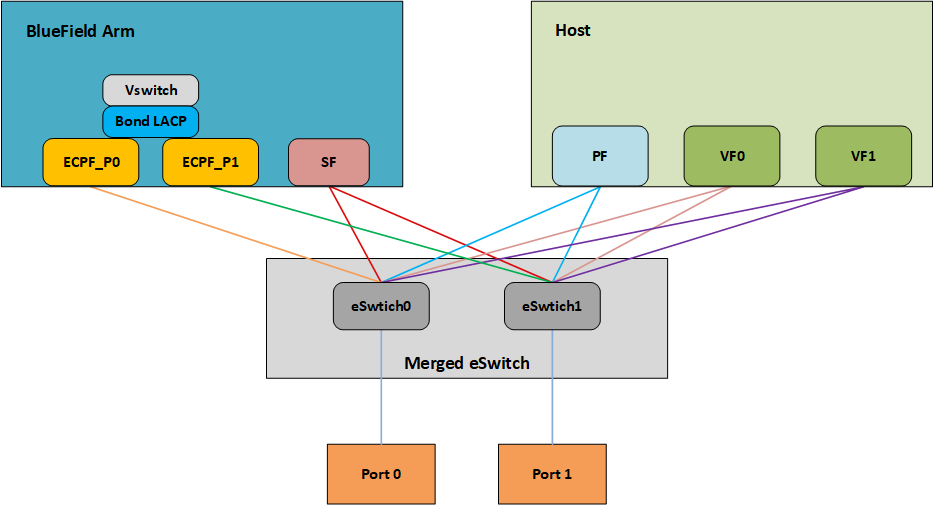
Network bonding enables combining two or more network interfaces into a single interface. It increases the network throughput, bandwidth and provides redundancy if one of the interfaces fails.
BlueField DPU has an option to configure network bonding on the Arm side in a manner transparent to the host. Under such configuration, the host would only see a single PF.
This functionality is supported when the DPU is set in embedded function ownership mode for both ports.
While LAG is being confiugred (starting with step 2 under section LAG Configuration), traffic cannot pass through the physical port.
The diagram below describes this configuration:
4.1. LAG Modes
Two LAG modes are supported on BlueField:
- Queue Affinity mode
- Hash mode
4.1.1. Queue Affinity Mode
In this mode, packets are distributed according to the QPs. To enable this mode, run:
$ mlxconfig -d /dev/mst/mt41686_pciconf0 s LAG_RESOURCE_ALLOCATION=0
Add/edit the following field from /etc/mellanox/mlnx-bf.conf as follows:
LAG_HASH_MODE="no"
Perform system power cycle.
4.1.2. Hash Mode
In this mode, packets are distributed to ports according to the hash on packet headers.
For this mode, prerequisite steps 3 and 4 are not required.
To enable this mode, run:
$ mlxconfig -d /dev/mst/mt41686_pciconf0 s LAG_RESOURCE_ALLOCATION=1
Add/edit the following field from /etc/mellanox/mlnx-bf.conf as follows:
LAG_HASH_MODE="yes"
Perform system power cycle.
4.2. Prerequisites
- Set the LAG mode to work with.
- (Optional) Hide the second PF on the host. Run:
$ mlxconfig -d /dev/mst/<device-name> s HIDE_PORT2_PF=True NUM_OF_PF=1
mt41686_pciconf0.Note:This step necessitates a system power cycle. If not performed, the second physical interface will still be visible to the host, but it will not be functional. This step has no effect on LAG configuration or functionality on the Arm side.
- Delete any installed Scalable Functions (SFs) on the Arm side.
- Stop the driver on the host side. Run:
$ systemctl stop openibd
- The uplink interfaces (p0 and p1) on the Arm side must be disconnected from any OVS bridge.
4.3. LAG Configuration
- Create the bond interface:
            $ ip link add bond0 type bond
$ ip link set bond0 down
$ ip link set bond0 type bond miimon 100 mode 4 xmit_hash_policy layer3+4
Note:While LAG is being configured (starting with the next step), traffic cannot pass through the physical ports.
- Subordinate both the uplink representors to the bond interface. Run:
            $ ip link set p0 down
$ ip link set p1 down
$ ip link set p0 master bond0
$ ip link set p1 master bond0
- Bring the interfaces up. Run:
            $ ip link set p0 up
$ ip link set p1 up
$ ip link set bond0 up
Note:When in shared RQ mode (enabled by default), the uplink interfaces (p0 and p1) must always stay enabled. Disabling them will break LAG support and VF-to-VF communication on same host.
For OVS configuration, the bond interface is the one that needs to be added to the OVS bridge (interfaces p0 and p1 should not be added). The PF representor for the first port (pf0hpf) of the LAG must be added to the OVS bridge. The PF representor for the second port (pf1hpf) would still be visible, but it should not be added to OVS bridge.
Trying to change bonding configuration in Queue Affinity mode (including bringing the subordinated interface up/down) while the host driver is loaded would cause FW syndrome and failure of the operation. Make sure to unload the host driver before altering DPU bonding configuration to avoid this.
When performing driver reload (openibd restart) or reboot, it is required to remove bond configuration from NetworkManager, and to reapply the configurations after the driver is fully up. Refer to steps 1-4 of section Removing LAG Configuration.
4.4. Removing LAG Configuration
- If Queue Affinity mode LAG is configured (i.e.,
LAG_RESOURCE_ALLOCATION=0):- Delete any installed Scalable Functions (SFs) on the Arm side. Refer to Scalable Function Setup Guide for instructions on deleting SFs.
- Stop driver (openibd) on the host side. Run:
systemctl stop openibd
- Delete the LAG OVS bridge on the Arm side. Run:
$ ovs-vsctl del-br bf-lag
This allows for later restoration of OVS configuration for non-LAG networking.
- Stop OVS service. Run:
$ systemctl stop openvswitch-switch.service
- Run:
            $ ip link set bond0 down
$ modprobe -rv bonding
As a result, both of the DPU's network interfaces would be available to the host side for networking and SR-IOV.
- For the host to be able to use the DPU ports, make sure to attach the ECPF and host representor in an OVS bridge on the Arm side. Refer to "Virtual Switch on DPU" for instructions on how to perform this.
- Revert from
HIDE_PORT2_PF, on the Arm side. Run:mlxconfig -d /dev/mst/<device-name> s HIDE_PORT2_PF=False NUM_OF_PF=2
- Restore default LAG settings in the DPU's firmware. Run:
mlxconfig -d /dev/mst/<device-name> s LAG_RESOURCE_ALLOCATION=DEVICE_DEFAULT
- Delete the following line from
/etc/mellanox/mlnx-bf.confon the Arm side:LAG_HASH_MODE=...
- Power cycle the system.
The following is a functional diagram of the BlueField DPU.
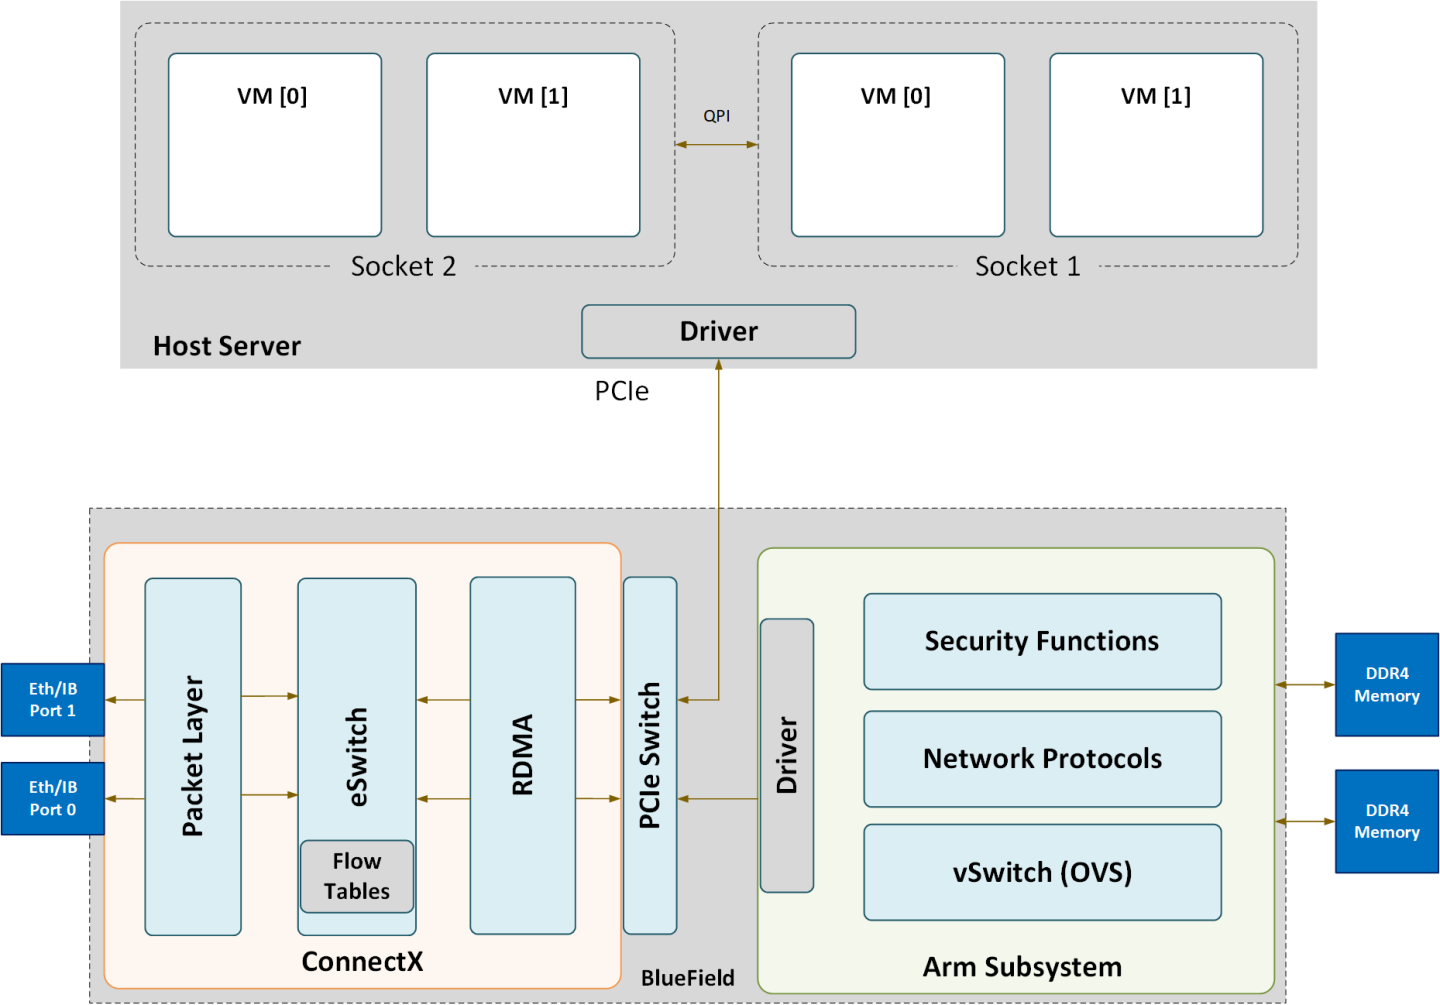
For each one of the BlueField DPU network ports, there are 2 physical PCIe networking functions exposed:
- To the embedded Arm subsystem
- To the host over PCIe
Different functions have different default grace period values during which functions can recover from/handle a single fatal error:
- ECPFs have a graceful period of 3 minutes
- PFs have a graceful period of 1 minute
- VFs/SFs have a graceful period of 30 seconds
The mlx5 drivers and their corresponding software stacks must be loaded on both hosts (Arm and the host server). The OS running on each one of the hosts would probe the drivers. BlueField-2 network interfaces are compatible with NVIDIA® ConnectX®-6 and higher.
The same network drivers are used both for BlueField and the ConnectX NIC family.
NVIDIA® BlueField® allows control over some of the networking parameters of the PFs and VFs running on the host side.
6.1. Setting Host PF and VF Default MAC Address
From the Arm, users may configure the MAC address of the physical function in the host. After sending the command, users must reload the NVIDIA driver in the host to see the newly configured MAC address. The MAC address goes back to the default value in the FW after system reboot. Example:
            $ echo "c4:8a:07:a5:29:59" > /sys/class/net/p0/smart_nic/pf/mac
$ echo "c4:8a:07:a5:29:61" > /sys/class/net/p0/smart_nic/vf0/mac
6.2. Setting Host PF and VF Link State
vPort state can be configured to Up, Down, or Follow. For example:
$ echo "Follow" > /sys/class/net/p0/smart_nic/pf/vport_state
6.3. Query Configuration
To query the current configuration, run:
            $ cat /sys/class/net/p0/smart_nic/pf/config
MAC        : e4:8b:01:a5:79:5e
MaxTxRate  : 0
State      : Follow
Zero signifies that the rate limit is unlimited.
6.4. Disabling Host Networking PFs
It is possible to not expose NVIDIA® ConnectX® networking functions to the host for users interested in using storage or VirtIO functions only. When this feature is enabled, the host PF representors (i.e., pf0hpf and pf1hpf) will not be seen on the Arm.
- Without a PF on the host, it is not possible to enable SR-IOV, so VF representors will not be seen on the Arm either
- Without PFs on the host, there can be no SFs on it
To disable host networking PFs, run:
mlxconfig -d /dev/mst/mt41686_pciconf0 s NUM_OF_PF=0
To reactivate host networking PFs, run:
- For single-port DPUs, run:
mlxconfig -d /dev/mst/mt41686_pciconf0 s NUM_OF_PF=1
- For dual-port DPUs, run:
mlxconfig -d /dev/mst/mt41686_pciconf0 s NUM_OF_PF=2
When there are no networking functions exposed on the host, the reactivation command must be run from the Arm.
Power cycle is required to apply configuration changes.
Notice
This document is provided for information purposes only and shall not be regarded as a warranty of a certain functionality, condition, or quality of a product. NVIDIA Corporation nor any of its direct or indirect subsidiaries and affiliates (collectively: “NVIDIA”) make no representations or warranties, expressed or implied, as to the accuracy or completeness of the information contained in this document and assume no responsibility for any errors contained herein. NVIDIA shall have no liability for the consequences or use of such information or for any infringement of patents or other rights of third parties that may result from its use. This document is not a commitment to develop, release, or deliver any Material (defined below), code, or functionality.
NVIDIA reserves the right to make corrections, modifications, enhancements, improvements, and any other changes to this document, at any time without notice.
Customer should obtain the latest relevant information before placing orders and should verify that such information is current and complete.
NVIDIA products are sold subject to the NVIDIA standard terms and conditions of sale supplied at the time of order acknowledgement, unless otherwise agreed in an individual sales agreement signed by authorized representatives of NVIDIA and customer (“Terms of Sale”). NVIDIA hereby expressly objects to applying any customer general terms and conditions with regards to the purchase of the NVIDIA product referenced in this document. No contractual obligations are formed either directly or indirectly by this document.
NVIDIA products are not designed, authorized, or warranted to be suitable for use in medical, military, aircraft, space, or life support equipment, nor in applications where failure or malfunction of the NVIDIA product can reasonably be expected to result in personal injury, death, or property or environmental damage. NVIDIA accepts no liability for inclusion and/or use of NVIDIA products in such equipment or applications and therefore such inclusion and/or use is at customer’s own risk.
NVIDIA makes no representation or warranty that products based on this document will be suitable for any specified use. Testing of all parameters of each product is not necessarily performed by NVIDIA. It is customer’s sole responsibility to evaluate and determine the applicability of any information contained in this document, ensure the product is suitable and fit for the application planned by customer, and perform the necessary testing for the application in order to avoid a default of the application or the product. Weaknesses in customer’s product designs may affect the quality and reliability of the NVIDIA product and may result in additional or different conditions and/or requirements beyond those contained in this document. NVIDIA accepts no liability related to any default, damage, costs, or problem which may be based on or attributable to: (i) the use of the NVIDIA product in any manner that is contrary to this document or (ii) customer product designs.
No license, either expressed or implied, is granted under any NVIDIA patent right, copyright, or other NVIDIA intellectual property right under this document. Information published by NVIDIA regarding third-party products or services does not constitute a license from NVIDIA to use such products or services or a warranty or endorsement thereof. Use of such information may require a license from a third party under the patents or other intellectual property rights of the third party, or a license from NVIDIA under the patents or other intellectual property rights of NVIDIA.
Reproduction of information in this document is permissible only if approved in advance by NVIDIA in writing, reproduced without alteration and in full compliance with all applicable export laws and regulations, and accompanied by all associated conditions, limitations, and notices.
THIS DOCUMENT AND ALL NVIDIA DESIGN SPECIFICATIONS, REFERENCE BOARDS, FILES, DRAWINGS, DIAGNOSTICS, LISTS, AND OTHER DOCUMENTS (TOGETHER AND SEPARATELY, “MATERIALS”) ARE BEING PROVIDED “AS IS.” NVIDIA MAKES NO WARRANTIES, EXPRESSED, IMPLIED, STATUTORY, OR OTHERWISE WITH RESPECT TO THE MATERIALS, AND EXPRESSLY DISCLAIMS ALL IMPLIED WARRANTIES OF NONINFRINGEMENT, MERCHANTABILITY, AND FITNESS FOR A PARTICULAR PURPOSE. TO THE EXTENT NOT PROHIBITED BY LAW, IN NO EVENT WILL NVIDIA BE LIABLE FOR ANY DAMAGES, INCLUDING WITHOUT LIMITATION ANY DIRECT, INDIRECT, SPECIAL, INCIDENTAL, PUNITIVE, OR CONSEQUENTIAL DAMAGES, HOWEVER CAUSED AND REGARDLESS OF THE THEORY OF LIABILITY, ARISING OUT OF ANY USE OF THIS DOCUMENT, EVEN IF NVIDIA HAS BEEN ADVISED OF THE POSSIBILITY OF SUCH DAMAGES. Notwithstanding any damages that customer might incur for any reason whatsoever, NVIDIA’s aggregate and cumulative liability towards customer for the products described herein shall be limited in accordance with the Terms of Sale for the product.
Trademarks
NVIDIA, the NVIDIA logo, and Mellanox are trademarks and/or registered trademarks of Mellanox Technologies Ltd. and/or NVIDIA Corporation in the U.S. and in other countries. The registered trademark Linux® is used pursuant to a sublicense from the Linux Foundation, the exclusive licensee of Linus Torvalds, owner of the mark on a world¬wide basis. Other company and product names may be trademarks of the respective companies with which they are associated.
Copyright
© 2022 NVIDIA Corporation & affiliates. All rights reserved.