East-west Overlay Encryption
NVIDIA DOCA East-West Overlay Encryption Application
This document describes IPsec based strongSwan solution.
Important note for NVIDIA® BlueField®-2 DPUs only: If your target application utilizes 100Gb/s or higher bandwidth, where a substantial part of the bandwidth is allocated for IPsec traffic, please refer to the NVIDIA BlueField-2 DPUs Product Release Notes to learn about a potential bandwidth limitation. To access the relevant product release notes, please contact your NVIDIA sales representative.
IPsec is used to set up encrypted connections between different devices. It helps keep data sent over public networks secure. IPsec is often used to set up VPNs, and it works by encrypting IP packets as well as authenticating the packets' originator. IPsec contains the following main modules:
- Key exchange – a key is a string of random bytes that can be used for encryption and decryption of messages. IPsec sets up keys with a key exchange between the connected devices, so that each device can decrypt the other device's messages.
- Authentication – IPsec provides authentication for each packet which ensures that they come from a trusted source.
- Encryption – IPsec encrypts the payloads within each packet and possibly, based on the transport mode, the packet's IP header.
- Decryption – at the other end of the communication, packets are decrypted by the IPsec supported node.
IPsec supports two types of headers:
- Authentication header (AH) – AH protocol ensures that packets are from a trusted source. AH does not provide any encryption.
- Encapsulating security protocol (ESP) – ESP encrypts the payload for each packet as well as the IP header depending on the transport mode. ESP adds its own header and a trailer to each data packet.
IPsec support two types of transport mode:
- IPsec tunnel mode – used between two network nodes, each acting as tunnel initiator/terminator on a public network. In this mode, the original IP header and payload are both encrypted. Since the IP header is encrypted, an IP tunnel is added for network forwarding. At each end of the tunnel, the routers decrypt the IP headers to route the packets to their destinations.
- Transport mode – the payload of each packet is encrypted, but the original IP header is not. Intermediary network nodes are therefore able to view the destination of each packet and route the packet, unless a separate tunneling protocol is used.
strongSwan is an open-source IPsec-based VPN solution. For more information, please refer to strongSwan documentation.
IPsec full offload offloads both IPsec crypto (encrypt/decrypt) and IPsec encapsulation to the hardware. IPsec full offload is configured on the Arm via the uplink netdev.
The deployment model allows the IPsec offload to be transparent to the host with the benefits of securing legacy workloads (no dependency on host SW stack) and to zero CPU utilization on host.
IPsec full offload configuration works with and is transparent to OVS offload. This means all packets from OVS offload are encrypted by IPsec rules.
The following figure illustrates the interaction between IPsec full offload and OVS VXLAN offload.
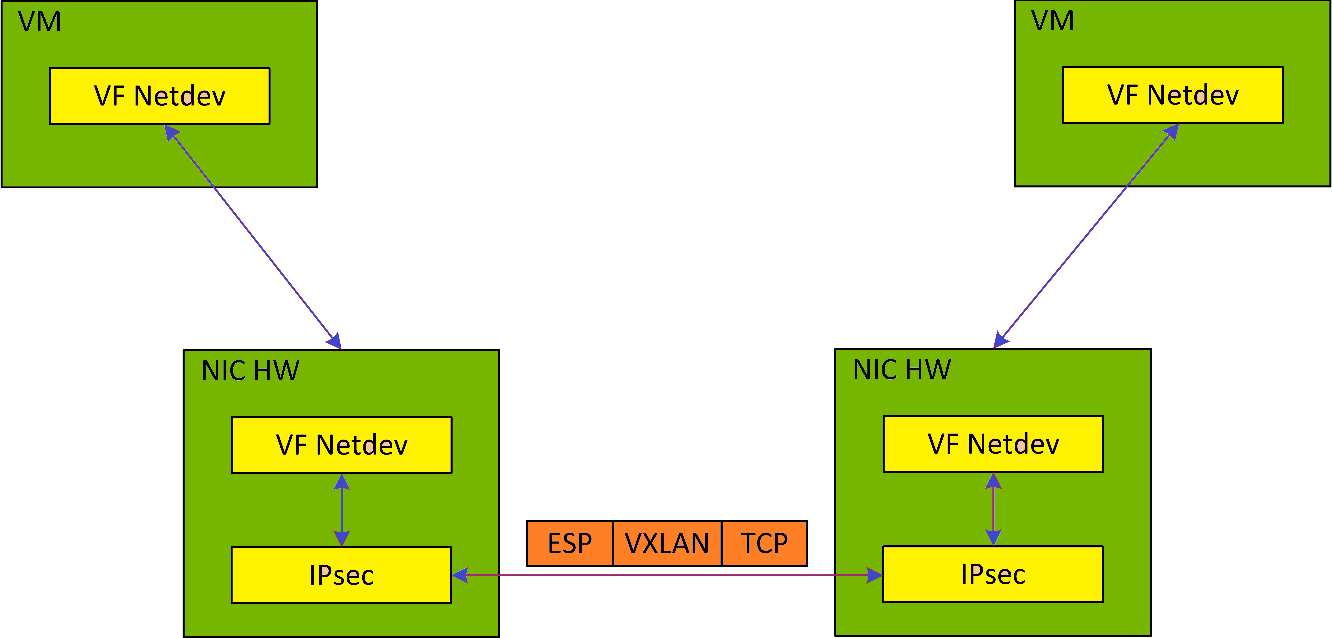
Note: OVS offload and IPsec IPv6 do not work together.
- Configure strongSwan IPsec offload using
swanctl.confconfiguration file. - Traffic is sent from the host through BlueField.
- Using OVS, the packets are encapsulated on ingress using tunnel protocols (VXLAN for example) to match IPsec configuration by strongSwan.
- Set by strongSwan configuration file, traffic will be encrypted using the hardware offload.
- Egress flow is decryption first, decapsulation of the tunnel header and forward to the relevant physical function.
The following section provides information on manually configuring IPsec full offload in general and on using OVS IPsec with strongSwan specifically.
There is a script, east_west_overlay_encryption.sh, which is elaborated on in section Running Application which performs the steps in this section automatically.
If you are working directly with the ip xfrm tool, use /opt/mellanox/iproute2/sbin/ip to benefit from IPsec full offload support.
There are two parts in the configuration flow:
- Enabling IPsec full offload mode.
- Configuring the IPsec OVS bridge using one of three modes of authentication.
An alternative for step two is configuring swanctl.conf files (configuration files for strongSwan) manually and using strongSwan directly instead of using IPsec OVS (which automatically generates swanctl.conf files) as explained in Configuring OVS IPsec Using strongSwan Manually
5.1. Enabling IPsec Full Offload
This section explicitly enables IPsec full offload on the Arm cores before setting up offload-aware IPSec tunnels.
There is a script, east_west_overlay_encryption.sh, which is elaborated on in section Running Application which performs the steps in this section automatically.
Explicitly enable IPsec full offload on the Arm cores:
- Disable
mlx-regex. Run:systemctl stop mlx-regex
- Set
IPSEC_FULL_OFFLOAD="yes"in/etc/mellanox/mlnx-bf.conf.Note:If
IPSEC_FULL_OFFLOADdoes not appear in/etc/mellanox/mlnx-bf.confthen you are probably using an old version of the BlueField image. Check the way of enabling IPsec full offload in a previous DOCA versions in the NVIDIA DOCA Documentation Archives. - Restart IB driver (rebooting also works). Run:
/etc/init.d/openibd restart
- Re-enable
mlx-regex. Run:systemctl restart mlx-regex
Note:To check if IPsec full offload is indeed enabled, verify that
/sys/class/net/*/compat/devlink/ipsec_modeisfull. If not (i.e.,none), then something is wrong. Retry this procedure and try rebooting instead of restarting the IB driver.Note:To revert IPsec full offload mode, redo the procedure from step 1, only difference is to set
IPSEC_FULL_OFFLOAD="no"in/etc/mellanox/mlnx-bf.conf.
5.2. Configuring OVS IPsec
Before proceeding with this section, make sure to follow the procedure in Enabling IPsec Full Offload for both DPUs.
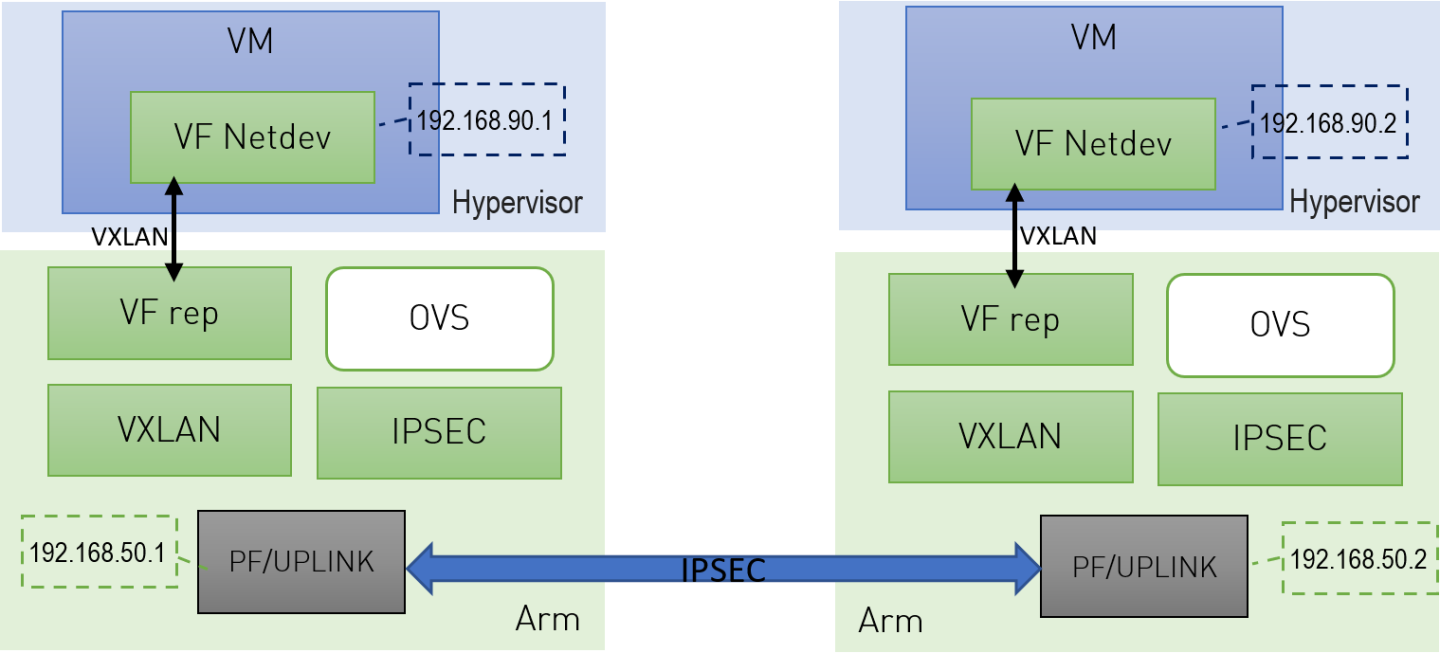
This section configures OVS IPsec VXLAN tunnel which automatically generates the swanctl.conf files and runs strongSwan (the IPsec daemon). The following figure illustrates an example with two BlueField DPUs, Left and Right, operating with a secured VXLAN channel.
Two BlueField DPUs are required to build an OVS IPsec tunnel between the two hosts, Right and Left.
The OVS IPsec tunnel configures an unaware IPsec connection between the two hosts' InfiniBand devices. For the sake of this example, the host's InfiniBand network device is HOST_PF, and the DPU's host representor is PF_REP and the DPU's physical function PF.
This example sets up the following variables on both Arms:
            # host_ip1=1.1.1.1
# host_ip2=1.1.1.2
# HOST_PF=ens7np0
# ip1=192.168.50.1
# ip2=192.168.50.2
# PF=p0
# PF_REP=pf0hpf
The name of the HOST_PF could be different in your machine. You may verify this by running the following on the host:
            # ibdev2netdev
mlx5_0 port 1 ==> ens7np0 (Down)
mlx5_1 port 1 ==> ens8np1 (Down)
This example uses the first InfiniBand's (mlx5_0) network device which is ens7np0.
- Configure IP addresses for the
HOST_PFs of both hosts (x86):- On
host_1:# ifconfig $HOST_PF $host_ip1/24 up
- On
host_2:# ifconfig $HOST_PF $host_ip2/24 up
Note:Step 1 is the only command that is performed on the host, the rest of the commands are performed on the Arm (DPU) side.
- On
- Configure IP addresses for the PFs of both Arms:
- On
Arm_1:# ifconfig $PF $ip1/24 up
- On
Arm_2:# ifconfig $PF $ip2/24 up
- On
- Enable TC offloading for the PF. Run the following on both
Arm_1andArm_2:# ethtool -K $PF hw-tc-offload on
- Disable host PF as the port owner from Arm. Run the following on both
Arm_1andArm_2:# mlxprivhost -d /dev/mst/mt${pciconf} --disable_port_owner r
Note:To get
${pciconf}, run the following on the Arm:# ls --color=never /dev/mst/ | grep --color=never '^m.*f0$' | cut -c 3-
For example:
# mlxprivhost -d /dev/mst/mt41686_pciconf0 --disable_port_owner r
- Start Open vSwitch. If your operating system is Ubuntu, run the following on both
Arm_1andArm_2:# service openvswitch-switch start
Arm_1andArm_2:# service openvswitch restart
- Start OVS IPsec service. Run the following on both
Arm_1andArm_2:# systemctl start openvswitch-ipsec.service
- Set up OVS bridges in both DPUs. Run the following on both
Arm_1andArm_2:# ovs-vsctl add-br vxlan-br # ovs-vsctl add-port ovs-br $PF_REP # ovs-vsctl set Open_vSwitch . other_config:hw-offload=true
Note:Configuring
other_config:hw-offload=truesets IPsec full offload. Setting it tofalsesets software IPsec. Make sure that IPsec devlink's mode is set back tononefor software IPsec. This is done by reverting the configurations in Enabling IPsec Full Offload.Note:The MTU of the tunnel interface (
PF) should be at least 50 bytes larger than the MTU of the endpoints of the tunnels above (PF_REP) to account for the size of the VXLAN tunnel header. For example, if the MTU ofPF_REPis 1500 then the MTU ofPFshould at least be 1550. To configure the MTU of the PF:# ifconfig $PF mtu $PF_MTU up
- Set up IPsec tunnel on the OVS bridge. Three authentication methods are possible. Select your preferred method and follow the steps relevant to it. Note that the last two authentication methods require you to create certificates (self-signed or certificate authority certificates).
Note:
After the IPsec tunnel is set up using one of the three methods of authentication, strongSwan configuration is done automatically and the
swanctl.conffiles are generated and strongSwan runs automatically.
5.2.1. Authentication Methods
The following subsections detail the possible authentication methods for setting up the IPsec tunnel on the OVS bridge.
5.2.1.1. Pre-shared Key
This method configures OVS IPsec using a pre-shared key. You must select a pre-shared key, for example:
psk=swordfish
- On
Arm_1, run:# ovs-vsctl add-port vxlan-br tun -- \ set interface tun type=vxlan \ options:local_ip=$ip1 \ options:remote_ip=$ip2 \ options:key=100 \ options:dst_port=4789 \ options:psk=$psk
- On
Arm_2, run:# ovs-vsctl add-port vxlan-br tun -- \ set interface tun type=vxlan \ options:local_ip=$ip2 \ options:remote_ip=$ip1 \ options:key=100 \ options:dst_port=4789\ options:psk=$psk
5.2.1.2. Self-signed Certificate
This method configures OVS IPsec using self-signed certificates. You must generate self-signed certificates and keys. This example demonstrates how to generate self-signed certificates using ovs-pki but you may generate them in any other way while skipping step 1.
- Generate self-signed certificates using
ovs-pki:- On
Arm_1, run:# ovs-pki req -u host_1 # ovs-pki self-sign host_1
After running this code you should have
host_1-cert.pemandhost_1-privkey.pem. - On
Arm_2, run:# ovs-pki req -u host_2 # ovs-pki self-sign host_2
After running this code you should have
host_2-cert.pemandhost_2-privkey.pem.
- On
- Configure the certificates and private keys:
- Copy the certificate of
Arm_1toArm_2, and the certificate ofArm_2toArm_1. - On each machine, move both
host_1-privkey.pemandhost_2-cert.pemto/etc/swanctl/x509/if on Ubuntu, or/etc/strongswan/swanctl/x509/if on CentOS. - On each machine, move the local private key (
host_1-privkey.pemonArm_1andhost_2-privkey.pemonArm_2) to/etc/swanctl/privateif on Ubuntu, or/etc/strongswan/swanctl/privateif on CentOS.
- Copy the certificate of
- Set up OVS
other_configon both sides.- On
Arm_1:# ovs-vsctl set Open_vSwitch . other_config:certificate=/etc/swanctl/x509/host_1-cert.pem \ other_config:private_key=/etc/swanctl/private/host_1-privkey.pem
- On
Arm_2:# ovs-vsctl set Open_vSwitch . other_config:certificate=/etc/swanctl/x509/host_2-cert.pem \ other_config:private_key=/etc/swanctl/private/host_2-privkey.pem
- On
- Set up the VXLAN tunnel:
- On
Arm_1:# ovs-vsctl add-port vxlan-br vxlanp0 -- set interface vxlanp0 type=vxlan options:local_ip=$ip1 \ options:remote_ip=$ip2 options:key=100 options:dst_port=4789 \ options:remote_cert=/etc/swanctl/x509/host_2-cert.pem # service openvswitch-switch restart
- On
Arm_2:# ovs-vsctl add-port vxlan-br vxlanp0 -- set interface vxlanp0 type=vxlan options:local_ip=$ip2 \ options:remote_ip=$ip1 options:key=100 options:dst_port=4789 \ options:remote_cert=/etc/swanctl/x509/host_1-cert.pem # service openvswitch-switch restart
Note:In steps 3 and 4, if you are in CentOS you must change the path of the certificates to
/etc/strongswan/swanctl/x509/and the path of the private keys to/etc/strongswan/swanctl/private. - On
5.2.1.3. CA-signed Certificate
This method configures OVS IPsec using self-signed certificates. You must generate self-signed certificates and keys. This example demonstrates how to generate self-signed certificates using ovs-pki but you may generate them in any other way while skipping step 1.
- Generate CA-signed certificates using
ovs-pki. For this method, all the certificates and the requests must be in the same directory during the certificate generating and signing. This example refers to this directory ascertsworkspace.- On
Arm_1, run:# ovs-pki init --force # cp /var/lib/openvswitch/pki/controllerca/cacert.pem <path_to>/certsworkspace # cd <path_to>/certsworkspace # ovs-pki req -u host_1 # ovs-pki sign host1 switch
After running this code, you should have
host_1-cert.pem,host_1-privkey.pem, andcacert.pmin thecertsworkspacefolder. - On
Arm_2, run:# ovs-pki init --force # cp /var/lib/openvswitch/pki/controllerca/cacert.pem <path_to>/certsworkspace # cd <path_to>/certsworkspace # ovs-pki req -u host_2 # ovs-pki sign host_2 switch
After running this code, you should have
host_2-cert.pem,host_2-privkey.pem, andcacert.pmin thecertsworkspacefolder.
- On
- Configure the certificates and private keys:
- Copy the certificate of
Arm_1toArm_2and the certificate ofArm_2toArm_1. - On each machine, move both
host_1-privkey.pemandhost_2-cert.pemto/etc/swanctl/x509/if on Ubuntu, or/etc/strongswan/swanctl/x509/if on CentOS. - On each machine, move the local private key (
host_1-privkey.pemif onArm_1andhost_2-privkey.pemif onArm_2) to/etc/swanctl/privateif on Ubuntu, or/etc/strongswan/swanctl/privateif on CentOS. - On each machine, copy
cacert.pemto thex509cadirectory under/etc/swanctl/x509ca/if on Ubuntu, or/etc/strongswan/swanctl/x509ca/if on CentOS.
- Copy the certificate of
- Set up OVS
other_configon both sides.- On
Arm_1:# ovs-vsctl set Open_vSwitch . \ other_config:certificate=/etc/strongswan/swanctl/x509/host_1.pem \ other_config:private_key=/etc/strongswan/swanctl/private/host_1-privkey.pem \ other_config:ca_cert=/etc/strongswan/swanctl/x509ca/cacert.pem
- On
Arm_2:# ovs-vsctl set Open_vSwitch . \ other_config:certificate=/etc/strongswan/swanctl/x509/host_2.pem \ other_config:private_key=/etc/strongswan/swanctl/private/host_2-privkey.pem \ other_config:ca_cert=/etc/strongswan/swanctl/x509ca/cacert.pem
- On
- Set up the tunnel:
- On
Arm_1:# ovs-vsctl add-port vxlan-br vxlanp0 -- set interface vxlanp0 type=vxlan options:local_ip=$ip1 \ options:remote_ip=$ip2 options:key=100 options:dst_port=4789 \ options:remote_name=host_2 # service openvswitch-switch restart
- On
Arm_2:# ovs-vsctl add-port vxlan-br vxlanp0 -- set interface vxlanp0 type=vxlan options:local_ip=$ip2 \ options:remote_ip=$ip1 options:key=100 options:dst_port=4789 \ options:remote_name=host_1 # service openvswitch-switch restart
Note:In steps 3 and 4, if you are in CenOS you must change the path of the certificates to
/etc/strongswan/swanctl/x509/, the path of the CA certificate to/etc/strongswan/swanctl/x509ca/, and the path of the private keys to/etc/strongswan/swanctl/private/. - On
5.4. Configuring OVS IPsec Using strongSwan Manually
This section configures an OVS VXLAN tunnel which then uses swanctl.conf files and runs strongSwan (the IPsec daemon) manually.
Before proceeding with this section, make sure to follow the procedure in Enabling IPsec Full Offload for both DPUs.
- Build a VXLAN tunnel over OVS and connect the PF representor to the same OVS bridge.
- On
Arm_1:# ovs-vsctl add-br vxlan-br # ovs-vsctl add-port vxlan-br PF_REP # ovs-vsctl add-port vxlan-br vxlan11 -- set interface vxlan11 type=vxlan options:local_ip=$ip1 \ options:remote_ip=$ip2 options:key=100 options:dst_port=4789 \ # ovs-vsctl set Open_vSwitch . other_config:hw-offload=true
- On
Arm_2:# ovs-vsctl add-br vxlan-br # ovs-vsctl add-port vxlan-br PF_REP # ovs-vsctl add-port vxlan-br vxlan11 -- set interface vxlan11 type=vxlan options:local_ip=$ip2 \ options:remote_ip=$ip1 options:key=100 options:dst_port=4789 \ # ovs-vsctl set Open_vSwitch . other_config:hw-offload=true
- On
- If your operating system is Ubuntu, run on both
Arm_1andArm_2:service openvswitch-switch start
service openvswitch restart
- Enable TC offloading for the PF. Run on both
Arm_1andArm_2:# ethtool -K $PF hw-tc-offload on
- Disable host PF as the port owner from Arm. Run on both
Arm_1andArm_2:# mlxprivhost -d /dev/mst/mt${pciconf} --disable_port_owner r
Note:To get
${pciconf}, run the following on the DPU:# ls --color=never /dev/mst/ | grep --color=never '^m.*f0$' | cut -c 3-
For example:
# mlxprivhost -d /dev/mst/mt41686_pciconf0 --disable_port_owner r
- Configure the
swanctl.conffiles for each machine. See section swanctl.conf Files.Note:Each machine should have exactly one .
swanctl.conffile in/etc/swanctl/conf.d/. - Load the
swanctl.conffiles and initialize strongSwan. Run:- On the
Arm_2, run:systemctl restart strongswan-starter.service swanctl --load-all
- On the
Arm_1, run:systemctl restart strongswan-starter.service swanctl --load-all swanctl -i --child bf
- On the
Now the IPsec connection should be established.
5.5. swanctl.conf Files
strongSwan configures IPSec HW full offload using a new value added to its configuration file swanctl.conf. The file should be placed under sysconfdir which by default can be found at /etc/swanctl/swanctl.conf. The terms Left (BFL) and Right (BFR), in reference to the illustration under Application Architecture, are used to identify the two nodes (or machines) that communicate.
Either side (BFL or BFR) can fulfill either role (initiator or receiver).
In this example, 192.168.50.1 is used for the left PF uplink and 192.168.50.2 for the right PF uplink.
            connections {
   BFL-BFR {
      local_addrs  = 192.168.50.1
      remote_addrs = 192.168.50.2

      local {
        auth = psk
        id = host1
      }
      remote {
        auth = psk
        id = host2
      }

      children {
         bf {
            local_ts = 192.168.50.1/24 [udp/4789]
            remote_ts = 192.168.50.2/24 [udp/4789]
            esp_proposals = aes128gcm128-x25519
            mode = transport
            policies_fwd_out = yes
            hw_offload = full
         }
      }
      version = 2
      mobike = no
      reauth_time = 0
      proposals = aes128-sha256-x25519
   }
}

secrets {
   ike-BF {
      id-host1 = host1
      id-host2 = host2
      secret = 0sv+NkxY9LLZvwj4qCC2o/gGrWDF2d21jL
   }
   }
The BFB installation will place two example swanctl.conf files for BFL and BFR (BFL.swanctl.conf and BFR.swanctl.conf respectively) in the strongSwan conf.d directory. Each node should have only one swanctl.conf file in its strongSwan conf.d directory.
Note that:
- "hw_offload = full" is responsible for configuring IPSec HW full offload
- Full offload support has been added to the existing hw_offload field and preserves backward compatibility.
For your reference:
Value Description no Do not configure HW offload, fail if not supported yes Configure crypto HW offload if supported by the kernel, fail if not supported (Existing) auto Configure crypto HW offload if supported by the kernel, do not fail (Existing) full Configure full HW offload if supported by the kernel, fail if not supported (New) - Whenever the value of hw_offload is changed, strongSwan configuration must be reloaded.
- Switching to crypto HW offload requires setting up devlink/ipsec_mode to none beforehand.
- Switching to full HW offload requires setting up devlink/ipsec_mode to full beforehand.
- [udp/4789] is crucial for instructing strongSwan to IPSec only VXLAN communication.
- Full HW offload can only be done on what is streamed over VXLAN.
Mind the following limitations:
| Fields | Limitation |
|---|---|
| reauth_time | Ignored if set |
| rekey_time | Do not use. Ignored if set. |
| rekey_bytes | Do not use. Not supported and will fail if it is set. |
| rekey_packets | Use for rekeying |
Refer to the following documents:
- NVIDIA DOCA Installation Guide for Linux for details on how to install BlueField-related software.
- NVIDIA DOCA Troubleshooting Guide for any issue you may encounter with the installation, compilation, or execution of DOCA applications.
6.1. Running strongSwan Example
Notes:
- IPsec daemons are started by systemd strongswan-starter.service
- Use systemctl [start | stop | restart] to control IPsec daemons through strongswan-starter.service. For example, to restart, run:
systemctl restart strongswan-starter.service
Note:Do not use the ipsec script (located under /usr/sbin/ipsec) to restart/stop/start the IPsec connection.
This subsection explains how to configure and set an IPsec connection using the script. To configure the IPsec connection, you need two DPUs, referred to as the initiator and receiver machines. There are no differences between the two machines except that the initiator is the one that initiates the connection between the two (and should run the script after the receiver).
The script is located under /opt/mellanox/doca/applications/east_west_overlay_encryption/bin/east_west_overlay_encryption.sh.
6.1.1. Script Parameters
| Parameter | Description | Valid Values | Use When | Notes |
|---|---|---|---|---|
| side | The side of the connection (receiver or initiator). |
|
Always | This parameter must be always passed on the command line and cannot be passed in the JSON parameter file. |
| j|json | The JSON parameters file full path. | JSON file path, written according to the template demonstrated in the following file: /opt/mellanox/doca/applications/east_west_overlay_encryption/bin/east_west_overlay_encryption_params.json. | To pass the parameters as a JSON file. | When running the script with JSON file, you cannot pass on the command line other parameters than the side and the JSON file. |
| initiator_ip_addr | The IP address of the initiator machine's port interface for the IPsec connection. | A valid IP address, ranging from 1.1.1.1 to 255.255.255.255. | Always | In the JSON file it is set by default to 192.168.50.1 |
| receiver_ip_addr | The IP address of the receiver machine's port interface for the IPsec connection. | A valid IP address, ranging from 1.1.1.1 to 255.255.255.255. | Always | In the JSON file it is set by default to 192.168.50.2 |
| port_num | The number of the port interface (p0/p1) for the IPsec connection. | 0 or 1. | Always | In the JSON file it is set by default to 0 |
| auth_method | the authentication method of IPsec. can be psk (pre-shared key), ssc (self-signed certificate) or ca (CA-signed certificate). Set by default to psk. | Can be psk (pre-shared key), ssc (self-signed certificate) or ca (CA-signed certificate). | Always | In the JSON file it is set by default to psk. |
| preshared_key | The pre-shared key. | A sequence of characters (string). | The auth_method parameter is set to psk | In the JSON file it is set by default to swordfish. Both the initiator and receiver must configure the same preshared_key. |
| initiator_cert_path | The initiator's certificate. | Any valid self-signed or CA-signed certificate. Must provide full path of certificate. | The auth_method parameter is set to ssc or ca | Both the initiator and receiver must configure the same initiator_cert_path. |
| receiver_cert_path | The receiver's certificate. | Any valid self-signed or CA-signed certificate. Must provide full path of certificate. | The auth_method parameter is set to ssc or ca | Both the initiator and receiver must configure the same receiver_cert_path. |
| initiator_key_path | the initiator's private-key. | Any valid private key that is generated with the certificate. Must provide full path of private key. | The side parameter is set to initiator and the auth_method is set to ssc or ca | N/A |
| receiver_key_path | the receiver's private-key. | Any valid private key that is generated with the certificate. Must provide full path of private key. | The side parameter is set to receiver and the auth_method is set to ssc or ca | N/A |
| initiator_cacert_path | The initiator's CA certificate. | Any valid CA certificate. Must provide full path of certificate. | The side and auth_method parameters are set to initiator and ca respectively | N/A |
| receiver_cacert_path | The receiver's CA certificate. | Any valid CA certificate. Must provide full path of certificate. | The side and auth_method parameters are set to receiver and ca respectively | N/A |
| initiator_cn | The common name (CN) of the initiator's certificate. | Must be the same as the CN described in the initiator's certificate. | The side and auth_method parameters are set to receiver and ca respectively | N/A |
| receiver_cn | The CN of the receiver's certificate. | Must be the same as the CN described in the receiver's certificate. | The side and auth_method parameters are set to initiator and ca respectively | N/A |
6.1.2. Using JSON Parameters File
In this method, you must configure the parameters file and the then run the script:
- Configure the JSON parameters file located under /opt/mellanox/doca/applications/east_west_overlay_encryption/bin/east_west_overlay_encryption_params.json or create a JSON file according to the template of
east_west_overlay_encryption_params.jsonfor the script according to the explanation under Script Parameters. - Run the script on the receiver's DPU with the JSON file:
/opt/mellanox/doca/applications/east_west_overlay_encryption/bin/east_west_overlay_encryption.sh --side=r --json=/opt/mellanox/doca/applications/east_west_overlay_encryption/bin/east_west_overlay_encryption_params.json
- Run the script on the initiator's DPU:
/opt/mellanox/doca/applications/east_west_overlay_encryption/bin/east_west_overlay_encryption.sh --side=i --json=/opt/mellanox/doca/applications/east_west_overlay_encryption/bin/east_west_overlay_encryption_params.json
You may now send encrypted data over the PF interface (192.168.50.[1|2]) configured for VXLAN.
6.1.3. Passing Parameters on Command Line
In this method, you do not need to configure the parameters file and can run the script with the appropriate parameters.
6.1.3.1. Passing Parameters for Pre-shared Key Authentication Method
- Run the script on the receiver's DPU:
            /opt/mellanox/doca/applications/east_west_overlay_encryption/bin/east_west_overlay_encryption.sh --side=r --initiator_ip_addr=INITIATOR_IP_ADDRESS --receiver_ip_addr=RECEIVER_IP_ADDRESS --port_num=PORT_NUM \
--auth_method=psk --preshared_key=PRESHARED_KEY
- Run the script on the initiator's DPU:
            /opt/mellanox/doca/applications/east_west_overlay_encryption/bin/east_west_overlay_encryption.sh --side=i --initiator_ip_addr=INITIATOR_IP_ADDRESS --receiver_ip_addr=RECEIVER_IP_ADDRESS --port_num=PORT_NUM \
--auth_method=psk --preshared_key=PRESHARED_KEY
If you configure the parameters file and pass the parameters on the command line, then the parameters that are passed on the command line override those that are in the parameters file.
6.1.3.2. Passing Parameters for Self-signed Certificates Authentication Method
- Run the script on the receiver's DPU:
            /opt/mellanox/doca/applications/east_west_overlay_encryption/bin/east_west_overlay_encryption.sh --side=r --initiator_ip_addr=INITIATOR_IP_ADDRESS --receiver_ip_addr=RECEIVER_IP_ADDRESS --port_num=PORT_NUM \
--auth_method=ssc --initiator_cert_path=INITIATOR_CERT_PATH --receiver_cert_path=RECEIVER_CERT_PATH --receiver_key_path=RECEIVER_KEY_PATH
- Run the script on the initiator's DPU:
            /opt/mellanox/doca/applications/east_west_overlay_encryption/bin/east_west_overlay_encryption.sh --side=i --initiator_ip_addr=INITIATOR_IP_ADDRESS --receiver_ip_addr=RECEIVER_IP_ADDRESS --port_num=PORT_NUM \
--auth_method=ssc --initiator_cert_path=INITIATOR_CERT_PATH --receiver_cert_path=RECEIVER_CERT_PATH --initiator_key_path=INITIATOR_KEY_PATH
If you configure the parameters file and pass the parameters on the command line, then the parameters that are passed on the command line override those that are in the parameters file.
6.1.3.3. Passing Parameters for CA Certificates Authentication Method
- Run the script on the receiver's DPU:
            /opt/mellanox/doca/applications/east_west_overlay_encryption/bin/east_west_overlay_encryption.sh --side=r --initiator_ip_addr=INITIATOR_IP_ADDRESS --receiver_ip_addr=RECEIVER_IP_ADDRESS --port_num=PORT_NUM \
--auth_method=ca --initiator_cert_path=INITIATOR_CERT_PATH --receiver_cert_path=RECEIVER_CERT_PATH --receiver_key_path=RECEIVER_KEY_PATH --receiver_cacert_path=RECEIVER_CACERT_PATH --initiator_cn=INITIATOR_CN
- Run the script on the initiator's DPU:
            /opt/mellanox/doca/applications/east_west_overlay_encryption/bin/east_west_overlay_encryption.sh --side=i --initiator_ip_addr=INITIATOR_IP_ADDRESS --receiver_ip_addr=RECEIVER_IP_ADDRESS --port_num=PORT_NUM \
--auth_method=ssc --initiator_cert_path=INITIATOR_CERT_PATH --receiver_cert_path=RECEIVER_CERT_PATH --initiator_key_path=INITIATOR_KEY_PATH --initiator_cacert_path=INITIATOR_CACERT_PATH --receiver_cn=RECEIVER_CN
If you configure the parameters file and pass the parameters on the command line, then the parameters that are passed on the command line override those that are in the parameters file.
For help and usage, run the script with --help/-h flag:
/opt/mellanox/doca/applications/east_west_overlay_encryption/bin/east_west_overlay_encryption.sh -h
6.2. Building strongSwan
Perform the following only if you want to build your own BFB and would like to rebuild strongSwan.
- strongSwan IPsec full version can be found here (tag: 5.9.6bf).
- Install dependencies mentioned here. libgmp-dev is missing from that list, so make sure to install that as well.
- Git clone https://github.com/Mellanox/strongswan.git.
- Git checkout BF-5.9.6.
- Run autogen.sh within the strongSwan repo.
- Run the following:
            configure --enable-openssl --disable-random --prefix=/usr/local --sysconfdir=/etc --enable-systemd
make
make install
- --enable-systemd enables the systemd service for strongSwan present inside the GitHub repo (see step 3) at init/systemd-starter/strongswan-starter.service.in. This service file is meant for Ubuntu, Debian and Yocto distributions. For CentOS, the contents of the above file must be replaced by the one present in systemd-conf/strongswan-starter.service.in.centos (inside the GitHub repo) before running the configure script above.
- When building strongSwan on your own, the openssl.cnf.mlnx file, required for PK and RNG HW offload via OpenSSL plugin, is not installed. It must be copied over manually from GitHub repo inside the openssl-conf directory. See section "Running Strongswan Example" for important notes.
- The openssl.cnf.mlnx file references PKA engine shared objects. libpka (version 1.3 or later) and openssl (version 1.1.1) must be installed for this to work.
6.3. Reverting IPsec Configuration
To destroy IPsec configuration, run the following on both machines:
/opt/mellanox/doca/applications/east_west_overlay_encryption/bin/east_west_overlay_encryption.sh -d
If you run this command without initializing the connection first (steps 2 and 3 in section Running strongSwan Example) you will receive errors. These errors have no functional impact and may be safely ignored.
Notice
This document is provided for information purposes only and shall not be regarded as a warranty of a certain functionality, condition, or quality of a product. NVIDIA Corporation nor any of its direct or indirect subsidiaries and affiliates (collectively: “NVIDIA”) make no representations or warranties, expressed or implied, as to the accuracy or completeness of the information contained in this document and assume no responsibility for any errors contained herein. NVIDIA shall have no liability for the consequences or use of such information or for any infringement of patents or other rights of third parties that may result from its use. This document is not a commitment to develop, release, or deliver any Material (defined below), code, or functionality.
NVIDIA reserves the right to make corrections, modifications, enhancements, improvements, and any other changes to this document, at any time without notice.
Customer should obtain the latest relevant information before placing orders and should verify that such information is current and complete.
NVIDIA products are sold subject to the NVIDIA standard terms and conditions of sale supplied at the time of order acknowledgement, unless otherwise agreed in an individual sales agreement signed by authorized representatives of NVIDIA and customer (“Terms of Sale”). NVIDIA hereby expressly objects to applying any customer general terms and conditions with regards to the purchase of the NVIDIA product referenced in this document. No contractual obligations are formed either directly or indirectly by this document.
NVIDIA products are not designed, authorized, or warranted to be suitable for use in medical, military, aircraft, space, or life support equipment, nor in applications where failure or malfunction of the NVIDIA product can reasonably be expected to result in personal injury, death, or property or environmental damage. NVIDIA accepts no liability for inclusion and/or use of NVIDIA products in such equipment or applications and therefore such inclusion and/or use is at customer’s own risk.
NVIDIA makes no representation or warranty that products based on this document will be suitable for any specified use. Testing of all parameters of each product is not necessarily performed by NVIDIA. It is customer’s sole responsibility to evaluate and determine the applicability of any information contained in this document, ensure the product is suitable and fit for the application planned by customer, and perform the necessary testing for the application in order to avoid a default of the application or the product. Weaknesses in customer’s product designs may affect the quality and reliability of the NVIDIA product and may result in additional or different conditions and/or requirements beyond those contained in this document. NVIDIA accepts no liability related to any default, damage, costs, or problem which may be based on or attributable to: (i) the use of the NVIDIA product in any manner that is contrary to this document or (ii) customer product designs.
No license, either expressed or implied, is granted under any NVIDIA patent right, copyright, or other NVIDIA intellectual property right under this document. Information published by NVIDIA regarding third-party products or services does not constitute a license from NVIDIA to use such products or services or a warranty or endorsement thereof. Use of such information may require a license from a third party under the patents or other intellectual property rights of the third party, or a license from NVIDIA under the patents or other intellectual property rights of NVIDIA.
Reproduction of information in this document is permissible only if approved in advance by NVIDIA in writing, reproduced without alteration and in full compliance with all applicable export laws and regulations, and accompanied by all associated conditions, limitations, and notices.
THIS DOCUMENT AND ALL NVIDIA DESIGN SPECIFICATIONS, REFERENCE BOARDS, FILES, DRAWINGS, DIAGNOSTICS, LISTS, AND OTHER DOCUMENTS (TOGETHER AND SEPARATELY, “MATERIALS”) ARE BEING PROVIDED “AS IS.” NVIDIA MAKES NO WARRANTIES, EXPRESSED, IMPLIED, STATUTORY, OR OTHERWISE WITH RESPECT TO THE MATERIALS, AND EXPRESSLY DISCLAIMS ALL IMPLIED WARRANTIES OF NONINFRINGEMENT, MERCHANTABILITY, AND FITNESS FOR A PARTICULAR PURPOSE. TO THE EXTENT NOT PROHIBITED BY LAW, IN NO EVENT WILL NVIDIA BE LIABLE FOR ANY DAMAGES, INCLUDING WITHOUT LIMITATION ANY DIRECT, INDIRECT, SPECIAL, INCIDENTAL, PUNITIVE, OR CONSEQUENTIAL DAMAGES, HOWEVER CAUSED AND REGARDLESS OF THE THEORY OF LIABILITY, ARISING OUT OF ANY USE OF THIS DOCUMENT, EVEN IF NVIDIA HAS BEEN ADVISED OF THE POSSIBILITY OF SUCH DAMAGES. Notwithstanding any damages that customer might incur for any reason whatsoever, NVIDIA’s aggregate and cumulative liability towards customer for the products described herein shall be limited in accordance with the Terms of Sale for the product.
Trademarks
NVIDIA, the NVIDIA logo, and Mellanox are trademarks and/or registered trademarks of Mellanox Technologies Ltd. and/or NVIDIA Corporation in the U.S. and in other countries. The registered trademark Linux® is used pursuant to a sublicense from the Linux Foundation, the exclusive licensee of Linus Torvalds, owner of the mark on a world¬wide basis. Other company and product names may be trademarks of the respective companies with which they are associated.
Copyright
© 2022 NVIDIA Corporation & affiliates. All rights reserved.