TLS Offload
NVIDIA TLS Offload Guide
This guide provides an overview and configuration steps of TLS hardware offloading via kernel-TLS, using hardware capabilities of NVIDIA® BlueField® DPU.
Transport layer security (TLS) is a cryptographic protocol designed to provide communications security over a computer network. The protocol is widely used in applications such as email, instant messaging, and voice over IP (VoIP), but its use in securing HTTPS remains the most publicly visible.
The TLS protocol aims primarily to provide cryptography, including privacy (confidentiality), integrity, and authenticity using certificates, between two or more communicating computer applications. It runs in the application layer and is itself composed of two layers: the TLS record and the TLS handshake protocols. TLS works over TCP and consists of 3 phases:
- Handshake – establishment of a connection
- Application – sending and receiving encrypted packets
- Termination – connection termination
1.1. TLS Handshake
In the handshake phase, the client and server decide on which cipher suites they will use, and exchange keys and certificates according to the following flow:
- Client hello, provides the server at a minimum with the following:
- A key exchange algorithm, to determine how symmetric keys are exchanged
- An authentication or digital signature algorithm, which dictates how server authentication and client authentication (if required) are implemented
- A bulk encryption cipher, which is used to encrypt the data
- A hash/MAC (message authentication code) function, which determines how data integrity checks are carried out
- The version of the protocol it understands
- The cipher suites it is capable of working with
- A unique random number, which is important to guard against replay attacks
- Server hello:
- Selects a cipher suite
- Generates its own random number
- Assigns a session ID to the TLS connection
- Sends enough information to complete a key exchange—most often, this means sending a certificate including an RSA public key
- Client:
- Responsible for completing the key exchange using the information the server provided
At this point, the connection is secured, both sides have agreed on an encryption algorithm, a MAC algorithm, and respective keys.
1.2. kTLS
The Linux kernel provides TLS offload infrastructure. kTLS (kernel TLS) offloads TLS handling from the user-space to the kernel-space. kTLS has 3 modes of operation:
- SW – all operation is handled in kernel (i.e., handshake, encryption, decryption)
- HW-offload (the focus of this guide) – handshake and error handling are performed in software. Packets are encrypted/decrypted in hardware. In this case, there is an additional offload from the kernel to the hardware.
- HW-record – all operations are handled by the hardware (driver and firmware) including the handshake. It also handles its own TCP session. This option is currently not supported.
It is important to understand that Rx (receiving) and Tx (sending) can have two separate modes. For example, Rx can be dealt in SW mode but Tx in HW-offload mode (i.e., the hardware will only encrypt but not decrypt).
1.3. HW-offloading kTLS
In general, the TLS HW-offload performs best and provides optimal value on longer lived sessions, with relatively large packets. Scaling in terms of concurrent connections and connections per second is use-case dependent (e.g., the amount of active concurrent connections from the overall open concurrent connections is material). It is necessary to learn the following terms before proceeding:
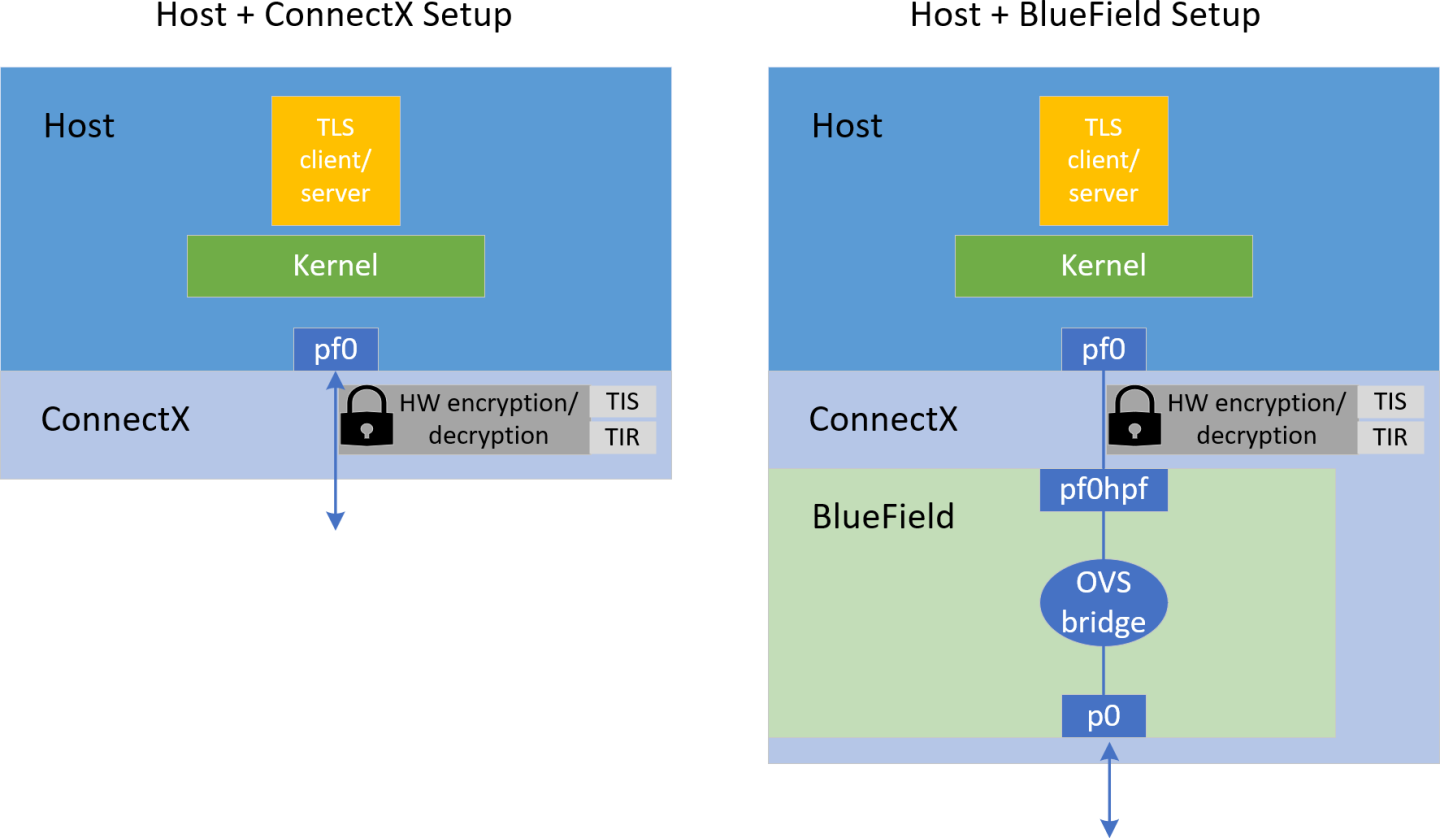
- The transport interface send (TIS) object is responsible for performing all transport-related operations of the transmit side. Messages from Send Queues (SQs) get segmented and transmitted by the TIS including all transport required implications. For example, in the case of a large send offload, the TIS is responsible for the segmentation. The ConnectX HW uses a TIS object to save and access the TLS crypto information and state of an offloaded Tx kTLS connection.
- The transport interface receive (TIR) object is responsible for performing all transport-related operations on the receive side. TIR performs the packet processing and reassembly and is also responsible for demultiplexing the packets into different receive queues (RQs).
- Both TIS and TIR hold the data encryption key (DEK).
1.3.1. kTLS Offload Flow in High Level
The following flow does not include resync and error handling.
- Establishes a TLS connection with remote host (server or client) by handling a TLS handshake by kernel on current host.
- Initializes the following state for each connection, Rx and Tx:
- Crypto secrets (e.g., public key)
- Crypto processing state
- Record metadata (e.g., record sequence number, offset)
- Expected TCP sequence number
Tx flow:
- Packets belonging to device offloaded sockets arrive to the kernel and it does not encrypt them.
- Kernel performs record framing and marks the packet with a connection identifier.
- Kernel sends packets to the device driver for offloading.
- Device checks that the sequence number matches the state in the TIS and performs encryption and authentication.
Rx flow:
- When the connection is created, a HW steering rule is added to steer packets to their respective TIR.
- Device receives the packet then validates and checks that sequence number of TCP matches the state in the TIR.
- Performs decryption and authentication, and indicates in the CQE (completion queue entry).
- Kernel understands that the packet is already decrypted so it does not decrypt it itself and passes it on to the user-space.
1.3.2. Resync and Error Handling
When the sequence number does not match expectations or if any other error occurs, the hardware gives control back to the SW which handles the problem.
See more about kTLS modes, resync, and error handling in the Linux Kernel documentation.
All commands in this section should be performed on host (not on BlueField) unless stated otherwise.
2.1. Checking Hardware Support for Crypto Acceleration
To check if the BlueField or ConnectX have crypto acceleration, run the following command from host:
            host> mst start # turn on mst driver
host> flint -d <device under /dev/mst/ directory> dc | grep Crypto
The output should include Crypto Enabled. For example:
            host> flint -d  /dev/mst/mt41686_pciconf0 dc | grep Crypto
....
;;Description = NVIDIA BlueField-2 E-Series Eng. sample DPU; 200GbE single-port QSFP56; PCIe Gen4 x16; Secure Boot Disabled; Crypto Enabled; 16GB on-board DDR; 1GbE OOB management
....
2.2. Kernel Requirements
Operating system must be either:
- FreeBSD 13.0+.
- A Linux distribution built on Linux kernel version 5.3 or later for Tx support and version 5.9 or later for Rx support. We recommend using the latest version when possible for the best available optimizations.
TIS Pool optimization is added to Linux kernel version 6.0. Instead of creating TIS per new connection, unused TIS from previous connection, will be recycled. This will improve Tx connection rate. No further installations required beyond installing the kernel itself.
To check the current kernel version on the host, run:
host> uname -r
The kernel must be configured to support TLS. The options TLS_DEVICE and MLX5_TLS must be set to y. To check if it is configured, run:
host> cat /boot/config-$(uname -r) | grep TLS
Example output:
            host> cat /boot/config-5.4.0-121-generic | grep TLS
...
CONFIG_TLS_DEVICE=y
CONFIG_MLX5_TLS=y
...
If the current kernel does not support one of the settings, you may want to change configurations and recompile, or build a new kernel.
Follow the building instructions provided with kernel provider when building a new kernel.
Schematic flow for building a Linux kernel:
            # Enter Linux kernel directory downloaded (usually in /usr/src/)
host> make menuconfig # in options set TLS_DEVICE=y, MLX5_TLS=y. Setting location in the menu, can be found by searching the setting- pressing '/' and typing setting.
host> make -j <num of cores> && make -j <num of cores> modules_install && make -j <num of cores> install
# Update grub to new configured kernel and than reboot
3.1. TLS Setup
3.2. Finding Netdev Interfaces
            host> mst start      # If mst driver is not loaded
host> mst status -v
NVIDIA's netdev interfaces are found be under the NET column.
For example:
            host> mst status -v
....
DEVICE_TYPE             MST                           PCI       RDMA            NET                       NUMA
BlueField2(rev:0)       /dev/mst/mt41686_pciconf0.1   b1:00.1   mlx5_1          net-ens5f1                1

BlueField2(rev:0)       /dev/mst/mt41686_pciconf0     b1:00.0   mlx5_0          net-ens5f0                1
In this example, the interfaces ens5f1 and ens5f0 are NVIDIA's netdev interfaces.
3.3. Configuring TLS Offload
To check if the offload option is on or off, run:
host> ethtool -k $iface | grep tls
Example output:
            tls-hw-tx-offload: on
tls-hw-rx-offload: off
tls-hw-record: off [fixed]
tls-hw-record is not required for the device as kTLS does not support "HW Record" mode.
To turn Tx offload on or off:
host> ethtool -K $iface tls-hw-tx-offload <on | off>
To turn Rx offload on or off:
host> ethtool -K $iface tls-hw-rx-offload <on | off>
3.4. Configuring OVS Bridge on BlueField
When the host is connected to a BlueField device, an OVS bridge must be configured on the BlueField so traffic passes bidirectionally from host to uplink. If no OVS bridge is configured, the host is isolated from the network (see diagram above).
On BlueField image version 3.7.0 or higher the default OVS configuration can be used without additional modifications.
To configure the OVS bridge on BlueField, run the following commands on BlueField:
            dpu> for br in $(ovs-vsctl list-br); do ovs-vsctl del-br $br; done           # erasing existing bridges
dpu> ovs-vsctl add-br ovs-br0 && ovs-vsctl add-port ovs-br0 p0 && ovs-vsctl add-port ovs-br0 pf0hpf
dpu> ovs-vsctl add-br ovs-br1 && ovs-vsctl add-port ovs-br1 p1 && ovs-vsctl add-port ovs-br1 pf1hpf
dpu> ovs-vsctl set Open_vSwitch . other_config:hw-offload=true && systemctl restart openvswitch-switch
Where p0/p1 are the uplink interfaces and pf0hpf/pf1hpf are the interfaces facing the host.
3.5. Configuring OpenSSL
OpenSSL is an all-around cryptography library that offers open-source application of the TLS protocol. It is the main library for using kTLS and other applications since Nginx depends on it as their base library.
The kTLS and HW offloading do not depend on OpenSSL. Any program that can implement a TLS stack can be run instead. However, because of the vast use of OpenSSL, this guide addresses installation recommendations.
kTLS is supported only in OpenSSL version 3.0.0 or higher, and only on the supported kernel versions. The supported OpenSSL version is available for download from distro packages, or it can be downloaded and compiled from the OpenSSL GitHub.
Many modules depend on OpenSSL. Changing the default version may cause problems. Adding --prefix=/var/tmp/ssl --openssldir=/var/tmp/ssl in the ./Configure command below may prevent the built OpenSSL from becoming the default one used by the system. Make sure the directory of the OpenSSL you build manually is not located in any paths listed in the PATH environment variable.
Check the version of the default OpenSSL:
host> openssl version
Follow OpenSSL installation instructions from their supplied guides. During the configuration process, make sure to configure the enable-ktls option before building it by running from within OpenSSL directory (works in version 3.0 and higher). For example:
host> ./Configure linux-$(uname -p) enable-ktls --prefix=/var/tmp/ssl --openssldir=/var/tmp/ssl # add "threads" as well for multithread support
Check if kTLS is enabled in OpenSSL by running the following command from within the OpenSSL directory, and check whether ktls is listed under Enabled features:
host> perl configdata.pm --dump | less
If OpenSSL has been downloaded manually, the OpenSSL executable would be located in the /<openssl-dir>/apps/ directory. For example, checking the version (from within OpenSSL directory) is done using the command ./apps/openssl version.
Installing a new OpenSSL requires recompiling user tools that were configured over OpenSSL (e.g., Nginx).
4.1. XLIO
The NVIDIA accelerated IO (XLIO) software library boosts the performance of TCP/IP applications based on Nginx (e.g., CDN, DoH) and storage solutions as part of SPDK. XLIO is a user-space software library that exposes standard socket APIs with kernel-bypass architecture, enabling a hardware-based direct copy between an application's user-space memory and the network interface. In particular, XLIO can boost the performance of applications that use the kTLS hardware offload as OpenSSL and Nginx. Read more about XLIO in the NVIDIA XLIO Documentation and XLIO TLS HW-offload over kTLS in the TLS HW Offload section.
Even though XLIO is a kernel-bypass library, the kernel must support kTLS for the bypass to work properly.
This section demonstrates how to test the kTLS hardware offload.
Make sure to refer to section Configuring OpenSSL before proceeding.
5.1. TLS Testing Setup
For testing, a server and a client are required. The testing section only tests a single setup of host and BlueField-2 or host ConnectX which will participate either as a server or as a client. Setting a back-to-back setup of the same kind and installing the same OpenSSL version can help avoid misconfigurations. Nevertheless, it is required to have the same OpenSSL version on both the client and server.
Make sure the desired kTLS is configured as detailed in section Configuring TLS Offload. To test hardware offload, make sure tls-hw-tx-offload and/or tls-hw-rx-offload are on. To test kTLS software mode, make sure to turn them off.
In addition, make sure both hosts (server and client) can communicate bidirectionally through ConnectX or BlueField. One can set the interface that supports the offload (on the host) with an IP, in same subnet. Make sure that when using BlueField, an OVS bridge will be set on BF, as shown in section Configuring OVS Bridge on BlueField.
Suggestion for setup:

5.2. Adding Certificate and Key
The server side should create a certificate and key. The client can also use a certificate, but it is not necessary for this test case. Run the following command in the installed OpenSSL directory and fill in all the requested details:
host> openssl req -x509 -newkey rsa:2048 -keyout key.pem -out cert.pem -days 365 -nodes
The following files are created:
key.pem– private-key file used to generate the CSR and, later, to secure and verify connections using the certificatecert.pem– certificate signing request (CSR) file used to order your SSL certificate and, later, to encrypt messages that only its corresponding private key can decrypt
The server side should be run before client side so that client's request are answered by server.
Running Server Side
The following example works on OpenSSL version 3.1.0:
host> openssl s_server -key key.pem -cert cert.pem -tls1_2 -cipher ECDHE-RSA-AES128-GCM-SHA256 -accept 443 -ktls
Notice the -ktls flag.
Refer to official OpenSSL documentation on s_server for more information.
In this example, the key and certificate are provided, the cipher suite and TLS version are configured, and the server listens to port 443 and is instructed to use kTLS.
5.4. Running Client Side
The following example works on OpenSSL version 3.1.0:
host> openssl s_client -connect 4.4.4.4:443 -tls1_2
Where 4.4.4.4 is the IP of the remote server.
Refer to official OpenSSL documentation on s_client for more information.
5.5. Testing TLS
After the connection is established (handshake is done), a prompt will open and the user, both on the client and server side, can send a message to other side in a chat-like manner. Messages should appear on the other side once they are received. The following example checks kTLS hardware offload on the tested setup by tracking Rx and Tx TLS on device counters:
host> ethtool -S $iface | grep -i 'tx_tls_encrypted\|rx_tls_decrypted' # ($iface is the interface that offloads)
To check kTLS over kernel counters:
host> cat /proc/net/tls_stat
Output example:
The comments are not part of the output and are added as explanation.
            host> cat /proc/net/tls_stat
TlsCurrTxSw                             0               # Current Tx connections opened in SW mode
TlsCurrRxSw                             0               # Current Rx connections opened in SW mode
TlsCurrTxDevice                         0               # Current Tx connections opened in HW-offload mode
TlsCurrRxDevice                         0               # Current Rx connections opened in HW-offload mode
TlsTxSw                                 2323828         # Accumulated number of Tx connections opened in SW mode
TlsRxSw                                 1               # Accumulated number of Rx connections opened in SW mode
TlsTxDevice                             12203652        # Accumulated number of Tx connections opened in HW-offload mode
TlsRxDevice                             0               # Accumulated number of Rx connections opened in HW-offload mode
TlsDecryptError                         0               # Failed record decryption (e.g., due to incorrect authentication tag)
TlsRxDeviceResync                       0               # Rx resyncs sent to HW's handling cryptographyTlsDecryptRetry                         0               # All Rx records re-decrypted due to TLS_RX_EXPECT_NO_PAD misprediction
TlsRxNoPadViolation                     0               # Data Rx records re-decrypted due to TLS_RX_EXPECT_NO_PAD misprediction
More information about the kernel counters can be found in the Statistics section of the Kernel TLS documentation.
Nginx is a free and open-source software web server that can also be used as a reverse proxy, load balancer, mail proxy and HTTP cache. Nginx can be configured to depend on OpenSSL library and therefore Nginx could have the great advantages of TLS HW-offload on NVIDIA ConnectX-6 Dx, NVIDIA ConnectX-7 or NVIDIA BlueField DPU. Helpful configuration instructions might be found in Kernel TLS official documentation here.
Notice
This document is provided for information purposes only and shall not be regarded as a warranty of a certain functionality, condition, or quality of a product. NVIDIA Corporation nor any of its direct or indirect subsidiaries and affiliates (collectively: “NVIDIA”) make no representations or warranties, expressed or implied, as to the accuracy or completeness of the information contained in this document and assume no responsibility for any errors contained herein. NVIDIA shall have no liability for the consequences or use of such information or for any infringement of patents or other rights of third parties that may result from its use. This document is not a commitment to develop, release, or deliver any Material (defined below), code, or functionality.
NVIDIA reserves the right to make corrections, modifications, enhancements, improvements, and any other changes to this document, at any time without notice.
Customer should obtain the latest relevant information before placing orders and should verify that such information is current and complete.
NVIDIA products are sold subject to the NVIDIA standard terms and conditions of sale supplied at the time of order acknowledgement, unless otherwise agreed in an individual sales agreement signed by authorized representatives of NVIDIA and customer (“Terms of Sale”). NVIDIA hereby expressly objects to applying any customer general terms and conditions with regards to the purchase of the NVIDIA product referenced in this document. No contractual obligations are formed either directly or indirectly by this document.
NVIDIA products are not designed, authorized, or warranted to be suitable for use in medical, military, aircraft, space, or life support equipment, nor in applications where failure or malfunction of the NVIDIA product can reasonably be expected to result in personal injury, death, or property or environmental damage. NVIDIA accepts no liability for inclusion and/or use of NVIDIA products in such equipment or applications and therefore such inclusion and/or use is at customer’s own risk.
NVIDIA makes no representation or warranty that products based on this document will be suitable for any specified use. Testing of all parameters of each product is not necessarily performed by NVIDIA. It is customer’s sole responsibility to evaluate and determine the applicability of any information contained in this document, ensure the product is suitable and fit for the application planned by customer, and perform the necessary testing for the application in order to avoid a default of the application or the product. Weaknesses in customer’s product designs may affect the quality and reliability of the NVIDIA product and may result in additional or different conditions and/or requirements beyond those contained in this document. NVIDIA accepts no liability related to any default, damage, costs, or problem which may be based on or attributable to: (i) the use of the NVIDIA product in any manner that is contrary to this document or (ii) customer product designs.
No license, either expressed or implied, is granted under any NVIDIA patent right, copyright, or other NVIDIA intellectual property right under this document. Information published by NVIDIA regarding third-party products or services does not constitute a license from NVIDIA to use such products or services or a warranty or endorsement thereof. Use of such information may require a license from a third party under the patents or other intellectual property rights of the third party, or a license from NVIDIA under the patents or other intellectual property rights of NVIDIA.
Reproduction of information in this document is permissible only if approved in advance by NVIDIA in writing, reproduced without alteration and in full compliance with all applicable export laws and regulations, and accompanied by all associated conditions, limitations, and notices.
THIS DOCUMENT AND ALL NVIDIA DESIGN SPECIFICATIONS, REFERENCE BOARDS, FILES, DRAWINGS, DIAGNOSTICS, LISTS, AND OTHER DOCUMENTS (TOGETHER AND SEPARATELY, “MATERIALS”) ARE BEING PROVIDED “AS IS.” NVIDIA MAKES NO WARRANTIES, EXPRESSED, IMPLIED, STATUTORY, OR OTHERWISE WITH RESPECT TO THE MATERIALS, AND EXPRESSLY DISCLAIMS ALL IMPLIED WARRANTIES OF NONINFRINGEMENT, MERCHANTABILITY, AND FITNESS FOR A PARTICULAR PURPOSE. TO THE EXTENT NOT PROHIBITED BY LAW, IN NO EVENT WILL NVIDIA BE LIABLE FOR ANY DAMAGES, INCLUDING WITHOUT LIMITATION ANY DIRECT, INDIRECT, SPECIAL, INCIDENTAL, PUNITIVE, OR CONSEQUENTIAL DAMAGES, HOWEVER CAUSED AND REGARDLESS OF THE THEORY OF LIABILITY, ARISING OUT OF ANY USE OF THIS DOCUMENT, EVEN IF NVIDIA HAS BEEN ADVISED OF THE POSSIBILITY OF SUCH DAMAGES. Notwithstanding any damages that customer might incur for any reason whatsoever, NVIDIA’s aggregate and cumulative liability towards customer for the products described herein shall be limited in accordance with the Terms of Sale for the product.
Trademarks
NVIDIA, the NVIDIA logo, and Mellanox are trademarks and/or registered trademarks of Mellanox Technologies Ltd. and/or NVIDIA Corporation in the U.S. and in other countries. The registered trademark Linux® is used pursuant to a sublicense from the Linux Foundation, the exclusive licensee of Linus Torvalds, owner of the mark on a world¬wide basis. Other company and product names may be trademarks of the respective companies with which they are associated.
Copyright
© 2022 NVIDIA Corporation & affiliates. All rights reserved.