Checking Your Customization Job Metrics#
After completing a customization job, you can monitor its performance through training and validation metrics. You can access these metrics in three ways:
Using the API
Through MLflow (optional)
Using Weights & Biases (optional)
Note
The time to complete this tutorial is approximately 10 minutes.
Prerequisites#
Platform Prerequisites#
New to using NeMo microservices?
NeMo microservices use an entity management system to organize all resources—including datasets, models, and job artifacts—into namespaces and projects. Without setting up these organizational entities first, you cannot use the microservices.
If you’re new to the platform, complete these foundational tutorials first:
Get Started Tutorials: Learn how to deploy, customize, and evaluate models using the platform end-to-end
Set Up Organizational Entities: Learn how to create namespaces and projects to organize your work
If you’re already familiar with namespaces, projects, and how to upload datasets to the platform, you can proceed directly with this tutorial.
Learn more: Entity Concepts
NeMo Customizer Prerequisites#
Microservice Setup Requirements and Environment Variables
Before starting, make sure you have:
Access to NeMo Customizer
The
huggingface_hubPython package installed(Optional) Weights & Biases account and API key for enhanced visualization
Set up environment variables:
# Set up environment variables
export CUSTOMIZER_BASE_URL="<your-customizer-service-url>"
export ENTITY_HOST="<your-entity-store-url>"
export DS_HOST="<your-datastore-url>"
export NAMESPACE="default"
export DATASET_NAME="test-dataset"

# Hugging Face environment variables (for dataset/model file management)
export HF_ENDPOINT="${DS_HOST}/v1/hf"
export HF_TOKEN="dummy-unused-value"  # Or your actual HF token

# Optional monitoring
export WANDB_API_KEY="<your-wandb-api-key>"
Replace the placeholder values with your actual service URLs and credentials.
Tutorial-Specific Prerequisites#
Completed customization job with a valid ID
(Optional) Access to NeMo with MLflow tracking enabled
Available Metrics#
Each customization job tracks two key metrics:
Training Loss: Calculated during training, logged every 10 steps (default, configurable via hyperparameters)
Validation Loss: Calculated during validation, logged at each validation interval
Viewing Your Metrics#
Using the API#
Get metrics with a simple API call:
from nemo_microservices import NeMoMicroservices
import os

# Initialize the client
client = NeMoMicroservices(
    base_url=os.environ['CUSTOMIZER_BASE_URL']
)
# Get job status with metrics
job_id = "your-customization-job-id"
job_status = client.customization.jobs.status(job_id)

print(f"Job ID: {job_status.id}")
print(f"Status: {job_status.status}")
print(f"Progress: {job_status.status_details.percentage_done}%")
print(f"Epochs completed: {job_status.status_details.epochs_completed}")

# Check for training metrics
if job_status.status_details.metrics:
    metrics = job_status.status_details.metrics.metrics

    # Display training loss
    if metrics.get("train_loss"):
        train_losses = metrics["train_loss"]
        print(f"Training loss values: {len(train_losses)} points")
        if train_losses:
            print(f"Latest training loss: {train_losses[-1]}")

    # Display validation loss
    if metrics.get("val_loss"):
        val_losses = metrics["val_loss"]
        print(f"Validation loss values: {len(val_losses)} points")
        if val_losses:
            print(f"Latest validation loss: {val_losses[-1]}")
curl ${CUSTOMIZER_BASE_URL}/v1/customization/jobs/${customizationID}/status | jq
The response includes timestamped training and validation loss values.
Using MLflow#
If your deployment has MLflow tracking enabled:
Access the MLflow UI at your cluster’s MLflow tracking URL
Locate your experiment by the output model name
Find the run using your customization job ID
View detailed metrics, including training and validation loss curves, under the “Metrics” tab
Note
MLflow integration is configured at the cluster level. Contact your administrator if you need access to the MLflow UI or if MLflow tracking is not enabled for your deployment.
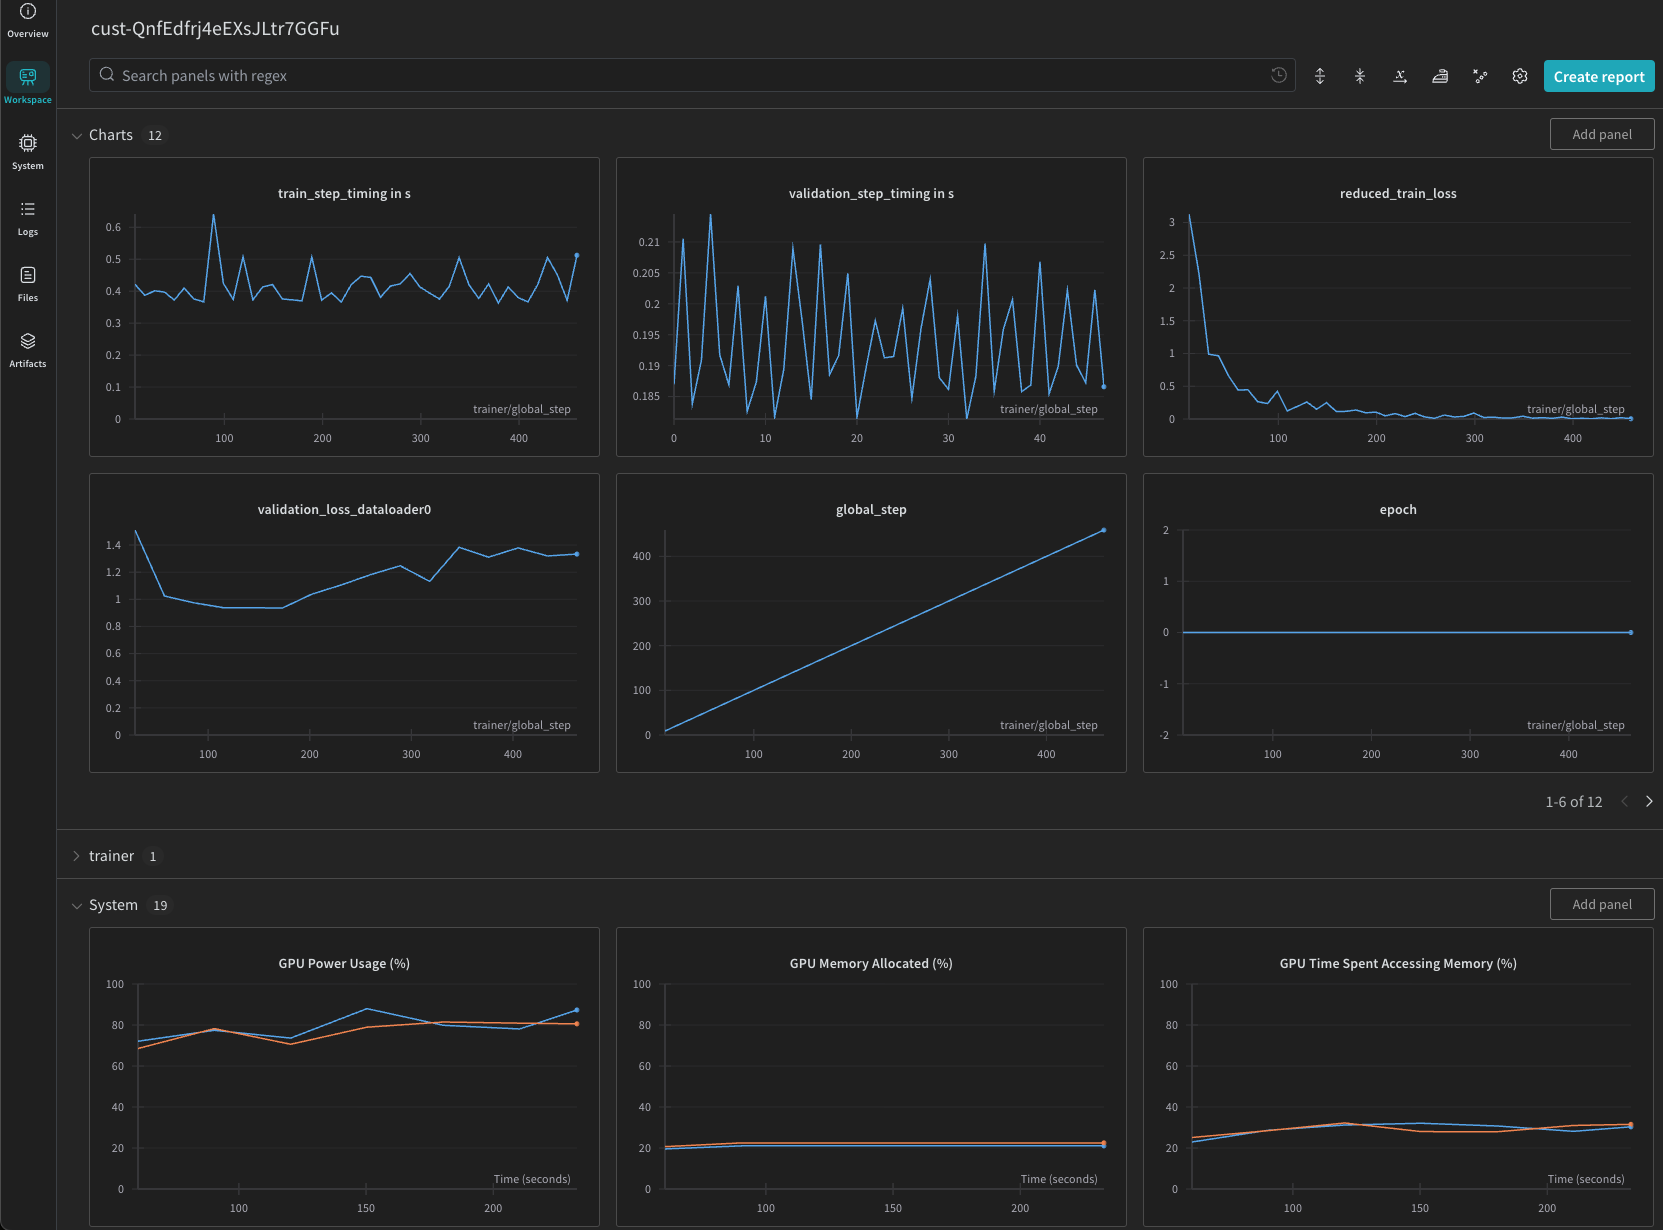
Using Weights & Biases#
To enable W&B integration, include your API key when creating a customization job:
from nemo_microservices import NeMoMicroservices
import os

# Initialize the client
client = NeMoMicroservices(
    base_url=os.environ['CUSTOMIZER_BASE_URL']
)
# Set up WandB API key for enhanced visualization
extra_headers = {}
if os.getenv('WANDB_API_KEY'):
    extra_headers['wandb-api-key'] = os.getenv('WANDB_API_KEY')
# Create a customization job with W&B integration
job = client.customization.jobs.create(
    config="meta/llama-3.1-8b-instruct",
    dataset={
        "name": "test-dataset"
    },
    hyperparameters={
        "training_type": "sft",
        "finetuning_type": "lora",
        "epochs": 10,
        "batch_size": 16,
        "learning_rate": 0.0001,
        "lora": {
            "adapter_dim": 8
        }
    },
    extra_headers=extra_headers
)

print(f"Created job with W&B integration:")
print(f"Job ID: {job.id}")
print(f"Status: {job.status}")
curl --location "https://${CUSTOMIZER_BASE_URL}/v1/customization/jobs" \
--header 'Content-Type: application/json' \
--header 'Accept: application/json' \
--header 'wandb-api-key: <WANDB_API_KEY>' \
--data '{
    "config": "meta/llama-3.1-8b-instruct",
    "dataset": {"name": "test-dataset"},
    "hyperparameters": {
      "training_type": "sft",
      "finetuning_type": "lora",
      "epochs": 10,
      "batch_size": 16,
      "learning_rate": 0.0001,
      "lora": {
        "adapter_dim": 8
      }
    }
}'
Then view your results at wandb.ai under the nvidia-nemo-customizer project.
Note
The W&B integration is optional. When enabled, we’ll send training metrics to W&B using your API key. While we encrypt your API key and don’t log it internally, please review W&B’s terms of service before use.