


Installing Tools on MGX ARC Pro System#
This chapter describes how to manually install the required kernel, driver, and tools on the host. This is a one-time installation and can be skipped if the system has been configured already.
In the following sequence of steps, the target host is MGX ARC Pro System.
Depending on the release, tools that are installed in this section may need to be upgraded in the Installing and Upgrading cuBB section.
After everything is installed and updated, refer to the cuBB Quick Start Guide for how to use cuBB.
MGX ARC Pro Configuration#
HW Component |
|
|---|---|
CPU |
Grace CPU with 72 Arm Neoverse V2 Cores |
GPU |
NVIDIA RTX PRO 4500 Blackwell GPU |
NIC |
On-board NVIDIA ConnectX-8 - 2x QSFP112 and 16x SFP28 ports |
Cable Connection#
Host OS Internet Connection#
The QSFP and SFP ports are reserved for fronthaul and backhaul connections, a USB to Ethernet dongle to the back USB-C port is recommended for the host OS internet connection.
E2E Test Connection#
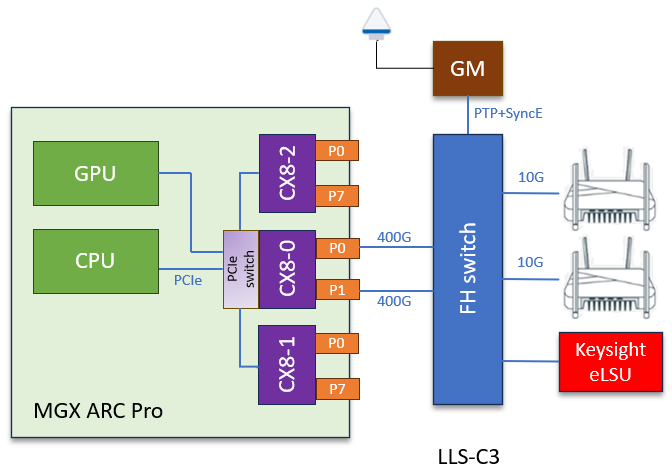
The following diagram shows a typical E2E connection in O-RAN LLS-C3 topology.
cuBB Test Connection#
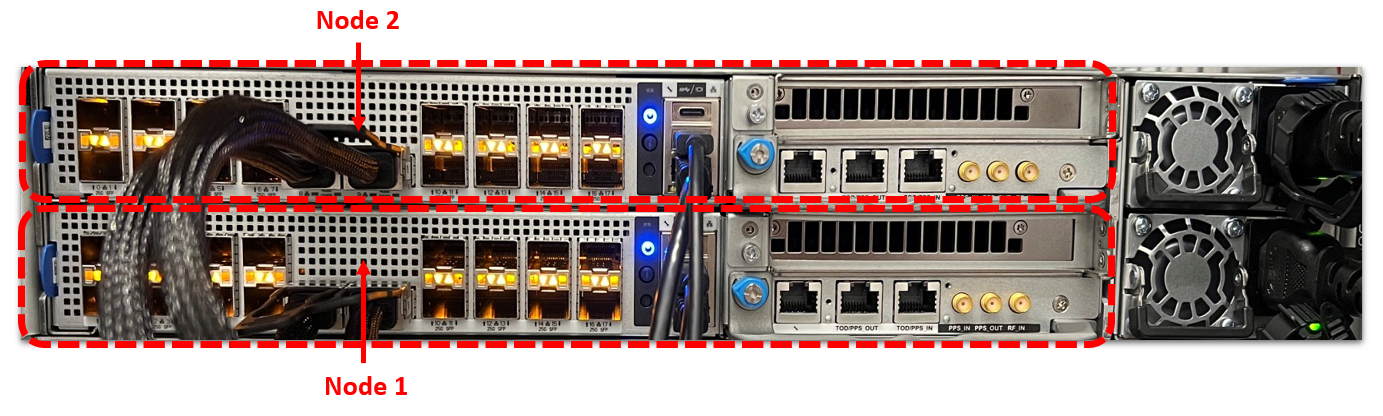
The MGX ARC Pro server has two nodes. The following example uses node 1 to run TestMAC and cuphycontroller and node 2 to run the RU emulator. The QSFP ports of node 1 and node 2 are connected back to back via DAC cable.
Install Ubuntu 24.04 Server#
Download the Ubuntu server 24.04 ISO image for an ARM-based system from https://ubuntu.com/download/server/arm. Before installing the system OS, prepare a bootable USB drive that contains the OS image or configure the virtual media in the BMC for remote installation.
When the installation is done, the console shows Install complete and Reboot now. Reboot the system and check the following:
Check if the system time is correct to avoid apt update error.
Run the following commands to set the date and time via NTP once (this will not enable the NTP service):
$ sudo apt-get install ntpdate
$ sudo ntpdate -s pool.ntp.org
Check if the GPU and NIC are detected by the OS.
Use the following commands to determine whether the GPU and NIC are detected by the OS:
$ lspci |grep -i nvidia
# RTX Pro 4500 GPU
0002:06:00.0 3D controller: NVIDIA Corporation Device 2c3a (rev a1)
$ lspci |grep -i mellanox
# CX8-0 (2x QSFP)
0002:03:00.0 Ethernet controller: Mellanox Technologies CX8 Family [ConnectX-8]
0002:03:00.1 Ethernet controller: Mellanox Technologies CX8 Family [ConnectX-8]
# CX8-1 (8x SFP)
0002:09:00.0 Ethernet controller: Mellanox Technologies CX8 Family [ConnectX-8]
0002:09:00.1 Ethernet controller: Mellanox Technologies CX8 Family [ConnectX-8]
0002:09:00.2 Ethernet controller: Mellanox Technologies CX8 Family [ConnectX-8]
0002:09:00.3 Ethernet controller: Mellanox Technologies CX8 Family [ConnectX-8]
0002:09:00.4 Ethernet controller: Mellanox Technologies CX8 Family [ConnectX-8]
0002:09:00.5 Ethernet controller: Mellanox Technologies CX8 Family [ConnectX-8]
0002:09:00.6 Ethernet controller: Mellanox Technologies CX8 Family [ConnectX-8]
0002:09:00.7 Ethernet controller: Mellanox Technologies CX8 Family [ConnectX-8]
# CX8-2 (8x SFP)
0002:0a:00.0 Ethernet controller: Mellanox Technologies CX8 Family [ConnectX-8]
0002:0a:00.1 Ethernet controller: Mellanox Technologies CX8 Family [ConnectX-8]
0002:0a:00.2 Ethernet controller: Mellanox Technologies CX8 Family [ConnectX-8]
0002:0a:00.3 Ethernet controller: Mellanox Technologies CX8 Family [ConnectX-8]
0002:0a:00.4 Ethernet controller: Mellanox Technologies CX8 Family [ConnectX-8]
0002:0a:00.5 Ethernet controller: Mellanox Technologies CX8 Family [ConnectX-8]
0002:0a:00.6 Ethernet controller: Mellanox Technologies CX8 Family [ConnectX-8]
0002:0a:00.7 Ethernet controller: Mellanox Technologies CX8 Family [ConnectX-8]
Use the following command to change the hostname:
$ sudo hostnamectl set-hostname NEW_HOSTNAME
To display the GRUB menu during boot, create /etc/default/grub.d/menu.cfg with the following content:
Automated Host Provisioning (Alpha)#
After completing the platform prerequisites above, installing the operating system, and configuring management-network access, you can follow the Aerial CUDA-Accelerated RAN (ACAR) cubb_scripts/install/README.md to automate the supported host software installation steps described in the remaining sections.
Note this automated host installer is an Alpha feature. If it does not support your system or does not complete successfully, follow the manual installation steps below.
Configure the Network Interfaces#
The following installation steps need an internet connection. Ensure that you have the proper netplan config for your local network.
The network interface names could change after reboot. To ensure persistent network interface
names after reboot, create persistent network link files under /etc/systemd/network, one for each interface.
To find the MAC address of the CX8 NIC, run lshw to check for network devices and look for the ConnectX-8 entries.
$ sudo apt-get install jq -y
$ sudo lshw -json -C network | jq '.[] | "\(.product), MAC: \(.serial)"' | grep "ConnectX-8"
"CX8 Family [ConnectX-8], MAC: 90:82:c3:xx:xx:xx"
"CX8 Family [ConnectX-8], MAC: 90:82:c3:yy:yy:yy"
...
Create files under /etc/systemd/network/ with the desired interface name and the MAC address found in the previous step.
Note
The rest of this document assumes that the aerial00 and aerial01 interfaces are connected to the RU emulator for cuBB testing or to the fronthaul switch for E2E testing, and that aerial00 is used for PTP.
$ sudo nano /etc/systemd/network/20-aerial00.link

[Match]
MACAddress=90:82:c3:xx:xx:xx

[Link]
Name=aerial00

$ sudo nano /etc/systemd/network/20-aerial01.link

[Match]
MACAddress=90:82:c3:yy:yy:yy

[Link]
Name=aerial01
To apply the change:
$ sudo netplan apply
Disable Auto Upgrade#
Edit the /etc/apt/apt.conf.d/20auto-upgrades system file and change "1" to "0" on both lines.
This prevents the installed version of the low latency kernel from being accidentally changed with a
subsequent software upgrade.
$ sudo sed -i 's/"1"/"0"/g' /etc/apt/apt.conf.d/20auto-upgrades
Disable the fwupd-refresh timer to prevent fwupdmgr from automatically checking for any updates.
$ sudo systemctl mask fwupd-refresh.timer
Disable Nouveau#
Disable the Nouveau open-source GPU driver before installing the NVIDIA driver:
Regenerate the kernel initramfs:
sudo update-initramfs -u
Note
The Nouveau blacklist takes effect after reboot. Complete the remaining kernel configuration steps before rebooting.
Install NVIDIA Optimized Ubuntu Kernel#
Run the following commands to install the NVIDIA optimized Ubuntu kernel.
$ sudo apt update
# NOTE: This will install the specific kernel version, not the latest NVIDIA optimized kernel.
$ sudo apt install -y linux-image-6.17.0-1018-nvidia-64k
Then, update the GRUB to change the default boot kernel. The version to use here depends on the latest version that was installed with the previous command:
# Update grub to change the default boot kernel
$ sudo sed -i 's/^GRUB_DEFAULT=.*/GRUB_DEFAULT="Advanced options for Ubuntu>Ubuntu, with Linux 6.17.0-1018-nvidia-64k"/' /etc/default/grub
Configure Linux Kernel Command-line#
Ensure the iommu.passthrough=y kernel parameter is NOT passed to the kernel. This parameter prevents the GPU driver from loading, so it must be removed if it is present.
Verify that the parameter is present by running:
$ grep iommu.passthrough=y /proc/cmdline
If the parameter is present, find the file that contains this parameter and remove it. For example:
# Remove iommu.passthrough=y from the found file
$ grep -rlZ 'iommu.passthrough=y' /etc/default/grub* | xargs -0 --no-run-if-empty sudo sed -i 's/ iommu.passthrough=y//'
To set kernel command-line parameters, edit the GRUB_CMDLINE_LINUX parameter in the grub
file /etc/default/grub.d/cmdline.cfg and append or update the parameters described below. The following kernel parameters
are optimized for the MGX ARC Pro system. To automatically append the grub file with these parameters, enter this command:
Note
The hugepage size is 512MB which is optimized for the 64k page size kernel on ARM.
Disable ACS (Access Control Services)#
cat <<"EOF" | sudo tee /etc/default/grub.d/config-acs.cfg
GRUB_CMDLINE_LINUX="$GRUB_CMDLINE_LINUX pci=config_acs=\"xx000x0@0000:00:00.0;xx000x0@0002:00:00.0;xx000x0@0002:02:00.0;xx000x0@0002:02:01.0;xx000x0@0002:02:03.0;xx000x0@0002:05:00.0;xx000x0@0002:08:00.0;xx000x0@0002:08:08.0;xx000x0@0004:00:00.0;xx000x0@0005:00:00.0;xx000x0@0006:00:00.0;xx000x0@0009:00:00.0\""
EOF
Apply the Changes and Reboot to Load the Kernel#
$ sudo update-grub
$ sudo reboot
After rebooting, enter the following command to verify that the kernel command-line parameters are configured properly:
$ uname -r
6.17.0-1018-nvidia-64k

$ cat /proc/cmdline
BOOT_IMAGE=/vmlinuz-6.17.0-1018-nvidia-64k root=/dev/mapper/ubuntu--vg-ubuntu--lv ro pci=realloc=off pci=pcie_bus_safe default_hugepagesz=512M hugepagesz=512M hugepages=48 tsc=reliable processor.max_cstate=0 audit=0 idle=poll rcu_nocb_poll nosoftlockup irqaffinity=0-3 isolcpus=managed_irq,domain,4-64 nohz_full=4-64 rcu_nocbs=4-64 earlycon module_blacklist=nouveau acpi_power_meter.force_cap_on=y numa_balancing=disable init_on_alloc=0 preempt=none pci=config_acs=xx000x0@0000:00:00.0;xx000x0@0002:00:00.0;xx000x0@0002:02:00.0;xx000x0@0002:02:01.0;xx000x0@0002:02:03.0;xx000x0@0002:05:00.0;xx000x0@0002:08:00.0;xx000x0@0002:08:08.0;xx000x0@0004:00:00.0;xx000x0@0005:00:00.0;xx000x0@0006:00:00.0;xx000x0@0009:00:00.0
Enter this command to verify if hugepages are enabled:
$ grep -i huge /proc/meminfo
AnonHugePages:         0 kB
ShmemHugePages:        0 kB
FileHugePages:         0 kB
HugePages_Total:      48
HugePages_Free:       48
HugePages_Rsvd:        0
HugePages_Surp:        0
Hugepagesize:     524288 kB
Hugetlb:        25165824 kB
Install Dependency Packages#
Enter these commands to install the prerequisite packages:
$ sudo apt-get update
$ sudo apt-get install -y build-essential linux-headers-$(uname -r) dkms unzip ipmitool linuxptp pv apt-utils net-tools
Install DOCA OFED and Mellanox Firmware Tools on the Host#
Check if there is an existing MOFED installed on the host system.
$ ofed_info -s
OFED-internal-25.10-1.7.1:
Uninstall MOFED if it is present, following the DOCA Installation Guide for Linux.
$ for f in $( dpkg --list | grep -E 'doca|flexio|dpa-gdbserver|dpa-stats|dpaeumgmt' | awk '{print $2}' ); do echo $f ; sudo apt remove --purge $f -y ; done
$ sudo /usr/sbin/ofed_uninstall.sh --force
$ sudo apt-get autoremove
Enter the following commands to install DOCA OFED.
# Install DOCA OFED
$ wget https://www.mellanox.com/downloads/DOCA/DOCA_v3.3.0/host/doca-host_3.3.0-088000-26.01-ubuntu2404_arm64.deb
$ sudo dpkg -i doca-host_3.3.0-088000-26.01-ubuntu2404_arm64.deb
$ sudo apt update
$ sudo apt install -y doca-tools doca-ofed

# To check what version of OFED you have installed
$ ofed_info -s
OFED-internal-26.01-1.0.0:
The Mellanox firmware tools are already installed through the DOCA-HOST package. Run the following command to verify the installation.
$ apt list --installed | grep mft
kernel-mft-dkms/DOCA-HOST-3.3.0,now 4.35.0.159-1 all [installed,automatic]
mft-mlx5/DOCA-HOST-3.3.0,now 4.35.0-159 arm64 [installed,automatic]
mft-nvredfish/DOCA-HOST-3.3.0,now 4.35.0-159 arm64 [installed,automatic]
mft/DOCA-HOST-3.3.0,now 4.35.0-159 arm64 [installed,automatic]

$ sudo mst version
mst, mft 4.35.0-159. Git SHA Hash: 004525846

$ sudo mst start

# check NIC PCIe bus addresses and network interface names
$ sudo mst status -v
MST modules:
------------
    MST PCI module is not loaded
    MST PCI configuration module loaded
PCI devices:
------------
DEVICE_TYPE                 MST                           PCI             RDMA            NET                 NUMA  VFIO              FWCTL                    STATE
ConnectX8(rev:0)            /dev/mst/mt4131_pciconf2.7    0002:0a:00.7    mlx5_17         net-enP2p10s0f7np7  0                       /dev/fwctl/fwctl17
ConnectX8(rev:0)            /dev/mst/mt4131_pciconf2.6    0002:0a:00.6    mlx5_16         net-enP2p10s0f6np6  0                       /dev/fwctl/fwctl16
ConnectX8(rev:0)            /dev/mst/mt4131_pciconf2.5    0002:0a:00.5    mlx5_15         net-enP2p10s0f5np5  0                       /dev/fwctl/fwctl15
ConnectX8(rev:0)            /dev/mst/mt4131_pciconf2.4    0002:0a:00.4    mlx5_14         net-enP2p10s0f4np4  0                       /dev/fwctl/fwctl14
ConnectX8(rev:0)            /dev/mst/mt4131_pciconf2.3    0002:0a:00.3    mlx5_13         net-enP2p10s0f3np3  0                       /dev/fwctl/fwctl13
ConnectX8(rev:0)            /dev/mst/mt4131_pciconf2.2    0002:0a:00.2    mlx5_12         net-enP2p10s0f2np2  0                       /dev/fwctl/fwctl12
ConnectX8(rev:0)            /dev/mst/mt4131_pciconf2.1    0002:0a:00.1    mlx5_11         net-enP2p10s0f1np1  0                       /dev/fwctl/fwctl11
ConnectX8(rev:0)            /dev/mst/mt4131_pciconf2      0002:0a:00.0    mlx5_10         net-enP2p10s0f0np0  0                       /dev/fwctl/fwctl10
ConnectX8(rev:0)            /dev/mst/mt4131_pciconf1.7    0002:09:00.7    mlx5_9          net-enP2p9s0f7np7   0                       /dev/fwctl/fwctl9
ConnectX8(rev:0)            /dev/mst/mt4131_pciconf1.6    0002:09:00.6    mlx5_8          net-enP2p9s0f6np6   0                       /dev/fwctl/fwctl8
ConnectX8(rev:0)            /dev/mst/mt4131_pciconf1.5    0002:09:00.5    mlx5_7          net-enP2p9s0f5np5   0                       /dev/fwctl/fwctl7
ConnectX8(rev:0)            /dev/mst/mt4131_pciconf1.4    0002:09:00.4    mlx5_6          net-enP2p9s0f4np4   0                       /dev/fwctl/fwctl6
ConnectX8(rev:0)            /dev/mst/mt4131_pciconf1.3    0002:09:00.3    mlx5_5          net-enP2p9s0f3np3   0                       /dev/fwctl/fwctl5
ConnectX8(rev:0)            /dev/mst/mt4131_pciconf1.2    0002:09:00.2    mlx5_4          net-enP2p9s0f2np2   0                       /dev/fwctl/fwctl4
ConnectX8(rev:0)            /dev/mst/mt4131_pciconf1.1    0002:09:00.1    mlx5_3          net-enP2p9s0f1np1   0                       /dev/fwctl/fwctl3
ConnectX8(rev:0)            /dev/mst/mt4131_pciconf1      0002:09:00.0    mlx5_2          net-enP2p9s0f0np0   0                       /dev/fwctl/fwctl2
ConnectX8(rev:0)            /dev/mst/mt4131_pciconf0.1    0002:03:00.1    mlx5_1          net-aerial01        0                       /dev/fwctl/fwctl1
ConnectX8(rev:0)            /dev/mst/mt4131_pciconf0      0002:03:00.0    mlx5_0          net-aerial00        0                       /dev/fwctl/fwctl0
Enter these commands to check the link status of port 0:
# Here is an example if the port 0 of CX8-0 NIC is connected to another server or switch via a 200GbE DAC cable.
$ sudo mlxlink -d /dev/mst/mt4131_pciconf0
Operational Info
----------------
State                              : Active
Physical state                     : ETH_AN_FSM_ENABLE
Speed                              : 200G
Width                              : 4x
FEC                                : Standard_RS-FEC - (544,514)
Loopback Mode                      : No Loopback
Auto Negotiation                   : ON

Supported Info
--------------
Enabled Link Speed (Ext.)          : 0x00013fc0 (400G_4X,200G_2X,200G_4X,100G_1X,100G_2X,100G_4X,50G_1X,50G_2X,25G)
Supported Cable Speed (Ext.)       : 0x000017f2 (200G_4X,100G_2X,100G_4X,50G_1X,50G_2X,40G,25G,10G,1G)

Troubleshooting Info
--------------------
Status Opcode                      : 0
Group Opcode                       : N/A
Recommendation                     : No issue was observed

Tool Information
----------------
Firmware Version                   : 40.97.5434
amBER Version                      : 6.4
MFT Version                        : 4.35.0-159
Follow the instructions at Configure CX8 NIC to configure the CX8 NIC.
Install CUDA Driver#
If the system has an older driver installed, unload the current driver modules and uninstall the old driver, using the following:
# Unload the current driver modules
$ for m in $(lsmod | awk "/^[^[:space:]]*(nvidia|nv_|gdrdrv)/ {print \$1}"); do echo Unload $m...; sudo rmmod $m; done

# Remove the driver if it was installed by runfile installer before.
$ sudo /usr/bin/nvidia-uninstall
Create the driver module config with the following recommended settings:
Run the following commands to install the NVIDIA open-source GPU kernel driver (OpenRM).
# Install NVIDIA GPU driver
$ wget https://us.download.nvidia.com/tesla/610.57.04/NVIDIA-Linux-aarch64-610.57.04.run
$ sudo sh NVIDIA-Linux-aarch64-610.57.04.run --silent -m kernel-open

# Verify that the driver is loaded successfully
$ nvidia-smi
+-----------------------------------------------------------------------------------------+
| NVIDIA-SMI 610.57.04              KMD Version: 610.57.04     CUDA UMD Version: 13.3     |
+-----------------------------------------+------------------------+----------------------+
| GPU  Name                 Persistence-M | Bus-Id          Disp.A | Volatile Uncorr. ECC |
| Fan  Temp   Perf          Pwr:Usage/Cap |           Memory-Usage | GPU-Util  Compute M. |
|                                         |                        |               MIG M. |
|=========================================+========================+======================|
|   0  NVIDIA RTX PRO 4500 Blac...    Off |   00000002:06:00.0 Off |                    0 |
| N/A   37C    P8             17W /  165W |       0MiB /  32623MiB |      0%      Default |
|                                         |                        |             Disabled |
+-----------------------------------------+------------------------+----------------------+

+-----------------------------------------------------------------------------------------+
| Processes:                                                                              |
|  GPU   GI   CI              PID   Type   Process name                        GPU Memory |
|        ID   ID                                                               Usage      |
|=========================================================================================|
|  No running processes found                                                             |
+-----------------------------------------------------------------------------------------+
Install GDRCopy Driver#
Run the following commands to install the GDRCopy driver. If the system has an older version installed, remove the old driver first.
Warning
GDRCopy driver must be installed after the CUDA driver.
# Check the installed GDRCopy driver version
$ apt list --installed | grep gdrdrv-dkms

# Remove the driver, if you have the older version installed.
$ sudo apt purge gdrdrv-dkms
$ sudo apt autoremove

# Install GDRCopy driver
$ wget https://developer.download.nvidia.com/compute/redist/gdrcopy/CUDA%2013.0/ubuntu24_04/aarch64/gdrdrv-dkms_2.6-1_arm64.Ubuntu24_04.deb
$ sudo dpkg -i gdrdrv-dkms_2.6-1_arm64.Ubuntu24_04.deb
Install Docker CE#
The full official instructions for installing Docker CE can be found here: https://docs.docker.com/engine/install/ubuntu/#install-docker-engine. The following instructions are one supported way of installing Docker CE:
$ sudo apt-get update
$ sudo apt-get install -y ca-certificates curl gnupg
$ sudo install -m 0755 -d /etc/apt/keyrings
$ curl -fsSL https://download.docker.com/linux/ubuntu/gpg | sudo gpg --dearmor -o /etc/apt/keyrings/docker.gpg
$ sudo chmod a+r /etc/apt/keyrings/docker.gpg
$ echo "deb [arch=$(dpkg --print-architecture) signed-by=/etc/apt/keyrings/docker.gpg] https://download.docker.com/linux/ubuntu $(. /etc/os-release && echo "$VERSION_CODENAME") stable" | sudo tee /etc/apt/sources.list.d/docker.list > /dev/null
$ sudo apt-get update
$ sudo apt-get install -y docker-ce docker-ce-cli containerd.io docker-buildx-plugin docker-compose-plugin
$ sudo docker run --rm hello-world
Install the NVIDIA Container Toolkit#
Locate and follow the NVIDIA Container Toolkit installation instructions.
Alternatively, use the following instructions to install the NVIDIA Container Toolkit.
Warning
Install the NVIDIA GPU driver (CUDA driver) and verify it with nvidia-smi before installing the NVIDIA Container Toolkit.
$ curl -fsSL https://nvidia.github.io/libnvidia-container/gpgkey | sudo gpg --dearmor -o /usr/share/keyrings/nvidia-container-toolkit-keyring.gpg
$ curl -s -L https://nvidia.github.io/libnvidia-container/stable/deb/nvidia-container-toolkit.list | sed 's#deb https://#deb [signed-by=/usr/share/keyrings/nvidia-container-toolkit-keyring.gpg] https://#g' | sudo tee /etc/apt/sources.list.d/nvidia-container-toolkit.list
$ sudo apt-get update
$ sudo apt-get install -y nvidia-container-toolkit
$ sudo nvidia-ctk runtime configure --runtime=docker
$ sudo systemctl restart docker
$ sudo docker run --rm --runtime=nvidia --gpus all ubuntu nvidia-smi
Note
If you have nvidia-container-toolkit installed on the existing system, check the version by running the nvidia-ctk --version
command. If it is older than 1.17.4, run the following commands to upgrade to the current version:
$ nvidia-ctk --version
NVIDIA Container Toolkit CLI version 1.14.4
commit: d167812ce3a55ec04ae2582eff1654ec812f42e1

$ sudo apt update
$ sudo apt-get install -y nvidia-container-toolkit

$ nvidia-ctk --version
NVIDIA Container Toolkit CLI version 1.19.1
commit: 09ceee5dde66ba9ce25c7cc69b1ebd5e6e3266fa
Update CX8 NIC Firmware#
Note
The following instructions are for the on-board CX8 of the MGX ARC Pro system only. Use nvonline to download the early access NIC FW.
# Enable MST
$ sudo mst start
$ sudo mst status

MST modules:
------------
    MST PCI module is not loaded
    MST PCI configuration module loaded

MST devices:
------------
/dev/mst/mt4131_pciconf0         - PCI configuration cycles access.
                                domain:bus:dev.fn=0002:03:00.0 addr.reg=88 data.reg=92 cr_bar.gw_offset=-1
                                Chip revision is: 00
/dev/mst/mt4131_pciconf1         - PCI configuration cycles access.
                                domain:bus:dev.fn=0002:09:00.0 addr.reg=88 data.reg=92 cr_bar.gw_offset=-1
                                Chip revision is: 00
/dev/mst/mt4131_pciconf2         - PCI configuration cycles access.
                                domain:bus:dev.fn=0002:0a:00.0 addr.reg=88 data.reg=92 cr_bar.gw_offset=-1
                                Chip revision is: 00

# Update the NIC firmware of the first CX8
$ sudo flint -d /dev/mst/mt4131_pciconf0 -i fw-ConnectX8-rel-40_97_5452-cx8_P4180_MGX_ARC_QP_Ax-UEFI-14.41.14-FlexBoot-3.9.101.bin -y b
# Update the NIC firmware of the second CX8
$ sudo flint -d /dev/mst/mt4131_pciconf1 -i fw-ConnectX8-rel-40_97_5452-cx8_P4180_MGX_ARC_QP_Ax-UEFI-14.41.14-FlexBoot-3.9.101.bin -y b
# Update the NIC firmware of the third CX8
$ sudo flint -d /dev/mst/mt4131_pciconf2 -i fw-ConnectX8-rel-40_97_5452-cx8_P4180_MGX_ARC_QP_Ax-UEFI-14.41.14-FlexBoot-3.9.101.bin -y b

Current FW version on flash:  40.97.5444
New FW version:               40.97.5452

FSMST_INITIALIZE -   OK
Writing Boot image component -   OK
Restoring signature                     - OK

# NOTE: Requires a full power cycle from host with cold boot
$ sudo ipmitool power cycle

#Enable MST
$ sudo mst start

# Verify NIC FW version after reboot
$ sudo mst start
$ sudo flint -d /dev/mst/mt4131_pciconf0 q
Image type:            FS5
FW Version:            40.97.5452
FW Release Date:       22.7.2026
Product Version:       40.97.5452
Rom Info:              type=UEFI version=14.41.14 cpu=AMD64,AARCH64
                    type=PXE version=3.9.101 cpu=AMD64
Base GUID:             9082c303000e2928        8
Base MAC:              9082c30e2928            8
System GUID:           9082c303000e2928
Node GUID:             9082c303000e2928
Port GUID:             9082c303000e2928
Allocated GUID:        0000000000000000
Image VSD:             N/A
Device VSD:            N/A
PSID:                  NVD0000000138
Security Attributes:   N/A
Geographical Address:  ASIC 0
PCIe switch mode only: Disabled
Run the following commands to configure the CX8 NIC:
# Setting CX8 port to Ethernet mode (not Infiniband)
$ sudo mlxconfig -d /dev/mst/mt4131_pciconf0 --yes set LINK_TYPE_P1=2
$ sudo mlxconfig -d /dev/mst/mt4131_pciconf0 --yes set LINK_TYPE_P2=2
# eCPRI flow steering enable
$ sudo mlxconfig -d /dev/mst/mt4131_pciconf0 --yes set FLEX_PARSER_PROFILE_ENABLE=4
$ sudo mlxconfig -d /dev/mst/mt4131_pciconf0 --yes set PROG_PARSE_GRAPH=1
# Accurate send scheduling enable
$ sudo mlxconfig -d /dev/mst/mt4131_pciconf0 --yes set ACCURATE_TX_SCHEDULER=1
$ sudo mlxconfig -d /dev/mst/mt4131_pciconf0 --yes set REAL_TIME_CLOCK_ENABLE=1
# Maximum level of CQE compression
$ sudo mlxconfig -d /dev/mst/mt4131_pciconf0 --yes set CQE_COMPRESSION=1

# NOTE: Requires a full power cycle from host with cold boot
$ sudo ipmitool power cycle

# Verify that the NIC FW changes have been applied
$ sudo mlxconfig -d /dev/mst/mt4131_pciconf0 q | grep "CQE_COMPRESSION\|PROG_PARSE_GRAPH\|ACCURATE_TX_SCHEDULER\|FLEX_PARSER_PROFILE_ENABLE\|REAL_TIME_CLOCK_ENABLE\|INTERNAL_CPU_MODEL\|LINK_TYPE_P1\|LINK_TYPE_P2"
    FLEX_PARSER_PROFILE_ENABLE                  4
    PROG_PARSE_GRAPH                            True(1)
    ACCURATE_TX_SCHEDULER                       True(1)
    CQE_COMPRESSION                             AGGRESSIVE(1)
    REAL_TIME_CLOCK_ENABLE                      True(1)
    LINK_TYPE_P1                                ETH(2)
    LINK_TYPE_P2                                ETH(2)
Install ptp4l and phc2sys#
Versions of ptp4l prior to 4.0 do not support dual-port PTP. Run the following commands to install ptp4l 4.2 from source:
$ sudo apt remove linuxptp
$ wget https://github.com/richardcochran/linuxptp/archive/refs/tags/v4.2.tar.gz
$ tar -xzf v4.2.tar.gz
$ cd linuxptp-4.2/
$ make
$ sudo make install prefix=/usr sbindir=/usr/sbin
Enter the following commands to configure ptp4l. This example assumes that aerial00 is the
NIC interface used for PTP.
Create /etc/ptp.conf:
Note
To run a cuBB test, comment out clientOnly on the node that acts as the PTP grandmaster.
Create /etc/systemd/system/ptp4l.service:
Reload systemd and start the ptp4l service:
Verify that the PTP service is active and that one server has become the master clock, as shown below:
$ sudo systemctl status ptp4l.service

● ptp4l.service - Precision Time Protocol (PTP) service
    Loaded: loaded (/etc/systemd/system/ptp4l.service; enabled; preset: enabled)
    Active: active (running) since Fri 2026-07-17 16:03:46 UTC; 2h 30min ago
    Docs: man:ptp4l
Main PID: 7495 (ptp4l)
    Tasks: 1 (limit: 73110)
    Memory: 4.6M (peak: 21.6M)
        CPU: 299ms
    CGroup: /system.slice/ptp4l.service
            └─7495 /usr/sbin/ptp4l -f /etc/ptp.conf

Jul 17 16:03:44 aerial-mgx systemd[1]: Starting ptp4l.service - Precision Time Protocol (PTP) service...
Jul 17 16:03:46 aerial-mgx systemd[1]: Started ptp4l.service - Precision Time Protocol (PTP) service.
Jul 17 16:03:46 aerial-mgx ptp4l[7495]: [25741.242] selected /dev/ptp0 as PTP clock
Jul 17 16:03:46 aerial-mgx ptp4l[7495]: [25741.268] port 1 (aerial00): INITIALIZING to LISTENING on INIT_COMPLETE
Jul 17 16:03:46 aerial-mgx ptp4l[7495]: [25741.268] port 0 (/var/run/ptp4l): INITIALIZING to LISTENING on INIT_COMPLETE
Jul 17 16:03:46 aerial-mgx ptp4l[7495]: [25741.268] port 0 (/var/run/ptp4lro): INITIALIZING to LISTENING on INIT_COMPLETE
Jul 17 16:03:47 aerial-mgx ptp4l[7495]: [25741.692] selected local clock 9082c3.fffe.0e2838 as best master
Jul 17 16:03:47 aerial-mgx ptp4l[7495]: [25741.692] port 1 (aerial00): assuming the grand master role
The other becomes the secondary (follower) clock, as shown below:
$ sudo systemctl status ptp4l.service

● ptp4l.service - Precision Time Protocol (PTP) service
    Loaded: loaded (/etc/systemd/system/ptp4l.service; enabled; preset: enabled)
    Active: active (running) since Fri 2026-07-17 16:03:46 UTC; 2h 44min ago
    Docs: man:ptp4l
Main PID: 7495 (ptp4l)
    Tasks: 1 (limit: 73110)
    Memory: 16.6M (peak: 21.6M)
        CPU: 386ms
    CGroup: /system.slice/ptp4l.service
            └─7495 /usr/sbin/ptp4l -f /etc/ptp.conf

Jul 17 18:47:53 aerial-mgx ptp4l[7495]: [35588.229] rms    1 max    3 freq     -1 +/-   7 delay  -129 +/-   0
Jul 17 18:47:54 aerial-mgx ptp4l[7495]: [35589.229] rms    2 max    5 freq     -2 +/-   9 delay  -129 +/-   0
Jul 17 18:47:55 aerial-mgx ptp4l[7495]: [35590.230] rms    2 max    4 freq     +1 +/-  10 delay  -129 +/-   0
Jul 17 18:47:56 aerial-mgx ptp4l[7495]: [35591.230] rms    2 max    4 freq     -1 +/-   8 delay  -128 +/-   0
Jul 17 18:47:57 aerial-mgx ptp4l[7495]: [35592.230] rms    1 max    2 freq     +1 +/-   7 delay  -129 +/-   0
Jul 17 18:47:58 aerial-mgx ptp4l[7495]: [35593.230] rms    1 max    3 freq     -0 +/-   6 delay  -129 +/-   0
Enter the commands to turn off NTP:
$ sudo timedatectl set-ntp false
$ timedatectl
            Local time: Fri 2026-07-17 04:30:28 UTC
        Universal time: Fri 2026-07-17 04:30:28 UTC
                RTC time: Fri 2026-07-17 04:30:28
                Time zone: Etc/UTC (UTC, +0000)
System clock synchronized: no
            NTP service: inactive
        RTC in local TZ: no
Run PHC2SYS as service:
PHC2SYS is used to synchronize the system clock to the PTP hardware clock (PHC) on the NIC.
Set the PTP NIC, such as aerial00, as the source clock and the system clock
(CLOCK_REALTIME) as the slave clock.
If more than one phc2sys instance is already running, stop the existing sessions before
updating the service file.
Create or update /etc/systemd/system/phc2sys.service with the following contents:
Note
PTP is based on TAI time and the system clock is synchronized to TAI time scale with the above PHC2SYS settings.
The current offset between UTC and TAI is 37 seconds (leap seconds) and TAI is ahead of UTC by this amount.
If there is a need to change the system clock to UTC time on the DU, the first ExecStart with -O 0 should be commented out and the second ExecStart with -w should be uncommented assuming the PTP and Grandmaster are properly configured.
Reload systemd and start the PHC2SYS service:
Verify that the PHC2SYS service is running and has converged to a low rms value (<30) and the correct NIC has been selected (aerial00):
$ sudo systemctl status phc2sys.service

● phc2sys.service - Synchronize system clock or PTP hardware clock (PHC)
    Loaded: loaded (/etc/systemd/system/phc2sys.service; enabled; preset: enabled)
    Active: active (running) since Fri 2026-07-17 16:04:57 UTC; 2h 29min ago
    Docs: man:phc2sys
Main PID: 7747 (sh)
    Tasks: 2 (limit: 73110)
    Memory: 13.1M (peak: 26.6M)
        CPU: 31.551s
    CGroup: /system.slice/phc2sys.service
            ├─7747 /bin/sh -c "/usr/sbin/phc2sys -s aerial00 -c CLOCK_REALTIME -n 24 -O 0 -R 256 -u 256"
            └─7748 /usr/sbin/phc2sys -s aerial00 -c CLOCK_REALTIME -n 24 -O 0 -R 256 -u 256

Jul 17 18:34:08 aerial-mgx phc2sys[7748]: [34762.877] CLOCK_REALTIME rms    6 max   19 freq -10541 +/-  27 delay   525 +/-  16
Jul 17 18:34:09 aerial-mgx phc2sys[7748]: [34763.893] CLOCK_REALTIME rms    6 max   17 freq -10542 +/-  26 delay   526 +/-  16
Jul 17 18:34:10 aerial-mgx phc2sys[7748]: [34764.910] CLOCK_REALTIME rms    5 max   17 freq -10548 +/-  20 delay   525 +/-  16
Jul 17 18:34:11 aerial-mgx phc2sys[7748]: [34765.926] CLOCK_REALTIME rms    5 max   15 freq -10541 +/-  22 delay   526 +/-  16
Jul 17 18:34:12 aerial-mgx phc2sys[7748]: [34766.943] CLOCK_REALTIME rms    5 max   13 freq -10551 +/-  14 delay   521 +/-  14
Jul 17 18:34:13 aerial-mgx phc2sys[7748]: [34767.959] CLOCK_REALTIME rms    4 max   14 freq -10544 +/-   8 delay   519 +/-  13
Verify that the system clock is synchronized:
$ timedatectl
            Local time: Fri 2026-07-17 04:43:28 UTC
        Universal time: Fri 2026-07-17 04:43:28 UTC
                RTC time: Fri 2026-07-17 04:43:28
                Time zone: Etc/UTC (UTC, +0000)
System clock synchronized: yes
            NTP service: inactive
        RTC in local TZ: no
Dual-port PTP#
Dual-port PTP is supported when both FH ports (for example, aerial00 and aerial01) receive the PTP signal from a timing source, such as a Primary Reference Time Clock (PRTC) or Grandmaster. Install linuxptp 4.2 as described in the previous section.
When dual-port PTP is configured and PTP services are enabled, linuxptp selects one FH port as RS_SLAVE (preferred timing reference) and the other as RS_PASSIVE (alternate timing reference). If the RS_SLAVE port loses the PTP signal, the RS_PASSIVE port assumes the RS_SLAVE role. When the PTP signal is restored on the preferred timing reference, that port resumes the RS_SLAVE role.
The phc2sys service applies the timing from the RS_SLAVE port to the MGX ARC Pro server system clock.
Enabling Dual-port PTP#
Add both FH ports to /etc/ptp.conf.
The assignment of RS_SLAVE and RS_PASSIVE does not depend on the order in which the ports are listed.
The following is an example of the contents of /etc/ptp.conf:
[global]
dataset_comparison              G.8275.x
G.8275.defaultDS.localPriority  128
maxStepsRemoved                 255
logAnnounceInterval             -3
logSyncInterval                 -4
logMinDelayReqInterval          -4
G.8275.portDS.localPriority     128
network_transport               L2
domainNumber                    24
tx_timestamp_timeout            30
clientOnly 1

clock_servo pi
step_threshold 1.0
egressLatency 28
pi_proportional_const 4.65
pi_integral_const 0.1

announceReceiptTimeout 3
delay_mechanism E2E
network_transport L2

[aerial01]
[aerial00]
Create or edit /etc/systemd/system/phc2sys.service with the following example contents:
[Unit]
Description=Synchronize system clock or PTP hardware clock (PHC)
Documentation=man:phc2sys
Requires=ptp4l.service
After=ptp4l.service

[Service]
Restart=always
RestartSec=5s
Type=simple
# Gives ptp4l a chance to stabilize
ExecStartPre=sleep 2

# Dual Port PTP
ExecStart=/bin/sh -c "/usr/sbin/phc2sys -a -r -n 24 -R 256 -u 256 -l 7"

[Install]
WantedBy=multi-user.target
Set Up the Boot Configuration Service#
Create the directory /usr/local/bin and create the /usr/local/bin/nvidia.sh file to run the commands on every reboot.
Note
The command for nvidia-smi -lgc expects just one GPU device (-i 0). This needs to be modified if the system uses more than one GPU.
Set --mode=1 so the RTX PRO 4500 GPU can use its maximum supported clock rate; otherwise, clock behavior may be limited with the default mode=0.
Create the rcu_affinity_manager.sh script referenced in the nvidia.sh script. This file can be found in the Aerial CUDA-Accelerated RAN source code at NVIDIA/aerial-cuda-accelerated-ran. After downloading the source, ensure the rcu_affinity_manager.sh file is copied to /usr/local/bin/rcu_affinity_manager.sh.
$ wget raw.githubusercontent.com/NVIDIA/aerial-cuda-accelerated-ran/refs/heads/main/cubb_scripts/infra/rcu_affinity_manager.sh
$ sudo cp rcu_affinity_manager.sh /usr/local/bin/rcu_affinity_manager.sh
$ sudo chmod +x /usr/local/bin/rcu_affinity_manager.sh
Create a system service file to be loaded after network interfaces are up.
Create a system service file for nvidia-persistenced to be run at startup.
Note
This file was created following the sample from /usr/share/doc/NVIDIA_GLX-1.0/samples/nvidia-persistenced-init.tar.bz2
Then set the file permissions, reload the systemd daemon, enable the service, restart the service when installing for the first time, and check the status.
$ sudo chmod 744 /usr/local/bin/nvidia.sh
$ sudo chmod 664 /etc/systemd/system/nvidia.service
$ sudo chmod 664 /etc/systemd/system/nvidia-persistenced.service
$ sudo systemctl daemon-reload
$ sudo systemctl enable nvidia-persistenced.service
$ sudo systemctl enable nvidia.service
$ sudo systemctl restart nvidia.service
$ sudo systemctl restart nvidia-persistenced.service
$ sudo systemctl status nvidia.service
$ sudo systemctl status nvidia-persistenced.service
The output of the last command should look like this:
$ sudo systemctl status nvidia.service
○ nvidia.service
    Loaded: loaded (/etc/systemd/system/nvidia.service; enabled; preset: enabled)
    Active: inactive (dead) since Fri 2026-07-17 04:19:58 UTC; 9min ago
Duration: 4.801s
    Process: 3898 ExecStart=/usr/local/bin/nvidia.sh (code=exited, status=0/SUCCESS)
Main PID: 3898 (code=exited, status=0/SUCCESS)
        CPU: 5.102s

Jul 17 04:19:58 aerial-mgx-arc nvidia.sh[8589]: CPU 2: : 1 RCU processes
Jul 17 04:19:58 aerial-mgx-arc nvidia.sh[8589]: CPU 3: : 1 RCU processes
Jul 17 04:19:58 aerial-mgx-arc nvidia.sh[8589]: CPU 65:: 2 RCU processes
Jul 17 04:19:58 aerial-mgx-arc nvidia.sh[8589]: CPU 66:: 1 RCU processes
Jul 17 04:19:58 aerial-mgx-arc nvidia.sh[8589]: CPU 67:: 1 RCU processes
Jul 17 04:19:58 aerial-mgx-arc nvidia.sh[8589]: CPU 68:: 2 RCU processes
Jul 17 04:19:58 aerial-mgx-arc nvidia.sh[8589]: CPU 70:: 1 RCU processes
Jul 17 04:19:58 aerial-mgx-arc nvidia.sh[5141]: === End of RCU Process Affinity Information ===
Jul 17 04:19:58 aerial-mgx-arc systemd[1]: nvidia.service: Deactivated successfully.
Jul 17 04:19:58 aerial-mgx-arc systemd[1]: nvidia.service: Consumed 5.102s CPU time.

$ sudo systemctl status nvidia-persistenced.service
● nvidia-persistenced.service - NVIDIA Persistence Daemon
    Loaded: loaded (/etc/systemd/system/nvidia-persistenced.service; enabled; preset: enabled)
    Active: active (running) since Fri 2026-07-17 04:18:43 UTC; 10min ago
    Process: 2458 ExecStart=/usr/bin/nvidia-persistenced (code=exited, status=0/SUCCESS)
Main PID: 2461 (nvidia-persiste)
    Tasks: 1 (limit: 73110)
    Memory: 2.5M (peak: 8.0M)
        CPU: 11ms
    CGroup: /system.slice/nvidia-persistenced.service
            └─2461 /usr/bin/nvidia-persistenced

Jul 17 04:18:43 aerial-mgx-arc systemd[1]: Starting nvidia-persistenced.service - NVIDIA Persistence Daemon...
Jul 17 04:18:43 aerial-mgx-arc nvidia-persistenced[2461]: Started (2461)
Jul 17 04:18:43 aerial-mgx-arc systemd[1]: Started nvidia-persistenced.service - NVIDIA Persistence Daemon.
Validating software-component versions and system configurations#
Before running Aerial, make sure that your software-component versions and system configurations meet the required specifications. For more information, refer to the System Configuration Validation Script.