DOCA Core Programming Guide
NVIDIA DOCA Core Programming Guide
This document provides instructions on how to deploy DOCA core objects.
DOCA Core objects provide a unified and holistic interface for application developers to interact with various DOCA libraries. The DOCA Core API and objects bring a standardized flow and building blocks for applications to build upon while hiding the internal details of dealing with hardware and other software components. DOCA Core is designed to give the right level of abstraction while maintaining performance.
DOCA Core has the same API (header files) for both DPU and CPU installations but specific API calls may return DOCA_ERROR_NOT_SUPPORTED if the API is not implemented for that processor. However, this is not the case for Windows and Linux as DOCA Core does have API differences between Windows and Linux installations.
DOCA Core exposes C-language API to application writers and users must include the right header file to use according to the DOCA Core facilities needed for their application. DOCA Core can be divided into the following software modules:
The following sections describe DOCA Core's architecture and sub-systems along with some basic flows that help users get started using DOCA Core.
The following sections describe the architecture for the various DOCA Core software modules.
3.1. General
3.1.1. doca_error_t
All DOCA APIs return the status in the form of doca_error.
            typedef enum doca_error {
        DOCA_SUCCESS,
        DOCA_ERROR_UNKNOWN,
        DOCA_ERROR_NOT_PERMITTED,         /**< Operation not permitted */
        DOCA_ERROR_IN_USE,                /**< Resource already in use */
        DOCA_ERROR_NOT_SUPPORTED,         /**< Operation not supported */
        DOCA_ERROR_AGAIN,                 /**< Resource temporarily unavailable, try again */
        DOCA_ERROR_INVALID_VALUE,         /**< Invalid input */
        DOCA_ERROR_NO_MEMORY,             /**< Memory allocation failure */
        DOCA_ERROR_INITIALIZATION,        /**< Resource initialization failure */
        DOCA_ERROR_TIME_OUT,              /**< Timer expired waiting for resource */
        DOCA_ERROR_SHUTDOWN,              /**< Shut down in process or completed */
        DOCA_ERROR_CONNECTION_RESET,      /**< Connection reset by peer */
        DOCA_ERROR_CONNECTION_ABORTED,    /**< Connection aborted */
        DOCA_ERROR_CONNECTION_INPROGRESS, /**< Connection in progress */
        DOCA_ERROR_NOT_CONNECTED,         /**< Not Connected */
        DOCA_ERROR_NO_LOCK,               /**< Unable to acquire required lock */
        DOCA_ERROR_NOT_FOUND,             /**< Resource Not Found */
        DOCA_ERROR_IO_FAILED,             /**< Input/Output Operation Failed */
        DOCA_ERROR_BAD_STATE,             /**< Bad State */
        DOCA_ERROR_UNSUPPORTED_VERSION,   /**< Unsupported version */
        DOCA_ERROR_OPERATING_SYSTEM,      /**< Operating system call failure */
        DOCA_ERROR_DRIVER,                /**< DOCA Driver call failure */
        DOCA_ERROR_UNEXPECTED,            /**< An unexpected scenario was detected */
} doca_error_t;
3.1.2. Generic Structures/Enum
The following types are common across all device types in the DOCA Core API.
            union doca_data {
        void *ptr;
        uint64_t u64;
};

enum doca_access_flags {
	DOCA_ACCESS_LOCAL_READ_ONLY     = 0,
	DOCA_ACCESS_LOCAL_READ_WRITE    = (1 << 0),
	DOCA_ACCESS_RDMA_READ           = (1 << 1),
	DOCA_ACCESS_RDMA_WRITE          = (1 << 2),
	DOCA_ACCESS_RDMA_ATOMIC         = (1 << 3),
	DOCA_ACCESS_DPU_READ_ONLY       = (1 << 4),
	DOCA_ACCESS_DPU_READ_WRITE      = (1 << 5),
};

enum doca_pci_func_type {
        DOCA_PCI_FUNC_PF = 0, /* physical function */
        DOCA_PCI_FUNC_VF,     /* virtual function */
        DOCA_PCI_FUNC_SF,     /* sub function */
};
3.2. DOCA Device
3.2.1. Local Device and Representor
The DOCA device represents an available processing unit backed by hardware or software implementation. The DOCA device exposes its properties to help an application in choosing the right device(s). DOCA Core supports two device types:
- Local device – this is an actual device exposed in the local system (DPU or host) and can perform DOCA library processing jobs (can be a hardware device or device emulation)
- Representor device – this is a representation of a local device. The local device is usually on the host (except for SFs) and the representor is always on the DPU side (a proxy on the DPU for the host-side device).
The following figure provides an example topology:

The diagram shows a DPU (on the right side of the figure) connected to a host (on the left side of the figure). The host topology consists of two physical functions (PF0 and PF1). Furthermore, PF0 has two child virtual functions, VF0 and VF1. PF1 has only one VF associated with it, VF0. Using the DOCA SDK API, the user gets these five devices as local devices on the host.
The DPU side has a representor-device per each host function in a 1-to-1 relation (e.g., hpf0 is the representor device for the host's pf0 device and so on) as well as a representor for each SF function such that both the SF and its representor reside in the DPU.
If the user queries local devices on the DPU side (not representor devices), they get the two (in this example) DPU PFs, p0 and p1. These two DPU local devices are the parent devices for:
- 7 representor devices –
- 5 representor devices shown as arrows to/from the host (devices with the prefix
hpf*) in the diagram - 2 representor devices for the SF devices,
pf0sf0andpf1sf0
- 5 representor devices shown as arrows to/from the host (devices with the prefix
- 2 local SF devices (not the SF representors),
p0s0andp1s0
In the diagram, the topology is split into 2 parts (see dotted line), each part is represented by a DPU physical device, p0 and p1, each of which is responsible for creating all other local devices (host PFs, host VFs, and DPU SFs). As such, the DPU physical device can be referred to as the parent device of the other devices and would have access to the representor of every other function (via doca_devinfo_rep_list_create).
3.2.1.1. Local Device and Representor Matching
Based on the diagram in section Local Device and Representor, the mmap export APIs can be used as follows:
| Device to Select on Host When Using doca_mmap_export() | DPU Matching Representor | Device to Select on DPU When Using doca_mmap_from_export() |
|---|---|---|
| pf0 – 0b:00.0 | hpf0 – 0b:00.0 | p0 – 03:00.0 |
| pf0vf0 – 0b:00.2 | hpf0vf0 – 0b:00.2 | |
| pf0vf1 – 0b:00.3 | hpf0vf1 – 0b:00.3 | |
| pf1 – 0b:00.1 | hpf1 – 0b:00.1 | p1 – 03:00.1 |
| pf1vf0 – 0b:00.4 | hpf1vf0 – 0b:00.4 |
3.2.2. Expected Flow
To work with DOCA libraries or DOCA Core objects, the application must open and use a representor device on the DPU. Before it can open the representor device and use it, the application needs tools to allow it to select the appropriate representor device with the necessary capabilities. The DOCA Core API provides a wide range of device capabilities to help the application select the right device pair (device and its DPU representor). The flow is as follows:
- List all representor devices on DPU.
- Select one with the required capabilities.
- Open this representor and use it.
As mentioned previously, the DOCA Core API is able to identify devices and their representors that have a unique property (e.g., the BDF address, the same BDF for the device and its DPU representor).
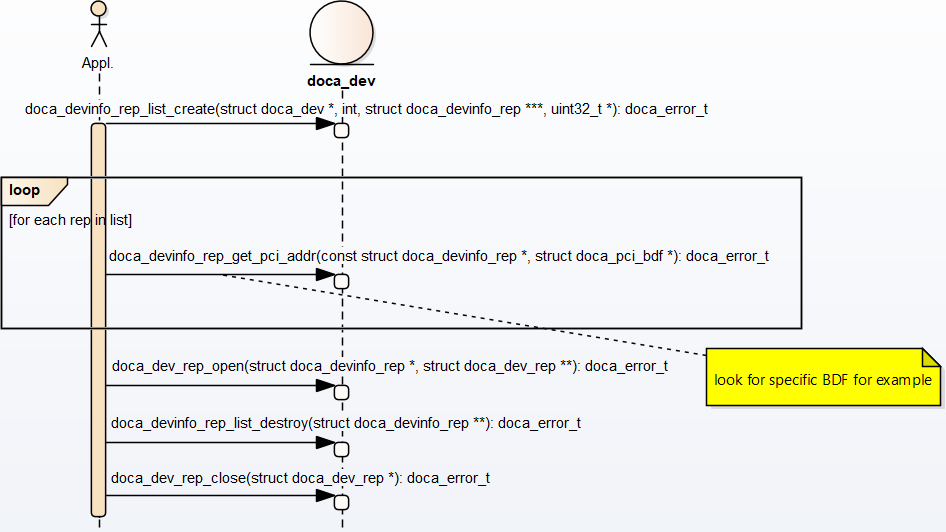
- The application "knows" which device it wants to use (e.g., by its PCIe BDF address). On the host, it can be done using DOCA Core API or OS services.
- On the DPU side, the application gets a list of device representors for a specific DPU local device.
- Select a specific
doca_devinfo_repto work with according to one of its properties. This example looks for a specific PCIe address. - Once the
doca_devinfo_repthat suites the user's needs is found, opendoca_dev_rep. - After the user opens the right device representor, they can close the
doca_devinfolist and continue working withdoca_dev_rep. The application eventually has to closedoca_devtoo.
Regarding device property caching, the functions doca_devinfo_list_create and doca_devinfo_rep_list_create provide a snapshot of the DOCA device properties when they are called. If any device's properties are changed dynamically (e.g., BDF address may change on bus reset), the device properties that those functions return would not reflect this change. One should call them again to get the updated properties of the devices.
3.3. DOCA Memory Subsystem
DOCA memory subsystem is designed to optimize performance while keeping a minimal memory footprint (to facilitate scalability) as main design goals. DOCA memory is has the following main components:
doca_buf– this is the data buffer descriptor.That is, it is not the actual data buffer, rather it is a descriptor that holds metadata on the "pointed" data buffer.doca_mmap– this is the data buffers pool whichdoca_bufpoints at. The application provides the memory as a single memory region as well as permissions for certain devices to access it.
As the doca_mmap serves as the memory pool for data buffers, there is also an entity called doca_buf_inventorywhich serves as a pool of doca_buf with same characteristics (see more under doca_buf and Inventory). As all DOCA entities, memory subsystem objects are opaque and can be instantiated by DOCA SDK only.
One of the critical requirements from doca_buf is to minimize its size so programs would not run into a lack of memory or scalability issues. For that purpose, DOCA features an extension support for doca_buf_inventory which means that the application can assign specific extensions to each doca_buf_inventory it creates (can also bitwise OR extensions). By default, the minimal doca_buf structure is used without any extensions. Without any extensions, the doca_buf can be used as a linked list which allows the application to chain several doca_bufs and create a linked list of doca_buf (which can be used for scatter/gather scenarios).
The following diagram shows the various modules within the DOCA memory subsystem:
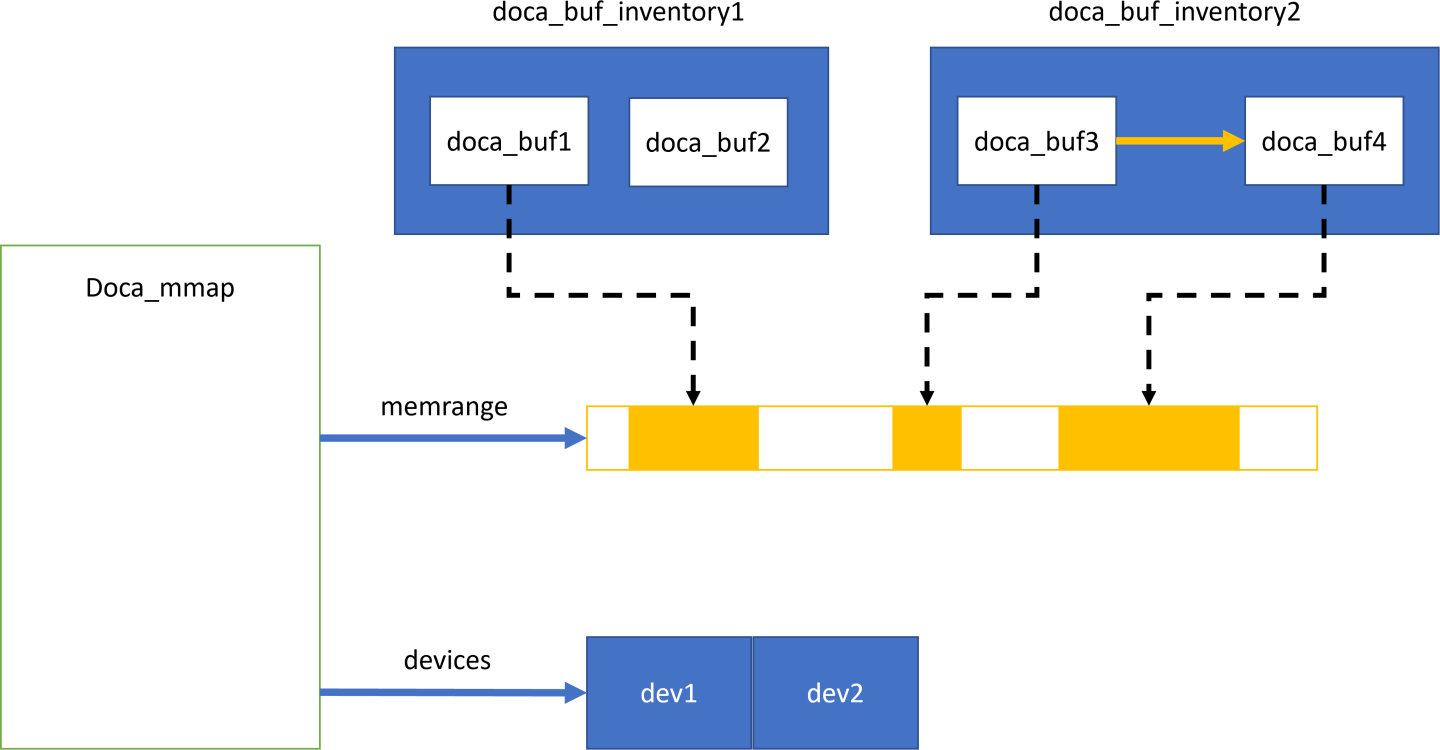
In the diagram, you may see two doca_buf_inventorys. Each doca_buf points to a portion of the memory buffer which is part of a doca_mmap. The mmap is populated with a 1 continuous memory buffer memrange and is mapped to 2 devices, dev1 and dev2.
3.3.1. Requirements and Considerations
- The DOCA memory subsystem mandates the usage of pools as opposed to dynamic allocation
- Pool for
doca_buf→doca_buf_inventory - Pool for data memory →
doca_mmap
- Pool for
- The memory buffer in the mmap can be mapped to one device or more
- Devices in the mmap are restricted by access permissions defining how they can access the memory buffer
doca_bufpoints to a specific memory buffer (or part of it) and holds the metadata for that buffer- The internals of mapping and working with the device (e.g., memory registrations) is hidden from the application
- The host-mapped memory buffer can be accessed by DPU
3.3.2. doca_mmap
doca_mmap is more than just a data buffer as it hides a lot of details (e.g., RDMA technicalities, device handling, etc.) from the application developer while giving the right level of abstraction to the software using it. doca_mmapis the best way to share memory between the host and the DPU so the DPU can have direct access to the host-side memory.
DOCA SDK supports several types of mmap that help with different use cases: local mmap and mmap from export.
3.3.2.1. Local mmap
This is the basic type of mmap which maps local buffers to the local device(s).
- The application creates and starts
doca_mmap. - The application adds devices and sets a memory region to the mmap, granting the devices access to that memory region.
- The application can specify the access permission for the devices to that memory range using
doca_mmap_set_permissions.- If the mmap is used only locally, then
DOCA_ACCESS_LOCAL_*must be specified - If the mmap is shared with the DPU (see step 4), then
DOCA_ACCESS_DPU_*must be specified - If the mmap is shared with a remote RDMA target, then
DOCA_ACCESS_DPU_*must be specified
- If the mmap is used only locally, then
- To share the mmap with the DPU or the RDMA remote target, call
doca_mmap_export_dpuordoca_mmap_export_rdmarespectively. If appropriate access has not been provided, the export fails. - The generated blob from previous step can be shared out of band using a socket. If sharing with a DPU, it is recommended to use the DOCA Comm Channel. See the DMA Copy application for the exact flow.
3.3.2.2. mmap from Export
This mmap is used to access the host memory (from the DPU) or the remote RDMA target's memory.
- The application receives a blob from the other side. The blob contains data returned from step 4 in the former bullet.
-
The application calls
doca_mmap_create_from_exportand receives a new mmap that represents memory defined by the other side.
Now the application can create doca_buf to point to this imported mmap and have direct access to the other machine's memory.
3.3.3. doca_buf and Inventory
doca_buf is opaque and can only be allocated using DOCA API. As previously mentioned, it is the descriptor that points to a specific (portion or entire) mmap buffer (chunk). doca_buf_inventory is a pool of doca_bufs that the application creates. Still, the doca_bufs in such an inventory are placeholders and do not point to the data. When the application desires to assign a doca_buf to a specific data buffer, it calls the doca_buf_inventory_buf_by_addr API.
3.3.3.1. Inventory Types
| Inventory Type | Characteristics | When to Use | Notes |
|---|---|---|---|
doca_buf_inventory |
Multiple mmaps, flexible address, flexible buffer size. | When multiple sizes or mmaps are used. | Most common use case. |
doca_buf_array |
Single mmap, fixed buffer size. User receives an array of pointers to DOCA buffers. | Use for creating DOCA buffers on GPU. | doca_buf_arr is configured on the CPU and created on the GPU. |
doca_bufpool |
Single mmap, fixed buffer size, address not controlled by the user. | Use as a pool of buffers of the same characteristics when buffer address is not important. | Slightly faster than doca_buf_inventory. |
3.3.4. Example Flow
The following is a simplified example of the steps expected for exporting the host mmap to the DPU to be used by DOCA for direct access to the host memory (e.g. for DMA):
Create mmap on the host (see section Local Device and Representor Matching for information on how to choose the
doca_devto add to mmap if exporting to DPU). This example adds a singledoca_devto the mmap and exports it so the DPU/RDMA endpoint can use it.
Import to the DPU/RDMA endpoint (e.g., use the mmap descriptor output parameter as input to
doca_mmap_create_from_export).
3.4. DOCA Execution Model
In DOCA, the workload involves transforming source data to destination data. The basic transformation is a DMA operation on the data which simply copies data from one memory location to another. Other operations involve calculating the SHA value of the source data and writing it to the destination.
The workload can be broken into 3 steps:
- Read source data (
doca_bufsee memory subsystem). - Apply an operation on the read data (handled by a dedicated hardware accelerator).
- Write the result of the operation to the destination (
doca_bufsee memory subsystem).
Each such operation is referred to as a job (doca_job).
Jobs describe operations that an application would like to submit to DOCA (hardware or DPU). To do so, the application requires a means of communicating with the hardware/DPU. This is where the doca_workq comes into play. The WorkQ is a per-thread object used to queue jobs to offload to DOCA and eventually receive their completion status.
doca_workq introduces three main operations:
- Submission of jobs.
- Checking progress/status of submitted jobs.
- Querying job completion status.
A workload can be split into many different jobs that can be executed on different threads, each thread represented by a different WorkQ. Each job must be associated to some context, where the context defines the type of job to be done.
A context can be obtained from some libraries within the DOCA SDK. For example, to submit DMA jobs, a DMA context can be acquired from doca_dma.h, whereas SHA context can be obtained using doca_sha.h. Each such context may allow submission of several job types.
A job is considered asynchronous in that once an application submits a job, the DOCA execution engine (hardware or DPU) would start processing it, and the application can continue to do some other processing until the hardware finishes. To keep track of which job has finished, there are two modes of operation: polling mode and event-driven mode.
3.4.1. Requirements and Considerations
- The job submission/execution flow/API is optimized for performance (latency)
- DOCA does not manage internal (operating system) threads. Rather, progress is managed by application resources (calling DOCA API in polling mode or waiting on DOCA event in event-driven mode).
- The basic object for executing the task is a
doca_job. Each job is mapped to a specific DOCA library context. doca_workqrepresents a logical thread of execution for the application and jobs submitted to workq- Execution-related elements (e.g.,
doca_workq,doca_ctx) are opaque and the application performs minimal initialization/configuration before using these elements - A job submitted to WorkQ can fail (even after the submission succeeds). In some cases, it is possible to recover from the error. In other cases, the only option is to reinitialize the relevant objects.
- WorkQ does not guarantee order (i.e., jobs submitted in certain order might finish out-of-order). If the application requires order, it must impose it (e.g., submit a dependent job once the previous job is done).
- A WorkQ can either work in polling mode or event-driven mode, but not in both at same time
-
Not all DOCA contexts support event-driven mode (i.e., can be added to a WorkQ that supports event-driven mode). The following API can query whether a context supports event-driven mode or not:
doca_ctx_get_event_driven_supported(struct doca_ctx*, uint8)
3.4.2. DOCA Context
doca_ctx represents an instance of a specific DOCA library (e.g., DMA, SHA). Before submitting jobs to the WorkQ for execution, the job must be associated to a specific context that executes the job. The application is expected to associate (i.e., add) WorkQ with that context. Adding a WorkQ to a context allows submitting a job to the WorkQ using that context. Context represents a set of configurations including the job type and the device that runs it such that each job submitted to the WorkQ is associated with a context that has already been added. The following diagram shows the high-level (domain model) relations between various DOCA Core entities.
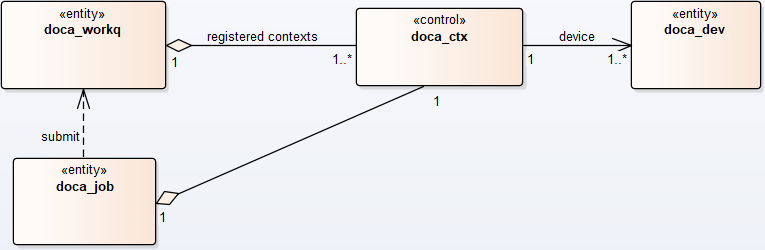
-
doca_jobis associated to a relevantdoca_ctxthat executes the job (with the help of the relevantdoca_dev). -
doca_job, after it is initialized, is submitted todoca_workqfor execution. -
doca_ctxs are added to thedoca_workq. once adoca_jobis queued todoca_workq, it is submitted to thedoca_ctxthat is associated with that job type in this WorkQ.
The following diagram describes the initialization sequence of a context:

After the context is started, it can be used to enable the submission of jobs to a WorkQ based on the types of jobs that the context supports. See DOCA WorkQ for more information.
Context is a thread-safe object. Some contexts can be used across multiple WorkQs while others can only be added only to a single WorkQ. Please refer to documentation of the specific context for specific information per context (e.g., doca_dma).
3.4.3. DOCA WorkQ
doca_workq is a logical representation of DOCA thread of execution (non-thread-safe). WorkQ is used to submit jobs to the relevant context/library (hardware offload most of the time) and query the job's completion status. To start submitting jobs, however, the WorkQ must be configured to accept that type of job. Each WorkQ can be configured to accept any number of job types depending on how it initialized.
The following diagram describes the initialization flow of the WorkQ:
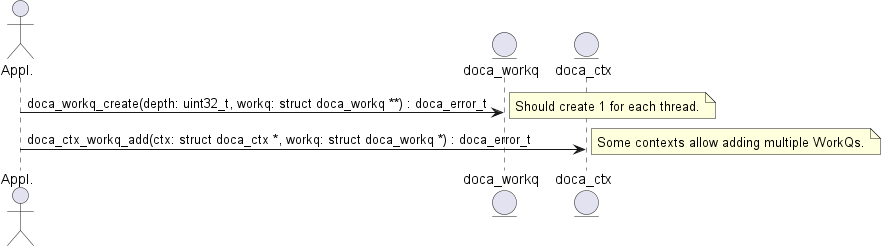
After the WorkQ has been created and added to a context, it can start accepting jobs that the context defines. Refer to the context documentation to find details such as whether the context supports adding multiple doca_workqs to the same context and what jobs can be submitted using the context.
Please note that the WorkQ can be added to multiple contexts. Such contexts can be of the same type or of different types. This allows submitting different job types to the same WorkQ and waiting for any of them to finish from the same place/thread.
3.4.4. Polling Mode
In this mode, the application submits a job and then does busy-wait to find out when the job has completed. Polling mode is enabled by default. The following diagram demonstrates this sequence:
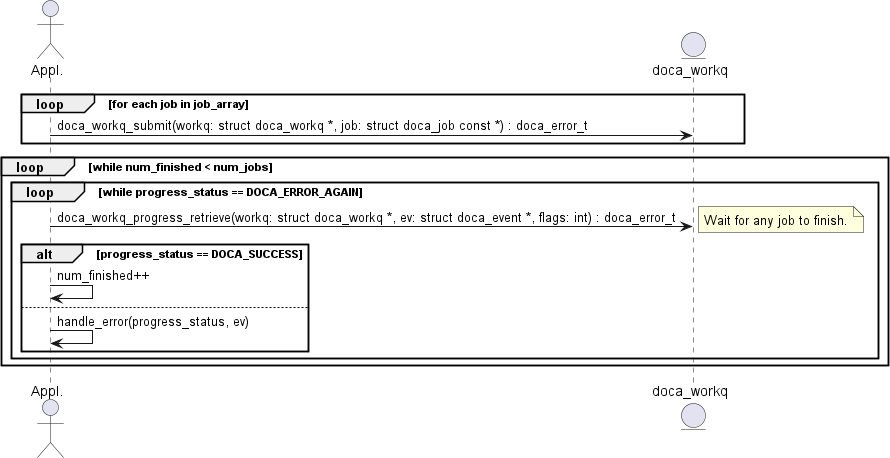
- The application submits all jobs (one or more) and tracks the number of completed jobs to know if all jobs are done.
- The application waits for a job to finish.
- If
doca_workq_progress_retrieve()returnsDOCA_ERROR_AGAIN, it means that jobs are still running (i.e. no result). - Once a job is done,
DOCA_SUCCESSis returned fromdoca_workq_progress_retrieve(). - If another status is returned, that means an error has occurred (see section Job Error Handling).
- If
- Once a job has finished, the counter for tracking the number of finished jobs is updated.
In this mode the application is always using the CPU even when it is doing nothing (during busy-wait).
3.4.5. Event-driven Mode
In this mode, the application submits a job and then waits for a signal to be received before querying the status. The following diagram shows this sequence:
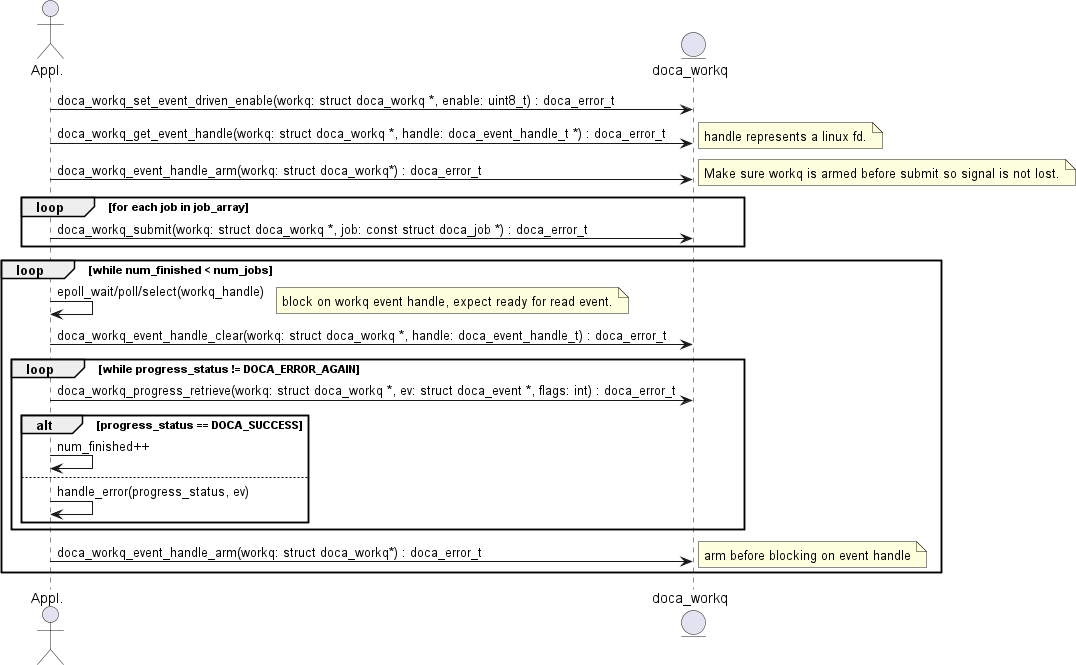
- The application enables event-driven mode of the WorkQ. If this step fails (
DOCA_ERROR_NOT_SUPPORTED), it means that one or more of the contexts associated with the WorkQ (viadoca_ctx_workq_add) do not support this mode. To find out if a context supports this event-driven mode, refer to the context documentation. Alternatively, the APIdoca_ctx_get_event_driven_supported()can be called during runtime. - The application gets an event handle from the
doca_workqrepresenting a Linux file descriptor which is used to signal the application that some work has finished. - The application then arms the WorkQ.
Note:
This must be done every time an application is interested in receiving a signal from the WorkQ.
- The application submits a job to the WorkQ.
- The application waits (e.g., Linux epoll/select) for a signal to be received on the
workq-fd. - The application clears the received events, notifying the WorkQ that a signal has been received and allowing it to do some event handling.
- The application attempts to retrieve a result from the WorkQ.
Note:
There is no guarantee that the call to
doca_workq_progress_retrievewould return a job completion event but the WorkQ can continue the job. - Increment the number of finished jobs if successful or handle error.
- Arm the WorkQ to receive the next signal.
- Repeat steps 5-9 until all jobs are finished.
3.4.6. DOCA Sync Event
DOCA Sync Event does not currently support DPA or GPU related features (see DOCA Sync Event Limitations and Disclaimers for more limitations).
DOCA Sync Event is a software synchronization mechanism for parallel execution across the CPU and DPU. The sync event holds a 64-bit counter which can be updated, read, and waited upon from any of these units to achieve synchronization between executions on them.
DOCA Sync Event defines a subscriber and publisher:
- Publisher – the entity which updates (sets or increments) the event value
- Subscriber – the entity which gets and waits upon the sync event
Each DOCA Sync Event is configured with a single publisher location and a single subscriber location which can be the CPU or DPU.
The sync event control path happens on the CPU (either host CPU or DPU CPU) through the DOCA Sync Event CPU handle. It is possible to retrieve different execution-unit-specific handles (DPU/DPA/GPU handles) by exporting the sync event instance through the CPU handle. Each sync event handle refers to the DOCA Sync Event instance from which it is retrieved. By using the execution-unit-specific handle, the associated sync event instance can be operated from that execution unit.
In a basic scenario, synchronization is achieved by updating the sync event from one execution and waiting upon the sync event from another execution unit.
3.4.6.1. Creating DOCA Sync Event
DOCA Sync Event does not currently support DPA or GPU related features (see DOCA Sync Event Limitations and Disclaimers for more limitations).
DOCA Sync Event exposes different types of handles per execution unit:
- CPU (host/DPU) handle type,
struct doca_sync_event - DPU handle type,
struct doca_sync_event - DPA handle type,
doca_dpa_dev_sync_event_t - GPU handle type,
doca_gpu_dev_sync_event_t
Each one of the handle types above has its own dedicated API for creation.
Any DOCA Sync Event creation starts with creating CPU handle by calling doca_sync_event_create API.
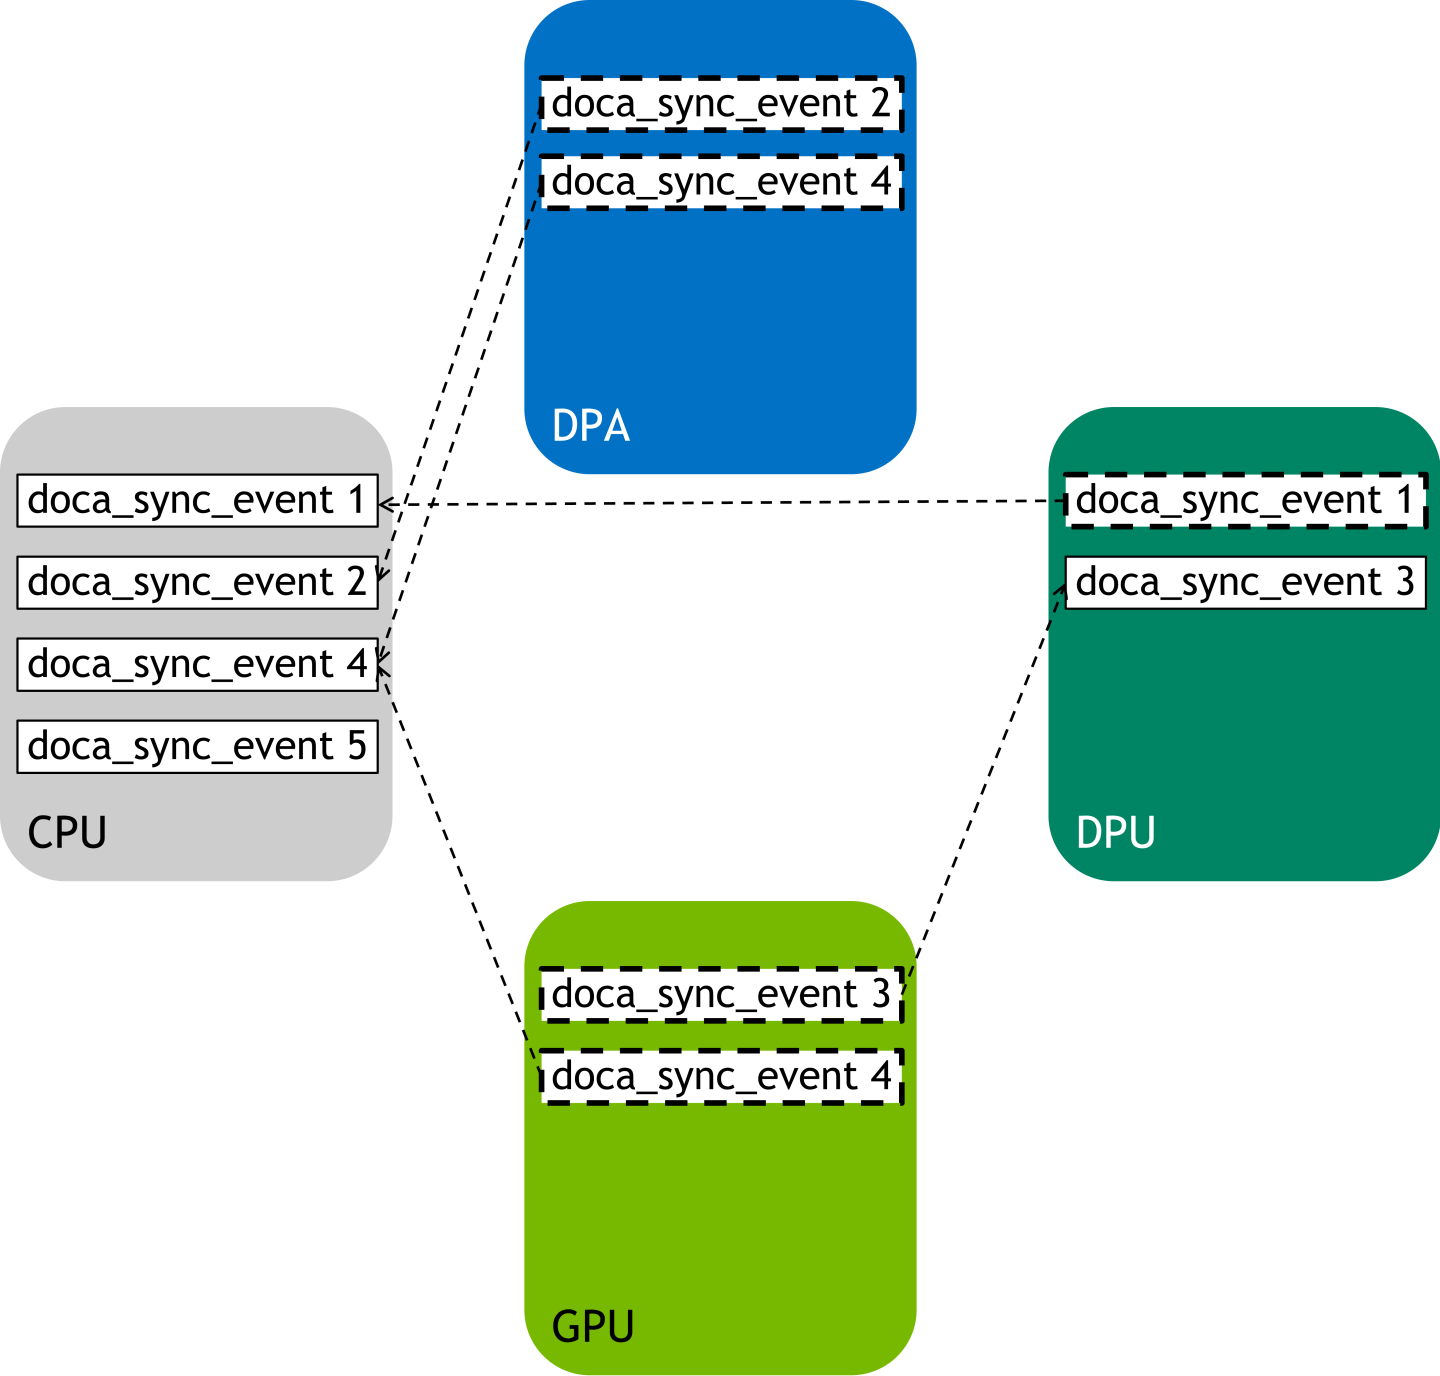
DPU, DPA, and GPU handle creation is part of the DOCA Sync Event export flow, as illustrated in the following diagram:
3.4.6.2. Configuring DOCA Sync Event
DOCA Sync Event does not currently support DPA or GPU related features (see DOCA Sync Event Limitations and Disclaimers for more limitations).
Once the DOCA Sync Event (CPU handle) is created, it must be configured by providing the runtime hints on the publisher and subscriber locations.
Both the subscriber and publisher locations must be configured using the following APIs:
doca_sync_event_publisher_add_location_<cpu|dpa|gpu>doca_sync_event_subscriber_add_location_<cpu|dpa|gpu>
Another optional configuration, allowed for CPU-DPU sync events only is to provide an 8-byte host buffer to be used as the backing memory of the sync event. If set, it is the user responsibility to handle the memory (i.e., preserve the memory allocated during all DOCA Sync Event lifecycle and free it after DOCA Sync Event destruction).
3.4.6.3. DOCA Sync Event Operation Modes
After creating a CPU handle and configuring it, the next step is to start the sync event. DOCA Sync Event exposes two different APIs for starting it depending on the desired operation mode, synchronous or asynchronous.
3.4.6.3.1. Synchronous Mode
Start the sync event to operate in synchronous mode by calling doca_sync_event_start.
In synchronous operation mode, each data path operation (get, update, wait) blocks the calling thread from continuing until the operation is done.
3.4.6.3.2. Asynchronous Mode
To start the sync event to operate in asynchronous mode, convert the sync event instance to doca_ctx by calling doca_sync_event_as_ctx. Then use DOCA CTX API to start the sync event and DOCA WorkQ API to submit operation jobs on the sync event (see DOCA WorkQ for more details).
3.4.6.4. Exporting DOCA Sync Event to Another Execution Unit
DOCA Sync Event does not currently support DPA or GPU related features (see DOCA Sync Event Limitations and Disclaimers for more limitations).
To use a sync event from an execution unit other than CPU, it should be exported to get a handle for the specific execution unit:
- DPA –
doca_sync_event_export_to_dpareturns DOCA Sync Event DPA handle (doca_dpa_dev_sync_event_t) which later can be passed to the DPA Sync Event data path APIs from the DPA kernel. - GPU –
doca_sync_event_export_to_gpureturns DOCA Sync Event GPU handle (doca_gpu_dev_sync_event_t) which later can be passed to the GPU Sync Event data path APIs for the CUDA kernel. - DPU –
doca_sync_event_export_to_dpureturns opaque which later can be used from the DPU CPU to instantiate a DOCA Sync Event DPU handle (struct doca_sync_event) using thedoca_sync_event_create_from_exportfunction.
3.4.6.5. DOCA Sync Event Data Path Operations
The DOCA Sync Event synchronization mechanism is achieved by using exposed data path operations. The API exposes a function for "writing" to the sync event and for "reading" the sync event.
The synchronous API is a set of functions which can be called directly by the user, while the asynchronous API is exposed by defining a corresponding doca_job type for each synchronous function to be submitted on a DOCA WorkQ in addition to a doca_sync_event_result type that can be retrieved from the DOCA WorkQ (see DOCA WorkQ and DOCA Context for more additional information).
The following subsections describe the DOCA Sync Event data path operation with respect to these two operation modes.
3.4.6.5.1. Publishing on DOCA Sync Event
3.4.6.5.1.1. Setting DOCA Sync Event Value
Users can set DOCA Sync Event to a 64-bit value:
- Synchronously by calling
doca_sync_event_update_set - Asynchronously by submitting
doca_sync_event_job_update_setjob
3.4.6.5.1.2. Adding to DOCA Sync Event Value
Users can atomically increment the value of a DOCA Sync Event:
- Synchronously by calling
doca_sync_event_update_add - Asynchronously by submitting
doca_sync_event_job_update_addjob
3.4.6.5.2. Subscribing on DOCA Sync Event
3.4.6.5.2.1. Getting DOCA Sync Event Value
Users can get the value of a DOCA Sync Event:
- Synchronously by calling
doca_sync_event_get - Asynchronously by submitting
doca_sync_event_job_getjob
3.4.6.5.2.2. Waiting on DOCA Sync Event
Waiting for an event is the main operation for achieving synchronization between different execution units.
Users can wait until a sync event reaches some specified value in a variety of ways. Synchronously
doca_sync_event_wait_gtwaits for the value of a DOCA Sync Event to be greater than a specified value in a "polling busy wait" manner (100% processor utilization). This API enables users to wait for a sync event in real time.-
doca_sync_event_wait_gt_yieldwaits for the value of a DOCA Sync Event to be greater than a specified value in a "periodically busy wait" manner. After each polling iteration, the calling thread relinquishes the CPU so a new thread gets to run. This API allows a tradeoff between real-time polling to CPU starvation.
Asynchronously
DOCA Sync Event exposes asynchronous wait method by defining a wait doca_job. Submitting doca_job on a doca_workq is an asynchronous non-blocking API.
Users can wait for wait job completion in the following methods:
- Blocking – get a
doca_workqevent handle to blocking wait on - Polling – poll the wait job status by calling
doca_workq_progress_retrieve
Refer to DOCA WorkQ and DOCA Context for more information.
3.4.6.6. DOCA Sync Event Tear Down
Multiple sync event handles (for different execution units) associated with the same DOCA Sync Event instance can live simultaneously, though the teardown flow is preformed only from the CPU on the CPU handle.
3.4.6.6.1. Stopping DOCA Sync Event
- Synchronous – call
doca_sync_event_stopon the CPU handle - Asynchronous – stop the DOCA CTX associated with the DOCA Sync Event instance
Stopping a DOCA Sync Event must be followed by destruction. Refer to Destroying DOCA Sync Event for details.
3.4.6.6.2. Destroying DOCA Sync Event
Once stopped, a DOCA Sync Event instance can be destroyed by calling doca_sync_event_destroy on the CPU handle.
Upon destruction, all the internal resources are released, allocated memory is freed, associated doca_ctx (if it exists) is destroyed and any associated exported handles (other than CPU handles) and their resources are also destroyed.
3.4.6.7. DOCA Sync Event Sample
This section provides DOCA Sync Event sample implementation on top of the BlueField DPU.
The sample demonstrates how to share a sync event between the host and the DPU while simultaneously interacting with the event from both the host and DPU sides using different handles.
3.4.6.7.1. Running DOCA Sync Event Sample
- Refer to the following documents:
- NVIDIA DOCA Installation Guide for Linux for details on how to install BlueField-related software.
- NVIDIA DOCA Troubleshooting Guide for any issue you may encounter with the installation, compilation, or execution of DOCA samples.
- To build a given sample:
            cd /opt/mellanox/doca/samples/doca_common/sync_event_<host|dpu>
meson build
ninja -C build
- Sample (e.g.,
sync_event_dpu) usage:Usage: doca_sync_event_dpu [DOCA Flags] [Program Flags] DOCA Flags: -h, --help Print a help synopsis -v, --version Print program version information -l, --log-level Set the log level for the program <CRITICAL=20, ERROR=30, WARNING=40, INFO=50, DEBUG=60> Program Flags: -d, --dev-pci-addr Device PCI address -r, --rep-pci-addr DPU representor PCI address --async Start DOCA Sync Event in asynchronous (synchronous by default) --qdepth DOCA WorkQ depth for asynchronous mode --atomic Update DOCA Sync Event using Add operation (Set operation by default)
-hoption:./build/doca_sync_event_<host|dpu> -h
3.4.6.7.2. Samples
3.4.6.7.2.1. Sync Event DPU
This sample should be run on the DPU before Sync Event Host.
This sample demonstrates creating a sync event from an export on the DPU which is associated with a sync event on the host, and interacting with the sync event to achieve synchronization between the host and DPU. This sample should be run on the DPU. The sample logic includes:
- Reading configuration files and saving their content into local buffers.
- Locating and opening DOCA devices and DOCA representors matching the given PCIe addresses.
- Initializing DOCA Comm Channel.
- Receiving sync event blob through Comm Channel.
- Creating sync event from export.
- Starting the above sync event in the requested operation mode (synchronous or asynchronous)
- Interacting with the sync event from the DPU:
- Waiting for signal from the host – synchronously or asynchronously (with busy wait polling) according to user input.
- Signaling the sync event for the host – synchronously or asynchronously, using set or atomic add, according to user input.
- Cleaning all resources.
- /opt/mellanox/doca/samples/doca_common/sync_event_dpu/sync_event_dpu_sample.c
- /opt/mellanox/doca/samples/doca_common/sync_event_dpu/sync_event_dpu_main.c
- /opt/mellanox/doca/samples/doca_common/sync_event_dpu/meson.build
3.4.6.7.2.2. Sync Event Host
This sample should be run on the DPU before Sync Event DPU.
This sample demonstrates how to initialize a sync event on the host to be shared with the DPU, how to export it to DPU, and how to interact with the sync event to achieve synchronization between the host and DPU. This sample should be run on the host. The sample logic includes:
- Reading configuration files and saving their content into local buffers.
- Locating and opening the DOCA device matching the given PCIe address.
- Creating and configuring the sync event to be shared with the DPU.
- Starting the above sync event in the requested operation mode (synchronous or asynchronous).
- Initializing DOCA Comm Channel.
- Exporting the sync event and sending it through the Comm Channel.
- Interacting with the sync event from the host:
- Signaling the sync event for the DPU – synchronously or asynchronously, using set or atomic add, according to user input.
- Waiting for a signal from the DPU – synchronously or asynchronously, with busy wait polling, according to user input.
- Cleaning all resources.
/opt/mellanox/doca/samples/doca_common/sync_event_host/sync_event_host_sample.c/opt/mellanox/doca/samples/doca_common/sync_event_host/sync_event_host_main.c/opt/mellanox/doca/samples/doca_common/sync_event_host/meson.build
3.4.6.8. DOCA Sync Event Limitations and Disclaimers
- DOCA Sync Event API is considered thread unsafe
- GPU and DPA not currently supported
- Asynchronous wait (blocking/polling) is supported on NVIDIA® BlueField®-3 and NVIDIA® ConnectX®-7 and newer
3.4.7. DOCA Graph Execution
DOCA Graph facilitates running a set of actions (jobs, user callbacks, graphs) in specific order and dependencies. DOCA Graph runs on a DOCA work queue.
DOCA Graph creates graph instances that are submitted to the work queue (doca_workq_graph_submit).
3.4.7.1. Nodes
DOCA Graph is comprised of context, user, and sub-graph nodes. Each of these types can be in any of the following positions in the network:
- Root nodes – a root node does not have a parent. The graph can have one or more root nodes. All roots begin running when the graph instance is submitted.
- Edge nodes – an edge node is a node that does not have child nodes connected to it. The graph instance is completed when all edge nodes are completed.
- Intermediate node – a node with parent and child nodes connected to it.
3.4.7.1.1. Context Node
A context node runs a specific DOCA job and uses a specific DOCA context (doca_ctx). The context must be added to the work queue before the graph is started.
The job lifespan must be longer or equal to the life span of the graph instance.
3.4.7.1.2. User Node
A user node runs a user callback to facilitate performing actions during the run time of the graph instance (e.g., adjust next node job data, compare results).
3.4.7.1.3. Sub-graph Node
A sub-graph node runs an instance of another graph.
3.4.7.2. Using DOCA Graph
- Create the graph using
doca_graph_create. - Create the graph nodes (e.g.,
doca_graph_ctx_node_create). - Define dependencies using
doca_graph_add_dependency. - Start the graph using
doca_graph_start. - Add the graph to a work queue using
doca_graph_workq_add. - Create the graph instance using
doca_graph_instance_create. - Set the nodes data (e.g.,
doca_graph_instance_set_ctx_node_data). - Submit the graph instance to the work queue using
doca_workq_graph_submit. - Call
doca_workq_progress_retrieveuntil it returnsDOCA_SUCCESS:-
doca_workq_progress_retrievereturnsDOCA_ERROR_AGAINfor every node and returnsDOCA_SUCCESSwhen the graph instance is completed -
doca_event::type == DOCA_GRAPH_JOBindicates that a graph instance is completed -
doca_event::result::u64contains the graph instance status (0impliesDOCA_SUCCESS) - Work queue can run graph instances and standalone jobs simultaneously
-
3.4.7.3. DOCA Graph Limitations
- DOCA Graph does not support circle dependencies.
- DOCA Graph must contain at least one context node. A graph containing a sub-graph with at least one context node is a valid configuration.
3.4.7.4. DOCA Graph Sample
The graph sample is based on the DOCA SHA and DOCA DMA libraries. The sample calculates a SHA value and copies a source buffer to a destination buffer in parallel.
The graph ends with a user callback node that prints the SHA value and compares the source with the DMA destination.
3.4.7.4.1. Running DOCA Graph Sample
- Refer to the following documents:
- NVIDIA DOCA Installation Guide for Linux for details on how to install BlueField-related software.
- NVIDIA DOCA Troubleshooting Guide for any issue you may encounter with the installation, compilation, or execution of DOCA samples.
- To build a given sample:
            cd /opt/mellanox/doca/samples/doca_common/graph/
meson build
ninja -C build
- Sample (e.g.,
doca_graph) usage:./doca_graph
No parameters required.
3.4.8. Job Error Handling
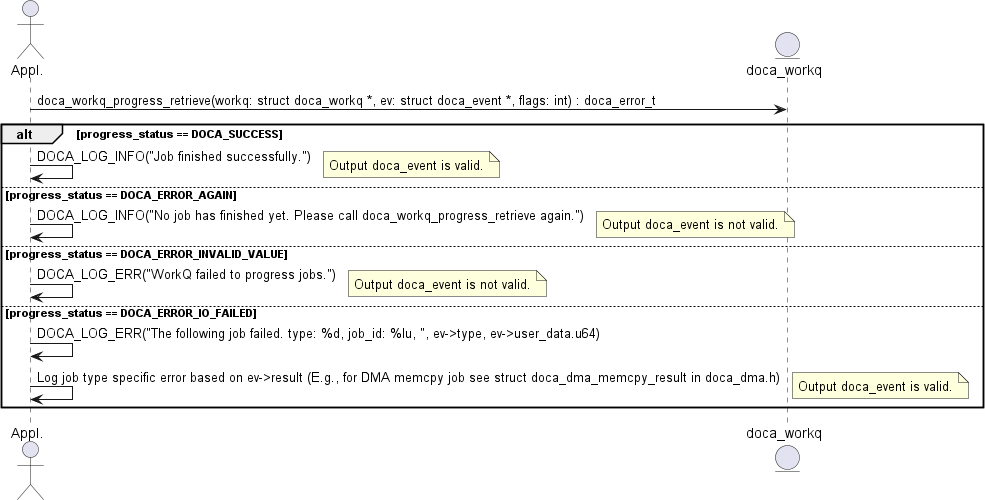
After a job is submitted successfully, consequent calls to doca_workq_progress_retrieve may fail (i.e., return different status from DOCA_SUCCESS or DOCA_ERROR_AGAIN). In this case, the error is split into 2 main categories:
-
DOCA_ERROR_INVALID_VALUEThis means that some error has occurred within the WorkQ that is not related to any submitted job. This can happen due to the application passing invalid arguments or to some objects that have been previously provided (e.g., a
doca_ctxthat was associated usingdoca_ctx_workq_add) getting corrupted. In this scenario, the output parameter of typedoca_eventis not valid and no more information is given about the error. -
DOCA_ERROR_IO_FAILEDThis means that a specific job has failed where the output variable of type
doca_eventis valid and can be used to trace the exact job that failed. Additional error code explaining the exact failure reason is given. To find the exact error, refer to the documentation of the context that provides the job type (e.g., if the job is DMA memcpy, then refer todoca_dma.h).
The following diagram shows how an application is expected to handle error from doca_workq_progress_retrieve:
3.5. Object Life Cycle
Most DOCA Core objects share the same handling model in which:
- The object is allocated by DOCA so it is opaque for the application (e.g.,
doca_buf_inventory_create,doca_mmap_create). - The application initializes the object and sets the desired properties (e.g.,
doca_mmap_set_max_num_chunks). - The object is started and no configuration or attribute change is allowed (e.g.,
doca_buf_inventory_start,doca_mmap_start). - The object is used.
- The object is stopped and deleted (e.g.,
doca_buf_inventory_stop→doca_buf_inventory_destroy,doca_mmap_stop→doca_mmap_destroy).
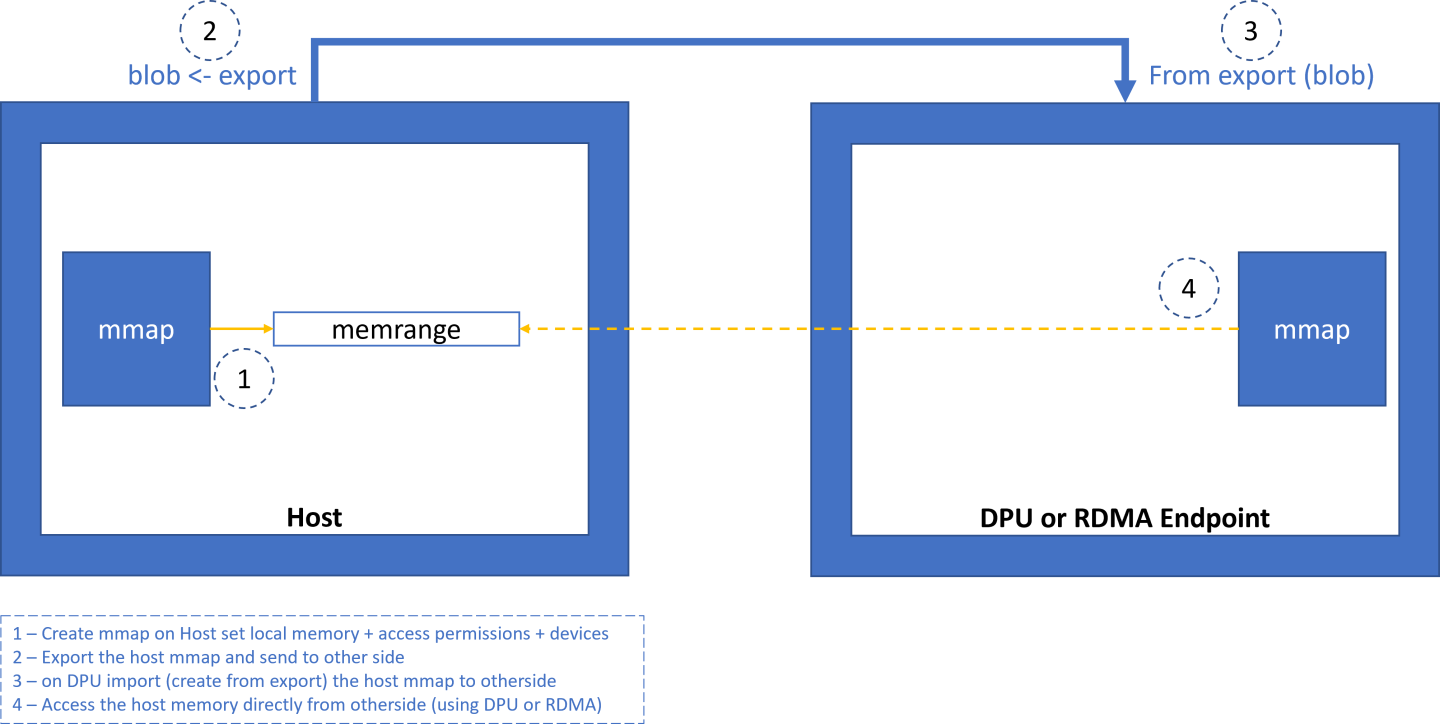
The following procedure describes the mmap export mechanism between two machines (remote machines or host-DPU):
- Memory is allocated on Machine1.
- Mmap is created and is provided memory from step 1.
- Mmap is exported to the Machine2 pinning the memory.
- On the Machine2, an imported mmap is created and holds a reference to actual memory residing on Machine1.
- Imported mmap can be used by Machine2 to allocate buffers.
- Imported mmap is destroyed.
- Exported mmap is destroyed.
- Original memory is destroyed.
3.6. RDMA Bridge
The DOCA Core library provides building blocks for applications to use while abstracting many details relying on the RDMA driver. While this takes away complexity, it adds flexibility especially for applications already based on rdma-core. The RDMA bridge allows interoperability between DOCA SDK and rdma-core such that existing applications can convert DOCA-based objects to rdma-core-based objects.
3.6.1. Requirements and Considerations
- This library enables applications already using rdma-core to port their existing application or extend it using DOCA SDK
- Bridge allows converting DOCA objects to equivalent rdma-core objects
3.6.2. DOCA Core Objects to RDMA Core Objects Mapping
The RDMA bridge allows translating a DOCA Core object to a matching RDMA Core object. The following table shows how the one object maps to the other.
An application that uses the hardware relies on a subset of features to be present for it to be able to function. As such, it is customary to check if the subset of features exists. The application may also need to identify the specific hardware resource to work with based on specific properties. The same applies for an application that uses a DOCA library.
It is up to the application to:
- Check which library's APIs are supported for a given
doca_devinfo. - Configure the library context through the dedicated API according to the library's limitations.
- Check library's configuration limitations.
DOCA capabilities is a set of APIs (DOCA library level) with a common look and feel to achieve this. For example:
- A hotplug (of emulated PCIe functions) oriented application can check if a specific DOCA device information structure enables hotplugging emulated devices, by calling:
doca_error_t doca_devinfo_get_is_hotplug_manager_supported(const struct doca_devinfo *devinfo, uint8_t *is_hotplug_manager);
- An application that works with DOCA memory map to be shared between the host and DPU must export the
doca_mmapfrom the host and import it from the DPU. Before starting the workflow, the application can check if those operations are supported for a givendoca_devinfousing the following APIs:doca_error_t doca_devinfo_get_is_mmap_export_dpu_supported(const struct doca_devinfo *devinfo, uint8_t *mmap_export); doca_error_t doca_devinfo_get_is_mmap_from_export_dpu_supported(const struct doca_devinfo *devinfo, uint8_t *from_export);
Notice
This document is provided for information purposes only and shall not be regarded as a warranty of a certain functionality, condition, or quality of a product. NVIDIA Corporation nor any of its direct or indirect subsidiaries and affiliates (collectively: “NVIDIA”) make no representations or warranties, expressed or implied, as to the accuracy or completeness of the information contained in this document and assume no responsibility for any errors contained herein. NVIDIA shall have no liability for the consequences or use of such information or for any infringement of patents or other rights of third parties that may result from its use. This document is not a commitment to develop, release, or deliver any Material (defined below), code, or functionality.
NVIDIA reserves the right to make corrections, modifications, enhancements, improvements, and any other changes to this document, at any time without notice.
Customer should obtain the latest relevant information before placing orders and should verify that such information is current and complete.
NVIDIA products are sold subject to the NVIDIA standard terms and conditions of sale supplied at the time of order acknowledgement, unless otherwise agreed in an individual sales agreement signed by authorized representatives of NVIDIA and customer (“Terms of Sale”). NVIDIA hereby expressly objects to applying any customer general terms and conditions with regards to the purchase of the NVIDIA product referenced in this document. No contractual obligations are formed either directly or indirectly by this document.
NVIDIA products are not designed, authorized, or warranted to be suitable for use in medical, military, aircraft, space, or life support equipment, nor in applications where failure or malfunction of the NVIDIA product can reasonably be expected to result in personal injury, death, or property or environmental damage. NVIDIA accepts no liability for inclusion and/or use of NVIDIA products in such equipment or applications and therefore such inclusion and/or use is at customer’s own risk.
NVIDIA makes no representation or warranty that products based on this document will be suitable for any specified use. Testing of all parameters of each product is not necessarily performed by NVIDIA. It is customer’s sole responsibility to evaluate and determine the applicability of any information contained in this document, ensure the product is suitable and fit for the application planned by customer, and perform the necessary testing for the application in order to avoid a default of the application or the product. Weaknesses in customer’s product designs may affect the quality and reliability of the NVIDIA product and may result in additional or different conditions and/or requirements beyond those contained in this document. NVIDIA accepts no liability related to any default, damage, costs, or problem which may be based on or attributable to: (i) the use of the NVIDIA product in any manner that is contrary to this document or (ii) customer product designs.
No license, either expressed or implied, is granted under any NVIDIA patent right, copyright, or other NVIDIA intellectual property right under this document. Information published by NVIDIA regarding third-party products or services does not constitute a license from NVIDIA to use such products or services or a warranty or endorsement thereof. Use of such information may require a license from a third party under the patents or other intellectual property rights of the third party, or a license from NVIDIA under the patents or other intellectual property rights of NVIDIA.
Reproduction of information in this document is permissible only if approved in advance by NVIDIA in writing, reproduced without alteration and in full compliance with all applicable export laws and regulations, and accompanied by all associated conditions, limitations, and notices.
THIS DOCUMENT AND ALL NVIDIA DESIGN SPECIFICATIONS, REFERENCE BOARDS, FILES, DRAWINGS, DIAGNOSTICS, LISTS, AND OTHER DOCUMENTS (TOGETHER AND SEPARATELY, “MATERIALS”) ARE BEING PROVIDED “AS IS.” NVIDIA MAKES NO WARRANTIES, EXPRESSED, IMPLIED, STATUTORY, OR OTHERWISE WITH RESPECT TO THE MATERIALS, AND EXPRESSLY DISCLAIMS ALL IMPLIED WARRANTIES OF NONINFRINGEMENT, MERCHANTABILITY, AND FITNESS FOR A PARTICULAR PURPOSE. TO THE EXTENT NOT PROHIBITED BY LAW, IN NO EVENT WILL NVIDIA BE LIABLE FOR ANY DAMAGES, INCLUDING WITHOUT LIMITATION ANY DIRECT, INDIRECT, SPECIAL, INCIDENTAL, PUNITIVE, OR CONSEQUENTIAL DAMAGES, HOWEVER CAUSED AND REGARDLESS OF THE THEORY OF LIABILITY, ARISING OUT OF ANY USE OF THIS DOCUMENT, EVEN IF NVIDIA HAS BEEN ADVISED OF THE POSSIBILITY OF SUCH DAMAGES. Notwithstanding any damages that customer might incur for any reason whatsoever, NVIDIA’s aggregate and cumulative liability towards customer for the products described herein shall be limited in accordance with the Terms of Sale for the product.
Trademarks
NVIDIA, the NVIDIA logo, and Mellanox are trademarks and/or registered trademarks of Mellanox Technologies Ltd. and/or NVIDIA Corporation in the U.S. and in other countries. The registered trademark Linux® is used pursuant to a sublicense from the Linux Foundation, the exclusive licensee of Linus Torvalds, owner of the mark on a world¬wide basis. Other company and product names may be trademarks of the respective companies with which they are associated.
Copyright
© 2023 NVIDIA Corporation & affiliates. All rights reserved.