Manual Deployment#
Attention
This is an alternative to the automated application deployment. If you have used the automation, move to the Platform Verification section.
Important
Ensure the basic prerequisites have been met before proceeding with the deployment.
Access to the public NGC catalog for Holoscan for Media is required before continuing with these instructions.
Note
For production installations, you may also use oc as a drop-in replacement for kubectl in the commands below.
Create Rivermax License Secret#
Create a Rivermax license secret that will be used by Rivermax-based applications like Media Gateway:
kubectl create secret generic rivermax-license --from-file=<path-to-license-file>
Replace <path-to-license-file> with the path on the host where your Rivermax license file is located (for example, /home/user/rivermax.lic).
Verify that the secret was created:
kubectl get secret rivermax-license
Create Image Pull Secret#
Create a secret to pull images from the NGC registry:
kubectl create secret docker-registry <ngc-secret-name> --docker-server=nvcr.io '--docker-username=$oauthtoken' --docker-password=<API-KEY> --docker-email=<your-email>
Replace the placeholders as appropriate. The <ngc-secret-name> will be used below to install the applications.
Install Applications#
Example values.yaml files are included below. Some placeholders need to be replaced.
For example, the <scheduler-name> must be "topo-aware-scheduler" if NUMA-aware scheduling is enabled, and "default-scheduler" (or "") otherwise.
Helm Dashboard#
To install Helm Dashboard, follow this NGC documentation. After it is installed, you can use the dashboard UI to launch the rest of applications.
To access the Helm Dashboard after it is installed, follow these steps:
Get the node IP address:
kubectl get nodes -o wide
NAME  STATUS  ROLES                 AGE  VERSION  INTERNAL-IP   EXTERNAL-IP  …
h4m   Ready   control-plane,worker  25h  v1.32.2  10.40.130.50  <none>       …
Get the port:
kubectl get services
NAME                 TYPE          CLUSTER-IP      EXTERNAL-IP  PORT(S)         AGE
helm-helm-dashboard  LoadBalancer  10.101.213.164  <pending>    8080:32634/TCP  25h
For example, in this instance the dashboard can be accessed on the port 32634 at IP address 10.40.130.50, that is, http://10.40.130.50:32634.
Go to Helm Dashboard, click the Repository tab, and add the repository:
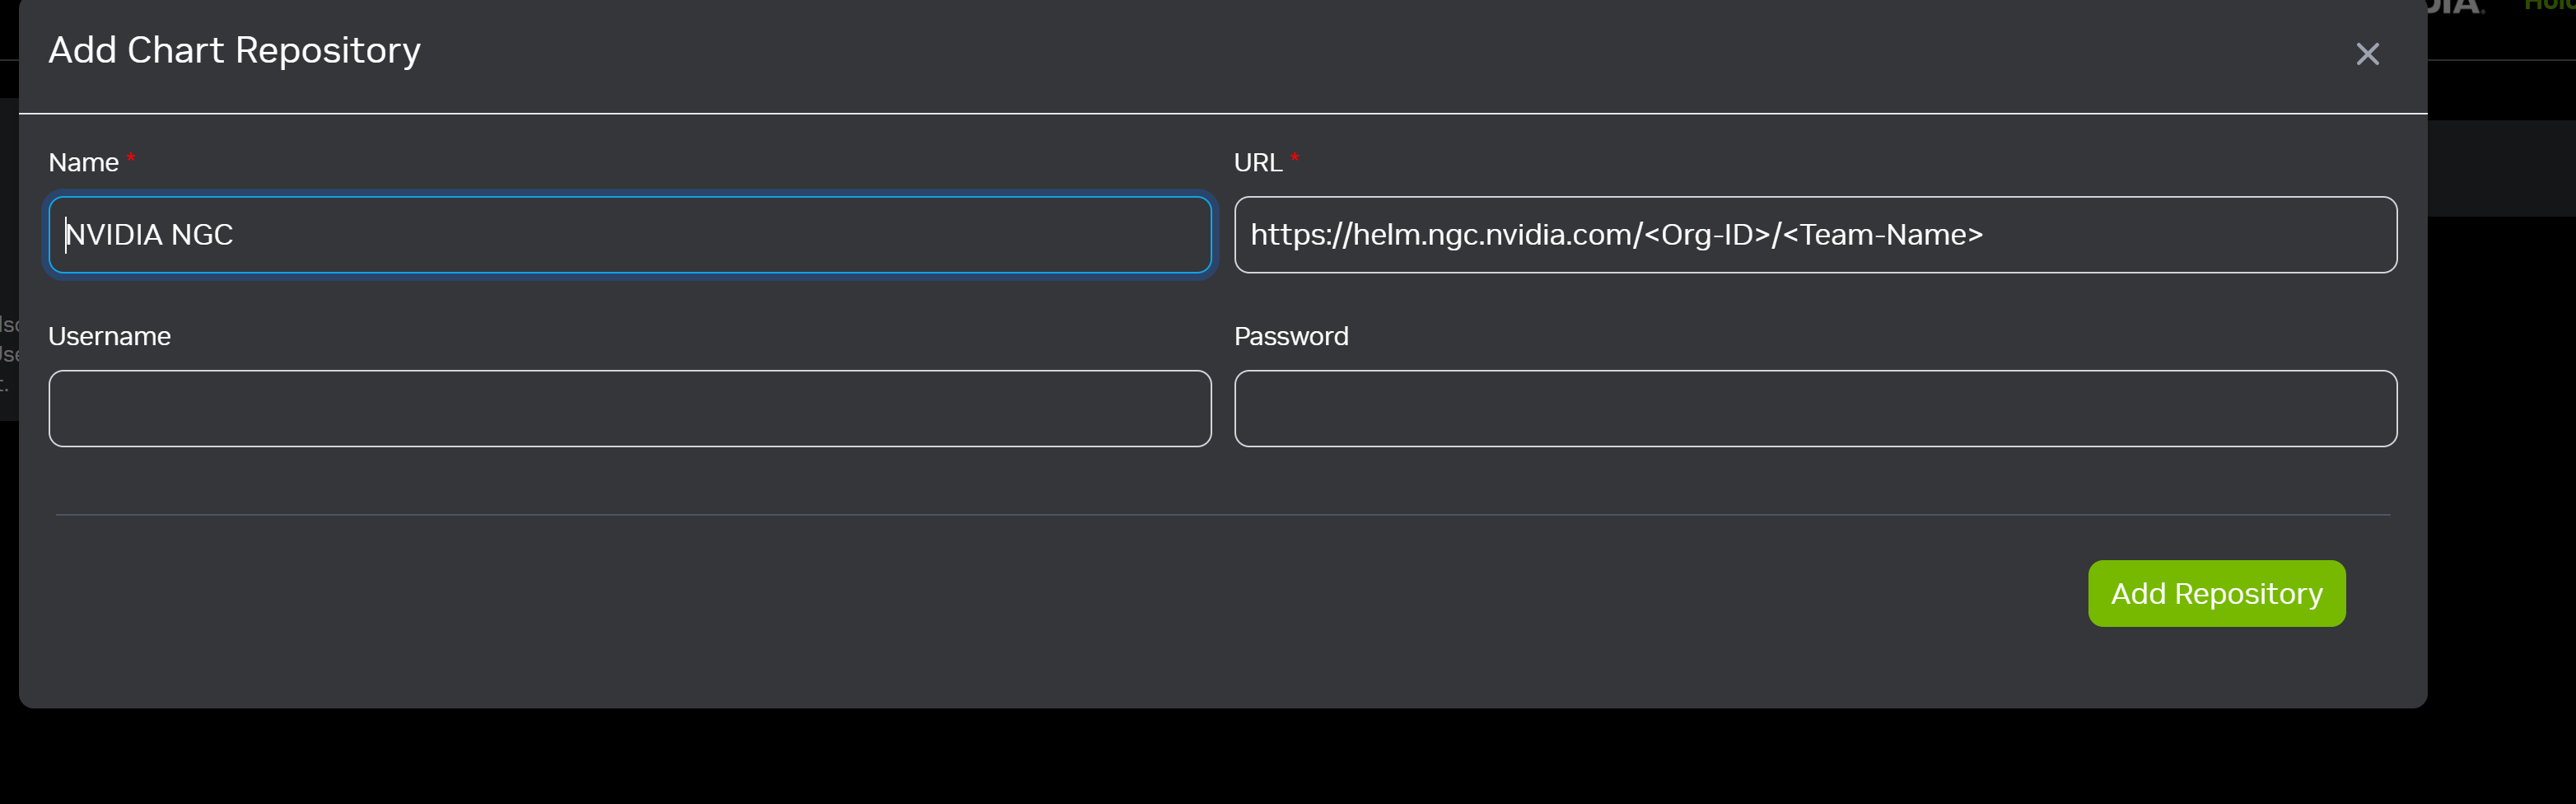
Name: Choose a name for the repository as per your preference.
URL:
https://helm.ngc.nvidia.com/nvidia/holoscan-for-mediaUsername:
$oauthtokenPassword: Enter your NGC API Key.
This window will pop up after adding the repository.
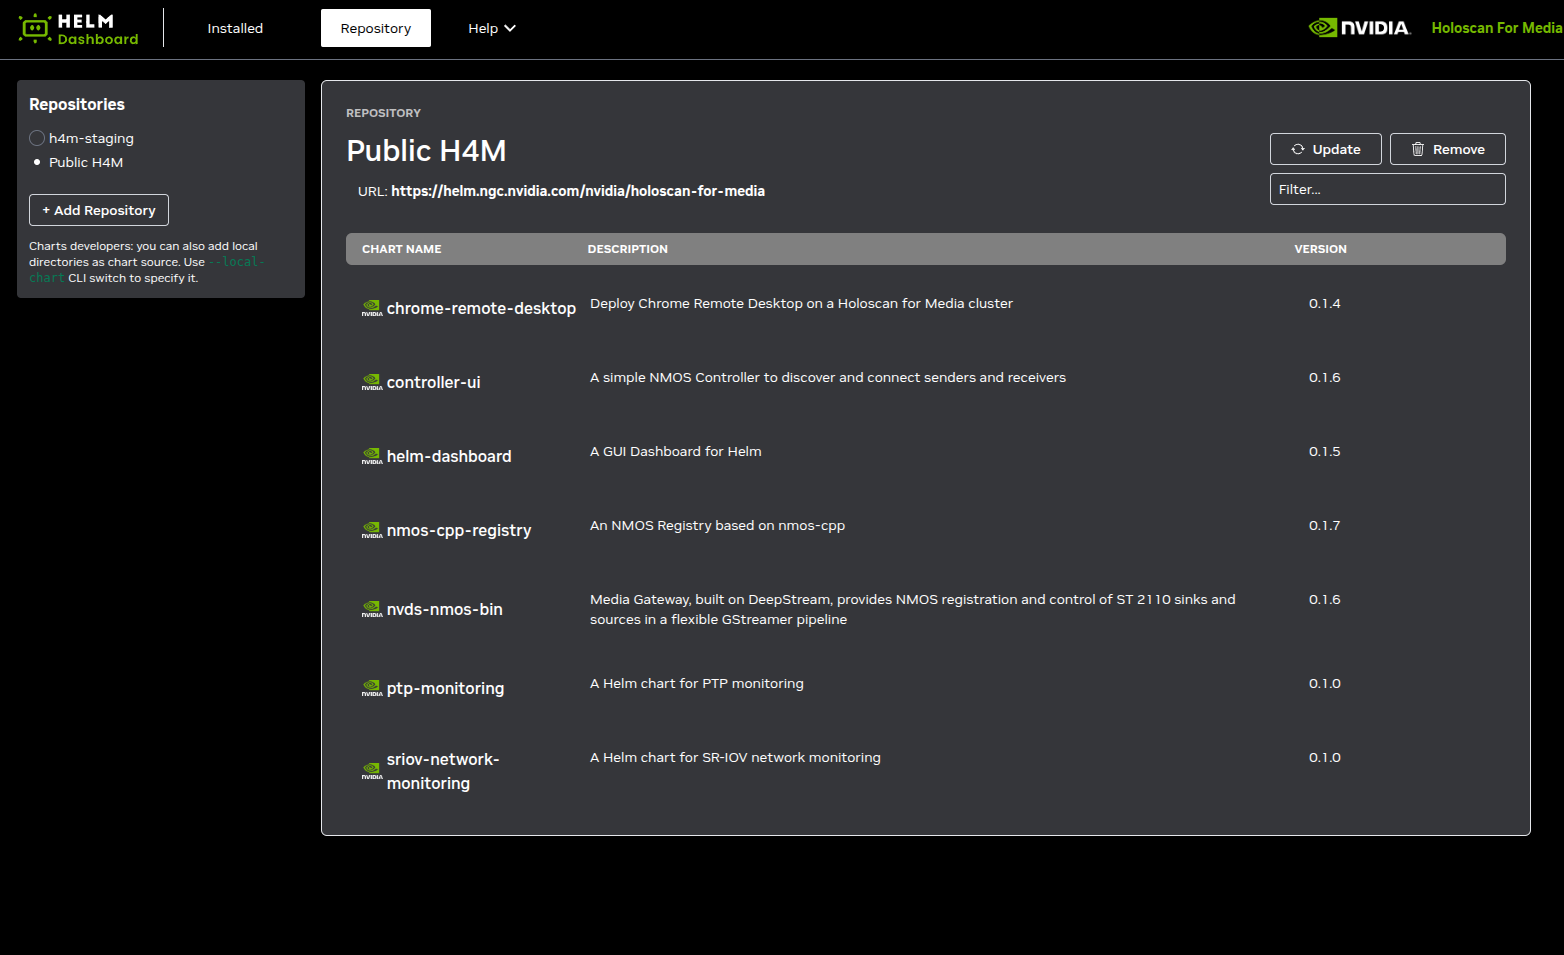
Click Install next to the application that you want to install, enter any user-defined
values.yaml, and then Confirm to launch the application.
Chrome Remote Desktop#
Create a Persistent Volume Claim for Chrome Remote Desktop#
Creating and using a persistent volume claim (PVC) is optional. However, it is necessary for remote access to continue working when the pod is restarted, because an authorization code can only be used once. To create a persistent volume claim, follow the steps below:
Create a YAML file,
<pv-claim>.yaml, like this:apiVersion: v1 kind: PersistentVolumeClaim metadata: name: <pv-claim> namespace: default spec: accessModes: - ReadWriteOnce resources: requests: storage: 2Mi
where
<pv-claim>is the unique name for this install. Increase the requested storage as needed. The value is given in bytes, using one of these SI suffixes: E, P, T, G, M, k (or the power-of-two equivalents: Ei, Pi, Ti, Gi, Mi, Ki). For example, 2Mi is roughly 2 million bytes, enough for a few cat pictures.Create the PVC with the following command
kubectl create -f <pv-claim>.yaml
Get Chrome Remote Desktop Authorization Code#
To get the Chrome Remote Desktop authorization code:
Navigate to https://remotedesktop.google.com/headless in your web browser.
Under the Set up via SSH section, click Begin, then Next, and then Authorize.
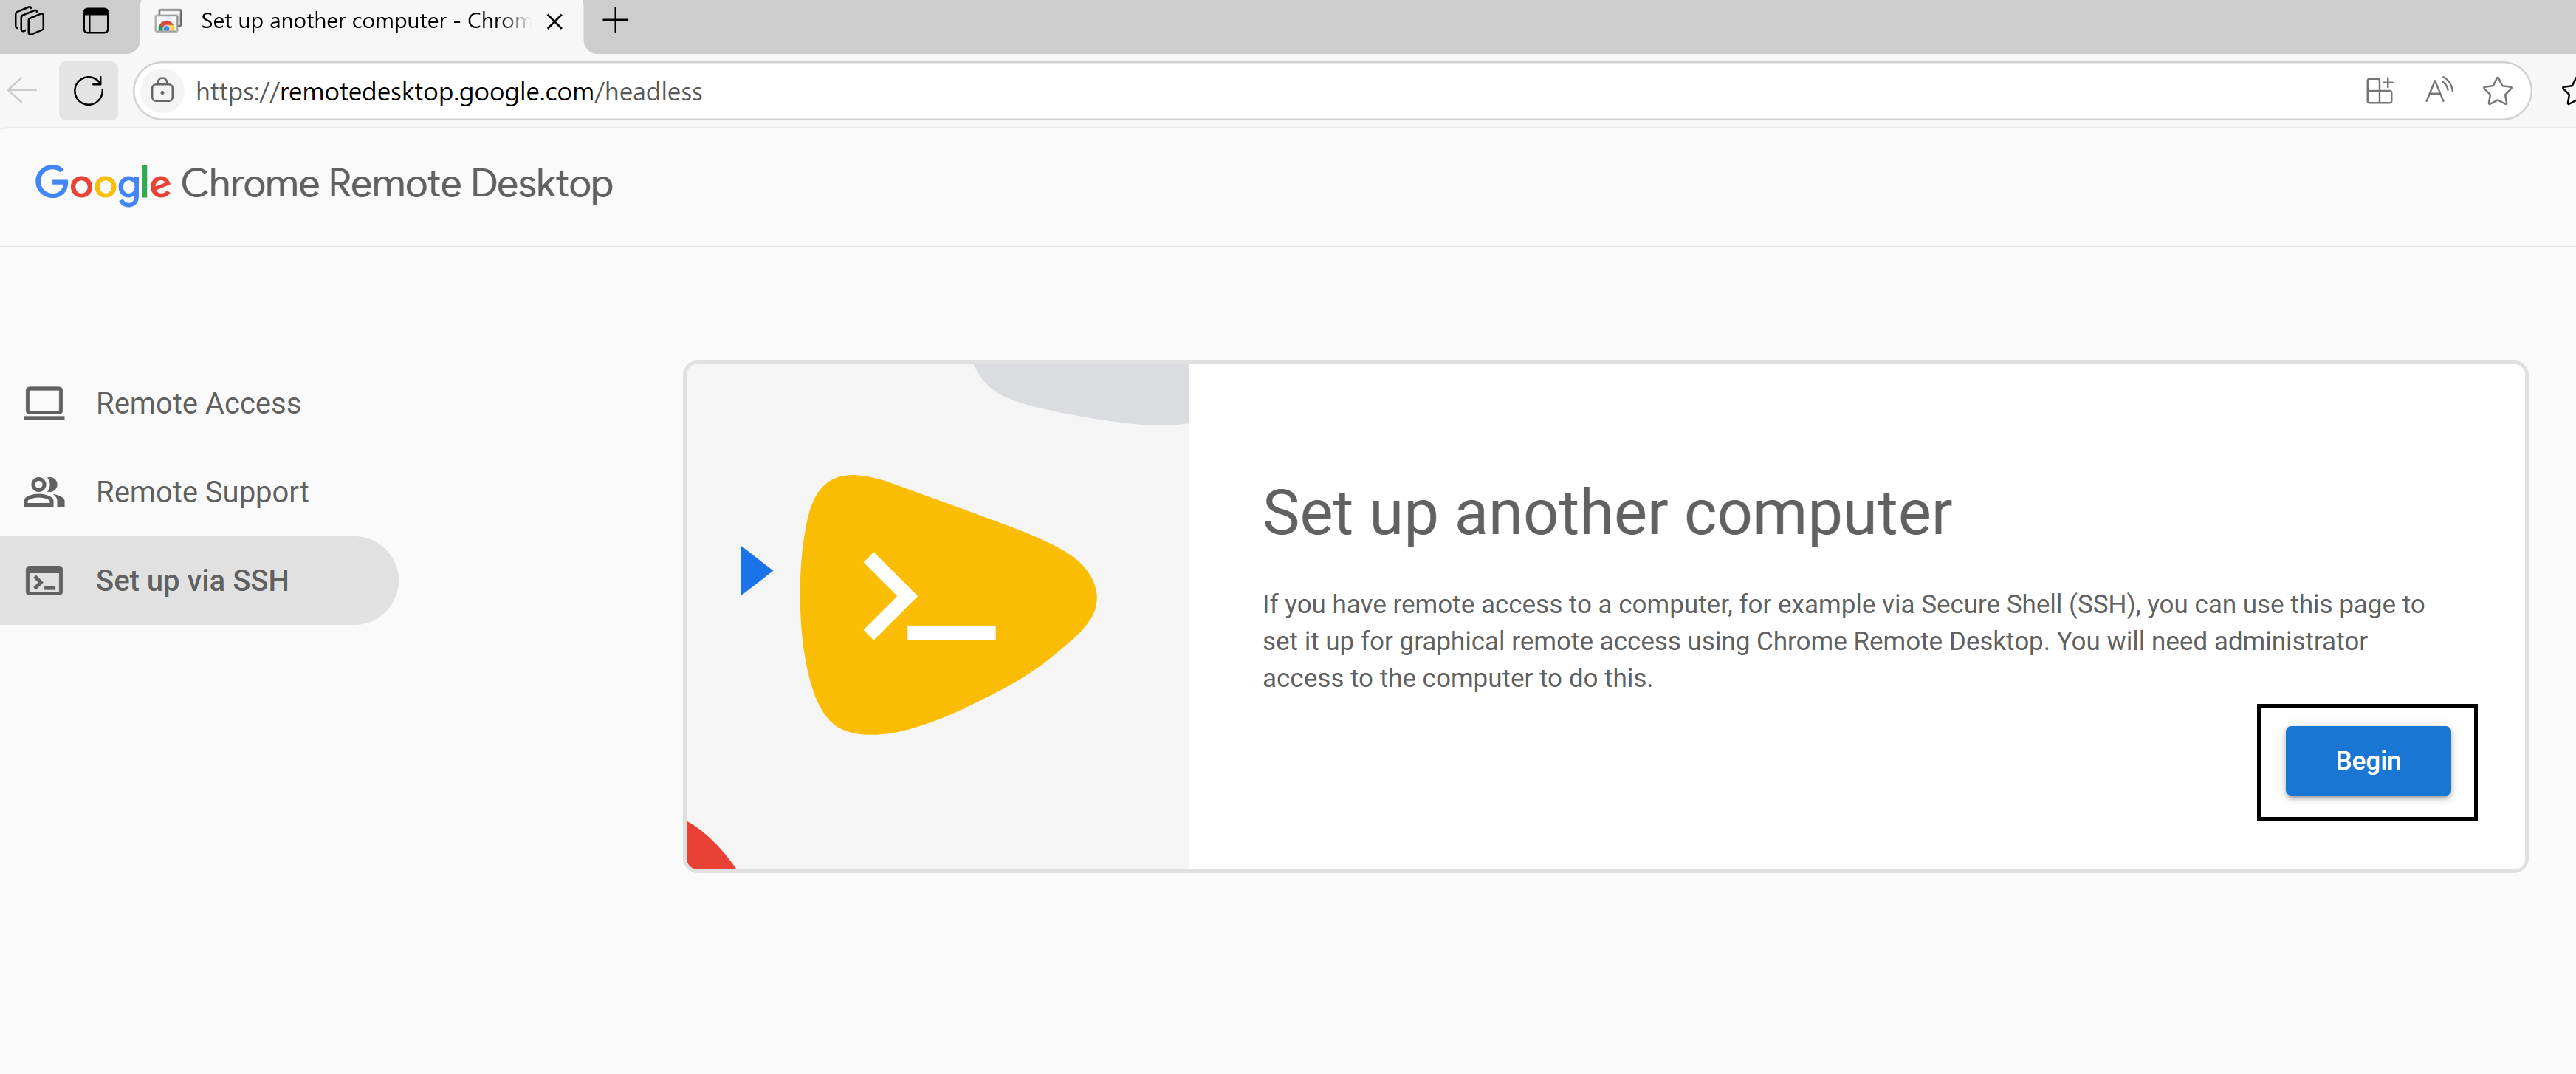
The page will display setup commands for various operating systems. Look for the section that contains the commands for Debian Linux.
From the command shown, locate the value inside the
code=""parameter and copy just that part.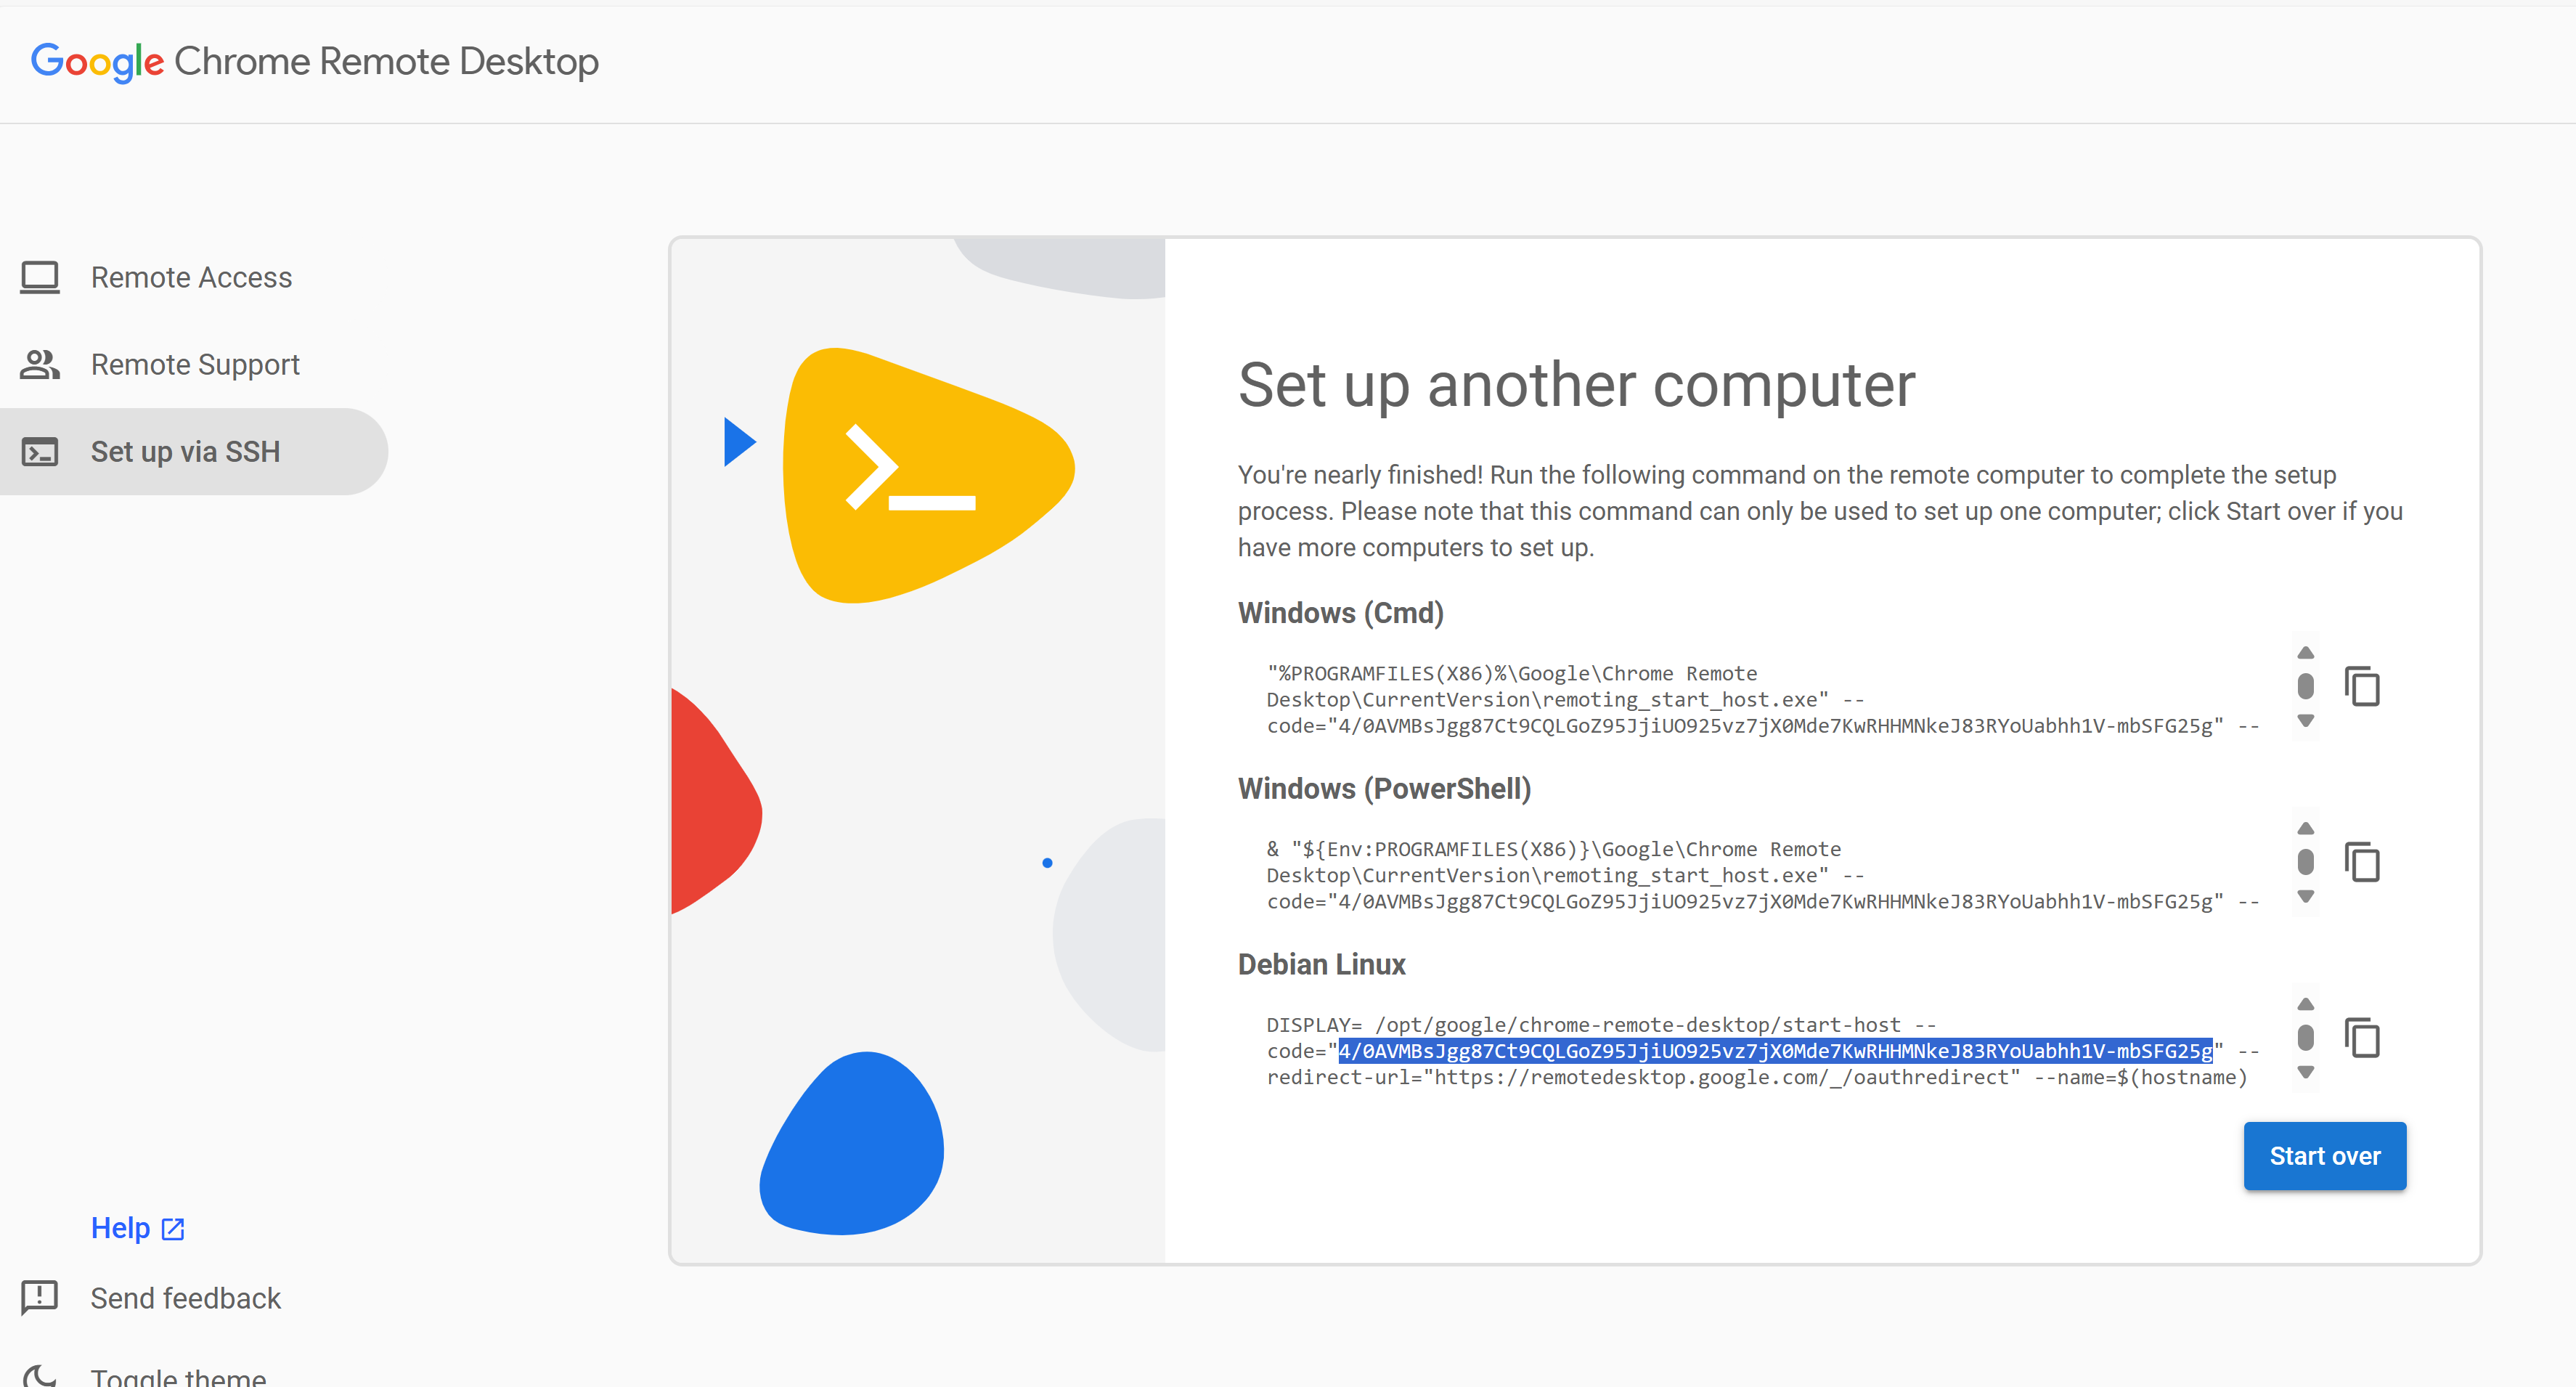
For example, from the command:
DISPLAY= /opt/google/chrome-remote-desktop/start-host --code="4/0AVMBsJgg...-mbSFG25g" --redirect-url="https://remotedesktop.google.com/_/oauthredirect" --name=$(hostname)"
Copy only the part:
4/0AVMBsJgg...-mbSFG25g
Important
The authorization code is only valid for five minutes. If it expires, you’ll need to generate a new one.
Launch Chrome Remote Desktop#
Launch Chrome Remote Desktop using the chrome-remote-desktop chart and the following values.yaml file after replacing the placeholders.
# Name of the scheduler (default: "topo-aware-scheduler", use "" for default scheduler)
schedulerName: <scheduler-name>

# Define env variables according to your usage.
# CODE and HOSTFILE are two ways to authenticate your account. Provide either one or the other for successful deployment.
env:
    HOSTNAME: myvirtualdesktop
    # Use at least 6 digits; this will be asked when you access it.
    PIN: "123456"
    # One-time code from Chrome Remote Desktop setup page
    CODE: <one-time-code>
    # Or pass existing host information.
    HOSTFILE: ""

# Name of an existing Persistent Volume Claim to persist host information (use "" to skip)
persistentVolumeClaim: <pv-claim>
NMOS Registry#
Launch the NMOS Registry using the nmos-cpp-registry chart and the following values.yaml file after replacing the placeholders.
RegistryConfig:
    http_port: 8010
# This is to define high speed network to access this application
highSpeedNetwork:
    name: media-a-rx-net-static
    # Example ip: "192.168.100.131/24"
    ip: <ip-address>
imagePullSecrets:
    # Name of the secret created to pull images from NGC
    - name: <ngc-secret-name>
# Name of the scheduler (default: "topo-aware-scheduler", use "" for default scheduler)
schedulerName: <scheduler-name>
After the pod is running you can use the NMOS Registry.
Access it using the high-speed secondary network, at http://<ip-address>:<http-port>/, where:
<ip-address>is the IP address specified in thevalues.yamlfile.<http-port>is 8010 by default; it can be overridden in thevalues.yamlfile.
NMOS Controller#
Launch the NMOS Controller using the controller-ui chart and the following values.yaml file after replacing the placeholders.
# This is to define high speed network to access this application
highSpeedNetwork:
    name: media-a-rx-net-static
    # Example ip: "192.168.100.132/24"
    ip: <ip-address>
imagePullSecrets:
    # Name of the secret created to pull images from NGC
  - name: <ngc-secret-name>
# Name of the scheduler (default: "topo-aware-scheduler", use "" for default scheduler)
schedulerName: <scheduler-name>
uiConfig:
    # Format: "http://<registry-host>:<query-port>"
    # - <registry-host>: IP address or fully-qualified domain name of your NMOS Registry
    # - <query-port>:  Query API port (default is 8010; can be changed in nmos_cpp_registry.RegistryConfig.http_port)
    # Example: "http://192.168.100.131:8010"
    NMOSRegistryBaseUrl: http://<registry-host>:<query-port>
After the pod is running you can use the NMOS Controller.
Access it through the high-speed secondary network, at http://<ip-address>/ where:
<ip-address>is the IP address specified in thevalues.yamlfile.
Media Gateway#
Install Media Gateway instances using the nvds-nmos-bin chart.
Start the sender using the following
values.yamlfile after replacing the placeholders:imagePullSecrets: # Name of the secret created to pull images from NGC - name: <ngc-secret-name> # Name of the scheduler (default: "topo-aware-scheduler", use "" for default scheduler) schedulerName: <scheduler-name> pipelines: pipeline1: description: 1080p60-sender env: - name: CPU_AFFINITY value: 2-3 name: sender-pipeline port: 9010 resources: limits: cpu: 4 hugepages-2Mi: 4Gi memory: 8Gi openshift.io/media_a_tx_pool: 1 requests: cpu: 4 hugepages-2Mi: 4Gi memory: 8Gi openshift.io/media_a_tx_pool: 1
Start the receiver using the following
values.yamlafter replacing the placeholders:imagePullSecrets: # Name of the secret created to pull images from NGC - name: <ngc-secret-name> # Name of the scheduler (default: "topo-aware-scheduler", use "" for default scheduler) schedulerName: <scheduler-name> pipelines: pipeline1: description: 1080p60-receiver env: - name: CPU_AFFINITY value: 0-1 highSpeedNetwork: name: media-a-rx-net name: receiver-pipeline port: 9010 resources: limits: cpu: 2 hugepages-2Mi: 4Gi memory: 8Gi nvidia.com/gpu: 1 openshift.io/media_a_rx_pool: 1 openshift.io/media_a_tx_pool: 0 requests: cpu: 2 hugepages-2Mi: 4Gi memory: 8Gi nvidia.com/gpu: 1 openshift.io/media_a_rx_pool: 1 openshift.io/media_a_tx_pool: 0
Test Connection#
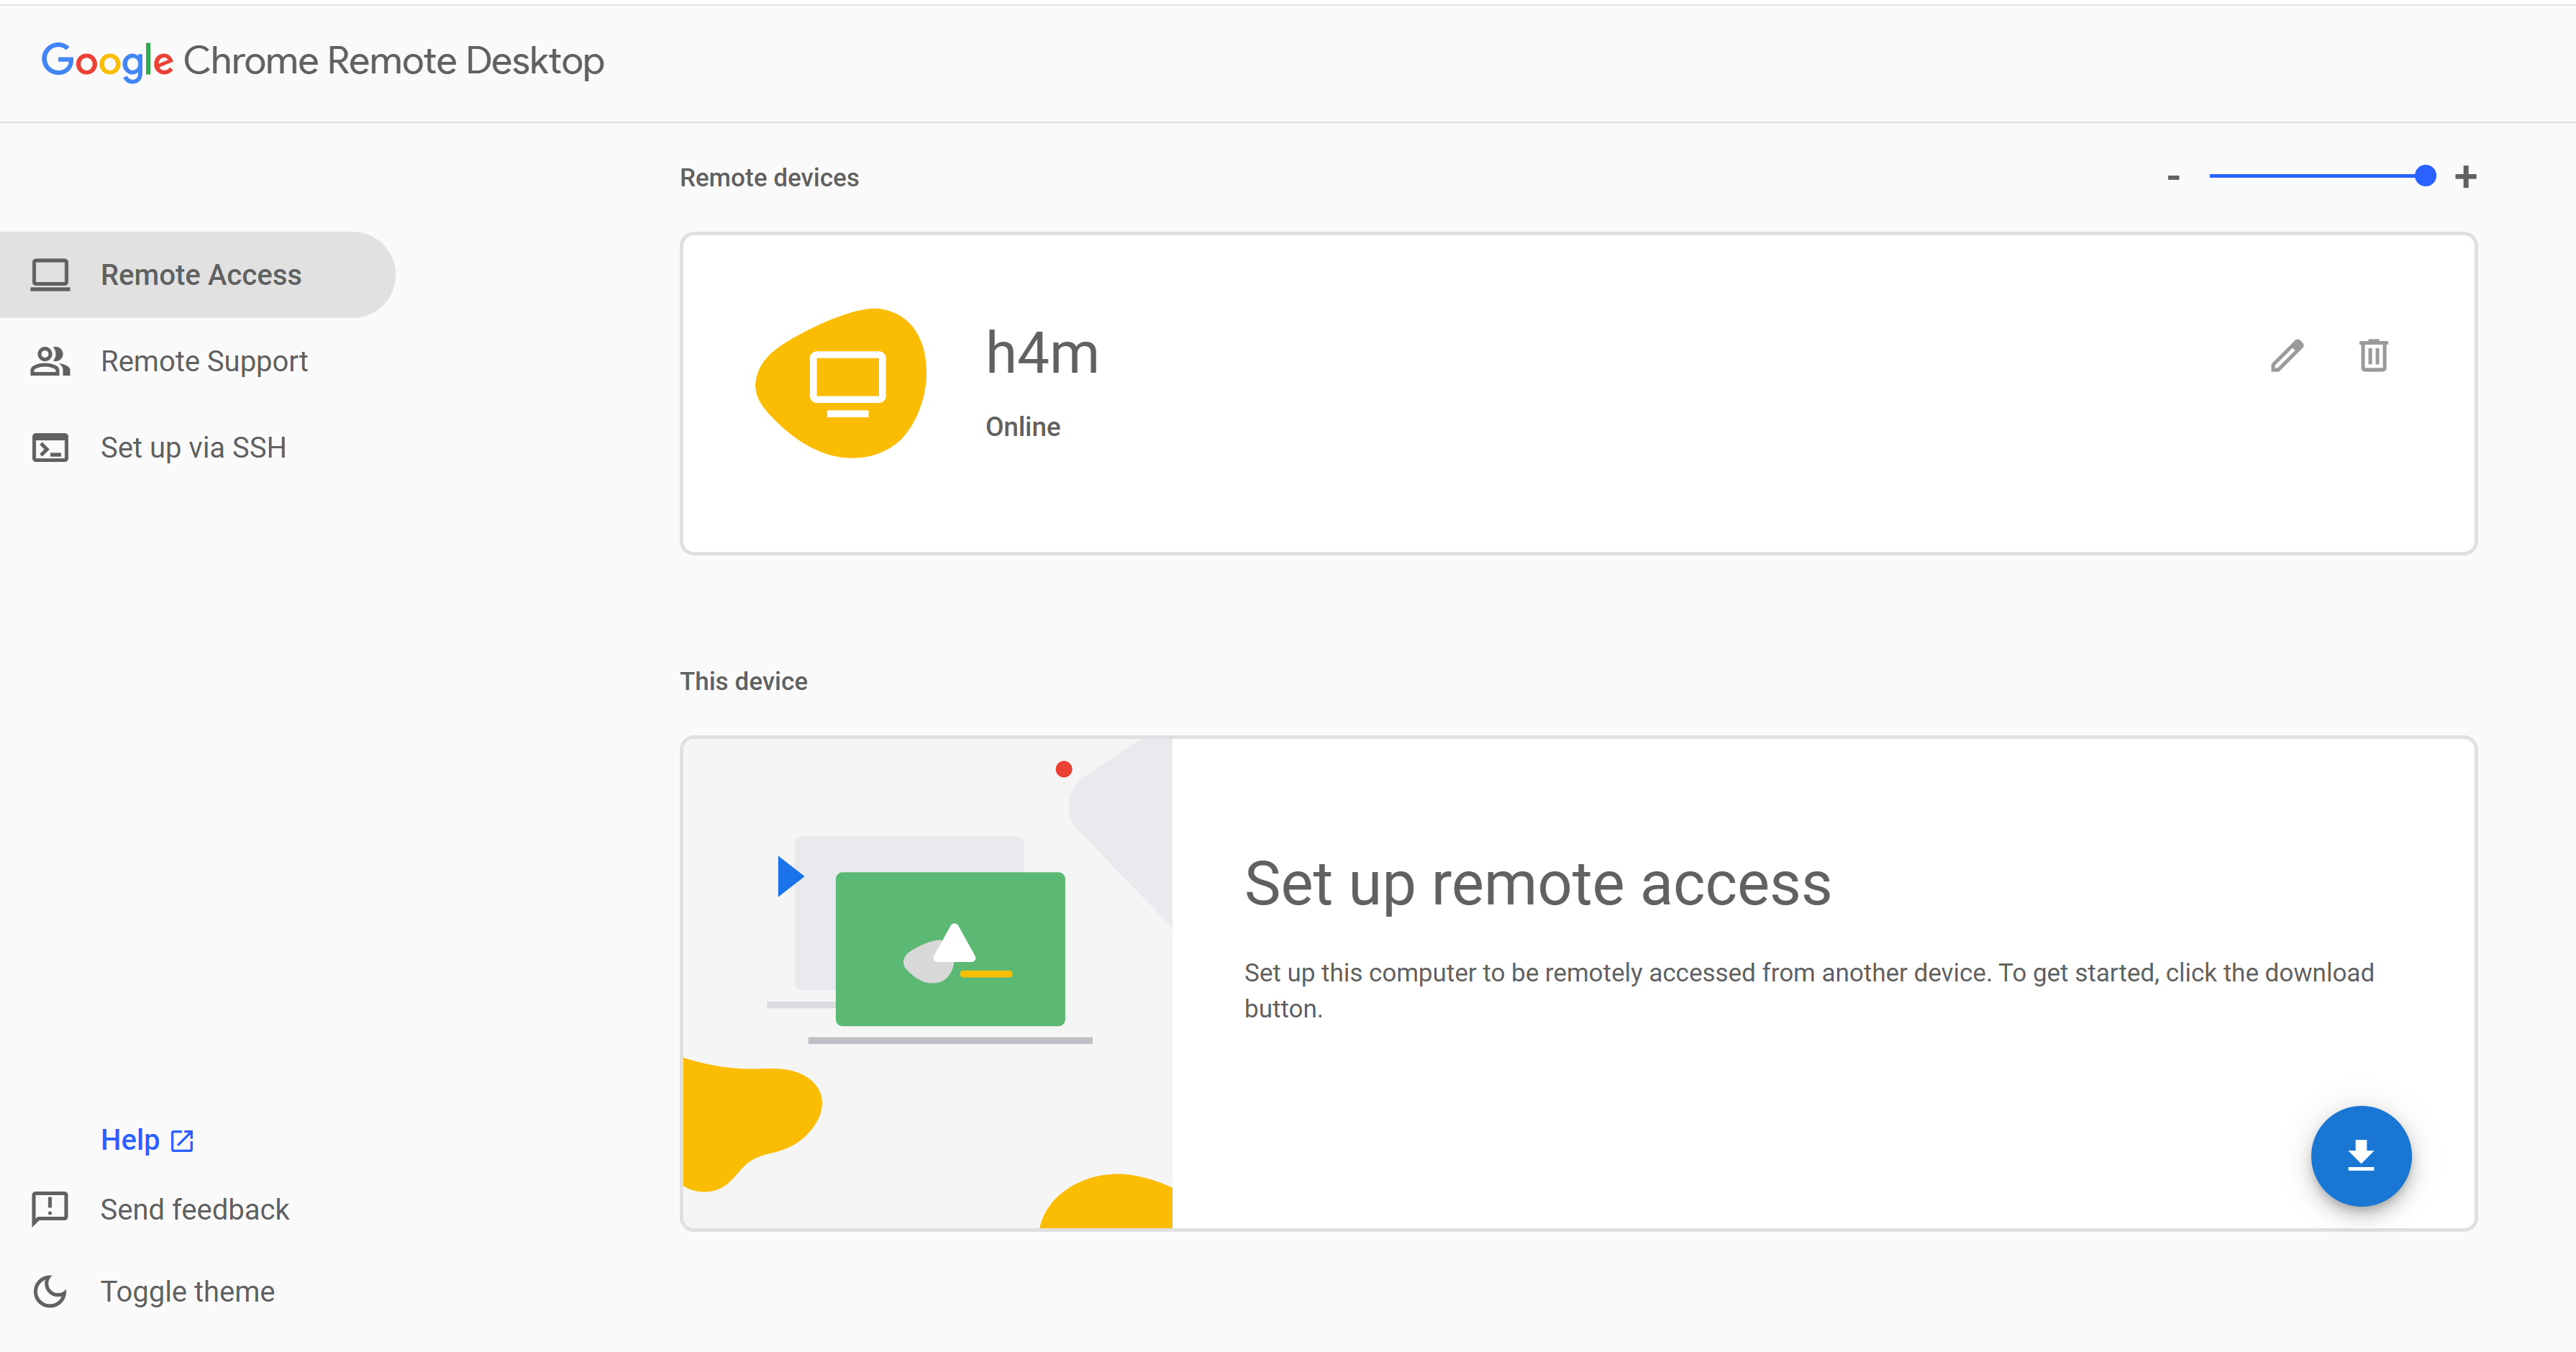
Go to the Chrome Remote Desktop web interface at https://remotedesktop.google.com/access.
You’ll see your remote computer listed based on the hostname you specified for the chrome-remote-desktop (default: myvirtualdesktop).
Click the name to connect.
Enter the PIN you configured for the chrome-remote-desktop (default:
123456) when prompted.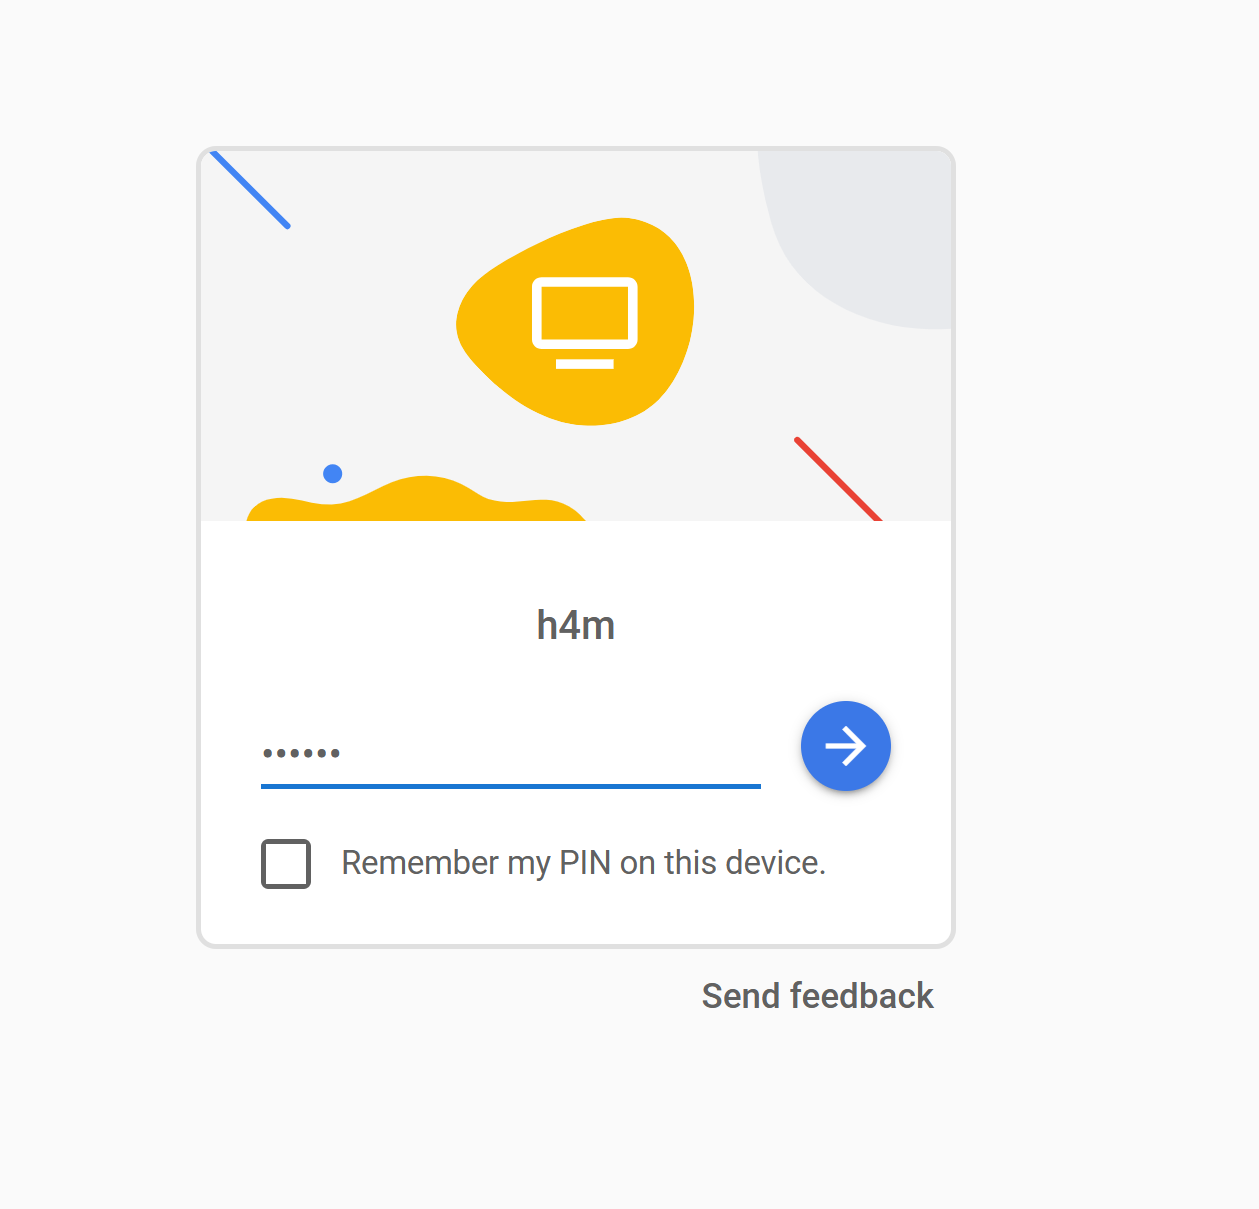
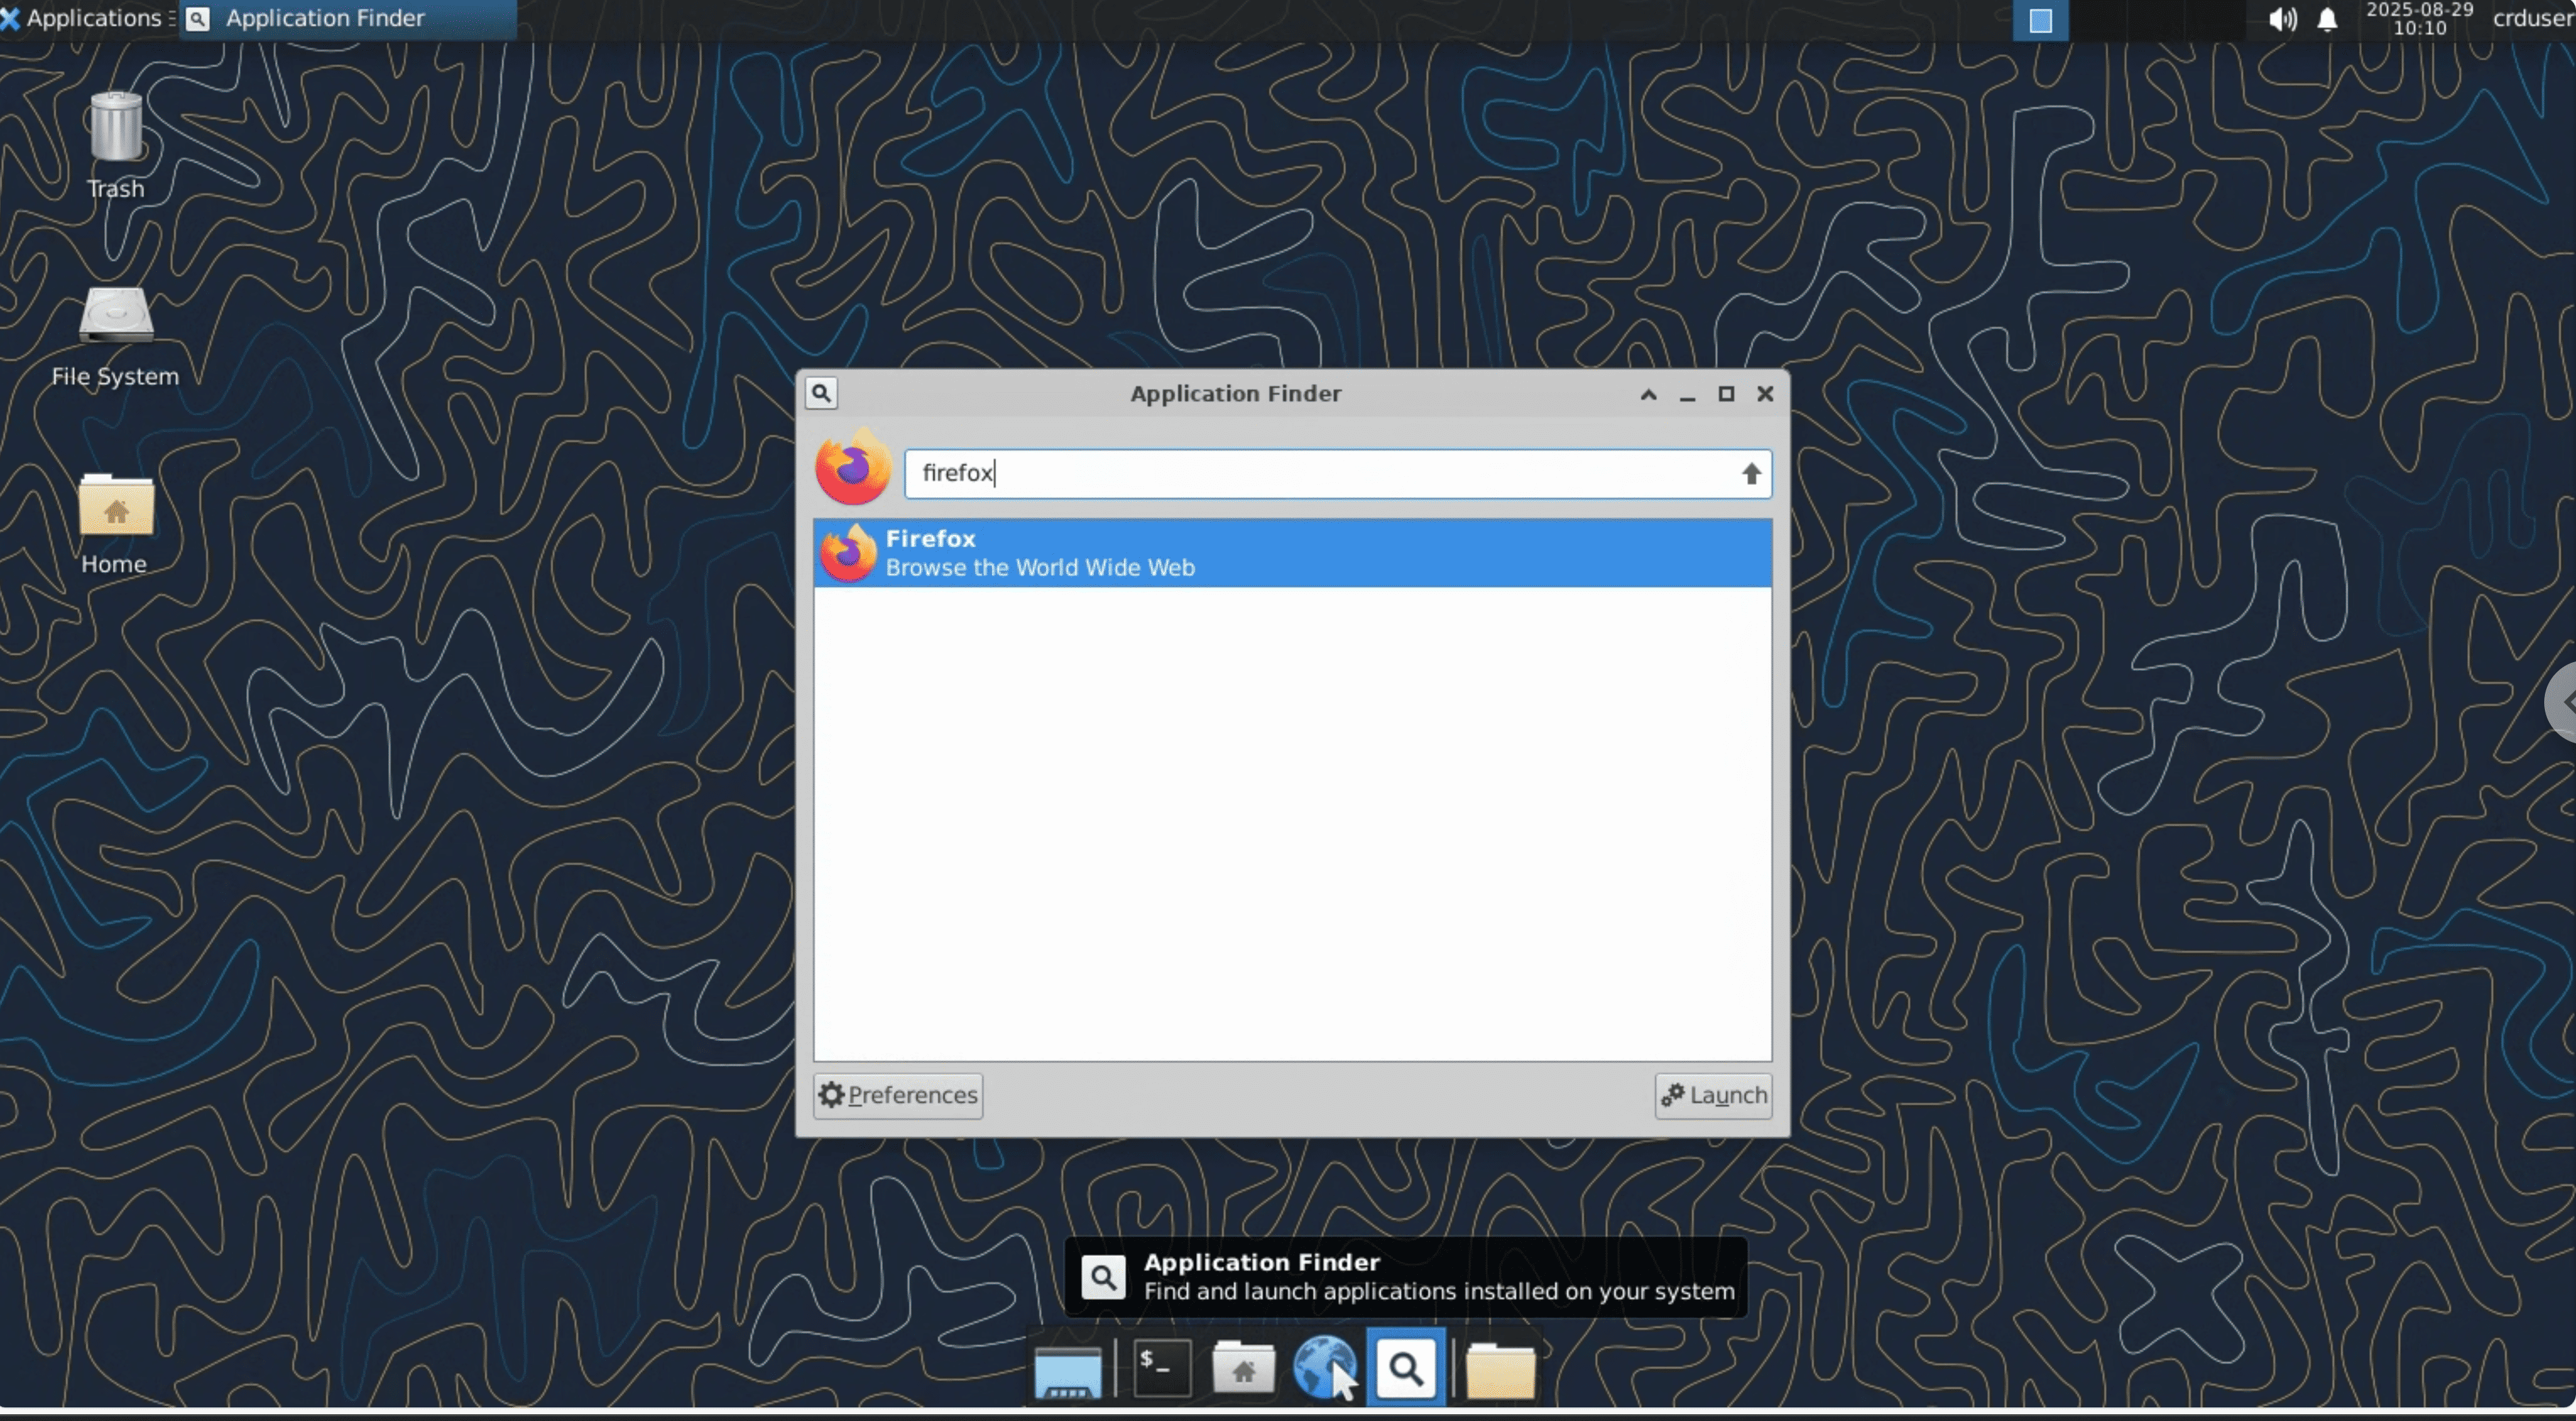
After connecting to Chrome Remote Desktop, click Application Finder in the dock at the bottom of the screen, search for Firefox, and click the icon to open it.
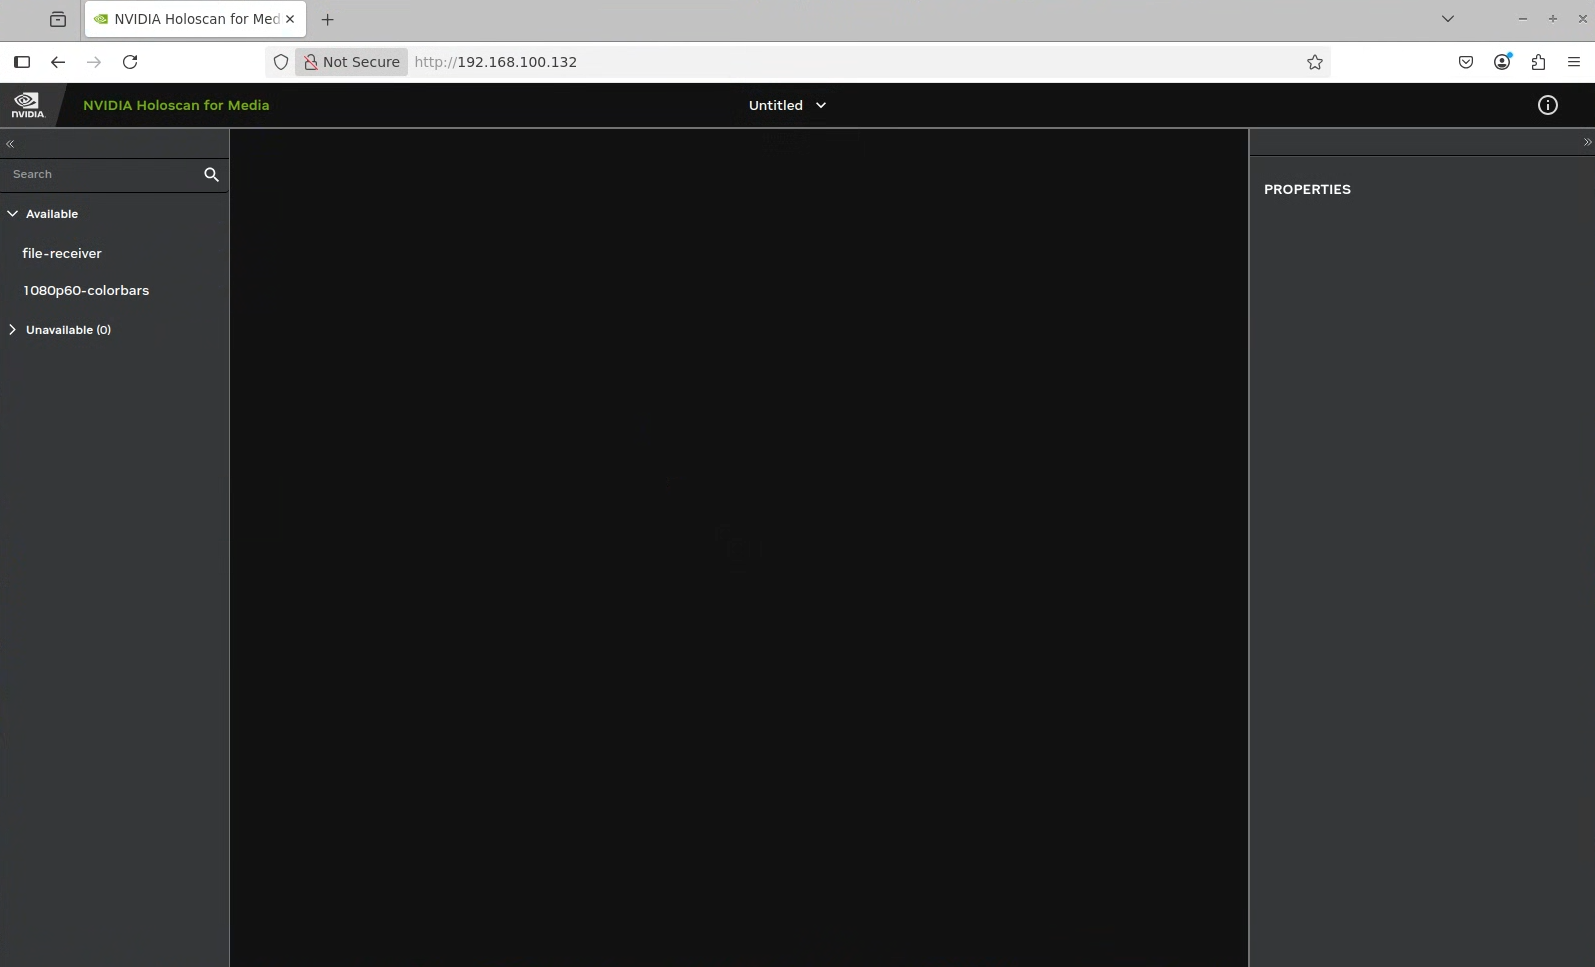
Navigate to the NMOS Controller UI at
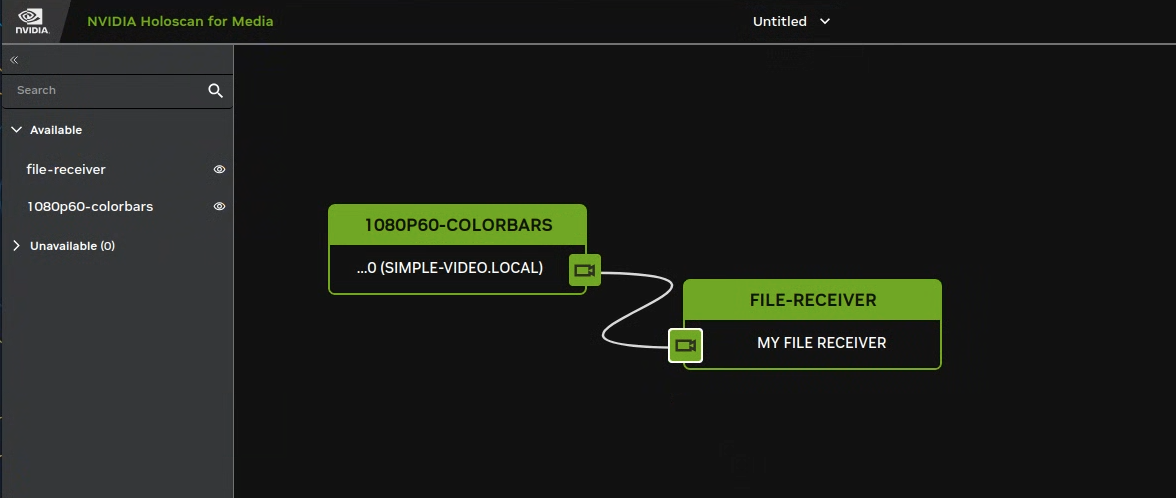
http://<controller-ui-ip-address>/, where<controller-ui-ip-address>is the high speed network IP specified at deployment time.In the NMOS Controller UI, you’ll see available devices listed in the left panel under Available.
Note
If the devices do not appear in the NMOS Controller UI, check the logs of each pod:
kubectl logs <pod-name>
Drag the sender and receiver devices from the left panel to the empty canvas.
Drag a link between the receiver and the sender to make a connection.
After some time, disconnect the link between sender and receiver using the context menu and check the video file saved in the workspace directory of the receiver container.
Alternatively, you can copy the file to your local directory using the following command:
kubectl cp <pod-name>:/workspace/recv.mp4 <destination-path>
Replace
<pod-name>with the name of the receiver pod, can be found using the following command:kubectl get pods | grep receiver
NAME                                                              READY   STATUS    RESTARTS   AGE
nvds-nmos-bin-receiver-nvds-nmos-bin-receiver-pipeline-dbd79rcb   1/1     Running   0          10m
Replace
<destination-path>with the path to the directory where you want to save the file (for example,/home/user/recv.mp4).