Gst-nvmsgbroker#
This plugin sends payload messages to the server using a specified communication protocol. It accepts any buffer that has NvDsPayload metadata attached and uses the nvds_msgapi_* interface to send the messages to the server. You must implement the nvds_msgapi_* interface for the protocol to be used and specify the implementing library in the proto-lib property.
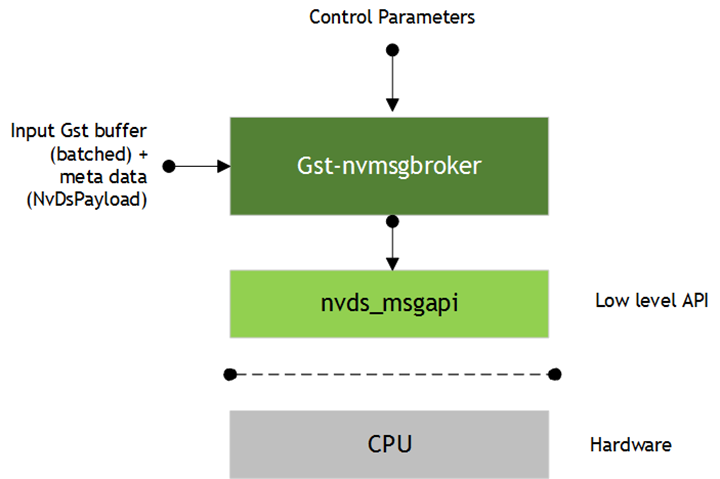
Inputs and Outputs#
Inputs
Gst Buffer with NvDsPayload
Control parameters
Config
conn-str
proto-lib
comp-id
topic
new-api
Output
None, as this is a sink component
Features#
The following table summarizes the features of the Gst-nvmsgbroker plugin.
Feature |
Description |
Release |
|---|---|---|
Payload in JSON format |
Accepts message payload in JSON format |
DS 3.0 |
Kafka protocol support |
Kafka protocol adapter implementation |
DS 3.0 |
Azure IOT support |
Integration with Azure IOT framework |
DS 4.0 |
AMQP support |
AMQP 0-9-1 protocol adapter implementation |
DS 4.0 |
REDIS support |
Redis protocol adapter using Redis Streams |
DS 5.1 |
MQTT support |
MQTT protocol adapter using Eclipse mosquitto |
DS 6.3 |
Custom protocol support |
Provision to support custom protocol through a custom implementation of the adapter interface |
DS 3.0 |
Configurable parameters |
Protocol specific options through configuration file |
DS 3.0 |
Gst Properties#
The following table describes the Gst properties of the Gst-nvmsgbroker plugin.
Property |
Meaning |
Type and Range |
Example Notes |
Platforms |
|---|---|---|---|---|
config |
Absolute pathname of configuration file required by nvds_msgapi_* interface |
String |
config=<msgapi_config.txt> |
dGPU Jetson |
conn-str |
Connection string as end point for communication with server |
String Format must be <name>;<port>;<specifier> |
conn-str= foo.bar.com;80 ;user-id |
dGPU Jetson |
proto-lib |
Absolute pathname of library that contains the protocol adapter as an implementation of nvds_msgapi_* |
String |
proto-lib=<libnvds_kafka_proto.so> |
dGPU Jetson |
comp-id |
ID of component from which metadata should be processed |
Integer, 0 to 4,294,967,295 |
comp-id=3 Default: plugin processes metadata from any component |
dGPU Jetson |
topic |
Message topic name |
String |
topic=dsapp1 |
dGPU Jetson |
new-api |
To use protocol adapter library apis directly or use new msgbroker library wrapper apis |
Integer 0 : Use adapter api’s directly 1 : msgbroker lib wrapper api’s (Refer to nv_msgbroker: Message Broker interface) |
new-api = 0 |
dGPU Jetson |
sleep-time |
Sleep time between consecutive do_work calls in milliseconds |
Integer >= 0. For Azure, use value >= 10 depending on IoT Hub service tier message rate limit. Warning: Failure is likely with unreasonably high sleep times, e.g. 10000000 ms |
sleep-time=10 |
dGPU Jetson |
nvds_msgapi: Protocol Adapter Interface#
You can use the DeepStream messaging interface, nvds_msgapi, to implement a custom protocol message handler and integrate it with DeepStream applications. Such a message handler, known as a protocol adapter, enables you to integrate DeepStream applications with backend data sources, such as data stored in the cloud.
New with DeepStream 7.1, the source code for all protocol adaptors provided with DeepStream is available at /opt/nvidia/deepstream/deepstream/sources/libs/*_protocol_adaptor.

The Gst-nvmsgbroker plugin calls the functions in your protocol adapter as shown in the figure above. These functions support:
Creating a connection
Sending messages by synchronous or asynchronous means
Terminating the connection
Coordinating the client’s and protocol adapter’s use of CPU resources and threads
Getting the protocol adapter’s version number
The nvds_msgapi interface is defined in the header file /opt/nvidia/deepstream/deepstream/sources/includes/nvds_msgapi.h. This header file defines a set of function pointers which provide an interface analogous to an interface in C++.
The following sections describe the methods defined by the nvds_msgapi interface.
nvds_msgapi_connect(): Create a Connection#
NvDsMsgApiHandle nvds_msgapi_connect(char *connection_str,
nvds_msgapi_connect_cb_t connect_cb, char *config_path
);
The function accepts a connection string and configures a connection. The adapter implementation can choose whether the function makes a connection to accommodate connectionless protocols such as HTTP.
Parameters
connection_str: A pointer to a string that specifies connection parameters in the general format<url>;<port>;<specifier>.<url>and<port>specify the network address of the remote entity.<specifier>specifies information specific to a protocol. Its content depends on the protocol’s implementation. It may be, for example, a client identifier for making the connection.
Note that this connection string format is not binding, and an adapter may omit some fields (e.g.: specifier) from its format, provided the omission is described in its documentation. A special case of such connection string adaptation is where the adapter expects all connection parameters to be specified as fields in the configuration file (see config path below), in which case the connection string is passed as NULL.
connect_cb: A callback function for events associated with the connection.config_path: The pathname of a configuration file that defines protocol parameters used by the adapter.
Return Value
A handle for use in subsequent interface calls if successful, or NULL otherwise.
nvds_msgapi_send() and nvds_msgapi_send_async(): Send an event#
NvDsMsgApiErrorType nvds_msgapi_send(NvDsMsgApiHandle *h_ptr,
char *topic, uint8_t *payload, size_t nbuf
);
NvDsMsgApiErrorType nvds_msgapi_send_async(NvDsMsgApiHandle h_ptr,
char *topic, const uint8_t *payload, size_t nbuf,
nvds_msgapi_send_cb_t send_callback, void *user_ptr
 );
Both functions send data to the endpoint of a connection. They accept a message topic and a message payload.
The nvds_send() function is synchronous. The nvds_msgapi_send_async() function is asynchronous; it accepts a callback function that is called when the “send” operation is completed.
Both functions allow the API client to control execution of the adapter logic by calling nvds_msgapi_do_work(). See the description of the nvds_msgapi_do_work() function.
Parameters
h_ptr: A handle for the connection, obtained by a call tonvds_msgapi_connect().topic: A pointer to a string that specifies a topic for the message; may be NULL if topic is not meaningful for the semantics of the protocol adapter.payload: A pointer to a byte array that contains the payload for the message.nbuf: Number of bytes to be sent.send_callback: A pointer to a callback function that the asynchronous function calls when the “send” operation is complete. The signature of the callback function is of typenvds_msgapi_send_cb_t, defined as:typedef void (*nvds_msgapi_send_cb_t)(void *user_ptr, NvDsMsgApiErrorType completion_flag );
where the callback’s parameters are:
user_ptr: The user pointer (user_ptr) from the call tonvds_msgapi_send()or`` nvds_msgapi_send_async()`` that initiated the “send” operation. Enables the callback function to identify the initiating call.completion_flag: A code that indicates the completion status of the asynchronous send operation.
nvds_msgapi_subscribe(): Consume data by subscribing to topics#
NvDsMsgApiErrorType nvds_msgapi_subscribe (NvDsMsgApiHandle h_ptr, char ** topics, int num_topics, nvds_msgapi_subscribe_request_cb_t cb, void *user_ctx);
This API is used to subscribe to topic(s) and consume messages from the external entity.
The API is asynchronous and must be called with an already created valid Kafka connection handle as parameter. The caller must also provide a pointer to the callback function to receive the consumed messages from the connection endpoint and an optional user_ctx pointer for specifying user context
Parameters
h_ptr: A handle for the connection, obtained by a call to nvds_msgapi_connect()topics: A 2d pointer which points to a char array of topic namesnum_topics: num of topics to subscribecb: A pointer to a callback function to get notified of the consumed messages on subscribed topic(s)user_ctx: user ptr to be passed to callback for context
The pointer to a callback function which is specified as a param in subscribe API is of type nvds_msgapi_subscribe_request_cb_t defined as:
    typedef void (*nvds_msgapi_subscribe_request_cb_t)(NvDsMsgApiErrorType flag, void *msg, int msg_len, char *topic, void *user_ptr);

where the callback’s parameters are:

* ``flag``: To specify the error status of message consumed
* ``msg``: Consumed message / payload
* ``msg_len``: Length of message in bytes
* ``topic``: Topic name where the message was received
* ``user_ptr``: pointer passed during subscribe() for context
nvds_msgapi_do_work(): Incremental Execution of Adapter Logic#
void nvds_msgapi_do_work();
The protocol adapter must periodically surrender control to the client during processing of nvds_msgapi_send() and nvds_msgapi_send_async() calls. The client must periodically call nvsd_msgapi_do_work() to let the protocol adapter resume execution. This ensures that the protocol adapter receives enough CPU resources. The client can use this convention to control the protocol adapter’s use of multi-threading and thread scheduling. The protocol adapter can use it to support heartbeat functionality, if the underlying protocol requires that.
The nvds_msgapi_do_work() convention is needed when the protocol adapter executes in the client thread. Alternatively, the protocol adapter may execute time-consuming operations in its own thread. In this case the protocol adapter need not surrender control to the client, the client need not call nvsd_msgapi_do_work(), and the implementation of nvds_msgapi_do_work() may be a no-op.
The protocol adapter’s documentation must specify whether the client must call nvds_msgapi_do_work(), and if so, how often.
nvds_msgapi_disconnect(): Terminate a Connection#
NvDsMsgApiErrorType nvds_msgapi_disconnect(NvDsMsgApiHandle h_ptr);
The function terminates the connection, if the underlying protocol requires it, and frees resources associated with h_ptr.
Parameters
h_ptr: A handle for the connection, obtained by a call tonvds_msgapi_connect().
nvds_msgapi_getversion(): Get Version Number#
char *nvds_msgapi_getversion();
This function returns a string that identifies the nvds_msgapi version supported by this protocol adapter implementation. The string must use the format <major>.<minor>, where <major> is a major version number and <minor> is a minor version number. A change in the major version number indicates an API change that may cause incompatibility. When the major version number changes, the minor version number is reset to 1.
nvds_msgapi_get_protocol_name(): Get name of the protocol#
char *nvds_msgapi_get_protocol_name(void);
This function returns a string that identifies the underlying protocol used in the adapter library. for example, "KAFKA”, “AMQP”, “AZURE_DEVICE_CLIENT” , “AZURE_MODULE_CLIENT”
nvds_msgapi_connection_signature(): Get Connection signature#
NvDsMsgApiErrorType nvds_msgapi_connection_signature(char *broker_str, char *cfg, char *output_str, int max_len);
This function returns a string that uniquely identifies the signature of the connection parameters passed to the adapter library for making a connection. On success, a connection signature string(generated by SHA256) is returned. Upon error or invalid connection parameters, empty string “” is returned.
Parameters:
broker_str: Broker connection string used to create connectioncfg: Path to config fileoutput_str: Output Connection signaturemax_len: max length of output_str
nvds_kafka_proto: Kafka Protocol Adapter#
DeepStream includes a protocol adapter that supports Apache Kafka. The adapter provides out-of-the-box capability for DeepStream applications to publish messages to Kafka brokers.
Installing Dependencies#
The Kafka adapter uses librdkafka for the underlying protocol implementation. This library must be installed prior to use.
To install librdkakfa, enter these commands:
sudo mkdir -p /etc/apt/keyrings

wget -qO - https://packages.confluent.io/deb/8.0/archive.key | gpg \
--dearmor | sudo tee /etc/apt/keyrings/confluent.gpg > /dev/null

CP_DIST=$(lsb_release -cs)
echo "Types: deb
URIs: https://packages.confluent.io/deb/8.0
Suites: stable
Components: main
Architectures: $(dpkg --print-architecture)
Signed-by: /etc/apt/keyrings/confluent.gpg

Types: deb
URIs: https://packages.confluent.io/clients/deb/
Suites: ${CP_DIST}
Components: main
Architectures: $(dpkg --print-architecture)
Signed-By: /etc/apt/keyrings/confluent.gpg" | sudo tee /etc/apt/sources.list.d/confluent-platform.sources > /dev/null

sudo apt-get update && sudo apt-get install confluent-platform
sudo apt-get install librdkafka-dev
Install additional dependencies:
sudo apt-get install libglib2.0 libglib2.0-dev
sudo apt-get install libjansson4 libjansson-dev
Using the Adapter#
You can use the Kafka adapter in an application by setting the Gst-nvmsgbroker plugin’s proto-lib property to the pathname of the adapter’s shared library, libnvds_kafka_proto.so. The plugin’s conn-str property must be set to a string with format:
<kafka broker address>;<port>
This instantiates the Gst-nvmsgbroker plugin and makes it use the Kafka protocol adapter to publish messages that the application sends to the broker at the specified broker address and topic.
Configuring Protocol Settings#
You can define configuration setting for the Kafka protocol adapter as described by the documentation at edenhill/librdkafka. You can set these options in the Gst-nvmsgbroker configuration file. Like the rest of DeepStream, the configuration file uses the gkey format. The Kafka settings must be in a group named [message-broker] and must be specified as part of a key named proto-cfg. The settings can be a series of key-value pairs separated by semicolons. For example:
[message-broker]
proto-cfg="message.timeout.ms=2000;retries=5"
consumer-group-id = groupid
partition-key = keyid
The Kafka adapter lets you specify the name of the field in messages that is to be used to define the partition key. For each message, the specified message field is extracted and send to the topic partitioner along with the message. The partitioner uses it to identify the partition in the Kafka cluster that handles the message. The partition key information must be specified in the Gst-nvmsgbroker configuration file’s [message-broker] group, using an entry named partition-key.
Fields embedded in a hierarchy of JSON objects in the message are specified using dotted notation. For example, for the sample JSON message shown below, the id field in the sensor object is identified as sensor.id
{
 "sensor" {
 "id": "cam1"
 }
}
Additionally, the Kafka adapter lets you specify the consumer group id. The consumer group is a string that uniquely identifies the group of consumer processes to which this Kafka consumer belongs. The key name consumer-group-id can be specified in the Gst-nvmsgbroker configuration file’s [message-broker] group. If this field is unspecified, the default consumer group name “test-consumer-group” will be used.
Note
For the DeepStream reference application and the 360 D application, both distributed with the DeepStream SDK, you can add the proto-cfg setting to the [message-broker] group of the top-level configuration file passed to the application.
Programmatic Integration#
You can integrate the Kafka adapter into custom user code by using the nvds_msgapi interface to call its functions. Note the following points regarding the functions defined by the interface:
The connection string passed to the
nvdm_msgapi_connect()has the format<kafka broker address>;<port>.For both “send” functions, the topic name must be passed as param to
nvds_msgapi_send(). ornvds_msgapi_send_async()For the subscribe API, a 2D pointer to a char array of topic-names must be passed as param. Also, a pointer to a user callback function must be provided. When there’s a new message from the remote entity, the Kafka consumer will forward the message to the application by calling the user callback function.
The application must call
nvds_msgapi_do_work()at least once a second, and preferably more often. The frequency of calls tonvds_msgapi_do_work()determines the rate at which messages waiting to be sent are processed.It is safe for multiple application threads to share connection handles. The library
librdkafkais thread-safe, so Kafka protocol adapter does not need to implement separate locking mechanisms for functions calling directly to this library.The Kafka protocol adapter expects the client to manage usage and retirement of the connection handle. The client must ensure that once a handle is disconnected, it is not used for either a “send” call or a call to
nvds_msgapi_do_work(). While the library attempts to ensure graceful failure if the application calls these functions with retired handles, it does not do so in a thread-safe manner.
Security for Kafka#
To learn more about security for Kafka, see the Secure Edge-to-Cloud Messaging section in the NVIDIA DeepStream SDK Developer Guide 6.0 Release.
Monitor Adapter Execution
The Kafka adapter generates log messages based on the nvds_logger framework to help you monitor execution. The adapter generates separate logs for the INFO, DEBUG, and ERROR severity levels, as described in nvds_logger: Logging Framework. You can limit the log messages generated by setting the level at which log messages are filtered as part of the logging setup script.
Note
If the severity level is set to DEBUG, the nvds_logger framework logs the entire contents of each message sent by the Kafka protocol adapter.
Azure MQTT Protocol Adapter Libraries#
DeepStream includes protocol adapters that supports direct messaging from device to cloud (using the Azure device client adapter) and through Azure IoT Edge runtime (using the Azure module client adapter). The adapters provide out-of-the-box capability for DeepStream applications to publish messages to Azure IoT Hub using the MQTT protocol.
The Azure IoT protocol adapters are encapsulated by their respective shared libraries found within the DeepStream package at /opt/nvidia/deepstream/deepstream/lib. The Azure device client adapter library is named libnvds_azure_proto.so.
The Azure module client adapter library is named libnvds_azure_edge_proto.so.
Installing Dependencies#
Azure adapters use libiothub_client.so from the Azure IoT C SDK (v1.11.0) for the underlying protocol implementation. After you install the DeepStream package you can find the precompiled library at:
/opt/nvidia/deepstream/deepstream/lib/libiothub_client.so. You can also compile libiothub_client.so manually by entering these commands:
git clone https://github.com/Azure/azure-iot-sdk-c.git
cd azure-iot-sdk-c
git checkout tags/1.11.0
git submodule update --init
mkdir cmake
cd cmake
cmake -Dbuild_as_dynamic:BOOL=ON -Duse_edge_modules:BOOL=ON ..
cmake --build .  # append '-- -j <n>' to run <n> jobs in parallel
To install some other required dependencies, enter one of these commands.
For an x86 computer using Ubuntu 24.04:
sudo apt-get install -y libcurl3 libssl-dev uuid-dev libglib2.0 libglib2.0-dev
For other platforms or OS:
sudo apt-get install -y libcurl4-openssl-dev libssl-dev uuid-dev libglib2.0 libglib2.0-dev
Setting Up Azure IoT#
Azure IoT adapter needs a functioning Azure IoT Hub instance to which is can publish messages. To set up an Azure IoT Hub instance if required, see the instructions at: https://docs.microsoft.com/en-us/azure/iot-hub/tutorial-connectivity. After you create the Azure IoT instance, create a device entry corresponding to the device that is running DeepStream.
To set up Azure IoT Edge runtime on the edge device, see the instructions at https://docs.microsoft.com/en-us/azure/iot-edge/how-to-install-iot-edge-linux.
Note
Note the message rate limitations for your IoT Hub service tier: https://learn.microsoft.com/en-us/azure/iot-hub/iot-hub-devguide-quotas-throttling#standard-tier-operations. Please set the sleep-time property for the nvmsgbroker plugin accordingly to prevent throttling.
Configuring Adapter Settings#
Place Azure IoT specific information in a custom configuration file named, e.g., cfg_azure.txt. The entries in the configuration file vary slightly between the Azure device client and the module client.
For an Azure device client:
[message-broker]
connection_str = HostName=<my-hub>.azure-devices.net;DeviceId=<device_id>;
custom_msg_properties =  <key1>=<value1>; <key2>=<value2>; <key3>=<value3>;
#cleanup-timeout = 20
For an Azure module client:
[message-broker]
#custom_msg_properties =  <key1>=<value1>; <key2>=<value2>; <key3>=<value3>;
Here is useful information about some of the configuration file properties:
connection_str: You can obtain the Azure connection string from the Azure IoT Hub web interface. A connection string uniquely identifies each device associated with the IoT Hub instance. It is under the “Primary Connection String” entry in the “Device detail” section.custom_msg_properties: Use this property to embed custom key/value pairs in the MQTT messages sent from the device to Azure IoT. You can embed multiple key values separated by semicolons, as in this example:custom_msg_properties = ex2: key1=value1;key2=value2;key3=value3;
cleanup-timeout: Time in seconds to wait for message cleanup during disconnect.
Note
The connection_str and custom_msg_properties strings are each limited to 512 characters.
Using the Adapter#
To use the Azure device client adapter in an application, set the Gst-nvmsgbroker plugin’s proto-lib property to the pathname of the adapter’s shared library - libnvds_azure_proto.so for the device client case, or libnvds_azure_edge_proto.so for the module client case.
The next step in using the adapter is to specify the connection details. The procedure for specifying connection details is different for the Azure device client and module client cases, as described in the following sections.
Connection Details for the Device Client Adapter#
Set the plugin’s conn-str property to the full Azure connection string in the format:
HostName=<my-hub>.azure-devices.net;DeviceId=<device_id>;SharedAccessKey=<my-policy-key>
Alternatively, you can specify the connection string details in the Azure configuration file:
[message-broker]
connection_str = HostName=<my-hub>.azure-devices.net;DeviceId=<device_id>;SharedAccessKey=<my-policy-key>
Connection Details for the Module Client Adapter#
Leave the connection string empty, since the Azure IoT Edge library automatically fetches the connection string from the file /etc/iotedge/config.yaml.
Once the connection details have been configured, you can integrate the Azure device client and module client adapters into custom user code by using the nvds_msgapi interface to call its functions. Note the following points about the functions defined by the interface:
The connection string passed to
nvds_msgapi_connect()may be NULL for both the Azure device client and the module client. For the device client the Azure configuration file has an option to specify a connection string. For the module client the connection string is always specified in/etc/iotedge/config.yaml.Both “send” functions use the topic name specified in the Gst-nvmsgbroker plugin’s property “topic.” It may be null.
The application must call
nvds_msgapi_do_work()after each call tonvds_msgapi_send_async(). The frequency of calls tonvds_msgapi_do_work()determines the rate at which messages waiting to be sent are processed.It is safe for multiple application threads to share connection handles. The library
libiothubclientis thread-safe, so Azure protocol adapters need not implement separate locking mechanisms for functions calling this library directly.The Azure protocol adapters expects the client to manage usage and retirement of the connection handle. The client must ensure that once a handle is disconnected, it is not used for either a “send” call or a call to
nvds_msgapi_do_work(). While the library attempts to ensure graceful failure if the application calls these functions with retired handles, it does not do so in a thread-safe manner.
Monitor Adapter Execution#
The Azure device client and module client use different logging mechanisms.
Azure device client library log messages#
The Azure device client adapter uses the nvds_logger framework to generate log messages which can help you monitor execution. The adapter generates separate logs for the INFO, DEBUG, and ERROR severity levels, as described in nvds_logger: Logging Framework. You can limit the generated log messages by setting the level at which log messages are filtered in the logging setup script.
Note
If the severity level is set to DEBUG, the nvds_logger framework logs the entire contents of each message sent by the Azure device client protocol adapter.
Azure Module Client Library Log Messages#
The log messages from the Azure module client adapter library are emitted to stdout, and the log output is captured in the docker/iotedge module logs.
Message Topics and Routes#
You can specify a message topic in a GStreamer property topic. However, the Azure device client and module client use the topic property in different ways. The Azure device client does not support topics. Thus, the value of the topic property is ignored, and you cannot use it to filter messages on Azure IoT Hub. The Azure module client uses the topic property to determine the route of messages, i.e. how messages are passed within a system. For more information about message routes, see: https://docs.microsoft.com/en-us/azure/iot-edge/module-composition#declare-routes)
AMQP Protocol Adapter#
DeepStream includes an AMQP protocol adapter that DeepStream applications can use out of the box to publish messages using AMQP 0-9-1 message protocol.
The AMQP protocol adapter shared library is in the deepstream package at:
/opt/nvidia/deepstream/deepstream/lib/libnvds_amqp_proto.so
Installing Dependencies#
AMQP protocol adapter for DeepStream uses the librabbitmq.so library.
Install rabbitmq-c library:
sudo apt-get install librabbitmq-dev
Install glib 2.0:
sudo apt-get install libglib2.0 libglib2.0-dev
AMQP broker#
The AMQP protocol communicates with an AMQP 0-9-1 compliant message broker. If you do not have a functioning broker already, you can deploy one by installing the rabbitmq-server package, available at:
https://www.rabbitmq.com/install-debian.html
You can install this package on your local system or on the remote machine where you want the broker to be installed.
To install the package, enter the command:
sudo apt-get install rabbitmq-server
To determine whether the rabbitmq service is running, enter the command:
sudo service rabbitmq-server status
If rabbitmq is not running, enter this command to start it:
sudo service rabbitmq-server start
Configure Adapter Settings#
You can place AMQP protocol adapter specific information in a custom configuration named, for example, cfg_amqp.txt. Here is an example of configuration file entries for an AMQP broker installed on the local machine:
[message-broker]
hostname = localhost
username = guest
password = guest
port = 5672
exchange = amq.topic
topic = topicname
amqp-framesize = 131072
#amqp-heartbeat = 0
#share-connection = 1
The properties in the configuration file are:
hostname: Hostname of the host on which the AMQP broker is installed
username: Username used to log in to the broker – TO BE DEPRECATED, USE ENV VARIABLE
password: Password used to log in to the broker – TO BE DEPRECATED, USE ENV VARIABLE
port: Port used to communicate with the AMQP broker
exchange: Name of the exchange on which to publish messages
topic: Message topic
amqp-framesize: Maximum size of an AMQP frame on the wire to request of the broker for this connection. 4096 is the minimum size, 2^31-1 is the maximum, a good default is 131072 (128KB).
amqp-heartbeat: Uncomment the field amqp-heartbeat in cfg_amqp.txt and set its value to an integer > 0 to enable the heartbeat protocol.
This integer is the number of seconds between heartbeat frames requested of the broker. After 2 missed frames, rabbitmq will consider the connection unreachable. A value of 0 disables the heartbeat protocol.
share-connection: Uncomment the field share-connection in cfg_amqp.txt and set its value to 1 if you need to generate a connection signature.
This signature is a unique string which is generated by parsing all the amqp connection related params used for making a connection. Uncommenting this field signifies that the connection created can be shared with other components within the same process.
Using the Adapter#
To use the AMQP protocol client adapter in a DeepStream application, set the Gst-nvmsgbroker plugin’s proto-lib property to the pathname of the adapter’s shared library, libnvds_amqp_proto.so.:
proto-lib = <path to libnvds_amqp_proto.so>
You can specify the AMQP connection details in the AMQP adapter specific configuration file (e.g., cfg_amqp.txt) as described above. This is the recommended method. The path to the AMQP configuration file is specified by the Gst property config:
config = <path to cfg_amqp.txt>
Alternatively, you can specify the AMQP protocol’s hostname, port number, and username in the Gst plugin’s conn-str property, and specify the password in the configuration file. In the Gst properties:
conn-str = hostname;5672;username
config   = <pathname of AMQP configuration file>
In the AMPQ configuration file:
[message-broker]
password = <password>
You can set the Gst-nvmsgbroker plugin’s topic property to specify the message topic.
topic = <topicname>
Alternatively, you can specify a topic in the AMQP configuration file (cfg_amqp.txt). In the Gst properties, set:
config = <path to cfg_amqp.txt>
In the AMQP configuration file:
[message-broker]
Topic = topicname
NOTE: Option to pass in username and password through config file and connection string is to be deprecated. Follow the below steps to set user credentials in environmental variables instead. Only acceptable connection string format after deprecation will be “url;port”.
User authentication#
To set username and password, export the following environmental variables:
export USER_AMQP=username
export PASSWORD_AMQP=password
If username and password are also set in the config, the adaptor will set according to the environmental variables and not the config.
Programmatic Integration#
Once you have configured the connection, you can integrate the AMQP protocol adapter into your application by using the nvds_msgapi interface to call its functions. Note the following points about the functions defined by the interface:
The connection string passed to
nvds_msgapi_connect()has the format`` Hostname;<port>;username``.For both “send” functions, the topic name is specified either by the Gst-nvmsgbroker plugin’s topic property or by the topic parameter in the AMQP configuration file.
The application must call
nvds_msgapi_do_work()after each call tonvds_msgapi_send_async(). The frequency of calls tonvds_msgapi_do_work()determines the rate at which messages waiting to be sent are processed.
The AMQP protocol adapter expects the client to manage usage and retirement of the connection handle. The client must ensure that once a handle is disconnected, it is not used for either a “send” call or a call to nvds_msgapi_do_work(). While the library attempts to ensure graceful failure, if the application calls these functions with retired handles, it does not do so in a thread-safe manner.
Note
As stated at alanxz/rabbitmq-c, you cannot share a socket, an amqp_connection_state_t, or a channel between threads using the librabbitmq library. This library is designed for use by event-driven, single-threaded applications, and does not yet meet the requirements of threaded applications.
To deal with this limitation, your application must open an AMQP connection (and an associated socket) per thread. If it needs to access a single AMQP connection or any of its channels from more than one thread, you must implement an appropriate locking mechanism.
It is generally simpler to have a connection dedicated to each thread.
Monitor Adapter Execution#
The AMQP protocol adapter uses the nvds_logger framework to generate log messages which can help you monitor execution. The adapter generates separate logs for the INFO, DEBUG, and ERROR severity levels, as described in nvds_logger: Logging Framework. You can limit the log messages being generated by setting the level at which log messages are filtered in the logging setup script.
Note
If the severity level is set to DEBUG, nvds_logger logs the entire contents of each message sent by the AMQP protocol adapter.
REDIS Protocol Adapter#
DeepStream includes a REDIS protocol adapter that DeepStream applications can use out of the box to publish messages using REDIS streams https://redis.io/topics/streams-intro
The REDIS protocol adapter shared library is in the deepstream package at: /opt/nvidia/deepstream/deepstream/lib/libnvds_redis_proto.so
Installing Dependencies#
REDIS protocol adapter for DeepStream uses the libhiredis.so library, built from Hiredis v1.0.2.
Build dependencies with installation instructions:
libhiredis:
sudo apt-get install libhiredis-dev
Note that for using TLS/SSL security, make sure to build libhiredis with SSL support enabled by using the USE_SSL option as specified in the README here: redis/hiredis
glib 2.0:
apt-get install libglib2.0 libglib2.0-dev
REDIS server#
Install & setup redis-server on your machine. Follow instructions here and download the redis version(6.0.8) : https://redis.io/download
wget http://download.redis.io/releases/redis-6.0.8.tar.gz
tar xzf redis-6.0.8.tar.gz
cd redis-6.0.8
make
Run the server
src/redis-server &
Configure Adapter Settings#
You can place REDIS protocol adapter specific information in a custom configuration file, for example, cfg_redis.txt.
Here is an example of configuration file entries for a redis server installed on the local machine:
[message-broker]
hostname=localhost
port=6379
password=password
payloadkey=metadata
consumergroup=mygroup
consumername=myname
streamsize=10000
The properties in the configuration file are:
hostname: Hostname of the host on which the REDIS server is installed
port: Port used to communicate with the REDIS server
password: password for connection to the server. Use if requirepass is enabled in the redis server config file: https://redis.io/docs/latest/operate/oss_and_stack/management/security/ (CONFIG TO BE DEPRECATED: password should be set in an environmental variable instead)
payloadkey: Specify the redis stream key for the payload (More info on streams key: https://redis.io/topics/streams-intro)
consumergroup: Specify redis streams consumer groupname (More info on redis streams consumer groups : https://redis.io/commands/xgroup)
consumername: Specify redis streams consumer name
streamsize: Specify the max stream size for the redis stream where data is being published
User Authentication#
Enable requirepass in the redis server config file to set password in the broker (see https://redis.io/docs/latest/operate/oss_and_stack/management/security/).
Set the password in the adaptor by setting the following environmental variable:
export PASSWORD_REDIS=password
If the password is also set in the config, the adaptor will set according to the environmental variable and not the config.
Using the Adapter#
To use the REDIS protocol client adapter in a DeepStream application, set the Gst-nvmsgbroker plugin’s proto-lib property to the pathname of the adapter’s shared library, libnvds_redis_proto.so.
proto-lib = <path to libnvds_redis_proto.so>
You can specify the REDIS connection details in the REDIS adapter specific configuration file (e.g., cfg_redis.txt) as described above. This is the recommended method. The path to the REDIS configuration file is specified by the Gst property config:
config = <path to cfg_redis.txt>
Alternatively, you can specify the REDIS protocol’s hostname, port number in the Gst plugin’s conn-str property, and specify the password in the configuration file. In the Gst properties:
conn-str = hostname;6379
config   = <pathname of REDIS configuration file>
You can set the Gst-nvmsgbroker plugin’s topic property to specify the message topic.
topic = <redis streamname>
Programmatic Integration#
Once you have configured the connection, you can integrate the REDIS protocol adapter into your application by using the nvds_msgapi interface to call its functions. Note the following points about the functions defined by the interface:
The connection string passed to
nvds_msgapi_connect()has the format`` Hostname;<port>``.For both “send” functions, the topic name is specified either by the Gst-nvmsgbroker plugin’s topic property.
The application must call
nvds_msgapi_do_work()after each call tonvds_msgapi_send_async(). The frequency of calls tonvds_msgapi_do_work()determines the rate at which messages waiting to be sent are processed.
The REDIS protocol adapter expects the client to manage usage and retirement of the connection handle. The client must ensure that once a handle is disconnected, it is not used for either a “send” call or a call to nvds_msgapi_do_work(). While the library attempts to ensure graceful failure, if the application calls these functions with retired handles, it does not do so in a thread-safe manner.
Monitor Adapter Execution#
The REDIS protocol adapter uses the nvds_logger framework to generate log messages which can help you monitor execution. The adapter generates separate logs for the INFO, DEBUG, and ERROR severity levels, as described in nvds_logger: Logging Framework. You can limit the log messages being generated by setting the level at which log messages are filtered in the logging setup script.
Note
If the severity level is set to DEBUG, nvds_logger logs the entire contents of each message sent by the REDIS protocol adapter.
MQTT Protocol Adapter#
DeepStream 6.4 includes the release of an MQTT protocol adapter that DeepStream applications can use out of the box to publish messages using the MQTT V5.0 protocol.
The MQTT protocol adapter shared library is in the deepstream package at:
/opt/nvidia/deepstream/deepstream/lib/libnvds_mqtt_proto.so
Installing Dependencies#
MQTT protocol adapter for DeepStream uses the libmosquitto.so library.
glib 2.0:
sudo apt-get install libglib2.0 libglib2.0-dev
ssl:
sudo apt-get install libssl-dev
cjson:
sudo apt-get install libcjson-dev
mosquitto:
sudo apt-add-repository ppa:mosquitto-dev/mosquitto-ppa
sudo apt-get update
sudo apt-get install libmosquitto-dev mosquitto
Eclipse Mosquitto#
Eclipse mosquitto is a lightweight and open source message broker implementing the MQTT protocol. Read more about it here: https://mosquitto.org/. The broker, the mosquitto_pub and mosquitto_sub command line clients, and the C library on which the protocol adapter depends, are all installed via the instructions in the last section.
Run the mosquitto broker:
adduser --system mosquitto
mosquitto
To run with specific mosquitto broker config file:
mosquitto -c <path_to_config_file>
For example:
mosquitto -c /etc/mosquitto/mosquitto.conf
Enable authentication:
Create a simple text file and enter the username and password pairs, one for each line such as below:
user1:password1
user2:password2
Encrypt the password file using the following command: :: mosquitto_passwd -U <path_to_password_file>
Change the following configurations at /etc/mosquitto/mosquitto.conf (or write a new config file):
allow_anonymous false
password_file <path_to_password_file>
Run the mosquitto broker using the updated config file
To set user and password in the protocol adaptor:
Export the following environmental variables:
export USER_MQTT=username
export PASSWORD_MQTT=password
If username and password are also set in the config, the adaptor will set according to the environmental variables and not the config.
Enable TLS encryption:
mosquitto provides TLS support for encrypted network connections and authentication. The broker can be configured to accept CA certificates, the broker server certificate, and broker server key, and to require certification from clients attempting to connect. The CA certificates, client server certificate, and client server key can be passed to the mqtt protocol adapter through the adapter config file.
Change the following configurations at /etc/mosquitto/mosquitto.conf (or write a new config file):
# At least one of cafile or capath must be defined
# cafile is a file ending in ".crt" containing PEM encoded CA certificates
cafile <path to CA crt file>
# capath is a directory containing PEM encoded CA certificate files ending in ".pem".
# For capath to work correctly, the certificates files must have ".pem" as the file ending
# and you must run "openssl rehash <path to capath>" each time you add/remove a certificate.
capath <path to directory containing CA certificates>

# Path to the PEM encoded server certificate for the broker.
certfile <path to broker crt file>

# Path to the PEM encoded keyfile for the broker.
keyfile <path to broker key file>

# By setting require_certificate to true,
# the client must provide a valid certificate in order for the network
# connection to proceed. This allows access to the broker to be controlled
# outside of the mechanisms provided by MQTT.
require_certificate true
Run the broker using the updated config file
Test the broker configuration using mosquitto_pub:
$ mosquitto_pub -p 1883 --cafile <path to CA crt file> --cert <path to client crt file> --key <path to client key file> -h localhost -m hello -t /world
or
$ mosquitto_pub -p 1883 --capath <path to directory containing CA certificates> --cert <path to client crt file> --key <path to client key file> -h localhost -m hello -t /world
Update the mqtt protocol adapter config with the cafile/capath. If require_certificate is set to true in the broker config, the client certfile, and client keyfile must also be provided.
Configure Adapter Settings#
You can place MQTT protocol adapter specific information in a custom configuration file named, for example, cfg_mqtt.txt. Here is an example of configuration file entries for an MQTT broker installed on the local machine:
[message-broker]
username = user
password = password
client-id = uniqueID
#enable-tls = 1
#tls-cafile =
#tls-capath =
#tls-certfile =
#tls-keyfile =
#share-connection = 1
#loop-timeout = 2000
#keep-alive = 60
The properties in the configuration file are:
username - the username to be set to authenticate with the mosquitto broker, if enabled – TO BE DEPRECATED, USE ENV VARIABLE
password - the password to be set to authenticate with the mosquitto broker, if enabled – TO BE DEPRECATED, USE ENV VARIABLE
client-id - string to use as client ID. If empty, a random client ID will be generated. Each client ID must be unique to connect to the same broker
- enable-tls - 0 for no, 1 for yes
Enable TLS encryption. If enabled, at least one of tls-cafile and tls-capath must be set.
tls-cafile - path to a file containing the PEM encoded trusted CA certificate files. Either cafile or capath must be provided.
- tls-capath - path to a directory containing the PEM encoded trusted CA certificate files. Either cafile or capath must be provided.
For capath to work correctly, the certificates files must have “.pem” as the file ending and you must run “openssl rehash <path to capath>” each time you add/remove a certificate.
tls-certfile - path to a file containing the PEM encoded certificate file for this client. If not provided, no client certificate will be used.
tls-keyfile - path to a file containing the PEM encoded private key for this client. If not provided. no client certificate will be used.
share-connection - 0 for no, 1 for yes
Uncomment the field share-connection in cfg_mqtt.txt and set its value to 1 if you need to generate a connection signature. This signature is a unique string which is generated by parsing all the mqtt connection related params used for making a connection Uncommenting this field signifies that the connection created can be shared with other components within the same process.
loop-timeout - timeout in ms to pass to the
mosquitto_loop()call, which is called bynvds_msgapi_do_work(). Default is 2000 ms.This refers to the maximum number of milliseconds to wait for network activity before the call times out. Set to 0 for instant return.
keep-alive - number of seconds after which the broker should send a PING message to the client if no other messages have been exchanged in that time.
Using the Adapter#
To use the MQTT protocol client adapter in a DeepStream application, set the Gst-nvmsgbroker plugin’s proto-lib property to the pathname of the adapter’s shared library, libnvds_mqtt_proto.so.:
proto-lib = <path to libnvds_mqtt_proto.so>
You can specify the MQTT protocol’s hostname and port number in the Gst plugin’s conn-str property, and specify the username and password in the configuration file. In the Gst properties:
conn-str = localhost;1883
config   = <pathname of MQTT configuration file>
In the MQTT configuration file:
[message-broker]
username = user
password = password
You can set the Gst-nvmsgbroker plugin’s topic property to specify the message topic.
topic = <topicname>
Programmatic Integration#
Once you have configured the connection, you can integrate the MQTT protocol adapter into your application by using the nvds_msgapi interface to call its functions. Note the following points about the functions defined by the interface:
The connection string passed to
nvds_msgapi_connect()has the formatHostname;<port>.For
nvds_msgapi_send_async(), the topic name is specified by the Gst-nvmsgbroker plugin’s topic property.The application must call
nvds_msgapi_do_work()after each call tonvds_msgapi_send_async(). The frequency of calls tonvds_msgapi_do_work()determines the rate at which messages waiting to be sent are processed.
The MQTT protocol adapter expects the client to manage usage and retirement of the connection handle. The client must ensure that once a handle is disconnected, it is not used for either a “send” call or a call to nvds_msgapi_do_work(). While the library attempts to ensure graceful failure, if the application calls these functions with retired handles, it does not do so in a thread-safe manner.
Note
The synchronous send function nvds_msgapi_send() is not supported by the MQTT protocol adapter. Only nvds_msgapi_send_async() can be called to send messages.
Monitor Adapter Execution#
The MQTT protocol adapter uses the nvds_logger framework to generate log messages which can help you monitor execution. The adapter generates separate logs for the INFO, DEBUG, and ERROR severity levels, as described in nvds_logger: Logging Framework. You can limit the log messages being generated by setting the level at which log messages are filtered in the logging setup script.
Note
If the severity level is set to DEBUG, nvds_logger logs the entire contents of each message sent by the MQTT protocol adapter.
nv_msgbroker: Message Broker interface#
Deepstream 5.0 features a new messagebroker library which can be used to make connections with multiple external brokers. This library acts as a wrapper around the message adapter libraries described in the above section and provides its own API’s
Gst-msgbroker plugin has an option to directly call in to the adapter library API’s for connecting with external entity or use the nvmsgbroker library interface to have the ability to connect with multiple external entities at a time.
Additionally, autoreconnect feature is introduced within nvmsgbroker library as of Deepstream 6.0 wherein a periodic reconnection attempt is made to re-establish connection with the external entity. Source code for this library is now available at /opt/nvidia/deepstream/deepstream/sources/libs/nvmsgbroker as of DeepStream 7.1.
As of Deepstream-6.2, a new configuration work-interval is available, which allows the user to set the wait time between execution of adapter logic.
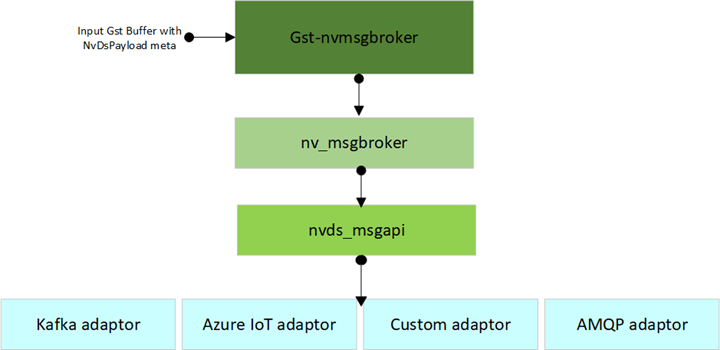
The Gst-nvmsgbroker plugin can call the Api’s in the nvmsgbroker library as shown in the diagram above. The Api’s support:
Creating a connection
Sending messages by asynchronous means
Terminating the connection
Fetching the nvmsgbroker library version number
The nvmsgbroker interface is defined in the header file /opt/nvidia/deepstream/deepstream/sources/includes/nvmsgbroker.h. This header file defines a set of function pointers which provide an interface analogous to an interface in C++.
The following sections describe the methods defined by the nvmsgbroker interface.
nv_msgbroker_connect(): Create a Connection#
NvMsgBrokerClientHandle nv_msgbroker_connect(char *broker_conn_str, char *broker_proto_lib, nv_msgbroker_connect_cb_t connect_cb, char *cfg);
The function accepts a connection string and configures a connection. The broker adapter proto lib implementation can choose whether the function makes a connection to accommodate connectionless protocols such as HTTP.
Parameters
broker_conn_str: A connection string with format specific for protocol adapterbroker_proto_lib: Full Path to Message protocol adapter libraryconnect_cb: A pointer to a callback function for events associated with the connection.Cfg: Pathname of a configuration file passed to be passed to the protocol adapterConnect callback
typedef void (*nv_msgbroker_connect_cb_t)(NvMsgBrokerClientHandle h_ptr, NvMsgBrokerErrorType status );Where the callback’s parameters are:
h_ptr: The connection handle to identify the initiating call.status: A code that indicates the status of the connection.
Return Value
A connection handle for use in subsequent interface calls if successful, or NULL otherwise.
nv_msgbroker_send_async(): Send an event asynchronously#
NvMsgBrokerErrorType nv_msgbroker_send_async (NvMsgBrokerClientHandle h_ptr, NvMsgBrokerClientMsg message, nv_msgbroker_send_cb_t cb, void *user_ctx);
The API sends data to the endpoint of a connection. It accepts a message topic and a message payload. Send is asynchronous; it accepts a callback function that is called when the “send” operation is completed.
Parameters
h_ptr: connection handle to Message Broker librarymessage: Message packet which has details of message payload, payload length , topiccb: callback to be invoked to notify status of senduser_ctx: pointer to pass to callback for contextMessage Packet structure
typedef struct {
char *topic;
void *payload;
size_t payload_len;
} NvMsgBrokerClientMsg;
Send callback
typedef void (*nv_msgbroker_send_cb_t)(void *user_ptr, NvMsgBrokerErrorType flag);Where the callback’s parameters are:
user_ptr: The user pointer (user_ptr) from the call tonv_msgbroker_send_async()that initiated the “send” operation. Enables the callback function to identify the initiating call.flag: A code that indicates the completion status of the send operation.
nv_msgbroker_subscribe(): Consume data by subscribing to topics#
NvMsgBrokerErrorType nv_msgbroker_subscribe(NvMsgBrokerClientHandle h_ptr, char ** topics, int num_topics, nv_msgbroker_subscribe_cb_t cb, void *user_ctx);
This API is used to subscribe to topic(s) and consume messages from the external entity.
The API is asynchronous and must be called with an already created valid connection handle as parameter. The caller must also provide a pointer to the callback function to receive the consumed messages from the connection endpoint and an optional user_ctx pointer for specifying user context
Parameters
h_ptr: A handle for the connection, obtained by a call tonv_msgbroker_connect()topics: A 2d pointer which points to a char array of topic namesnum_topics: num of topics to subscribecb: A pointer to a callback function to get notified of the consumed messages on subscribed topic(s)user_ctx: user ptr to be passed to callback for contextThe pointer to a callback function which is specified as a param in subscribe API is of type nv_msgbroker_subscribe_cb_t defined as:
typedef void (*nv_msgbroker_subscribe_cb_t)(NvMsgBrokerErrorType flag, void *msg, int msglen, char *topic, void *user_ptr);Where the callback’s parameters are:
flag: To specify the error status of message consumedmsg: Consumed message / payloadmsg_len: Length of message in bytestopic: Topic name where the message was receiveduser_ptr: pointer passed during subscribe() for context
nv_msgbroker_disconnect(): Terminate a Connection#
NvMsgBrokerErrorType nv_msgbroker_disconnect(NvMsgBrokerClientHandle h_ptr);
The function terminates the connection, if the underlying protocol requires it, and frees resources associated with h_ptr.
Parameters
h_ptr: A handle for the connection, obtained by a call tonv_msgbroker_connect()
nv_msgbroker_version(): Get Version Number#
char *nv_msgbroker_version();
This function returns a string that identifies the nv_msgbroker version supported by this protocol adapter implementation. The string must use the format <major>.<minor>, where <major> is a major version number and <minor> is a minor version number. A change in the major version number indicates an API change that may cause incompatibility. When the major version number changes, the minor version number is reset to 1.
Autoreconnect feature#
nvmsgbroker library features autoreconnect capability wherein after network connection with the endpoint is down, a periodic reconnect attempt is made with the external entity. configurations applicable for nvmsgbroker library to avail this feature are listed in cfg_nvmsgbroker.txt:
(0):disable
(1):enable
auto-reconnect=1

#connection retry interval in seconds
retry-interval=<value>

#connection max retry limit in seconds
max-retry-limit=<value>

#interval at which to perform work, in microseconds
work-interval=10000
Note
The autoreconnect feature is not currently supported for use with the MQTT protocol adapter.
Work-interval configuration#
The user can now set the interval in microseconds at which protocol adapter work is performed by changing the work-interval configuration in cfg_nvmsgbroker.txt. The default is 10000 microseconds, aka 10 ms.
...
#interval at which to perform work, in microseconds
work-interval=10000
nvds_logger: Logging Framework#
DeepStream provides a logging framework named nvds_logger. The Kafka protocol adapter uses this framework to generate a run time log. nvds_logger is based on syslog, and offers many related features, including:
Choice of priorities (log levels)
Log filtering and redirection
Shared logging across different DeepStream instances running concurrently
Log retirement and management using
logrotateCross-platform support
Enabling Logging#
To enable logging, run the setup_nvds_logger.sh script. Note that this script must be run with sudo. You may have to modify the permissions associated with this script to make it executable.
The script accepts an optional parameter specifying the pathname of log file to be written. By default, the pathname is /tmp/nvds/ds.log.
Once logging is enabled, you can access the generated log messages by reading the log file.
By default, you must have sudo permissions to read the log file. Standard techniques for syslog-based logging configuration can eliminate this requirement.
Filtering Logs#
nvds_logger allows logs to be associate with a severity level similar to that which syslog offers. You can filter log messages based on severity level by modifying the setup script. By default, the script enables logging for messages at the INFO level (level 6) and above. You can modify this as outlined in the comments in the script:
# Modify log severity level as required and rerun this script
#              0       Emergency: system is unusable
#              1       Alert: action must be taken immediately
#              2       Critical: critical conditions
#              3       Error: error conditions
#              4       Warning: warning conditions
#              5       Notice: normal but significant condition
#              6       Informational: informational messages
#              7       Debug: debug-level messages
# refer https://tools.ietf.org/html/rfc5424.html for more information

echo "if (\$msg contains 'DSLOG') and (\$syslogseverity <= 6) then $nvdslogfilepath" >> 11-nvds.conf
Retiring and Managing Logs#
It is recommended that you limit the size of log files by retiring them periodically. logrotate is a popular utility for this purpose. You can use it in cron jobs so that the log files are automatically archived periodically and are discarded after a desired interval.
Generating Logs#
You can implement modules that use the logger by including /opt/nvidia/deepstream/deepstream/sources/includes/nvds_logger.h in the source code and linking to the libnvds_logger.so library.
Generating logs programmatically involves three steps:
Call
nvds_log_open()before you write any log messages.Call
nvds_log()to write log messages.Call
nvds_log_close()upon completion to flush and close the logs.
Note the nvds_logger is a process-based logging mechanism, so the recommended procedure is to call nvds_log_open() from the main application routine rather than the individual plugins. Similarly, call nvds_log_close() from the main application when it shuts down the application before exit.