

Departments
Departments group multiple projects under a shared organizational scope. By organizing projects into a department, you can manage resources and governance at scale, for example, by allocating quotas across a set of projects, applying policies at the department level, and creating assets that can be shared across all projects (or selected descendant projects) within the department.
For example, in an academic environment, a department can be the Physics Department grouping various projects (AI Initiatives) within the department, or grouping projects where each project represents a single student.
Departments Table
The Departments table can be found under Organization in the NVIDIA Run:ai platform.
The Departments table lists all departments defined for a specific cluster and allows you to manage them. You can switch between clusters by selecting your cluster using the filter at the top.
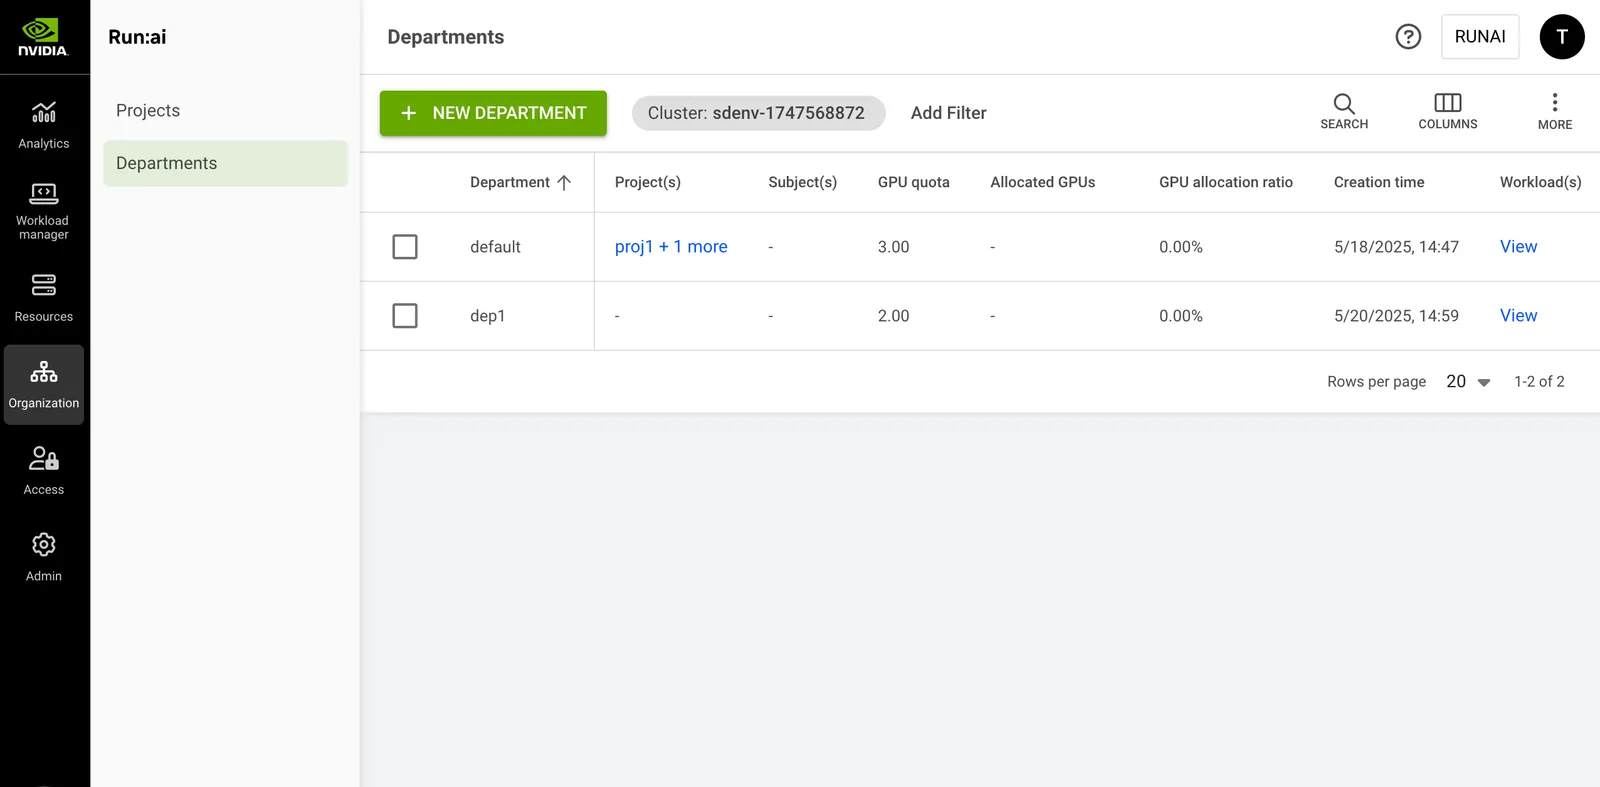
The Departments table consists of the following columns:
Projects Associated with the Department
Click one of the values of Projects(s) column, to view the list of workloads and their parameters.
Node Pools with Quota Associated with the Department
Click one of the values of Node pool(s) with quota column, to view the list of node pools and their parameters.
Subjects Authorized for the Project
Click one of the values of the Subject(s) column, to view the list of subjects and their parameters. This column is only viewable if your role in the NVIDIA Run:ai system affords you those permissions.
Note
A role given in a certain scope, means the role applies to this scope and any descendant scopes in the organizational tree.
Workloads Associated with the Department
Click one of the values of Workload(s) column, to view the list of workloads and their parameters
Customizing the Table View
- Filter - Click ADD FILTER, select the column to filter by, and enter the filter values
- Search - Click SEARCH and type the value to search by
- Sort - Click each column header to sort by
- Column selection - Click COLUMNS and select the columns to display in the table
- Download table - Click MORE and then Click Download as CSV. Export to CSV is limited to 20,000 rows.
Adding a New Department
To create a new Department:
-
Click +NEW DEPARTMENT
-
Select a scope.
By default, the field contains the scope of the current UI context cluster, viewable at the top left side of your screen. You can change the current UI context cluster by clicking the ‘Cluster: cluster-name’ field and applying another cluster as the UI context. Alternatively, you can choose another cluster within the ‘+ New Department’ form by clicking the organizational tree icon on the right side of the scope field, opening the organizational tree and selecting one of the available clusters. -
Enter a name for the department. Department names must start with a letter and can only contain lower case latin letters, numbers or a hyphen (’-’).
-
Choose how to proceed:
- Click CREATE DEPARTMENT & CLOSE to create the department without assigning resources.
- Click CREATE DEPARTMENT & CONTINUE to assign resources and scheduling behavior.
Note
- The department is created and appears in the Departments grid.
When you select CREATE DEPARTMENT & CLOSE, the department is created without assigned resources. The department’s quota is set to 0, which means workloads can run only when spare GPUs are available in the node pool. The following default settings are applied:
- The department is created with a Medium Low rank.
- Over quota weight is always applied when distributing over-quota GPUs among departments in the same rank. By default, the department’s weight is derived proportionally from its assigned GPU quota. Since the quota is set to 0, the effective weight is 0. If Over quota weight is enabled via General settings, the department is assigned a default weight of 2.
Assigning GPU Quota
Assign GPUs to the department and define how the Scheduler prioritizes node pools when running the project’s workloads.
-
Review the node pools available to the department. The list includes all node pools configured in the platform and represents the department’s default (suggested) configuration. This configuration determines which node pools and priority order are applied to newly created projects in the department. Administrators can override this configuration per project by selecting different node pools and adjusting their order.
-
Add node pools and set the default order in which workloads will be scheduled to use them. The leftmost node pool is the first one workloads will attempt to schedule onto. The Scheduler first tries to allocate resources using the highest priority node pool, then the next in priority, until it reaches the lowest priority node pool list, then the Scheduler starts from the highest again.
Note
- When no node pools are configured, you can assign quota for the whole department, instead of per node pool. After node pools are created, you can assign quota for each node pool separately.
- The order of node pools can be overridden during workload submission by an admin policy or by the user.
-
Review the GPU quota per node pool:
- Unassigned - The number of GPUs not assigned to subordinate projects.
- Total - The total number of GPUs assigned to the department in this node pool.
-
Set the department’s GPU quota in the selected node pool. A Quota distribution next to the department visualizes how GPUs are distributed across the department for that node pool. The graph reflects:
-
Assigned quota - The number of GPUs from the node pool that are assigned to this department.
-
Unassigned quota - The number of GPUs still available in the node pool that are not yet assigned for any department.
-
Sum of other departments’ assigned quota - The total number of GPUs already assigned to all other departments in this same node pool.
Note
When assigning a department GPU quota that exceeds the node pool’s available GPUs, or setting the department quota to Unlimited, the system may display warnings, but the quota is not enforced. Actual GPU consumption is constrained by the physical capacity of the node pool or cluster, regardless of the assigned quota.
-
-
You can adjust other departments’ quotas to free up additional resources. A table lists all departments and their assigned GPU quotas. Updating these values redistributes the department’s assigned and unassigned GPU quota across projects for the selected node pool, as reflected in the Quota distribution graph next to each department:
- Use the Search icon to find a department
- Click the GPU quota value and set the number of GPUs
- Click APPLY
-
These steps apply to the selected node pool. If multiple node pools are configured, repeat the process for each.
-
Click SAVE & CONTINUE
Defining GPU Over Quota
Define how workloads can consume GPUs beyond the department’s assigned quota when additional resources are available.
-
Allow workloads to exceed the department’s quota is enabled by default, allowing workloads in the department to consume GPUs beyond the assigned quota. If disabled, workloads from the department will run only within the assigned quota and will not consume additional GPUs, even if resources are available.
Note
Workloads running over quota are opportunistic and may be preempted or stopped at any time when higher priority workloads require resources.
-
Set the max GPU allocation. This value defines the maximum GPU device allocation the department can get from the node pool, representing the maximum sum of assigned quota and over-quota GPUs:
- By default, this field is set to Unlimited, allowing the department to consume any available over-quota GPUs
- Enter a number equal to or above the assigned quota
-
Rank departments in the order in which their workloads will be scheduled. A department’s rank determines the scheduling priority of its workloads only when competing for over-quota GPUs within the same node pool. By default, departments are assigned a Medium Low rank. Departments with a higher rank are scheduled before departments with a lower rank when over-quota GPUs become available. When multiple departments share the same rank, available over-quota GPUs are distributed according to each department’s weight:
-
Filter the list of departments:
- Click Add filter
- Select Rank to filter by rank level, or Department to filter by department name
- Enter or select the filter criteria and click APPLY
-
Locate and select departments:
- Locate the department or departments whose rank you want to change
- Select one or more departments
-
Change the rank:
- Click MOVE TO RANK
- In the Move to Rank dialog, select the destination rank
- Click MOVE <n> DEPARTMENTS to confirm the change
To learn more about department ranks, see The NVIDIA Run:ai Scheduler: concepts and principles.
-
-
Assign weights to determine the departments’ share of resources. A department’s weight determines how available over-quota GPUs are distributed between departments that have the same rank within the same node pool. Weight behavior depends on whether Over quota weight is enabled or disabled via General settings. When disabled, the department’s weight is proportional to its assigned GPU quota, displayed for reference, and cannot be edited. When enabled, all departments within the same rank are assigned a default weight of 2, and the value can be adjusted per department:
- Filter the list of departments:
- Click Add filter
- Select Rank to filter by rank level, or Department to filter by department name
- Enter or select the filter criteria and click APPLY
- Review weight distribution:
- Departments are grouped by rank
- For each department, the Weight distribution graph shows:
- The departments weight
- The total weight of other departments in the same rank
- Edit the department’s weight (when Over quota weight is enabled):
- Click the Weight value for the project and enter a value
- Click APPLY
- Filter the list of departments:
-
These steps apply to the selected node pool. If multiple node pools are configured, repeat the process for each.
-
Click SAVE & CONTINUE
Assigning CPU Quota
Assign CPU resources (cores and memory) to the project and define the maximum CPU usage per node pool. This form is displayed only if CPU quota is enabled via the General settings.
-
Set the number of CPU (Cores) department can use in the selected node pool. By default, CPU cores are set to Unlimited, allowing the department to consume any available CPU resources in the node pool. Enter a number.
-
Set the amount of CPU memory available to the department in the selected node pool. By default, CPU memory is set to Unlimited, allowing the department to consume any available CPU resources in the node pool. Enter a number and select a unit (MB, MiB, or GB)
Note
- When assigning a department CPU quota that exceeds the node pool’s available CPUs, or setting the CPU quota to Unlimited, the system may display warnings, but the quota is not enforced. Actual CPU consumption is constrained by the physical capacity of the node pool or cluster, regardless of the assigned quota.
- When the CPU quota feature flag is disabled, any previously set CPU quotas for a project are automatically removed.
-
These steps apply to the selected node pool. If multiple node pools are configured, repeat the process for each.
-
Click SAVE & CONTINUE
Setting Scheduling Rules
Scheduling rules control how compute resources are used by workloads. The restrict either the resources (nodes) on which workloads can run or the duration of the run time. Scheduling rules are set for departments and apply to specific workload types. See Scheduling rules for more details.
- Click +RULE
- Select a rule type from the dropdown:
- + Idle GPU timeout - Limit the duration of a workload whose GPU is idle
- + Workload time limit - Set a time limit for workspaces regardless of their activity (e.g., stop the workspace after 1 day of work)
- + Node type (Affinity) - Limit workloads to run on specific node types
- For each rule, select the workload type(s) to which the rule applies and configure the rule parameters
- Click SAVE & CONTINUE
Once scheduling rules are set for a department, all matching workloads associated with the department have the restrictions applied to them, as defined, when the workload is submitted. New scheduling rules added to a department are not applied over previously created workloads associated with that department.
Note
Setting scheduling rules in a department enforces the rules on all associated projects.
Applying Access Rules
- Click +ACCESS RULE
- Select a subject - User, SSO Group, Service account, or All authenticated users and service accounts
- Select or enter the subject identifier. You can define up to 10 subjects of the selected type. Not applicable when the subject is All authenticated users and service accounts:
- User email for a local user created in NVIDIA Run:ai or for SSO user as recognized by the IDP
- Group name as recognized by the IDP
- Service account name as created in NVIDIA Run:ai
- Select a role
- Click SAVE RULE
- Click CLOSE
Editing a Department
- Select the Department you want to edit
- Click EDIT
- From the dropdown menu, select the form you want to modify
- Update the settings and click SAVE & CONTINUE
Note
When editing a department:
- You can navigate directly to a specific form without completing the full department creation flow again.
- Changes apply only to the selected form; previously configured settings in other forms remain unchanged.
- You cannot set GPU and CPU quotas below the quotas currently consumed by non-preemptible workloads.
- You cannot set CPU or GPU quotas that are less than the quota already assigned to its subordinate projects.
Viewing a Department’s Policy
To view the policy of a department:
- Select the department for which you want to view its policies. This option is only active if the department has defined policies in place.
- Click VIEW POLICY and select the workload type for which you want to view the policies
- In the Policy form, view the workload rules that are enforcing your department for the selected workload type as well as the defaults:
- Parameter - The workload submission parameter that Rule and Default is applied on
- Type (applicable for data sources only) - The data source type (Git, S3, nfs, pvc etc.)
- Default - The default value of the Parameter
- Rule - Set up constraints on workload policy fields
- Source - The origin of the applied policy (cluster, department or project)
Note
- The policy affecting the department consists of rules and defaults. Some of these rules and defaults may be derived from the policies of a parent cluster (source). You can see the source of each rule in the policy form.
- A policy set for a department affects all subordinated projects and their workloads, according to the policy workload type.
Deleting a Department
- Select the department you want to delete
- Click DELETE
- On the dialog, click DELETE to confirm the deletion
Note
Deleting a department permanently deletes its subordinated projects, any assets created in the scope of this department, and any of its subordinated projects such as compute resources, environments, data sources, templates, and credentials. However, workloads running within the department’s subordinated projects, or the policies defined for this department or its subordinated projects - remain intact and running.
Using CLI
To view the available actions on departments, see the department CLI v2 reference.
Using API
To view the available actions, go to the Departments API reference.
Using MCP
The NVIDIA Run:ai MCP server exposes Resources and Organization tools to manage departments via natural language:
list_departments- list departments by name or countlist_department_resources- see a department’s configured GPU, CPU, and memory quota per node poolget_org_unit_metrics- track a department’s GPU, CPU, and memory allocation and utilization over timemanage_org_unit- create, update, or delete a department, including quota per node pool
See AI Agents for setup.