EfficientDet
With EfficientDet, the following tasks are supported:
dataset_convert
train
evaluate
prune
inference
export
These tasks may be invoked from the TAO Toolkit Launcher by following the below convention from command line:
tao efficientdet <sub_task> <args_per_subtask>
Where args_per_subtask are the command line arguments required for a given subtask. Each
of these sub-tasks are explained in detail below.
EfficientDet expects directories of images for training or validation and annotation JSON files in COCO format. See the Data Annotation Format page for more information about the data format for EfficientDet.
The raw image data and the corresponding annotation file need to be converted to TFRecords
before training and evaluation. The dataset_convert tool helps to achieve seamless
conversion while providing insight on potential issues in an annotation file.
The following sections detail how to use dataset_convert.
Sample Usage of the Dataset Converter Tool
The dataset_convert tool is described below:
            tao efficientdet dataset-convert [-h] -i <image_directory>
                                      -a <annotation_json_file>
                                      -o <tfrecords_output_directory>
                                      [-t <tag>]
                                      [-s <num_shards>]
                                      [--include_mask]
You can use the following arguments:
-i, --image_dir: The path to the directory where raw images are stored-a, --annotations_file: The annotation JSON file-o, --output_dir: The output directory where TFRecords are saved-t, --tag: The tag for the converted TFRecords (e.g. “train”). The tag defaults to the name of the annotation file.-s, --num_shards: The number of shards for the converted TFRecords. The default value is 256.--include_mask: Whether to include segmentation groundtruth during conversion. The default value is False.-h, --help: Show this help message and exit.NoteA log file named
<tag>_warnings.jsonwill be generated in theoutput_dirif the bounding box of an object is out of bounds with respect to the image frame or if an object mask is out of bounds with respect to its bounding box. The log file records theimage_idthat has problematic object IDs. For example,{"200365": {"box": [918], "mask": []}means the bounding box ofobject 918is out of bounds inimage 200365.
The following example shows how to use the command with the dataset:
            tao efficientdet dataset_convert -i /path/to/image_dir
                                 -a /path/to/train.json
                                 -o /path/to/output_dir
Below is a sample for the EfficientDet spec file. It has 5 major components:
model_config, training_config, eval_config,
augmentation_config and dataset_config. The format of the spec file is a protobuf
text (prototxt) message, and each of its fields can be either a basic data type or a nested
message. The top level structure of the spec file is summarized in the table below:
            training_config {
  train_batch_size: 16
  iterations_per_loop: 10
  checkpoint_period: 10
  num_examples_per_epoch: 14700
  num_epochs: 300
  model_name: 'efficientdet-d0'
  profile_skip_steps: 100
  tf_random_seed: 42
  lr_warmup_epoch: 5
  lr_warmup_init: 0.00005
  learning_rate: 0.1
  amp: True
  moving_average_decay: 0.9999
  l2_weight_decay: 0.00004
  l1_weight_decay: 0.0
  checkpoint: "/path/to/your/pretrained_model"
  # pruned_model_path: "/path/to/your/pruned/model"
}
dataset_config {
  num_classes: 91
  image_size: "512,512"
  training_file_pattern: "/path/to/coco/train-*"
  validation_file_pattern: "/path/to/coco/val-*"
  validation_json_file: "/path/to/coco/annotations/instances_val2017.json"
}
eval_config {
  eval_batch_size: 16
  eval_epoch_cycle: 10
  eval_after_training: True
  eval_samples: 5000
  min_score_thresh: 0.4
  max_detections_per_image: 100
}
model_config {
  model_name: 'efficientdet-d0'
  min_level: 3
  max_level: 7
  num_scales: 3
}
augmentation_config {
  rand_hflip: True
  random_crop_min_scale: 0.1
  random_crop_max_scale: 2.0
}
Training Config
The training configuration(training_config) defines the parameters needed for training,
evaluation, and inference. Details are summarized in the table below.
Field |
Description |
Data Type and Constraints |
Recommended/Typical Value |
train_batch_size |
The batch size for each GPU, so the effective batch size is batch_size_per_gpu * num_gpus. |
Unsigned int, positive |
16 |
num_epochs |
The number of epochs to train the network |
Unsigned int, positive |
300 |
num_examples_per _epoch |
Total number of images in the training set divided by the number of GPUs |
Unsigned int, positive |
– |
checkpoint |
The path to the pretrained model, if any |
String |
– |
pruned_model_path |
The path to a TAO pruned model for re-training, if any |
String |
– |
checkpoint_period |
The number of training epochs that should run per model checkpoint/validation |
Unsigned int, positive |
10 |
amp |
Whether to use mixed precision training |
Boolean |
– |
moving_average_decay |
Moving average decay |
Float |
0.9999 |
l2_weight_decay |
L2 weight decay |
Float |
– |
l1_weight_decay |
L1 weight decay |
Float |
– |
lr_warmup_epoch |
The number of warmup epochs in the learning rate schedule |
Unsigned int, positive |
– |
lr_warmup_init |
The initial learning rate in the warmup period |
Float |
– |
learning_rate |
The maximum learning rate |
Float |
– |
tf_random_seed |
The random seed |
Unsigned int, positive |
42 |
clip_gradients_norm |
Clip gradients by the norm value |
Float |
5 |
skip_checkpoint _variables |
If specified, the weights of the layers with matching regular expressions will not be loaded. This is especially helpful for transfer learning. |
string |
“-predict*” |
Evaluation Config
The evaluation configuration (eval_config) defines the parameters needed for the evaluation
either during training or standalone. Details are summarized in the table below.
Field |
Description |
Data Type and Constraints |
Recommended/Typical Value |
eval_epoch_cycle |
The number of training epochs that should run per validation |
Unsigned int, positive |
10 |
max_detections_per_image |
The maximum number of detections to visualize |
Unsigned int, positive |
100 |
min_score_thresh |
The minimum confidence of the predicted box that can be considered a match |
Float |
0.5 |
eval_batch_size |
The batch size for each GPU, so the effective batch size is batch_size_per_gpu * num_gpus |
Unsigned int, positive |
16 |
eval_samples |
The number of samples for evaluation |
Unsigned int |
– |
Dataset Config
The data configuration (data_config) specifies the input data source and format. This is
used for training, evaluation, and inference. A detailed description is summarized in the table
below.
Field |
Description |
Data Type and Constraints |
Recommended/Typical Value |
image_size |
The image dimension as a tuple within quote marks. “(height, width)” indicates the dimension of the resized and padded input. |
String |
“(512, 512)” |
training_file_pattern |
The TFRecord path for training |
String |
– |
validation_file_pattern |
The TFRecord path for validation |
String |
– |
val_json_file |
The annotation file path for validation |
String |
– |
num_classes |
The number of classes. If there are N categories in the annotation, num_classes should be N+1 (background class) |
Unsigned int |
– |
max_instances_per_image |
The maximum number of object instances to parse (default: 100) |
Unsigned int |
100 |
skip_crowd_during_training |
Specifies whether to skip crowd during training |
Boolean |
True |
Model Config
The model configuration (model_config) specifies the model structure. A detailed description is summarized in the table below.
Field |
Description |
Data Type and Constraints |
Recommended/Typical Value |
model_name |
EfficientDet model name |
string |
“efficientdet_d0” |
min_level |
The minimum level of the output feature pyramid |
Unsigned int |
3 (only 3 is supported) |
max_level |
The maximum level of the output feature pyramid |
Unsigned int |
7 (only 7 is supported) |
num_scales |
The number of anchor octave scales on each pyramid level (e.g. if set to 3, the anchor scales are [2^0, 2^(1/3), 2^(2/3)]) |
Unsigned int |
3 |
max_instances_per_image |
The maximum number of object instances to parse (default: 100) |
Unsigned int |
100 |
aspect_ratios |
A list of tuples representing the aspect ratios of anchors on each pyramid level |
string |
“[(1.0, 1.0), (1.4, 0.7), (0.7, 1.4)]” |
anchor_scale |
Scale of the base-anchor size to the feature-pyramid stride |
Unsigned int |
4 |
Augmentation Config
The augmentation_config parameter defines image augmentation after preprocessing.
Field |
Description |
Data Type and Constraints |
Recommended/Typical Value |
rand_hflip |
Whether to perform random horizontal flip |
Boolean |
– |
random_crop_min_scale |
The minimum scale of RandomCrop augmentation. Default: 0.1 |
Float |
0.1 |
random_crop_max_scale |
The maximum scale of RandomCrop augmentation. Default: 2.0 |
Float |
2.0 |
Train the EfficientDet model using this command:
            tao efficientdet train [-h] -e <experiment_spec>
                            -d <output_dir>
                            -k <key>
                            [--gpus <num_gpus>]
                            [--gpu_index <gpu_index>]
                            [--log_file <log_file_path>]
Required Arguments
-d, --model_dir: The path to the folder where the experiment output is written-k, --key: The encryption key to decrypt the model.-e, --experiment_spec_file: The experiment specification file to set up the evaluation experiment. This should be the same as the training specification file.
Optional Arguments
--gpus: The number of GPUs to be used for training in a multi-GPU scenario. The default value is 1.--gpu_index: The indices of the GPUs to use for training. This argument can be used when the machine has multiple GPUs installed.--log_file: The path to the log file. The default value isstdout.-h, --help: Show this help message and exit.
Input Requirement
Input size: C * W * H (where C = 1 or 3, W >= 128, H >= 128; W, H are multiples of 32)
Image format: JPG
Label format: COCO detection
Sample Usage
Here’s an example of the train command:
tao efficientdet train --gpus 2 -e /path/to/spec.txt -d /path/to/result -k $KEY
To run evaluation with an EfficientDet model, use this command:
            tao efficientdet evaluate [-h] -e <experiment_spec_file>
                               -m <model_file>
                               -k <key>
                               [--gpu_index <gpu_index>]
                               [--log_file <log_file_path>]
Required Arguments
-e, --experiment_spec_file: The experiment spec file to set up the evaluation experiment. This should be the same as the training specification file.-m, --model_path: The path to the model file to use for evaluation (only the TAO model is supported)-k, --key: The key to load the TAO model
Optional Arguments
--gpu_index: The index of the GPU to use for evaluation. This argument can be used when the machine has multiple GPUs installed. Note that evaluation can only run on a single GPU.--log_file: The path to the log file. The default value isstdout.-h, --help: Show this help message and exit.
Sample Usage
Here’s an example of using the evaluate command:
tao efficientdet evaluate -e /path/to/spec.txt -m /path/to/model.tlt -k $KEY
The inference tool for EfficientDet models can be used to visualize bboxes and generate frame-by- frame KITTI format labels on a directory of images.
            tao efficientdet inference [-h] -i <input directory>
                                -o <output annotated image directory>
                                -e <experiment spec file>
                                -m <model file>
                                -k <key>
                                [-l <output label directory>]
                                [--gpu_index <gpu_index>]
                                [--log_file <log_file_path>]
Required Arguments
-m, --model_path: The path to the pretrained model (supports both the TAO model and TensorRT engine)-i, --in_image_path: The directory of input images for inference-o, --out_image_path: The directory path to output annotated images-k, --key: The key to load a TAO model (it’s not required if a TensorRT engine is used)-e, --experiment_spec_file: The path to an experiment spec file for training
Optional Arguments
-l, --out_label_path: The directory to output KITTI labels--label_map: The path to a text file of training labels--gpu_index: The index of the GPU to run inference on. This argument can be used when the machine has multiple GPUs installed. Note that inference can only run on a single GPU.--log_file: The path to the log file. The default value isstdout.-h, --help: Show this help message and exit
Sample Usage
Here’s an example of using the inference command:
            tao efficientdet inference -e /path/to/spec.txt -m /path/to/model.tlt -k $KEY
                           -o /path/to/output_dir -i /path/to/input_dir
Pruning removes parameters from the model to reduce the model size without compromising the
integrity of the model itself using the tao efficientdet prune command.
The tao efficientdet prune command includes these parameters:
            tao efficientdet prune [-h] -m <efficientdet model>
                            -o <output_dir>
                            -k <key>
                            [-n <normalizer>]
                            [-eq <equalization_criterion>]
                            [-pg <pruning_granularity>]
                            [-pth <pruning threshold>]
                            [-nf <min_num_filters>]
                            [-el [<excluded_list>]
                            [--gpu_index <gpu_index>]
                            [--log_file <log_file_path>]
Required Arguments
-m, --model: The path to a pretrained EfficientDet model.-o, --output_dir: The path to output checkpoints.-k, --key: The key to load a :code`.tlt` model.
Optional Arguments
-n, –normalizer: Specifymaxto normalize by dividing each norm by the maximum norm within a layer; specifyL2to normalize by dividing by the L2 norm of the vector comprising all kernel norms. The default value ismax.-eq, --equalization_criterion: The criteria to equalize the stats of inputs to an element-wise op layer or depth-wise convolutional layer. This parameter is useful for resnets and mobilenets. Options arearithmetic_mean,geometric_mean,union, andintersection. The default option isunion.-pg, -pruning_granularity: The number of filters to remove at a time. The default value is 8.-pth: The threshold to compare the normalized norm against. The default value is 0.1.NoteNVIDIA recommends changing the threshold to keep the number of parameters in the model to within 10-20% of the original unpruned model.
-nf, --min_num_filters: The minimum number of filters to keep per layer. The default value is 16.-el, --excluded_layers: A list of excluded_layers (e.g. “-i item1 item2”. The default value is[].--gpu_index: The index of the GPU to run pruning on. This argument can be used when the machine has multiple GPUs installed. Note that inference can only run on a single GPU.--log_file: Path to the log file. The default value isstdout.-h, --help: Show this help message and exit.
After pruning, the model needs to be retrained. See Re-training the Pruned Model for more details.
Due to the complexity of larger EfficientDet models, the pruning process will take significantly longer to finish. For example, pruning the EfficientDet-D5 model may take at least 25 minutes on a V100 server.
Using the Prune Command
Here’s an example of using the tao efficientdet prune command:
            tao efficientdet prune -m /path/to/model.step-0.tlt \
                       -o /path/to/pruned_model/ \
                       -eq union \
                       -pth 0.7 -k $KEY
Once the model has been pruned, there might be a slight decrease in accuracy
because some previously useful weights may have been removed. To regain the accuracy,
we recommend that you retrain this pruned model over the same dataset. To do this, use
the tao efficientdet train command as documented in Training the model,
with an updated spec file that points to the newly pruned model as the pretrained model file.
We recommend turning off the regularizer or reducing the weight decay in the training_config
for EfficientDet to recover the accuracy when retraining a pruned model. To do this, set the
regularizer type to NO_REG as mentioned in the Training config
section. All the other parameters may be retained in the spec file from the previous training.
Exporting the model decouples the training process from deployment and allows conversion to
TensorRT engines outside the TAO environment. TensorRT engines are specific to each hardware
configuration and should be generated for each unique inference environment.
The exported model may be used universally across training and deployment hardware.
The exported model format is referred to as .etlt. The .etlt model
format is also an encrypted model format, and it uses the same key as the .tlt model that
it is exported from. This key is required when deploying this model.
INT8 Mode Overview
TensorRT engines can be generated in INT8 mode to improve performance, but require a calibration
cache at engine creation-time. The calibration cache is generated using a calibration tensor
file if tao efficientdet export is run with the --data_type flag set to int8.
Pre-generating the calibration information and caching it removes the need for calibrating the
model on the inference machine. Moving the calibration cache is usually much more convenient than
moving the calibration Tensorfile since it is a much smaller file and can be moved with the
exported model. Using the calibration cache also speeds up engine creation, as building the
cache can take several minutes to generate depending on the size of the Tensorfile and the model
itself.
The export tool can generate an INT8 calibration cache by ingesting training data using either of these options:
Option 1: Using the training data loader to load the training images for INT8 calibration. This option is now the recommended approach to support multiple image directories by leveraging the training dataset loader. This also ensures two important aspects of the data during calibration:
Data pre-processing in the INT8 calibration step is the same as in the training process.
The data batches are sampled randomly across the entire training dataset, thereby improving the accuracy of the INT8 model.
Option 2: Pointing the tool to a directory of images that you want to use to calibrate the model. For this option, make sure to create a sub-sampled directory of random images that best represent your training dataset.
FP16/FP32 Model
The calibration.bin is only required if you need to run inference at INT8 precision. For
FP16/FP32-based inference, the export step is much simpler: It merely requires you to convert
the .tlt model from the training/retraining step to .etlt.
Exporting the EfficientDet Model
Here’s an example of the command line arguments of the tao efficientdet export command:
            tao efficientdet export [-h]  -m <path to the .tlt model file>
                              -e <path to experiment spec file>
                              -k <key>
                              [-o <path to output file>]
                              [--cal_data_file <path to tensor file>]
                              [--cal_image_dir <path to the directory images to calibrate the model]
                              [--cal_cache_file <path to output calibration file>]
                              [--data_type <Data type for the TensorRT backend during export>]
                              [--batches <Number of batches to calibrate over>]
                              [--max_batch_size <maximum trt batch size>]
                              [--max_workspace_size <maximum workspace size]
                              [--batch_size <batch size to TensorRT engine>]
                              [--engine_file <path to the TensorRT engine file>]
                              [--gpu_index <gpu_index>]
                              [--log_file <log_file_path>]
                              [--verbose]
Required Arguments
-m, --model_path: The path to the.tltmodel file to be exported-k, --key: The key used to save the.tltmodel file-e, --experiment_spec: The path to the spec file-o, --output_path: The path to save the exported model to
Optional Arguments
--data_type: The desired engine data type, which generates a calibration cache if in INT8 mode. The options arefp32,fp16, andint8. The default value isfp32. If using INT8, the following INT8 arguments are required.--gpu_index: The index of (discrete) GPUs used for exporting the model. You can specify the index of the GPU to run export if the machine has multiple GPUs installed. Note that export can only run on a single GPU.--log_file: The path to the log file. The default value isstdout.-h, --help: Show this help message and exits.
INT8 Export Mode Required Arguments
--cal_image_dir: The directory of images to use for calibration--cal_cache_file: The path where the calibration cache file should be saved
INT8 Export Optional Arguments
--batches: The number of batches to use for calibration and inference testing. The default value is 10.--batch_size: The batch size to use for calibration. The default value is 16.--max_batch_size: The maximum batch size of the TensorRT engine. The default value is 1.--max_workspace_size: The maximum workspace size of TensorRT engine (in Gb). The default value is 2.--engine_file: The path to the serialized TensorRT engine file. Note that this file is hardware specific and cannot be generalized across GPUs. The engine file is useful for quickly testing your model accuracy using TensorRT on the host. As the TensorRT engine file is hardware specific, you cannot use this engine file for deployment unless the deployment GPU is identical to the training GPU.
Due to the complexity of EfficientDet models, the export process with TensorRT engine serialization will take some time to finish. For example, it may take several minutes on a V100 and more than a hour on a Xavier.
Sample usage
Here’s a sample command to export an EfficientDet model in INT8 mode.
            tao efficientdet export -m /path/to/model.step-0.tlt  \
                        -o /path/to/export/model.step-0.etlt \
                        -e /ws/spec.txt \
                        -k $KEY \
                        --cal_image_dir /ws/data/ \
                        --data_type int8 \
                        --batch_size 1 \
                        --batches 10 \
                        --cal_cache_file /path/to/export/cal.bin  \
                        --cal_data_file /path/to/export/cal.tensorfile
The deep learning and computer vision models that you’ve trained can be deployed on edge devices, such as a Jetson Xavier or Jetson Nano, a discrete GPU, or in the cloud with NVIDIA GPUs. TAO Toolkit has been designed to integrate with DeepStream SDK, so models trained with TAO Toolkit will work out of the box with DeepStream SDK.
DeepStream SDK is a streaming analytic toolkit to accelerate building AI-based video analytic applications. This section will describe how to deploy your trained model to DeepStream SDK.
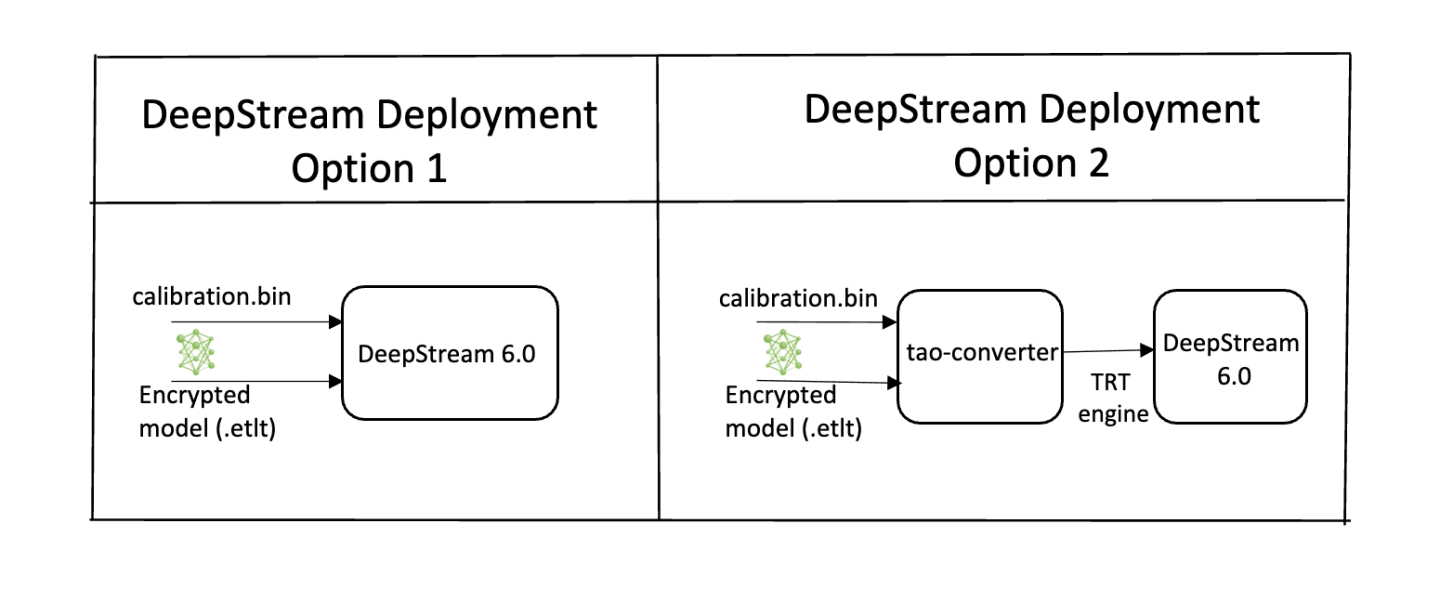
To deploy a model trained by TAO Toolkit to DeepStream we have two options:
Option 1: Integrate the
.etltmodel directly in the DeepStream app. The model file is generated by export.Option 2: Generate a device specific optimized TensorRT engine using
tao-converter. The generated TensorRT engine file can also be ingested by DeepStream.
Machine-specific optimizations are done as part of the engine creation process, so a distinct engine should be generated for each environment and hardware configuration. If the TensorRT or CUDA libraries of the inference environment are updated (including minor version updates), or if a new model is generated, new engines need to be generated. Running an engine that was generated with a different version of TensorRT and CUDA is not supported and will cause unknown behavior that affects inference speed, accuracy, and stability, or it may fail to run altogether.
Option 1 is very straightforward. The .etlt file and calibration cache are directly
used by DeepStream. DeepStream will automatically generate the TensorRT engine file and then run
inference. TensorRT engine generation can take some time depending on size of the model
and type of hardware. Engine generation can be done ahead of time with Option 2.
With option 2, the tao-converter is used to convert the .etlt file to TensorRT; this
file is then provided directly to DeepStream.
See the Exporting the Model section for more details on how to export a TAO model.
TensorRT Open Source Software (OSS)
TensorRT OSS build is required for EfficientDet models. This is required because several TensorRT
plugins that are required by these models are only available in TensorRT open source repo and not
in the general TensorRT release. Specifically, for EfficientDet, we need the batchTilePlugin and
NMSPlugin.
If the deployment platform is x86 with NVIDIA GPU, follow instructions for x86; if your deployment is on NVIDIA Jetson platform, follow instructions for Jetson.
TensorRT OSS on x86
Building TensorRT OSS on x86:
Install Cmake (>=3.13).
NoteTensorRT OSS requires cmake >= v3.13, so install cmake 3.13 if your cmake version is lower than 3.13c
            sudo apt remove --purge --auto-remove cmake
wget https://github.com/Kitware/CMake/releases/download/v3.13.5/cmake-3.13.5.tar.gz
tar xvf cmake-3.13.5.tar.gz
cd cmake-3.13.5/
./configure
make -j$(nproc)
sudo make install
sudo ln -s /usr/local/bin/cmake /usr/bin/cmake
Get GPU architecture. The
GPU_ARCHSvalue can be retrieved by thedeviceQueryCUDA sample:cd /usr/local/cuda/samples/1_Utilities/deviceQuery sudo make ./deviceQuery
If the
/usr/local/cuda/samplesdoesn’t exist in your system, you could downloaddeviceQuery.cppfrom this GitHub repo. Compile and rundeviceQuery.nvcc deviceQuery.cpp -o deviceQuery ./deviceQuery
This command will output something like this, which indicates the
GPU_ARCHSis75based on CUDA Capability major/minor version.Detected 2 CUDA Capable device(s) Device 0: "Tesla T4" CUDA Driver Version / Runtime Version 10.2 / 10.2 CUDA Capability Major/Minor version number: 7.5
Build TensorRT OSS:
            git clone -b 21.08 https://github.com/nvidia/TensorRT
cd TensorRT/
git submodule update --init --recursive
export TRT_SOURCE=`pwd`
cd $TRT_SOURCE
mkdir -p build && cd build
NoteMake sure your
GPU_ARCHSfrom step 2 is in TensorRT OSSCMakeLists.txt. If GPU_ARCHS is not in TensorRT OSSCMakeLists.txt, add-DGPU_ARCHS=<VER>as below, where<VER>representsGPU_ARCHSfrom step 2./usr/local/bin/cmake .. -DGPU_ARCHS=xy -DTRT_LIB_DIR=/usr/lib/x86_64-linux-gnu/ -DCMAKE_C_COMPILER=/usr/bin/gcc -DTRT_BIN_DIR=`pwd`/out make nvinfer_plugin -j$(nproc)
After building ends successfully,
libnvinfer_plugin.so*will be generated under\`pwd\`/out/.Replace the original
libnvinfer_plugin.so*:sudo mv /usr/lib/x86_64-linux-gnu/libnvinfer_plugin.so.8.x.y ${HOME}/libnvinfer_plugin.so.8.x.y.bak // backup original libnvinfer_plugin.so.x.y sudo cp $TRT_SOURCE/`pwd`/out/libnvinfer_plugin.so.8.m.n /usr/lib/x86_64-linux-gnu/libnvinfer_plugin.so.8.x.y sudo ldconfig
TensorRT OSS on Jetson (ARM64)
Install Cmake (>=3.13)
NoteTensorRT OSS requires cmake >= v3.13, while the default cmake on Jetson/Ubuntu 18.04 is cmake 3.10.2.
Upgrade TensorRT OSS using:
            sudo apt remove --purge --auto-remove cmake
wget https://github.com/Kitware/CMake/releases/download/v3.13.5/cmake-3.13.5.tar.gz
tar xvf cmake-3.13.5.tar.gz
cd cmake-3.13.5/
./configure
make -j$(nproc)
sudo make install
sudo ln -s /usr/local/bin/cmake /usr/bin/cmake
Get GPU architecture based on your platform. The
GPU_ARCHSfor different Jetson platform are given in the following table.Jetson Platform
GPU_ARCHS
Nano/Tx1
53
Tx2
62
AGX Xavier/Xavier NX
72
Build TensorRT OSS:
            git clone -b 21.03 https://github.com/nvidia/TensorRT
cd TensorRT/
git submodule update --init --recursive
export TRT_SOURCE=`pwd`
cd $TRT_SOURCE
mkdir -p build && cd build
NoteThe
-DGPU_ARCHS=72below is for Xavier or NX, for other Jetson platform, change72referring toGPU_ARCHSfrom step 2./usr/local/bin/cmake .. -DGPU_ARCHS=72 -DTRT_LIB_DIR=/usr/lib/aarch64-linux-gnu/ -DCMAKE_C_COMPILER=/usr/bin/gcc -DTRT_BIN_DIR=`pwd`/out make nvinfer_plugin -j$(nproc)
After building ends successfully,
libnvinfer_plugin.so*will be generated under‘pwd’/out/.Replace
"libnvinfer_plugin.so*"with the newly generated.sudo mv /usr/lib/aarch64-linux-gnu/libnvinfer_plugin.so.8.x.y ${HOME}/libnvinfer_plugin.so.8.x.y.bak // backup original libnvinfer_plugin.so.x.y sudo cp `pwd`/out/libnvinfer_plugin.so.8.m.n /usr/lib/aarch64-linux-gnu/libnvinfer_plugin.so.8.x.y sudo ldconfig
Generating an Engine Using tao-converter
The tao-converter tool is provided with the TAO Toolkit
to facilitate the deployment of TAO trained models on TensorRT and/or Deepstream.
This section elaborates on how to generate a TensorRT engine using tao-converter.
For deployment platforms with an x86-based CPU and discrete GPUs, the tao-converter
is distributed within the TAO docker. Therefore, we suggest using the docker to generate
the engine. However, this requires that the user adhere to the same minor version of
TensorRT as distributed with the docker. The TAO docker includes TensorRT version 8.0.
Instructions for x86
For an x86 platform with discrete GPUs, the default TAO package includes the tao-converter
built for TensorRT 8.2.5.1 with CUDA 11.4 and CUDNN 8.2. However, for any other version of CUDA and
TensorRT, please refer to the overview section for download. Once the
tao-converter is downloaded, follow the instructions below to generate a TensorRT engine.
Unzip the zip file on the target machine.
Install the OpenSSL package using the command:
sudo apt-get install libssl-dev
Export the following environment variables:
            $ export TRT_LIB_PATH=”/usr/lib/x86_64-linux-gnu”
$ export TRT_INC_PATH=”/usr/include/x86_64-linux-gnu”
Run the
tao-converterusing the sample command below and generate the engine.Instructions to build TensorRT OSS on Jetson can be found in the TensorRT OSS on x86 section above or in this GitHub repo.
Make sure to follow the output node names as mentioned in Exporting the Model
section of the respective model.
Instructions for Jetson
For the Jetson platform, the tao-converter is available to download in the NVIDIA developer zone. You may choose
the version you wish to download as listed in the overview section.
Once the tao-converter is downloaded, please follow the instructions below to generate a
TensorRT engine.
Unzip the zip file on the target machine.
Install the OpenSSL package using the command:
sudo apt-get install libssl-dev
Export the following environment variables:
            $ export TRT_LIB_PATH=”/usr/lib/aarch64-linux-gnu”
$ export TRT_INC_PATH=”/usr/include/aarch64-linux-gnu”
For Jetson devices, TensorRT comes pre-installed with Jetpack. If you are using older JetPack, upgrade to JetPack-5.0DP.
Instructions to build TensorRT OSS on Jetson can be found in the TensorRT OSS on Jetson (ARM64) section above or in this GitHub repo.
Run the
tao-converterusing the sample command below and generate the engine.
Make sure to follow the output node names as mentioned in Exporting the Model
section of the respective model.
Using the tao-converter
            tao-converter [-h] -k <encryption_key>
                   -d <input_dimensions>
                   -o <comma separated output nodes>
                   [-c <path to calibration cache file>]
                   [-e <path to output engine>]
                   [-b <calibration batch size>]
                   [-m <maximum batch size of the TRT engine>]
                   [-t <engine datatype>]
                   [-w <maximum workspace size of the TRT Engine>]
                   [-i <input dimension ordering>]
                   [-p <optimization_profiles>]
                   [-s]
                   [-u <DLA_core>]
                   input_file
Required Arguments
input_file:The path to the.etltmodel exported usingtao efficientdet export-k: The key used to encode the.tltmodel when training-d: A comma-separated list of input dimensions that should match the dimensions used fortao efficientdet export-o: A comma-separated list of output blob names that should match the output configuration used fortao efficientdet export. For EfficientDet, set this argument toNMS.
Optional Arguments
-e: The path to save the engine to. The default path is./saved.engine.-t: The desired engine data type, which generates calibration cache if in INT8 mode. The default value isfp32. The options arefp32,fp16, andint8.-w: The maximum workspace size for the TensorRT engine. The default value is1073741824(1<<30).-i: The input dimension ordering; all other TAO commands use NCHW. The options arenchw,nhwc,nc. For EfficientDet, you can omit this argument since the default value isnchw.-p: Optimization profiles for.etltmodels with dynamic shape, consisting of a comma-separated list of optimization profile shapes in the format<input_name>,<min_shape>,<opt_shape>,<max_shape>, where each shape has the format:<n>x<c>x<h>x<w>. This argument can be specified multiple times if there are multiple input tensors for the model. This is only useful for new models introduced since version 3.0. This parameter is not required for models that were already in version 2.0.-s: TensorRT strict-type constraints. A Boolean to apply TensorRT strict type constraints when building the TensorRT engine.-u: Specifies the DLA core index to use when building the TensorRT engine on Jetson devices
INT8 Mode Arguments
-c: The path to the calibration cache file, which is only used in INT8 mode. The default value is./cal.bin.-b: Batch size used during the export step for INT8 calibration cache generation. The default value is8.-m: The maximum batch size for the TensorRT engine. The default value is16. If you encounter out-of-memory issues, decrease the batch size accordingly.
Due to the complexity of EfficientDet models, the conversion process will take some time to finish. For example, it may take several minutes on a V100 and more than a hour on a Xavier.
Sample Output Log
Here is a sample command for exporting an EfficientDet model.
            tao converter -k $KEY  \
              -c /export/model.step-0.cal \
              -p Input,1x512x512x3,8x512x512x3,16x512x512x3 \
              -e /export/trt.int8.engine \
              -t int8 \
              -b 8 \
              /export/model.step-0.etlt
Integrating the model to DeepStream
There are two options to integrate models from TAO with DeepStream:
Option 1: Integrate the model (.etlt) with the encrypted key directly in the DeepStream app. The model file is generated by
tao efficientdet export.Option 2: Generate a device-specific optimized TensorRT engine using tao-converter. The TensorRT engine file can also be ingested by DeepStream.
For EfficientDet, we will need to build TensorRT Open source plugins and custom bounding box parser. The instructions are provided in the TensorRT OSS section above, and the required code can be found in this GitHub repo.
To integrate the models with DeepStream, you need the following:
The DeepStream SDK (download page). The installation instructions for DeepStream are provided in the DeepStream Development Guide.
An exported
.etltmodel file and optional calibration cache for INT8 precision.A
labels.txtfile containing the labels for classes in the order in which the networks produces outputs.A sample
config_infer_*.txtfile to configure the nvinfer element in DeepStream. The nvinfer element handles everything related to TensorRT optimization and engine creation in DeepStream.
The DeepStream SDK ships with an end-to-end reference application that is fully configurable. You
can configure input sources, inference model, and output sinks. The app requires a primary object
detection model, followed by an optional secondary classification model. The reference
application is installed as deepstream-app. The graphic below shows the architecture of the
reference application.

There are typically two or more configuration files that are used with this app. In the install
directory, the config files are located in samples/configs/deepstream-app or
sample/configs/tlt_pretrained_models. The main config file configures all the high level
parameters in the pipeline above. This would set the input source and resolution, number of
inferences, tracker, and output sinks. The other supporting config files are for each individual
inference engine. The inference specific config files are used to specify models, inference
resolution, batch size, number of classes, and other customization. The main config file will call
all the supporting config files. Here are some config files in
samples/configs/deepstream-app for reference:
source4_1080p_dec_infer-resnet_tracker_sgie_tiled_display_int8.txt: The main config fileconfig_infer_primary.txt: The supporting config file for primary detector in the pipeline aboveconfig_infer_secondary_*.txt: The supporting config file for secondary classifier in the pipeline above
The deepstream-app will only work with the main config file. This file will most likely
remain the same for all models and can be used directly from the DeepStream SDK with little to no
change. You will only need to modify or create config_infer_primary.txt and
config_infer_secondary_*.txt.
Integrating an EfficientDet Model
To run an EfficientDet model in DeepStream, you need a label file and a DeepStream configuration file. In addition, you need to compile the TensorRT 8+ OSS and EfficientDet bounding box parser for DeepStream.
A DeepStream sample with documentation on how to run inference using the trained EfficientDet models from TAO Toolkit is provided on GitHub here.
Prerequisite for EfficientDet Model
EfficientDet requires ResizeNearest_TRT and EfficientNMS_TRT. These plugins are available in the TensorRT open source repo. Detailed instructions to build TensorRT OSS can be found in TensorRT Open Source Software (OSS).
EfficientDet requires custom bounding-box parsers that are not built-in inside the DeepStream SDK. The source code to build custom bounding-box parsers for EfficientDet is available here. The following instructions can be used to build the bounding-box parser:
Install git-lfs (git >= 1.8.2)
            curl -s https://packagecloud.io/install/repositories/github/git-lfs/
script.deb.sh | sudo bash
sudo apt-get install git-lfs
git lfs install
Download the source code with SSH or HTTPS:
git clone -b release/tlt3.0 https://github.com/NVIDIA-AI-IOT/deepstream_tlt_apps
Build the custom bounding-box parser:
            // or Path for DS installation
export CUDA_VER=10.2         // CUDA version, e.g. 10.2
make
This generates libnvds_infercustomparser_tlt.so in the directory post_processor.
Label File
If the COCO annotation file has the following in categories:
            [{'supercategory': 'person', 'id': 1, 'name': 'person'},
 {'supercategory': 'car', 'id': 2, 'name': 'car'}]
Then the corresponding maskrcnn_labels.txt file will be as follows:
            BG
person
car
DeepStream Configuration File
The detection model is typically used as a primary inference engine. It can also be used as a
secondary inference engine. To run this model in the sample deepstream-app, you must modify
the existing config_infer_primary.txt file to point to this model.
Option 1: Integrate the model (.etlt) directly in the DeepStream app.
For this option, users will need to add the following parameters in the configuration file.
The int8-calib-file is only required for INT8 precision.
            tlt-encoded-model=<TLT exported .etlt>
tlt-model-key=<Model export key>
int8-calib-file=<Calibration cache file>
The tlt-encoded-model parameter points to the exported model (.etlt) from TLT.
The tlt-model-key is the encryption key used during model export.
Option 2: Integrate the TensorRT engine file with DeepStream app.
Generate the TensorRT engine using tao-converter. Detailed instructions are provided in the Generating an engine using tao-converter section above.
Once the engine file is generated successfully, modify the following parameters to use this engine with DeepStream.
model-engine-file=<PATH to generated TensorRT engine>
All other parameters are common between the two approaches. To use the custom bounding-box parser
instead of the default parsers in DeepStream, modify the following parameters in the [property]
section of the primary infer configuration file:
            parse-bbox-func-name=NvDsInferParseCustomEfficientDetTAO
custom-lib-path=<PATH to libnvds_infercustomparser_tlt.so>
Add the label file generated above using the following:
labelfile-path=<efficientdet labels>
For all the options, see the sample configuration file below. To learn about what all the parameters are used for, refer to the DeepStream Development Guide.
            [property]
gpu-id=0
net-scale-factor=1.0
offsets=0;0;0
model-color-format=0
network-input-order=1
labelfile-path=efficientdet_d0_labels.txt
model-engine-file=./d0_avlp_bs1_int8.engine
int8-calib-file=d0.cal
tlt-encoded-model=d0_avlp.etlt
tlt-model-key=nvidia_tlt
infer-dims=3;512;512
maintain-aspect-ratio=1
uff-input-blob-name=image_arrays:0
batch-size=1
## 0=FP32, 1=INT8, 2=FP16 mode
network-mode=2
num-detected-classes=1
interval=0
gie-unique-id=1
is-classifier=0
#network-type=0
cluster-mode=4
output-blob-names=num_detections;detection_boxes;detection_scores;detection_classes
parse-bbox-func-name=NvDsInferParseCustomEfficientDetTAO
custom-lib-path=nvdsinfer_custombboxparser_efficientdet_tao.so

[class-attrs-all]
pre-cluster-threshold=0.3
roi-top-offset=0
roi-bottom-offset=0
detected-min-w=0
detected-min-h=0
detected-max-w=0
detected-max-h=0