EquiDock Model Training using BioNeMo
Contents
EquiDock Model Training using BioNeMo#
The purpose of this tutorial is to provide an example use case of training a BioNeMo Geometric model using the BioNeMo framework. At the end of this tutorial, the user will get experience in
configuring various config files and launch parameters for EquiDock training
launching single and multi-node, multi-gpu training runs
using NVIDIA’s Base Command Platform commands for geometric model training
Overview - EquiDock model#
EquiDock is an pairwise-independent SE(3)-equivariant graph matching network used in protein-protein rigid docking. EquiDock predicts the rotation and translation to place one of the proteins at the right docked position relative to the second protein and it is trained over DIPS and DB5 datasets. EquiDock uses Kabsch algorithm and optimal transport loss to learns the binding pockets with docking poses from keypoint matching (optimal transport) and alignment (Kabsch).
This EquiDock model training example walkthrough will show how to utilize the compute resources, download and preprocess the datasets, and perform model training on single and multiple nodes.
Setup and Assumptions#
This tutorial assumes that the user has access to BioNeMo framework and NVIDIA’s BCP and DGX-Cloud compute infrastructure. The user is also expected to have required background details about
the BioNeMo framework, as described in the Getting Started, and
running the model training jobs on BCP
All model training related commands should be executed inside the BioNeMo docker container.
Requesting compute resources#
Access to DGX compute resource NGC site or NGC CLI#
As a prerequisite, configure your access to the DGX compute resources and required contents either via NVIDIA’s Base Command Platform or NGC-CLI using ngc config set command.
For more details on how to request the resources, visit Running BioNeMo on DGX-Cloud using BCP
Note
The interactive job launch example shown here using the Jupyter Lab interface is intended for initial user experience/trial runs. It is strongly advised to launch the model training jobs using the launch script as a part of the ngc batch run command, as mentioned in Running BioNeMo on DGX-Cloud using BCP. For MegaMolBART training, the model training script should be used as a template for launching the job as provided in <BioNeMO_Workspace>/example/protein/equidock/scripts/train_bcp_equidock.sh.
First, let’s request the resource for running the model training in an interactive manner.
Here is one such example of a command for requesting the resources using NGC-CLI. Make sure to update the relevant arguments according to the compute setup, datasets, workspaces, instance types, and so on.
In the configuration below, update nvidia and clara with the correct NGC org and team name, respectively. If there is no team name, then this can be omitted. Refer to NGC documentation for more details.
# execute on host machine
ngc batch run \
  --name "example-training-1" \
  --org nvidia \
  --team clara \
  --instance INSTANCE_TYPE \            #Compute node type, such as dgxa100.80g.8.norm
  --array-type PYTORCH \
  --replicas 2 \
  --image "nvidia/clara/bionemo-framework:1.3" \     #Image path for BioNeMo
  --result /results \
  --workspace WORKSPACE_ID:/example_training:RW \
  --port 8888 \
  --datasetid DATASET_ID:/data/ \       # Dataset's NGC ID
  --total-runtime 1D \
  --preempt RUNONCE \
  --order 1 \                           # Priority order for the jog execution [1-99]
  --commandline "jupyter lab --allow-root --ip=* --port=8888 --no-browser --NotebookApp.token='' --NotebookApp.allow_origin='*' --ContentsManager.allow_hidden=True --notebook-dir=/ & sleep infinity"  # This command can be replaced with the model training command: python pretrain.py....
The bcprun command provided in the cells below can also be submitted as --commandline argument (instead of launching Jupyter-lab).
Once the resources are assigned for the job and the BioNeMo container is running, we’ll proceed ahead via ngc attach <JOB_ID> or using the Jupyter-Lab interface accessible at https://<COMPUTE_HEAD_NODE_URL_ADDRESS>:8888.
Data Preprocessing#
Downloading and pre-processing the dataset#
Download the data#
The Database of Interacting Protein Structures for Interface Prediction (DIPS) and Docking Benchmark 5 (DB5) are comprehensive resources for protein-protein interactions.
DIPS and DB5 datasets are released with End-to-End Learning on 3D Protein Structure for Interface Prediction (NeurIPS 2019) [1]. These datasets [2] contains binary protein complexes, a total of 42826 binary protein complexes.
Using BioNeMo features to download DIPS and DB5#
The simplest and most reliable way to download the entire processed DB5 and DIPS datasets through the NGC (processed DATASETID: 1610980)
Processing of datasets#
You can also download raw dataset from NGC (raw DATASETID: 1611195) and run the training code with do_training=False with preconfigured parameters provided in the pretrain.yaml config file located in the ${BIONEMO_HOME}/examples/protein/equidock/conf folder.
# execute in container
cd examples/protein/equidock
python pretrain.py  --config-path=conf --config-name=pretrain   data.data_name=db5  do_training=False
Note
You can set non-default parameters for preprocessing through modification of corresponding hydra flags.
Model training#
Example dataset#
To briefly showcase the model training capacities of BioNeMo Framework, we will use a very small subset of the original DB5/DIPS datasets that is provided as a part of the sample datasets located in ${BIONEMO_HOME}/examples/tests/test_data/protein/equidock (DB5: db5_residues_maxneighbor_10_cutoff_30.0_pocketCut_8.0/cv_0 and DIPS: /workspace/bionemo/examples/tests/test_data/protein/equidock/dips_residues_maxneighbor_10_cutoff_30.0_pocketCut_8.0/cv_0).
For the purpose of this test run, the folder contains these files for training, testing, and validation:
label_test.pkllabel_train.pkllabel_val.pklligand_graph_test.binligand_graph_train.binligand_graph_val.binreceptor_graph_test.binreceptor_graph_train.binreceptor_graph_val.bin
If you wish to modify the DIPS or DB5 dataset, e.g. change graph cut off, maximum number of neighbors, or etc., you need to set do_training=False in the corresponding yaml file (located at examples/protein/equidock/conf/pretrain.yaml) and run python pretrain.py, which will process the data and store it at cache_path. For detailed configuration options and instructions look at the data section of yaml file.
To process new raw datasets, you need to provide raw_data_path and split_files_path and ensure the new raw dataset is compatible with DIPS or DB5 format.
For finetuning on a new dataset with a pretrained model, you should modify the finetune.yaml file to point to the correct pretrained model nemo file by setting restore_from_path in the model section of yaml file, see finetune.yaml.
Note
For inference purposes, please refer to inference.py located at examples/protein/equidock/nbs/Inference.ipynb.
Single-node or Multi-node setup#
In this test runs, we will use preconfigured parameters provided in the pretrain.yaml config file located in the ${BIONEMO_HOME}/examples/protein/equidock/conf folder.
We will also set other parameters suitable for a quick run, such as ++trainer.max_epochs=10 and by using a very limited protein complex subset ++limit_val_batches=1.0, ++limit_test_batches=1.0, ++limit_train_batches=0.5. User can update these parameters by editing the .yaml config file or as additional command line arguments, as shown in the example below. User can select the full dataset and adjust other parameters - for example - as shown in the pretrain.yaml file.
As we are connected to the compute node, we navigate to the BioNeMo home folder using the command cd ${BIONEMO_HOME}, and execute the following command in the terminal.
User may need to update relevant arguments in the commands according to their compute and data setup.
Note
To run the model training job on a local workstation, user can directly execute the pretrain.py script with desired configurations. For example,
# execute in container
python examples/protein/equidock/pretrain.py
The bcprun command is similar to srun command in SLURM, you can find more details at the NVIDIA BCP User Guide. Note, when using bcprun, we need to add backslashes to all environment variables inside --cmd so they are not pre-maturely expanded.
Please make changes in the example command provided below as needed before running them.
# execute on host machine
bcprun --nnodes=1 --npernode=1 -w /workspace/bionemo --cmd "export PROJECT_MOUNT=\${BIONEMO_HOME} && \
  cd \${BIONEMO_HOME}/examples/protein/equidock && \
  python pretrain.py  --config-path=conf --config-name=pretrain   data.data_name=db5   ++data.cache_path=\${BIONEMO_HOME}/examples/tests/test_data/protein/equidock/ \
  trainer.devices=1 trainer.num_nodes=1 \
  ++trainer.max_epochs=5 \
  exp_manager.wandb_logger_kwargs.offline=False model.micro_batch_size=8 \
  ++exp_manager.create_wandb_logger=False ++model.tensor_model_parallel_size=1 \
  ++trainer.accumulate_grad_batches=1 ++exp_manager.checkpoint_callback_params.always_save_nemo=False
  "
To run the model training on multiple nodes, you will have to update parameters accordingly, for example, the command running the model training job on 2 nodes would look like:
# execute on host machine
bcprun --nnodes=2 --npernode=8 -w /workspace/bionemo --cmd "export PROJECT_MOUNT=\${BIONEMO_HOME} && \
  cd \${BIONEMO_HOME}/examples/protein/equidock && \
  python pretrain.py  --config-path=conf --config-name=pretrain   data.data_name=db5   ++data.cache_path=\${BIONEMO_HOME}/examples/tests/test_data/protein/equidock/ \
  trainer.devices=8 trainer.num_nodes=2 \
  ++trainer.max_epochs=5 \
  exp_manager.wandb_logger_kwargs.offline=False model.micro_batch_size=1 \
  ++exp_manager.create_wandb_logger=False ++model.tensor_model_parallel_size=1 \
  ++trainer.accumulate_grad_batches=1 ++exp_manager.checkpoint_callback_params.always_save_nemo=False
  "
Logging with WandB#
If you are launching the model training job interactively from the terminal/Jupyter-Lab, you can set your Weights and Biases access via wandb login <YOUR_WANDB_API_KEY> or checkout https://docs.wandb.ai/ref/cli/wandb-login for more information. Alternatively, you may also export the API key as a variable at the time of launching the job via command-line, as shown in ${BIONEMO_HOME}/examples/protein/equidock/scripts/train_bcp_equidock.sh
Output and Results#
As the Equidock model training job is launched, BioNeMo will print out some of the details related to compute resources, model training configuration, and dataset being used for training. As the job progresses, it will also print out various details related to the test/train/validation steps and accuracy matrices at a set intervals.

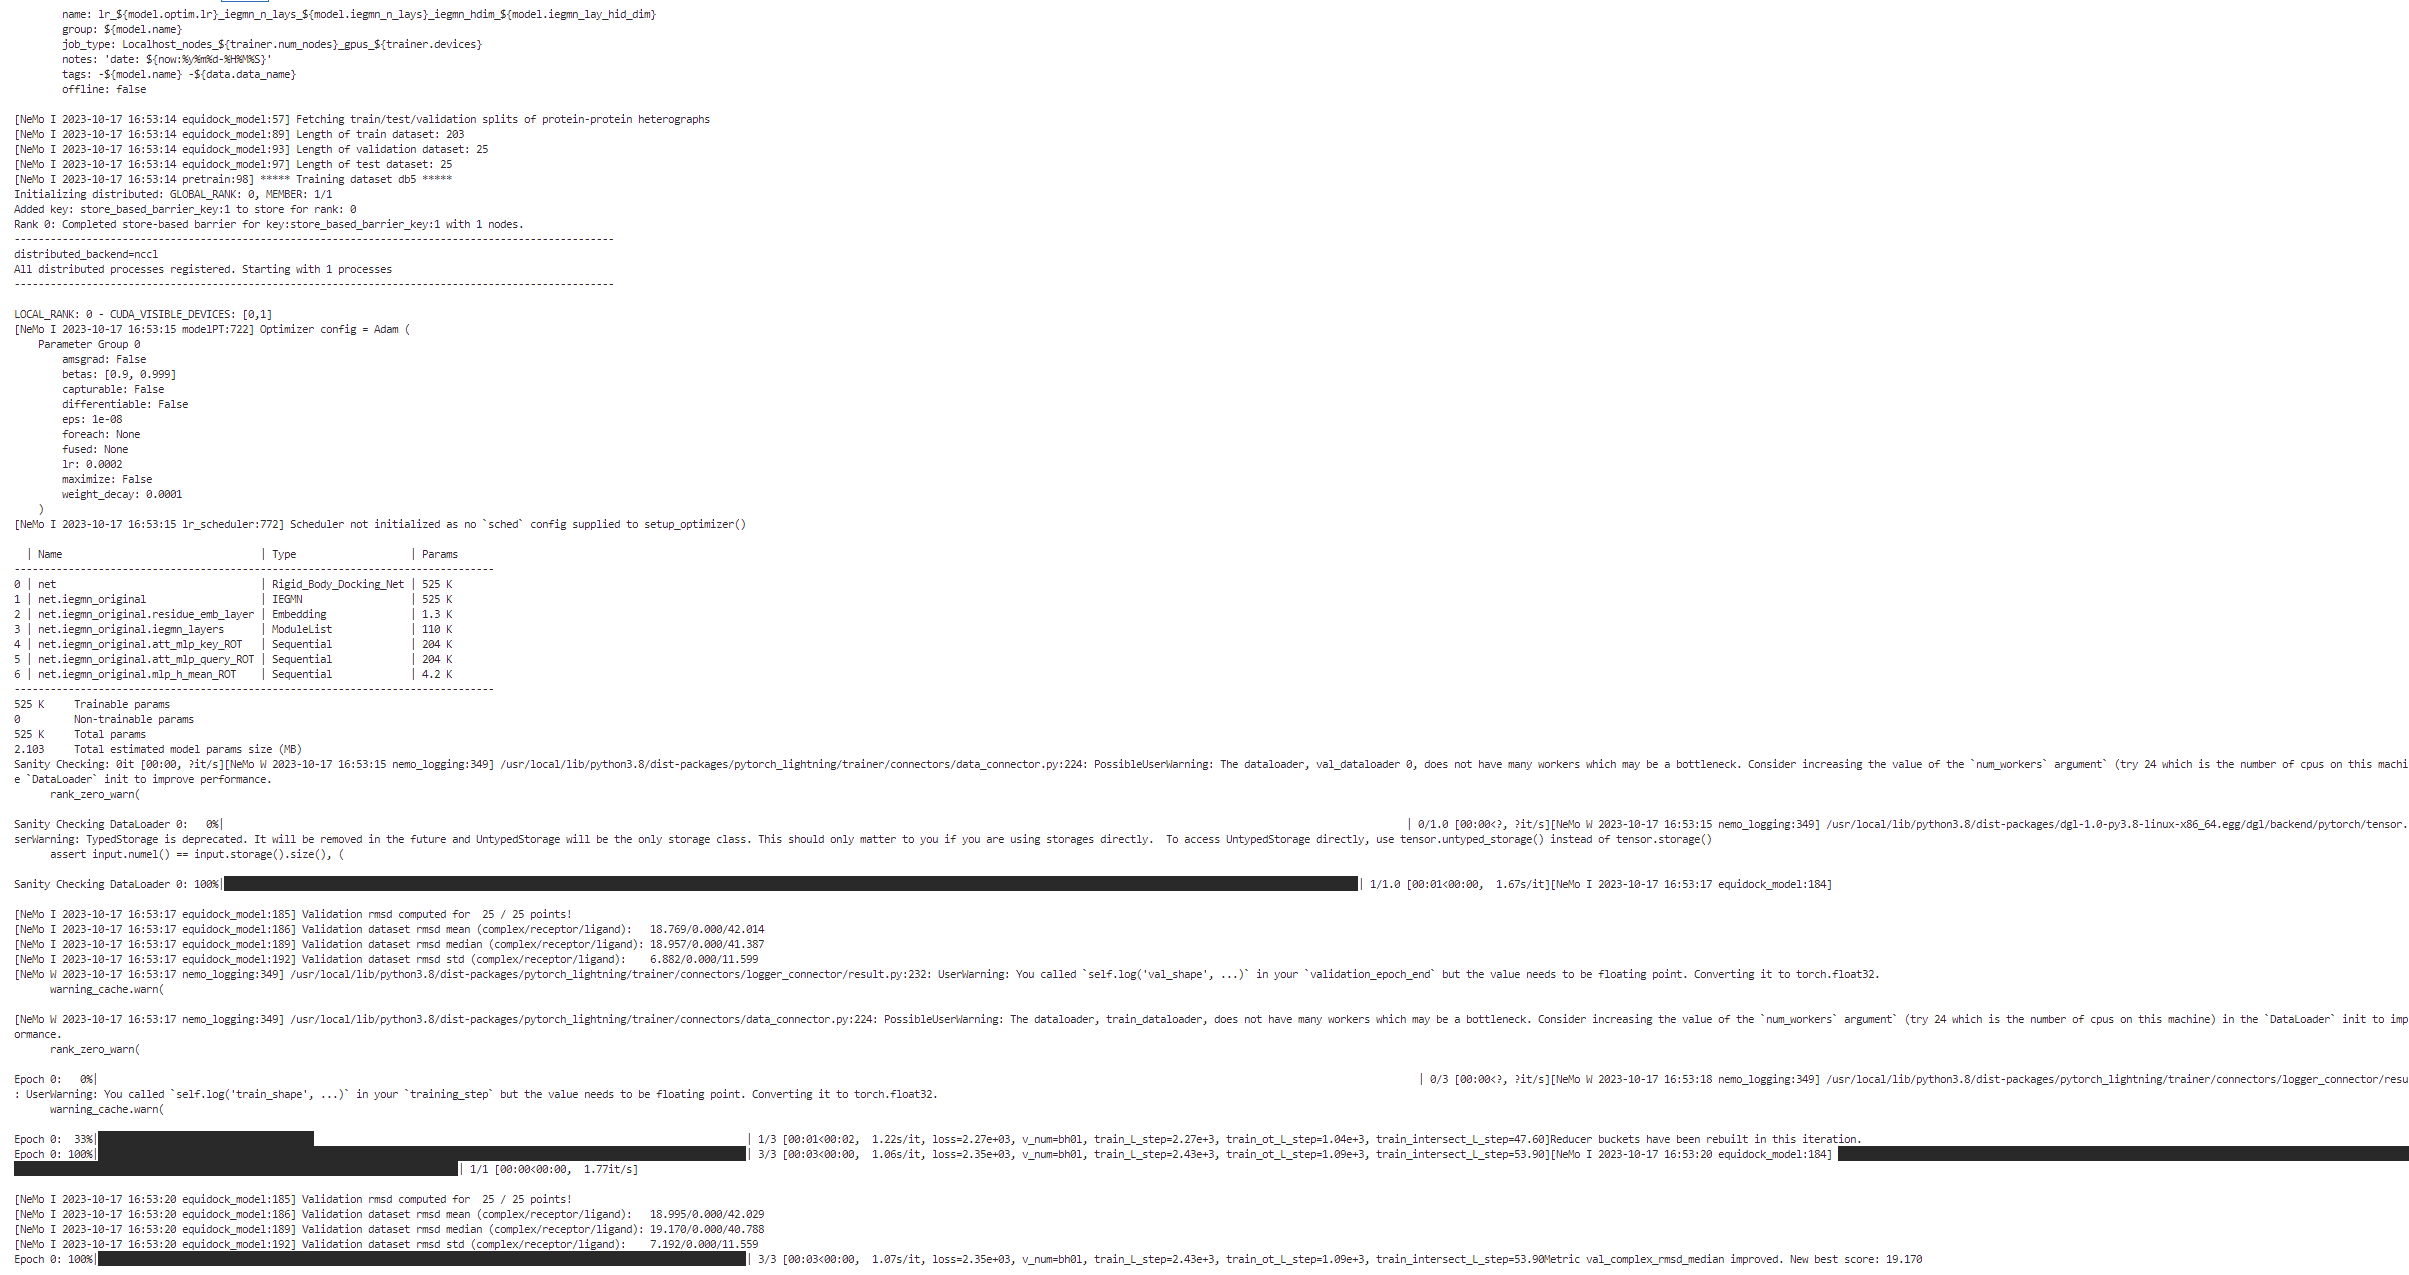
Upon the completion of training process, it will also print out the details related to log files, model checkpoints, and so on, that will also be saved in the directory as configured (usually /result).
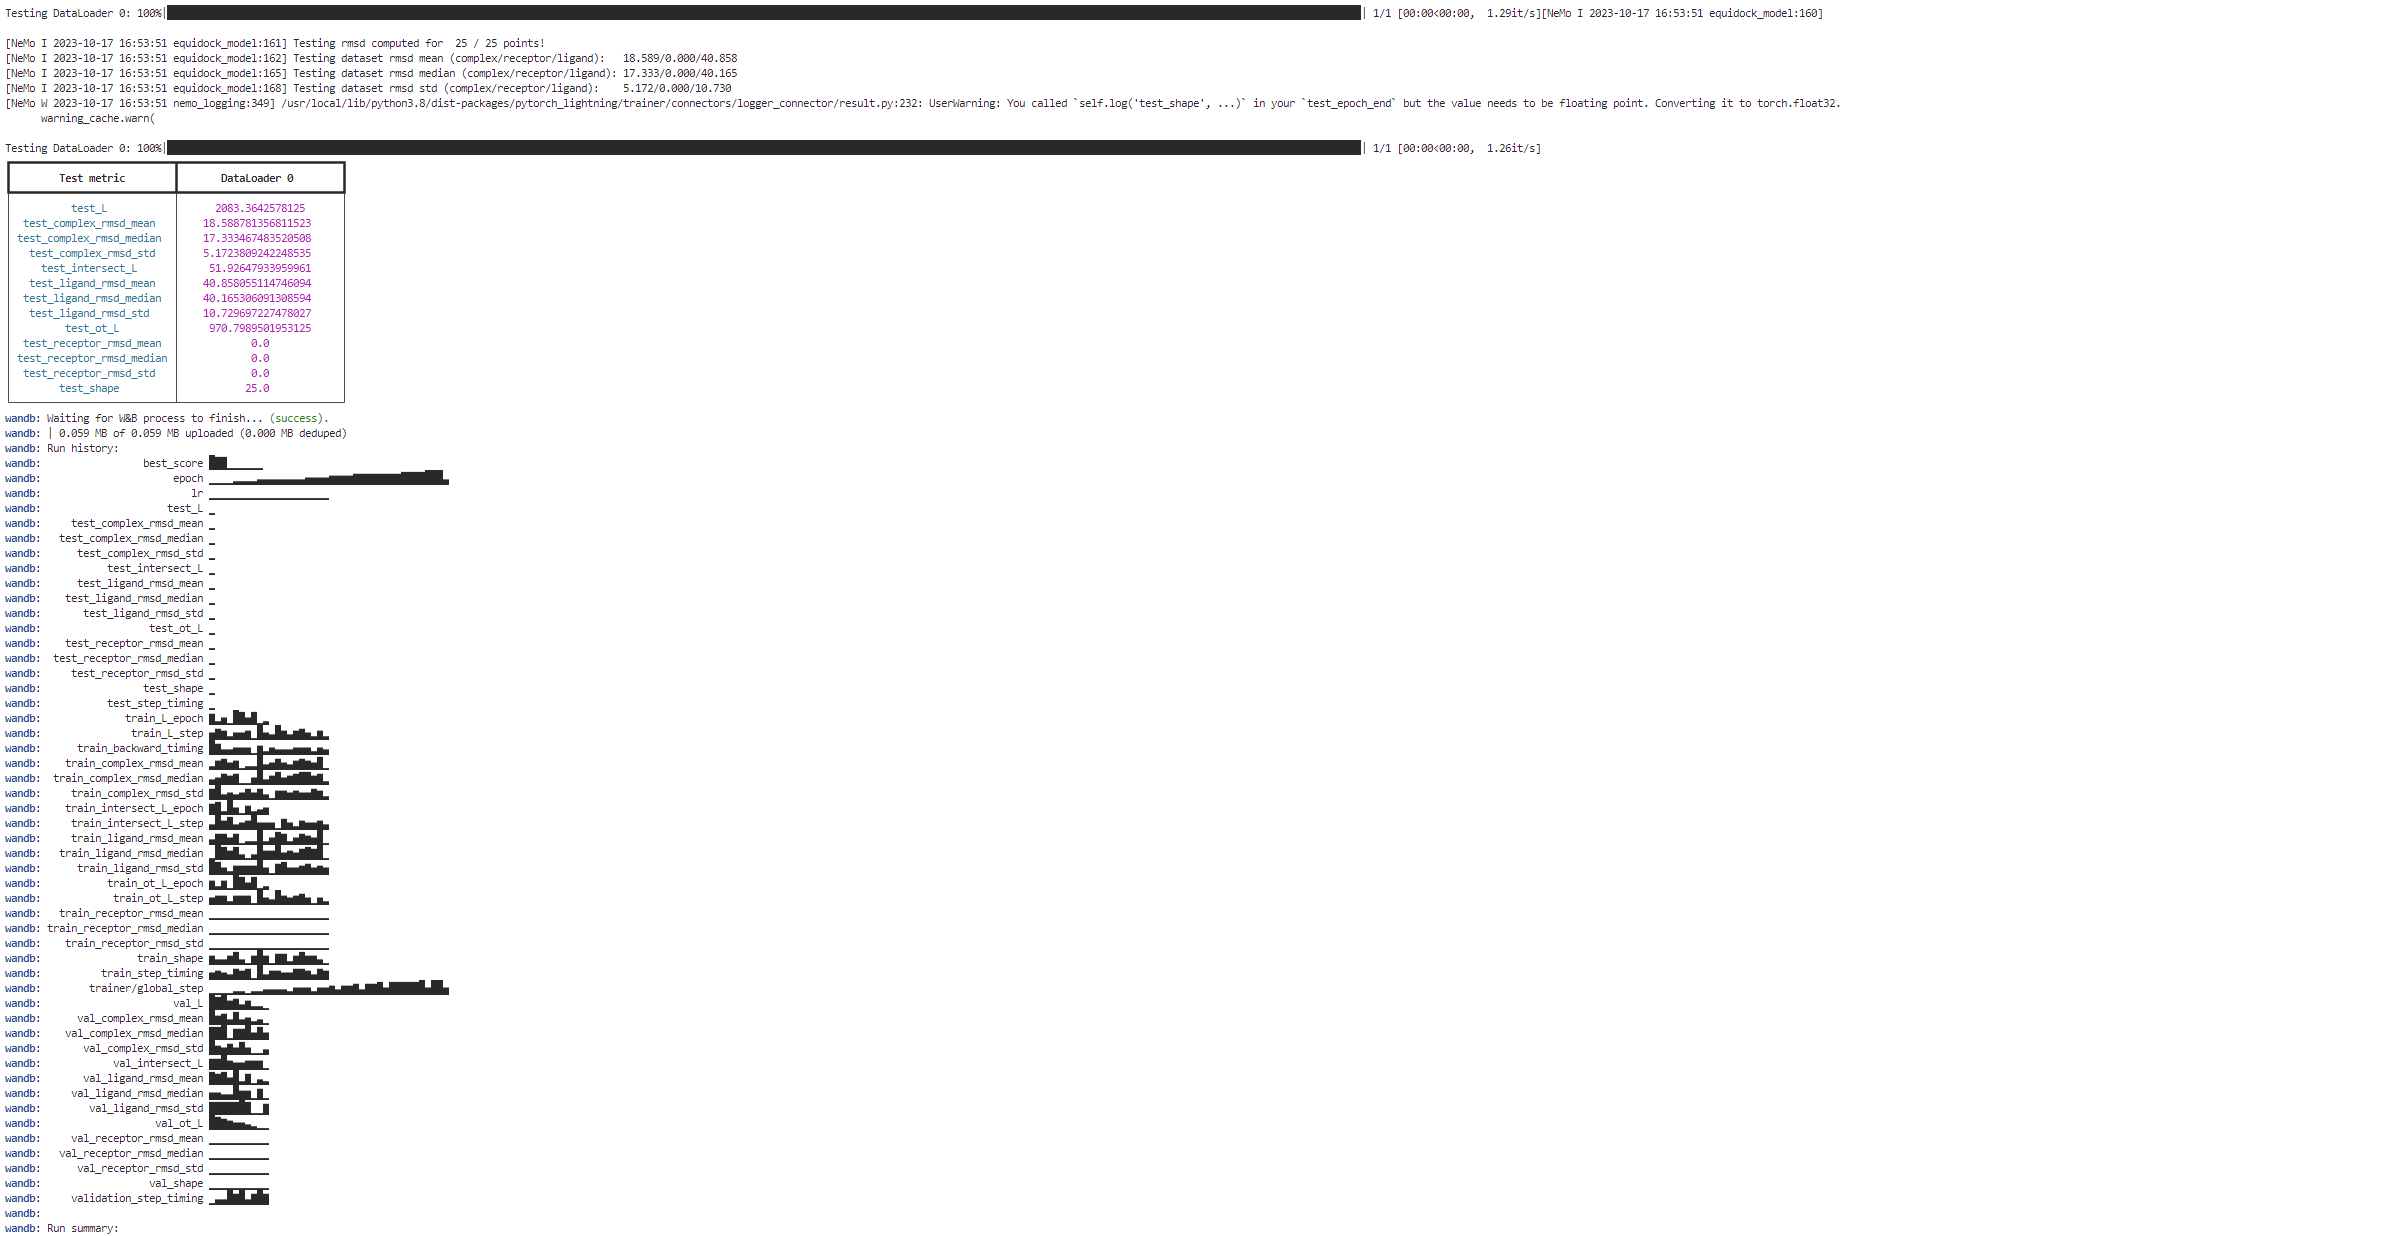
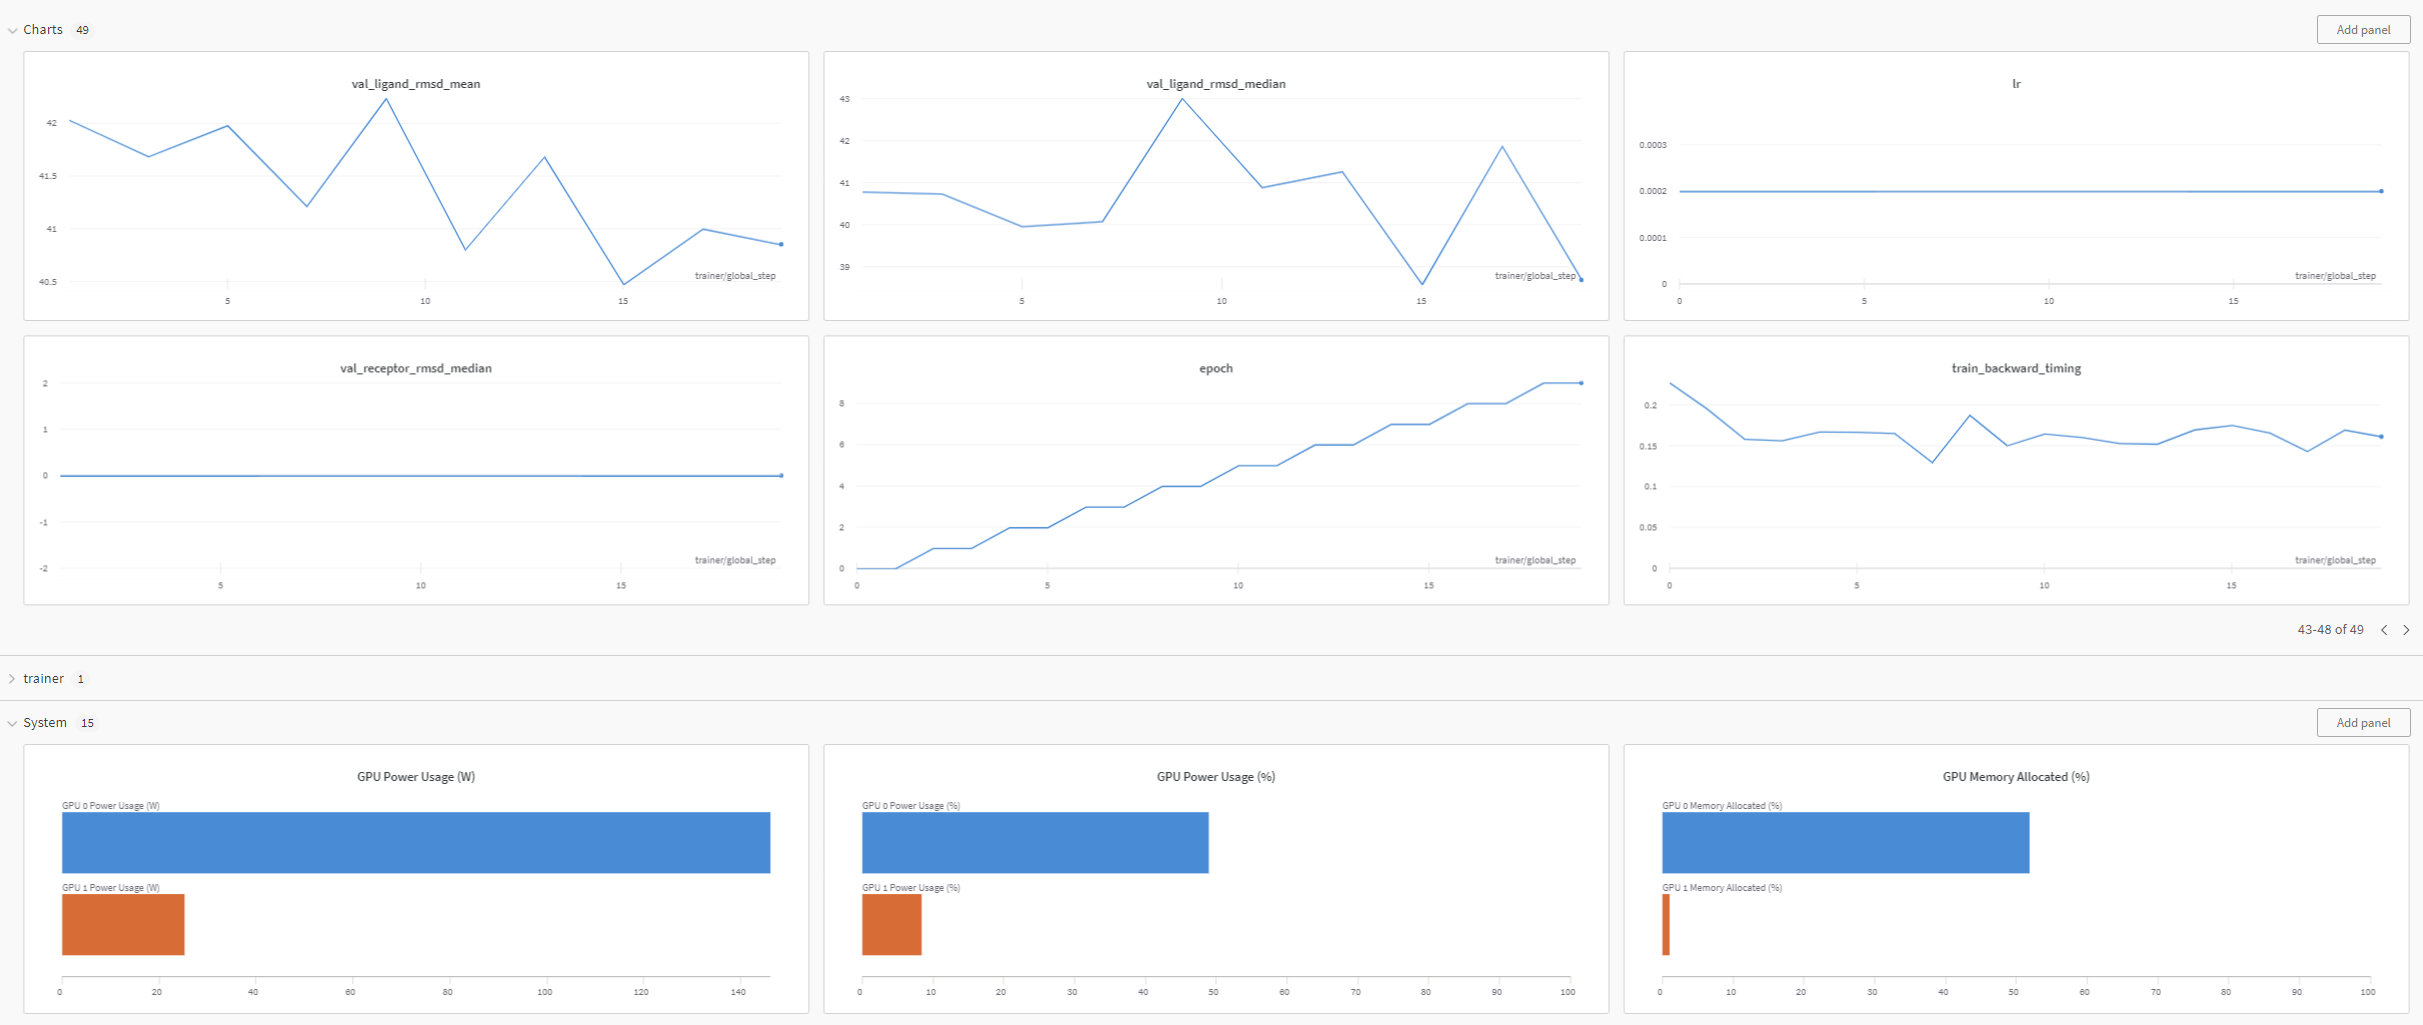
Finally, if Weights and Biases logging was enabled (for example, ++exp_manager.create_wandb_logger=True ), you can also visualize the model training progress and resulting matrices, and the summary also gets printed on the termainal at the end of the training job.