ESM2nv Model Training using BioNeMo
Contents
ESM2nv Model Training using BioNeMo#
The purpose of this tutorial is to provide an example use case of training a BioNeMo Large Language model using the BioNeMo framework. In this tutorial, the user will obtain experience in
adjusting config files, and setting launch parameters for ESM-2nv training jobs
launching single and multi-node, multi-gpu training runs
using NVIDIA’s Base Command Platform commands for LLM model training
Note
This tutorial focuses on ESM-2nv model training as an example, and the walk through can be easily modified for performing ProtT5-nv model training. The relevant config files and scripts for ProtT5-nv are provided in /workspace/bionemo/examples/protein/prott5nv/.
Overview - ESM2nv model#
ESM-2nv is based on the public ESM-2 model, which is a BERT architecture trained on millions of protein sequences from the UniProt database. ESM-2nv learns the patterns and dependencies between amino acids that ultimately give rise to a protein’s 2D structure. These can include properties such as alpha helix or beta sheet, plus cellular location, thermostability, solubility, and other protein properties. For more information, you can check the ESM2nv model card
This ESM-2nv model training example walkthrough will show how to utilize the compute resources, download and preprocess the datasets, and perform model training on single and multiple nodes.
Setup#
Before diving in, please ensure that you have completed all steps in the Getting Started section.
Additionally, this tutorial depends on: - the ESM-2 model - use of NGC BCP - creating an NGC workspace, described in Preparing Workspace and Data for Pre-training
Requesting compute resources#
Access to DGX compute resources via NGC site or NGC CLI#
As a prerequisite, configure your access to the DGX compute resources and required contents either via NVIDIA’s Base Command Platform or NGC-CLI using ngc config set command.
For more details on how to request the resources, visit Running BioNeMo on DGX-Cloud using BCP
Launch an Interactive NGC Job#
First, let’s request the resource for running the model training in an interactive manner.
Here is an example command for requesting resources using NGC CLI. This command uses your NGC credentials to authenticate to NGC, requests the DGX instances requested under ‘–instance’, retrieves the Docker image for BioNeMo provided via NGC, sets up the pre-training environment within a container launched from this image, and initiates a ‘sleep infinity’ command to launch a long-running interactive session.
In the configuration below, update nvidia and clara with the correct NGC org and team name, respectively. If there is no team name, you can omit it. Refer to NGC documentation for more details.
Also, make sure to update the relevant arguments according to your compute setup, BioNeMo image, workspaces, instance types, and so on. You will need to create a NGC workspace and replace the WORKSPACE_ID in the commands below with the ID assigned to your workspace. Refer Part 1 at Preparing Workspace and Data for Pre-Training or NGC documentation for more details.
ngc base-command job run \
  --name "example-training-1" \
  --org nvidia \
  --team clara \
  --ace nv-us-east-2 \
  --instance INSTANCE_TYPE \            # Compute node type, such as dgxa100.80g.8.norm
  --array-type PYTORCH \
  --replicas 2 \
  --image "nvcr.io/nvidia/clara/bionemo-framework:1.0" \     # Image path for BioNeMo
  --result /results \
  --workspace WORKSPACE_ID:/example_training:RW \
  --port 8888 \
  --total-runtime 1D \
  --preempt RUNONCE \
  --priority NORMAL \                   # Priority level for the jog execution [LOW, NORMAL, HIGH]
  --order 1 \                           # Priority order for the jog execution [1-99]
  --commandline "sleep infinity"  # This command can be replaced with the model training command: python pretrain.py....
Store the JOB ID provided after running the command. You will need this ID for attaching to the JOB shell and runing the training commands.
You can get information about the job’s status using ngc base-command info <YOUR-JOB-ID>
Once the resources are assigned for the job and the BioNeMo container is running, we’ll proceed ahead via ngc base-command job exec <YOUR-JOB-ID>
Notes
The
bcpruncommand provided in the cells below can also be submitted as--commandlineargument (instead of launching interactive shell).The interactive job launch example shown here is using interactive shell interface.
For larger training jobs, it is strongly advised to launch them using the launch script as a part of the
ngc base-command job runcommand, as mentioned in Running BioNeMo on DGX-Cloud using BCP. For ESM2nv training with the full dataset, we recommend luanching a model pre-training job using<BioNeMO_Workspace>/examples/protein/esm2nv/scripts/pretrain_esm2_bcp.sh.The script expects the pretraining data to be preprocessed and saved in a mounted workspace, you can follow the steps detailed in Preparing Workspace and Data for Pre-training to prepare such a workspace, and to preprocess the raw dataset. The script
pretrain_esm2_bcp.shscript can be configured to read the pre-processed dataset directly from the NGC workspace.
Data Pre-processing for a Down-sampled Dataset#
Downloading and pre-processing the example dataset#
To briefly showcase the model training capacities of BioNeMo Framework, we will use a very small subset of the original UniRef50 dataset (5,000 sequences) that is provided as a part of the sample datasets located in ${BIONEMO_HOME}/examples/tests/test_data/uniref202104_esm2_qc
The data is stored in zip file, so run the following the command to get raw fasta files:
unzip ${BIONEMO_HOME}/examples/tests/test_data/uniref202104_esm2_qc.zip -d ${BIONEMO_HOME}/examples/tests/test_data/
For the purpose of this tutorial, we use a sample subset of the data in NGC registry, included in the BioNeMo Framework codebase at examples/tests/test_data/uniref202104_esm2_qc.zip. Using the unzipped contents of this file, we first generate the pre-processed /train, /val, /test folders with protein sequences separated into batch CSV files:
cd ${BIONEMO_HOME}
python examples/protein/esm2nv/pretrain.py \
    --config-path=conf \
    ++do_training=False \
    ++model.data.val_size=500 \
    ++model.data.test_size=100 \
    ++model.data.train.uf50_datapath=/workspace/bionemo/examples/tests/test_data/uniref202104_esm2_qc_test200_val200/uniref50_train_filt.fasta \
    ++model.data.train.uf90_datapath=/workspace/bionemo/examples/tests/test_data/uniref202104_esm2_qc_test200_val200/ur90_ur50_sampler.fasta \
    ++model.data.train.cluster_mapping_tsv=/workspace/bionemo/examples/tests/test_data/uniref202104_esm2_qc_test200_val200/mapping.tsv \
    ++model.data.dataset_path=/workspace/bionemo/examples/tests/test_data/uniref202104_esm2_qc_test200_val200
Model training#
Single-node or Multi-node setup#
In these test runs, we will use preconfigured parameters provided in the pretrain_esm2_650M.yaml config file located in the ${BIONEMO_HOME}/examples/protein/esm2nv/conf folder.
We will also set other parameters suitable for a quick run, such as ++trainer.max_steps=1000 and ++val_check_interval=100 . User can update these parameters by editing the .yaml config file or as additional command line arguments, as shown in the example below. User can select the full dataset and adjust other parameters - for example - as shown in the base_config.yaml file.
As we are connected to the compute node, we navigate to the BioNeMo home folder using the command cd ${BIONEMO_HOME}, and execute the following command in the terminal.
The bcprun command is similar to srun command in SLURM, you can find more details at the NVIDIA BCP User Guide. Note, when using bcprun, we need to add backslashes to all environment variables inside --cmd so they are not pre-maturely expanded.
BCP Run commands (click to expand)
bcprun --nnodes=1 --npernode=8 \
    --cmd "cd \${BIONEMO_HOME}/examples/protein/esm2nv/ && python pretrain.py \
    --config-path=conf \
    --config-name=pretrain_esm2_650M do_training=True ++trainer.max_steps=1000 ++trainer.val_check_interval=100 \
    ++trainer.devices=8 \
    ++model.data.dataset_path=/example_training/data/uf50/ \
    ++model.data.uf90.uniref90_path=/example_training/data/uf90 \
    ++model.data.cluster_mapping_tsv=\${BIONEMO_HOME}/examples/tests/test_data/uniref202104_esm2_qc/mapping.tsv \
    ++model.validation.validation_enabled=True ++model.micro_batch_size=2 \
    ++trainer.val_check_interval=12 ++exp_manager.create_wandb_logger=False ++model.tensor_model_parallel_size=1 \
    ++trainer.accumulate_grad_batches=1 ++exp_manager.checkpoint_callback_params.always_save_nemo=False ++trainer.precision=16 \
    ++exp_manager.exp_dir=/results/esm2_pretraining ++exp_manager.resume_if_exists=False ++model.dwnstr_task_validation.enabled=False"
To run the model training on multiple nodes, you will have to update parameters accordingly, for example, the command running the model training job on 4 nodes would look like:
bcprun --nnodes=4 --npernode=8 \
    --cmd "cd \${BIONEMO_HOME}/examples/protein/esm2nv/ python examples/protein/esm2nv/pretrain.py \
    --config-path=conf \
    --config-name=pretrain_esm2_650M do_training=True ++trainer.max_steps=1000 ++trainer.val_check_interval=100 \
    ++trainer.devices=8 \
    ++model.data.dataset_path=/example_training/data/uf50/ \
    ++model.data.uf90.uniref90_path=/example_training/data/uf90 \
    ++model.data.cluster_mapping_tsv=/example_training/data/uniref202104_esm2_qa/mapping.tsv \
    ++model.validation.validation_enabled=False ++model.micro_batch_size=2 \
    ++trainer.val_check_interval=12 ++exp_manager.create_wandb_logger=False ++model.tensor_model_parallel_size=1 \
    ++trainer.accumulate_grad_batches=1 ++exp_manager.checkpoint_callback_params.always_save_nemo=False ++trainer.precision=16 \
    ++exp_manager.exp_dir=/results/esm2_pretraining ++exp_manager.resume_if_exists=False ++model.dwnstr_task_validation.enabled=false"
Note
To run the model training job on a local workstation, user can directly execute the pretrain.py script with desired configurations. For example,
python examples/protein/esm2nv/pretrain.py
Logging with WandB#
If you are launching the model training job interactively from the terminal, you can set your Weights and Biases access via wandb login <YOUR_WANDB_API_KEY> or checkout https://docs.wandb.ai/ref/cli/wandb-login for more information. Alternatively, you may also export the API key as a variable at the time of launching the job via command-line, as shown in ${BIONEMO_HOME}/examples/protein/esm2nv/scripts/pretrain_esm2_bcp.sh
Output and Results#
As the ESM2nv model training job is launched, BioNeMo will print out some of the details related to compute resources, model training configuration, and dataset being used for training. As the job progresses, it will also print out various details related to the test/train/validation steps and accuracy matrices at a set intervals.
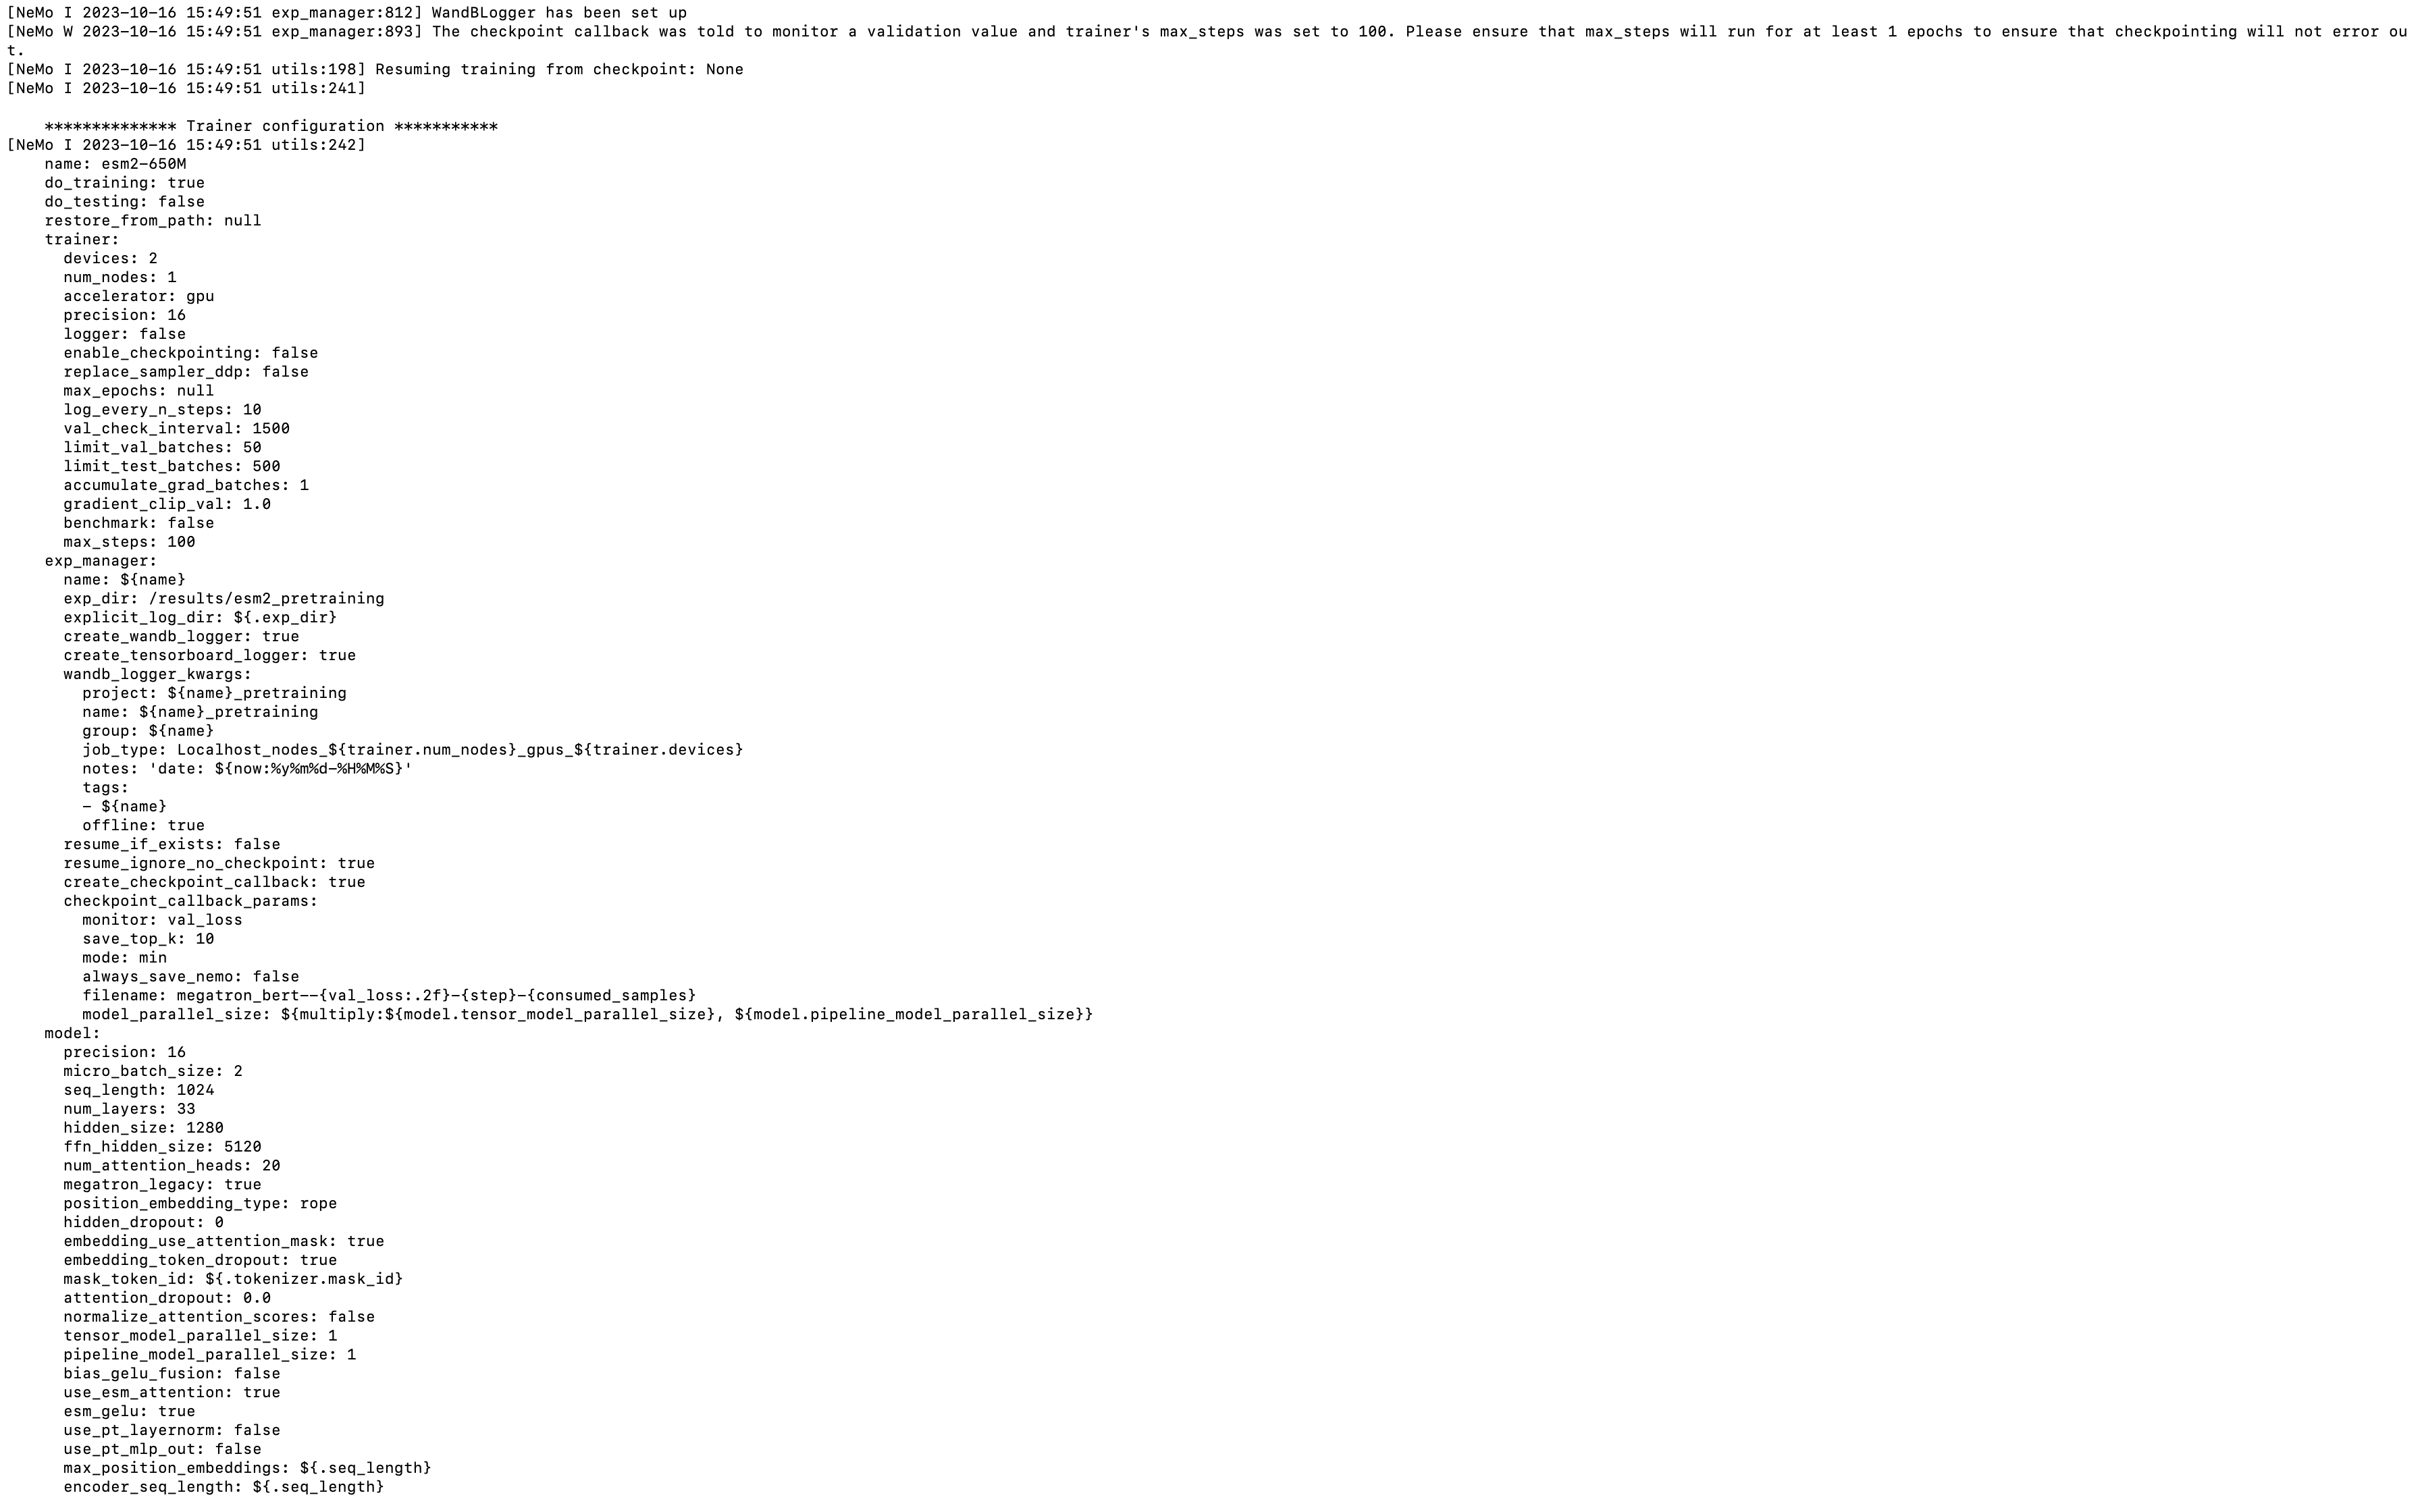
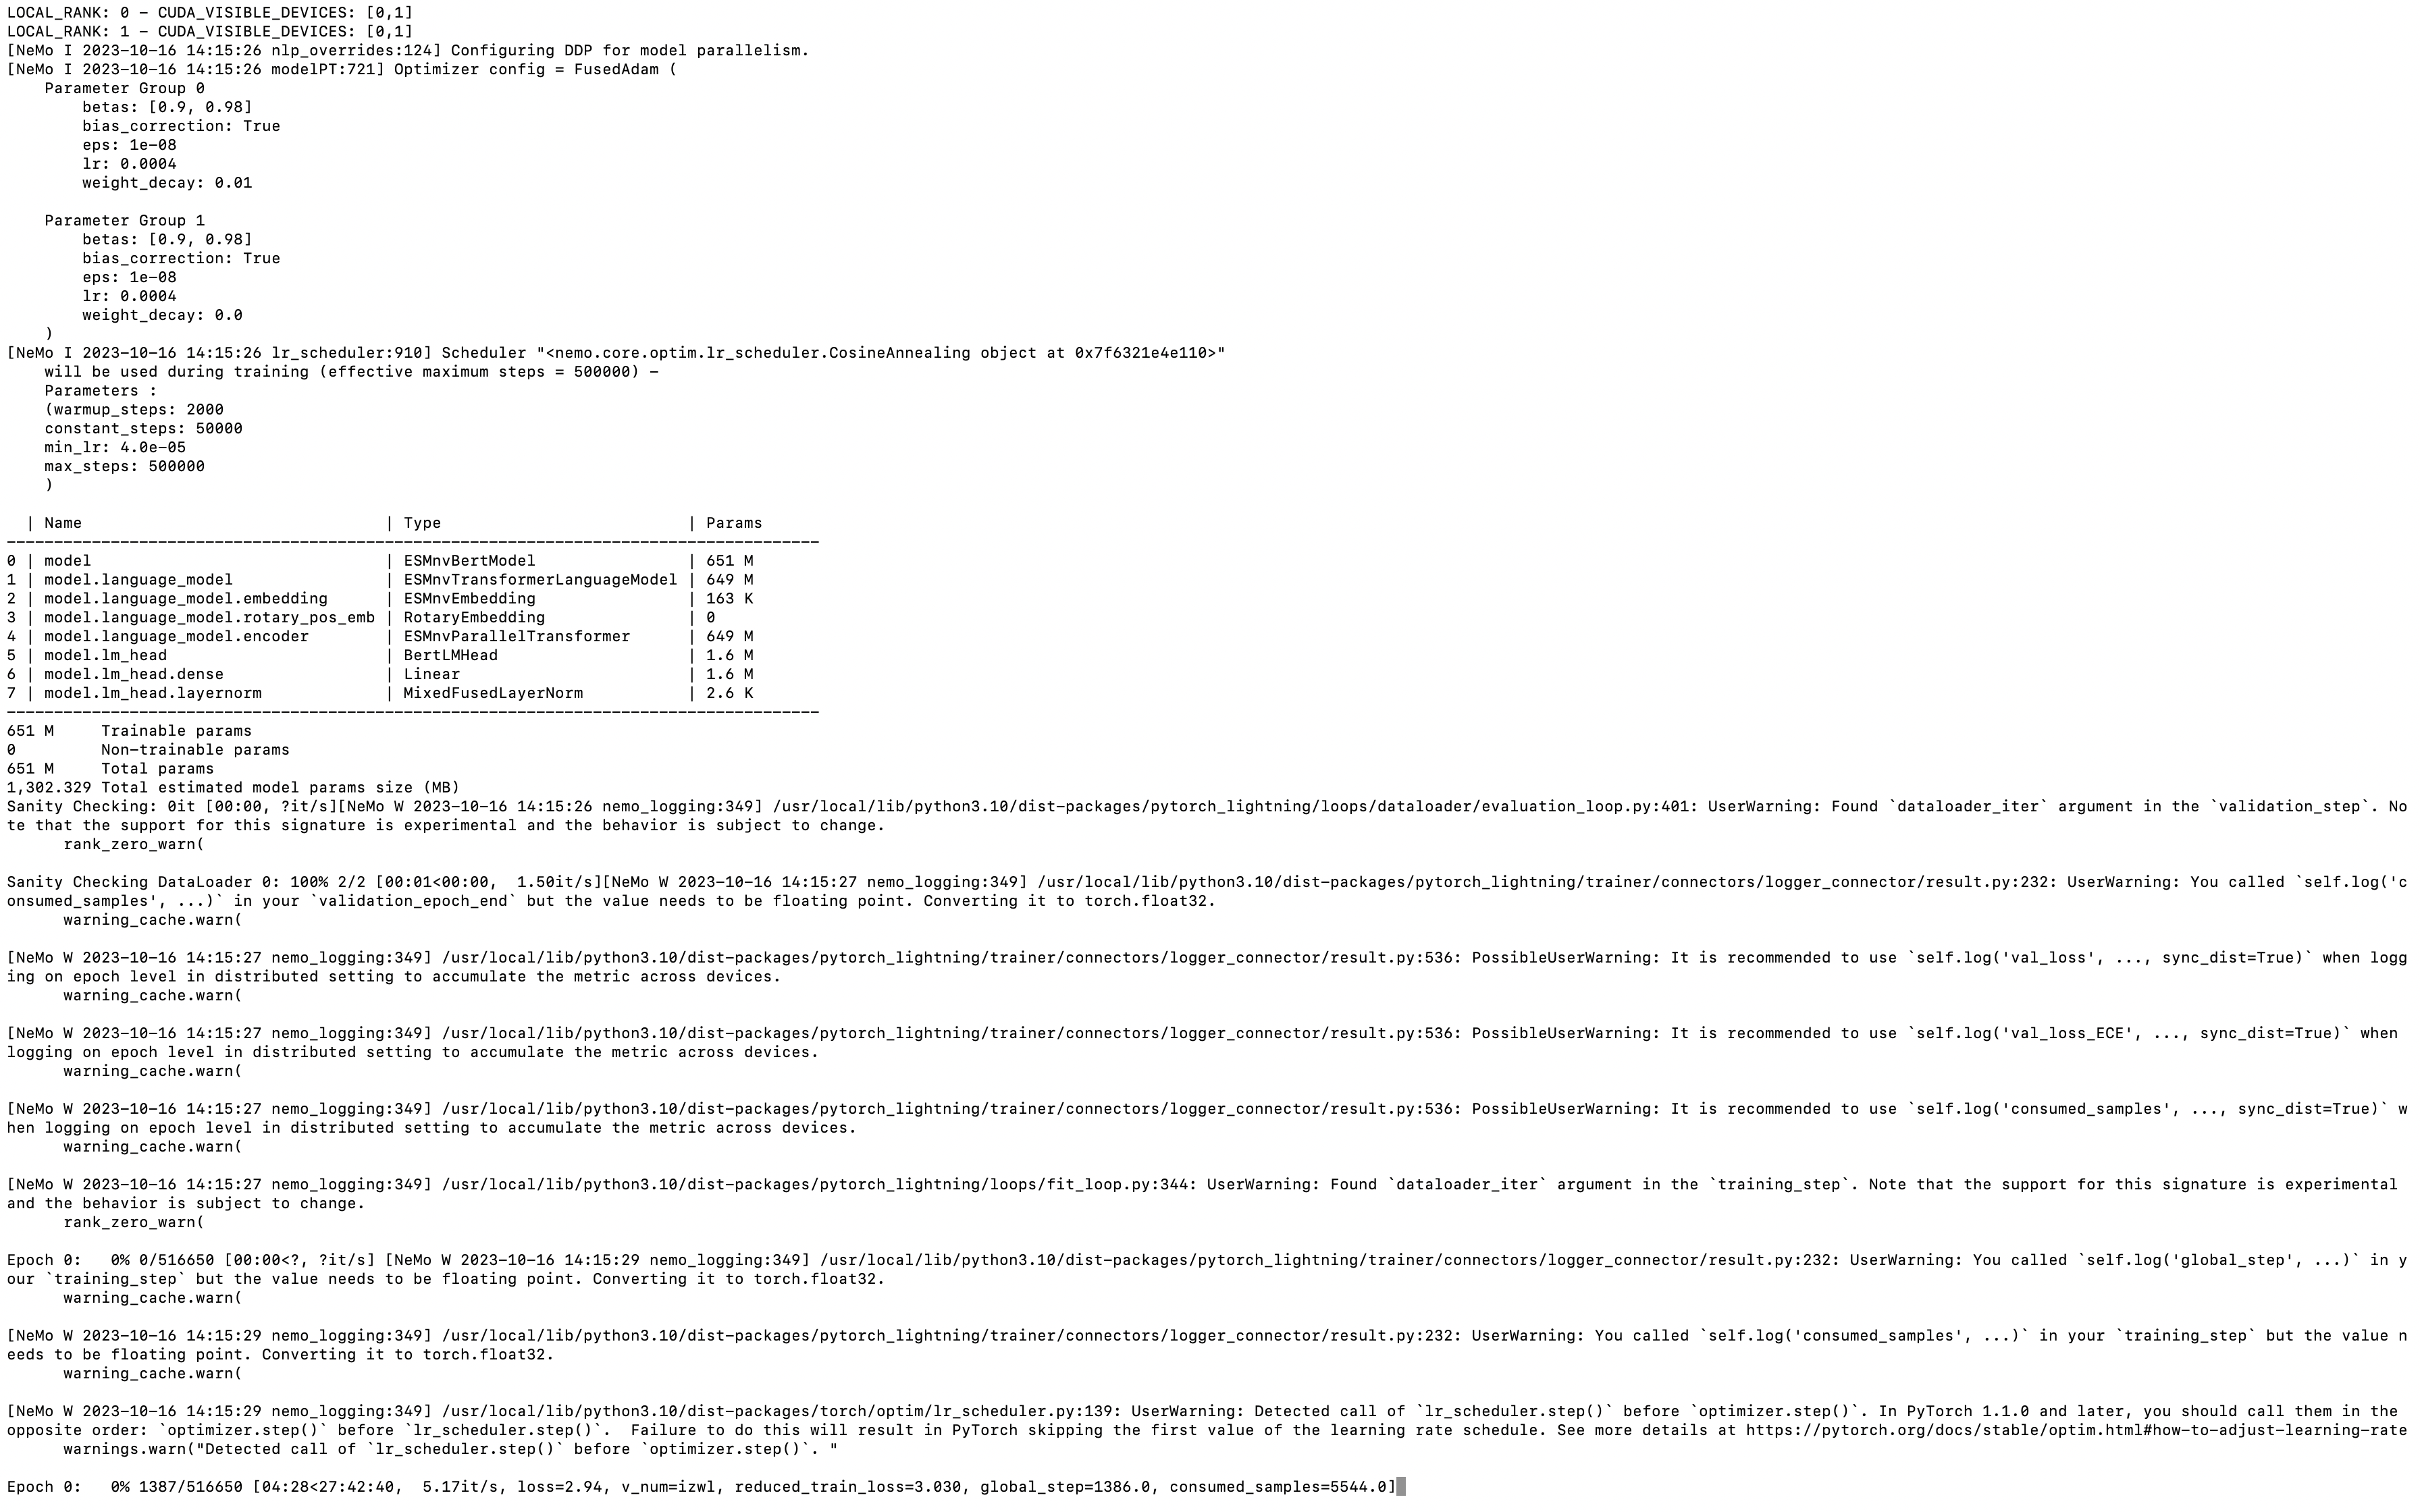
Upon the completion of training process, it will also print out the details related to log files, model checkpoints, and so on, that will also be saved in the directory as configured (usually /result).

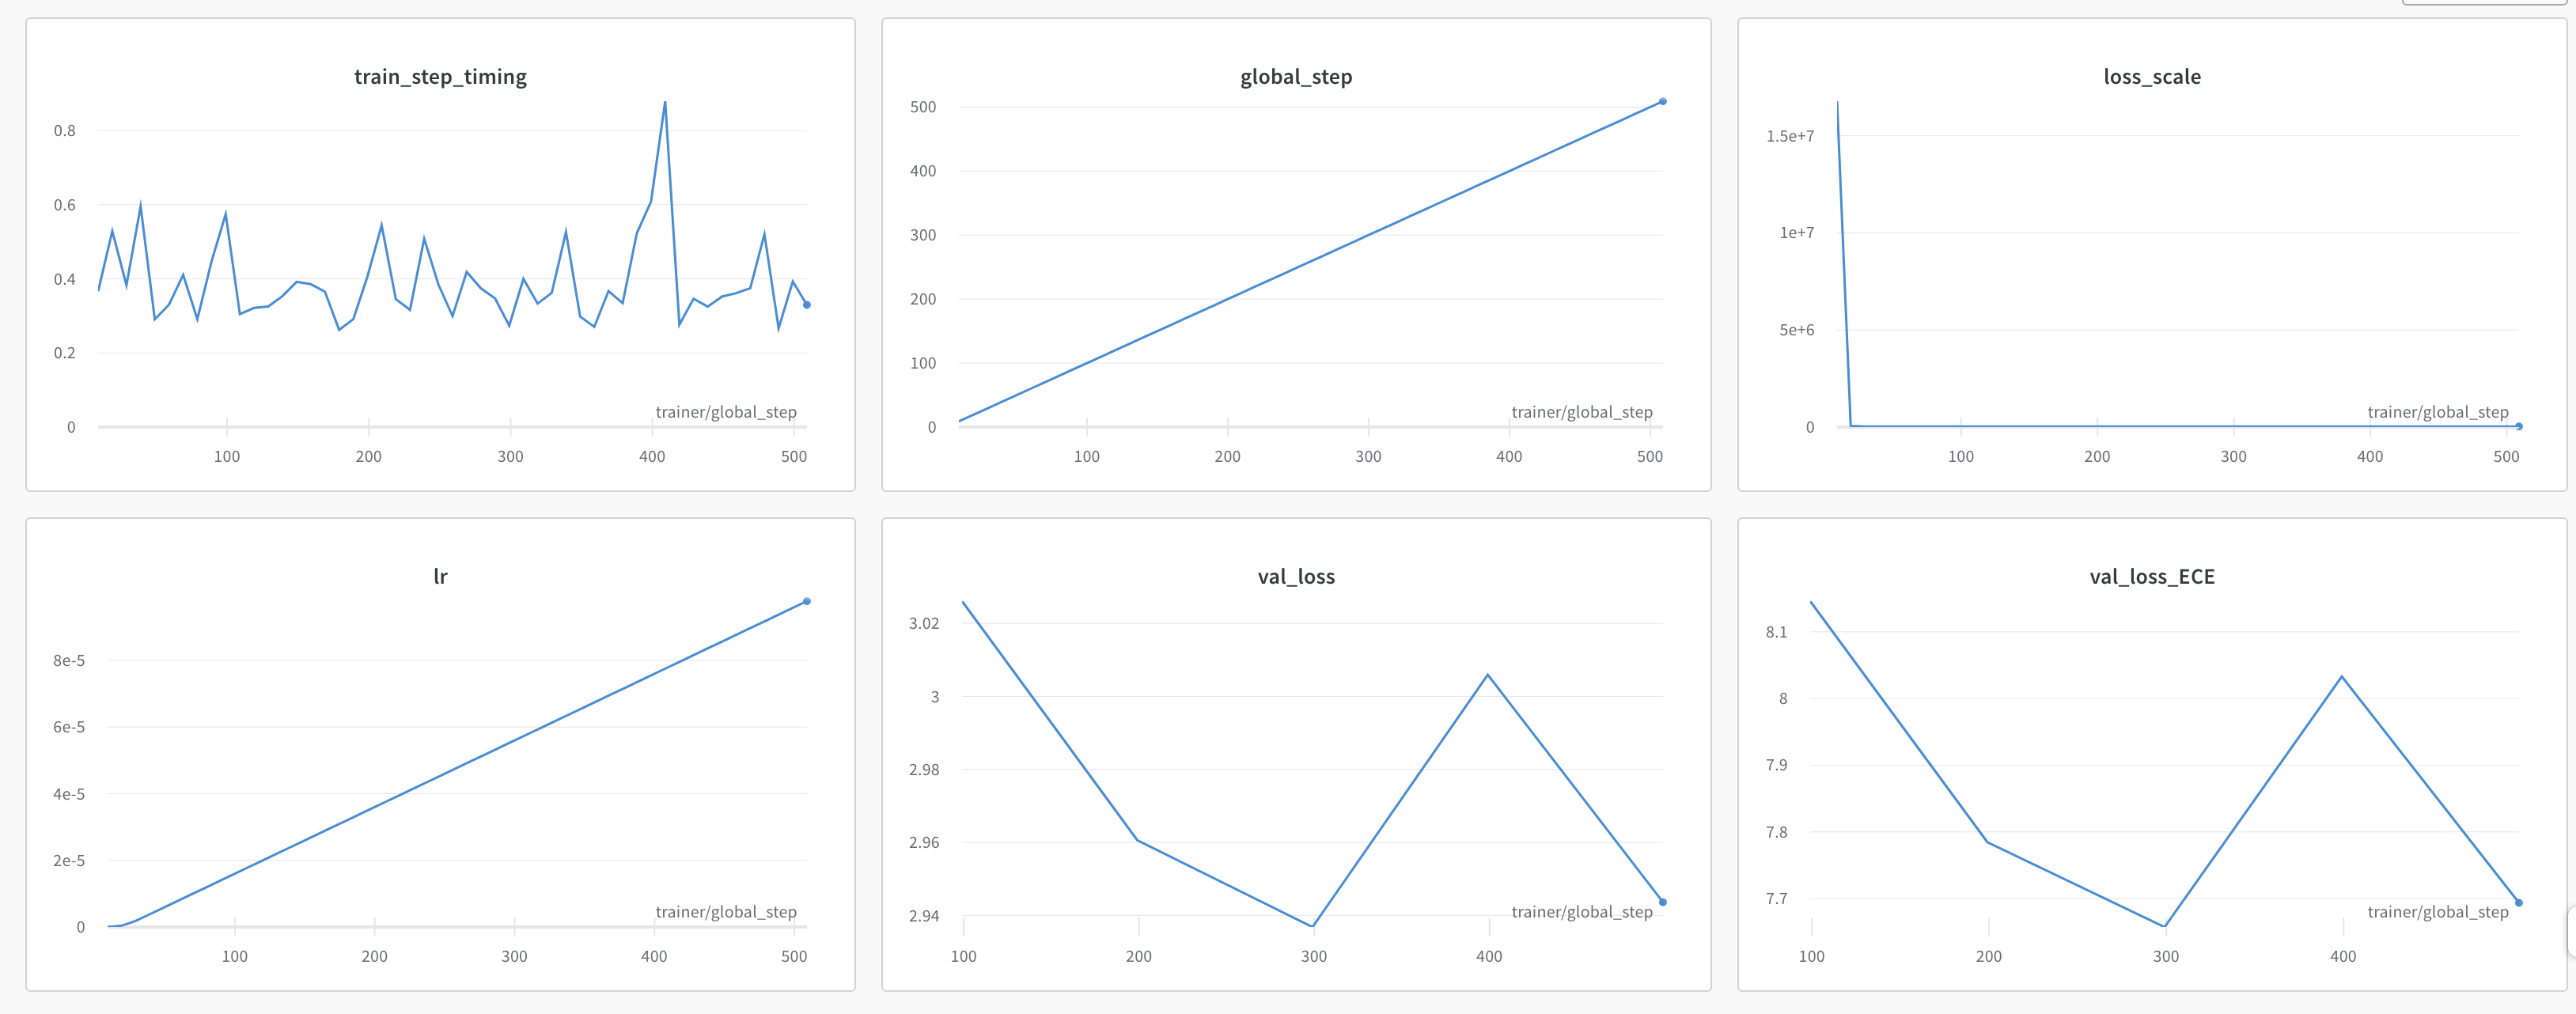
Finally, if Weights and Biases logging was enabled (for example, ++exp_manager.create_wandb_logger=True ), you can also visualize the model training progress and resulting matrices, and the summary also gets printed on the termainal at the end of the training job.
Data Pre-processing for the Full Dataset [Optional]#
In Preparing Workspace and Data for Pre-training, we discussed how to preprocess the NGC-supported pre-training dataset for ESM2. The end result is the full-preprocessed ESM2 dataset, stored in a directory on an NGC workspace. We advise using the dataset and scripts referenced in that section.
Under the hood, the script examples/protein/esm2nv/scripts/preprocess_esm2_bcp.sh
discussed in Preparing Workspace and Data for Pre-training,
uses the BioNeMo framework class ESM2Preprocess. For example
from bionemo.data.preprocess.protein.preprocess import ESM2Preprocess
data = ESM2Preprocess()
data.prepare_dataset()
Alternative datasets [Optional]#
We recommend using the NGC-supported pre-training dataset, but, alternatively, you can also download datasets that are not available in the BioNeMo Framework.
For example, raw pre-training data can be directly downloaded from Universal Protein Resource (UniProt), which is a comprehensive resource for protein sequence and annotation data [1].
UniRef is a set of Reference Clusters with sequences from the UniProt Knowledge base and selected UniParc records. UniRef50 is a “second derivation” of UniRef100: Uniref90 is generated by clustering UniRef100 seed sequences and UniRef50 is generated by clustering UniRef90 sequences. For more information refer to the UniRef page.
Downloading datasets from UniRef, or elsewhere, can be done in two ways:
A) Using bash and wget pointing to the dataset’s URL
mkdir -p /tmp/data/protein/esm2nv
wget -P /tmp/data/protein/esm2nv <URL>
B) Transfering from the local machine to the container
docker cp <dataset directory and filename> container_id:/<container directory and filename>
Then, once the data is downloaded, we can start moving files and using the Data Loaders and Data Module to make sure the dataset is in a format the BioNeMo Framework can operate. It is not guaranteed that the ESM2Preprocess class will handle datasets other than those from UniProt.
Note:
We recommend downloading large datasets directly to the NGC compute host where preprocessing is done. Data transfer between NGC workspace and NGC compute host is fast, but between NGC workspace and non-NGC compute host is slow.