MolMIM Model Training using BioNeMo
Contents
MolMIM Model Training using BioNeMo#
The purpose of this tutorial is to provide an example use case of training MolMIM model using the BioNeMo framework. By the end of this tutorial, the user will gain experience in
configuring various config files and launch parameters for MolMIM training
launching single and multi-node, multi-GPU training runs
using NVIDIA’s Base Command Platform commands for LLM model training
Overview - MolMIM model#
a probabilistic auto-encoder for small molecule drug discovery that learns an informative and clustered latent space. MolMIM is trained with Mutual Information Machine (MIM) learning and provides a fixed-size representation of variable-length SMILES strings
MolMIM is a probabilistic auto-encoder for small molecule drug discovery and is trained on billions of SMILES from the ZINC15 database. MolMIM provides a fixed size embedding for each molecule and produced a latent space from which samples can be drawn and novel SMILES string generated from a specific starting molecule. By using optimizers in tandem with MolMIM, specific properties of the molecules can be optimized and novel derivatives generated. For more information, we direct the reader to Reidenbach, et al. (2023).
Setup and Assumptions#
This tutorial assumes that the user has access to BioNeMo framework and NVIDIA’s BCP and DGX-Cloud compute infrastructure. The user is also expected to have required background details about
the BioNeMo framework, as described in the Getting Started section, and
running the model training jobs on BCP
All model training related commands should be executed inside the BioNeMo docker container.
Requesting compute resources#
Access to DGX compute resource NGC site or NGC CLI#
As a prerequisite, configure your access to the DGX compute resources and required contents either via NVIDIA’s Base Command Platform or NGC-CLI using ngc config set command.
Note:
The interactive job launch example shown here using the Jupyter Lab interface is intended for initial user experience/trial runs. It is strongly advised to launch the model training jobs using the launch script as a part of the ngc batch run command, as mentioned in Access and Startup.
Data Preprocessing#
Downloading and pre-processing the dataset#
Download the data#
The ZINC15 dataset is a free database of commercially-available compounds for virtual screening. [1].
The ZINC15 database was used for training Sterling and Irwin (2015). Approximately 1.74 billion molecules (SMILES strings) were selected from the full database meeting the following constraints: molecular weight <= 500 Daltons, LogP <= 5, the number of hydrogen bond donors <= 5, the number of hydrogen bond acceptors <= 10, and quantitative estimate of drug-likeness (QED) value >= 0.5. The compounds were filtered to ensure a maximum length of 128 characters. Train, validation, and test splits were randomly split as 99% / 0.5% / 0.5%.
A sample subset of the ZINC15 dataset can be downloaded, processed and split into train, val and test sets as follows:
cd ${BIONEMO_HOME}
python examples/molecule/molmim/pretrain.py \
    do_training=False \
    ++model.data.dataset_path=data/balanced_split \
    ++model.data.links_file=examples/molecule/molmim/dataset/ZINC-downloader-sample.txt
Run the same command without setting model.data.links_file to download and process all ZINC15 tranches (this can require up to a day and runs only on CPU).
Alternative datasets#
We can also download datasets that are not available in the BioNeMo Framework. This can be done in 2 ways:
A) Using bash and wget pointing to the dataset’s URL
mkdir -p /tmp/data/molecule/molmim
wget -P /tmp/data/molecule/molmim <URL>
B) Transfering from the local machine to the container
docker cp <dataset directory and filename> container_id:/<container directory and filename>
Then, once the data is downloaded, we can start moving files and using the Data Loaders and Data Module to make sure the dataset is in a format the BioNeMo Framework can operate. It is not guaranteed that the Zinc15Preprocess class will handle datasets other than those from ZINC15.
Model training#
Example dataset#
To briefly showcase the model training capacities of BioNeMo Framework, we will use a very small subset of the original ZINC15 dataset that is provided as a part of the sample datasets located in ${BIONEMO_HOME}/examples/tests/test_data/molecule
For the purpose of this test run, the folder contains /train, /val, /test folders with protein sequences in CSV files. In those directories, see how many files were created in each, and modify the $TRAIN_FILE_RANGE, $VAL_FILE_RANGE and $TEST_FILE_RANGE parameters in the example command below accordingly. These commands are currently set up to handle 175 files in the trainand test directories and 4 files in the val directory.
Single-node or Multi-node setup#
In this test run, we will use preconfigured parameters provided in the pretrain_small_canonicalized_logv.yaml config file located in the ${BIONEMO_HOME}/examples/molecule/molmim/conf folder. This is the config that was used to train our MolMIM-70M-24.3 checkpoint, and the command below was the one we used to train it on a similar infrastructure (slurm).
As we are connected to the compute node, we navigate to the BioNeMo home folder using the command cd ${BIONEMO_HOME}, and execute the following command in the terminal.
Note:
To run the model training job on a local workstation, user can directly execute the pretrain.py script with desired configurations. For example,
python examples/molecule/molmim/pretrain.py [...]
User may need to update relevant arguments in the commands according to their compute and data setup.
The bcprun command is alaogous to srun command in SLURM. You can find more details at the NVIDIA BCP User Guide.
USER_NOTES="Test run of pre-training molmim from scratch"
WANDB_PROJECT="molmim_training_scratch"
TRAIN_FILE_RANGE="x_OP_000..175_CL_"
TEST_FILE_RANGE="x_OP_000..004_CL_"
VAL_FILE_RANGE="x_OP_000..175_CL_"

bcprun --nnodes=4 --npernode=8 --cmd "python examples/molecule/molmim/pretrain.py \
    --config-path /workspace/bionemo/examples/molecule/molmim/conf/ \
    --config-name molmim_70m_24_3 \
    ++trainer.num_nodes=4 \
    ++trainer.devices=8 \
    ++trainer.max_steps=1000000 \
    ++trainer.accumulate_grad_batches=1 \
    ++trainer.val_check_interval=2500 \
    ++trainer.limit_val_batches=1.0 \
    ++trainer.precision=32 \
    ++model.micro_batch_size=2048 \
    ++model.global_batch_size=null \
    ++model.dwnstr_task_validation.enabled=False \
    ++model.data.dataset_path=/data/balanced_split \
    ++model.data.dataset.train=$TRAIN_FILE_RANGE \
    ++model.data.dataset.val=$VAL_FILE_RANGE \
    ++model.data.dataset.test=$TEST_FILE_RANGE \
    ++model.data.index_mapping_dir=/results/data_index/ \
    ++model.seq_length=128 \
    ++exp_manager.exp_dir=/results/logs/ \
    ++exp_manager.create_wandb_logger=True \
    ++exp_manager.wandb_logger_kwargs.name=molmim_test_run \
    ++exp_manager.wandb_logger_kwargs.project=$WANDB_PROJECT \
    ++exp_manager.wandb_logger_kwargs.notes=$USER_NOTES \
    ++exp_manager.create_tensorboard_logger=True \
    ++exp_manager.create_checkpoint_callback=True \
    ++exp_manager.resume_if_exists=True \
    ++create_dllogger_callbacks=True \
    ++create_trainer_metric_callback=True \
    ++dllogger_callbacks_kwargs.use_existing_dllogger=True \
    ++dllogger_callbacks_kwargs.warmup=0 \
    ++dllogger_callbacks_kwargs.json_file=dlloger.json"
To run the model training on multiple nodes, the user will have to update parameters accordingly. For example, the command running the model training job on eight nodes would require nnodes=8 and ++trainer.num_nodes=8 arguments.
Continuing training from an existing checkpoint#
This following command is identical to the previous one, however it allows you to continue training from an existing checkpoint. The weights learned for one task will often transfer to other molecule tasks to some degree, so this practice can shorten the overall training time required and may lead to better results.
First, to download our example checkpoint for molmim, run the following:
python download_models.py --download_dir /workspace/bionemo/models molmim_70m_24_3
Note the new option: ++restore_from_path=/path/to/checkpoint.nemo which will start by initializing the model with those parameters. Any parameter that involves changes to the shape of the model, dimension of weights, etc., will likely not work. Modifications to any argument not tied to a model parameter should work.
USER_NOTES="Test run of continuing training molmim from an existing checkpoint"
WANDB_PROJECT="molmim_continued_training"
TRAIN_FILE_RANGE="x_OP_000..175_CL_"
TEST_FILE_RANGE="x_OP_000..004_CL_"
VAL_FILE_RANGE="x_OP_000..175_CL_"
INITIAL_CHECKPOINT_PATH="/workspace/bionemo/models/molecule/molmim/molmim_70m_24_3.nemo"

bcprun --nnodes=4 --npernode=8 --cmd "python examples/molecule/molmim/pretrain.py \
    --config-path /workspace/bionemo/examples/molecule/molmim/conf/ \
    --config-name molmim_70m_24_3 \
    ++restore_from_path=$INITIAL_CHECKPOINT_PATH \
    ++trainer.num_nodes=4 \
    ++trainer.devices=8 \
    ++trainer.max_steps=1000000 \
    ++trainer.accumulate_grad_batches=1 \
    ++trainer.val_check_interval=2500 \
    ++trainer.limit_val_batches=1.0 \
    ++trainer.precision=32 \
    ++model.micro_batch_size=2048 \
    ++model.global_batch_size=null \
    ++model.dwnstr_task_validation.enabled=False \
    ++model.data.dataset_path=/data/balanced_split \
    ++model.data.dataset.train=$TRAIN_FILE_RANGE \
    ++model.data.dataset.val=$VAL_FILE_RANGE \
    ++model.data.dataset.test=$TEST_FILE_RANGE \
    ++model.data.index_mapping_dir=/results/data_index/ \
    ++model.seq_length=128 \
    ++exp_manager.exp_dir=/results/logs/ \
    ++exp_manager.create_wandb_logger=True \
    ++exp_manager.wandb_logger_kwargs.name=molmim_test_run \
    ++exp_manager.wandb_logger_kwargs.project=$WANDB_PROJECT \
    ++exp_manager.wandb_logger_kwargs.notes=$USER_NOTES \
    ++exp_manager.create_tensorboard_logger=True \
    ++exp_manager.create_checkpoint_callback=True \
    ++exp_manager.resume_if_exists=True \
    ++create_dllogger_callbacks=True \
    ++create_trainer_metric_callback=True \
    ++dllogger_callbacks_kwargs.use_existing_dllogger=True \
    ++dllogger_callbacks_kwargs.warmup=0 \
    ++dllogger_callbacks_kwargs.json_file=dlloger.json"
Logging with Weights and Biases#
If you are launching the model training job interactively from the terminal/Jupyter-Lab, you can set your Weights and Biases access via wandb login <YOUR_WANDB_API_KEY> or checkout https://docs.wandb.ai/ref/cli/wandb-login for more information.
Output and Results#
As the MolMIM model training job is launched, BioNeMo will print out some of the details related to compute resources, model training configuration, and the dataset being used for training. As the job progresses, it will also log various details related to the test/train/validation steps and accuracy matrices at a set intervals.
Upon the completion of training process, it will also print out the details related to log files, model checkpoints, and so on, that will also be saved in the directory as configured (usually /result). These logs will begin with lines similar to the following:
[NeMo I 2024-03-10 23:07:37 exp_manager:850] WandBLogger has been set up
[NeMo I 2024-03-10 23:07:38 utils:294]
    ************** Trainer configuration ***********
[NeMo I 2024-03-10 23:07:38 utils:295]
    model:
      encoder:
        num_layers: 6
        hidden_size: 512
        ffn_hidden_size: ${multiply:${.hidden_size}, 4}
        num_attention_heads: 8
        init_method_std: 0.02
        hidden_dropout: 0.1
        attention_dropout: 0.1
        ffn_dropout: 0.0
        position_embedding_type: learned_absolute
        relative_attention_num_buckets: 32
        relative_attention_max_distance: 128
        relative_position_bias_self_attention_only: true
...
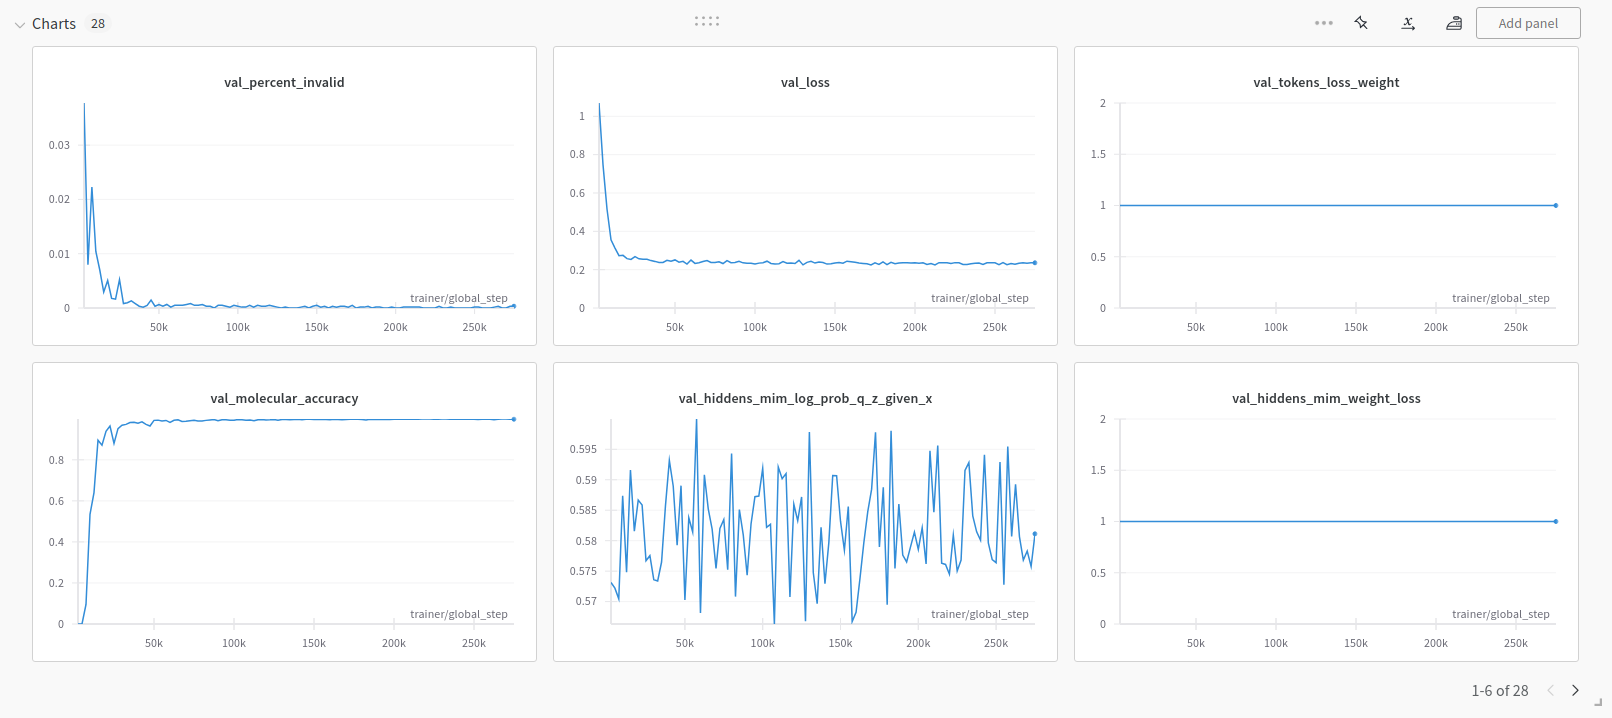
Finally, if Weights and Biases logging was enabled (for example ++exp_manager.create_wandb_logger=True ), you can also visualize the model training progress there, as in the example below.