Building from source#
Basic build#
Users must have a working installation of the Legate library prior to installing cuPyNumeric. Installing cuPyNumeric by itself will not automatically install Legate.
See below for a list of cuPyNumeric’s dependencies. The easiest way to set up a
build environment that includes all of cuPyNumeric dependencies is to use the
scripts/generate-conda-envs.py script from the Legate build instructions,
passing the --cupynumeric flag.
Once all dependencies are installed, you can simply invoke ./install.py from
the cuPyNumeric top-level directory. The build will automatically pick up the
configuration used when building Legate (e.g. the CUDA Toolkit directory).
Dependencies#
OpenBLAS#
Used for implementing linear algebra routines on CPUs.
If you want to use a custom build of OpenBLAS, you will need to get a
Fortran compiler, e.g. by pulling fortran-compiler from conda-forge.
If using a build of Legate that includes OpenMP support, then you need a build of OpenBLAS configured with the following options:
USE_THREAD=1USE_OPENMP=1NUM_PARALLEL=32(or at least as many as the NUMA domains on the target machine) – TheNUM_PARALLELflag defines how many instances of OpenBLAS’s calculation API can run in parallel. Legate will typically instantiate a separate OpenMP group per NUMA domain, and each group can launch independent BLAS work. IfNUM_PARALLELis not high enough, some of this parallel work will be serialized.
TBLIS#
Used for implementing tensor contraction routines on CPUs.
This library will be automatically downloaded and built during cuPyNumeric installation.
cuPyNumeric requires a build of TBLIS configured as follows:
--with-label-type=int32_t --with-length-type=int64_t --with-stride-type=int64_t
and additionally --enable-thread-model=openmp if using a build of Legate
that includes OpenMP support.
Advanced topics#
Building through pip & cmake#
cuPyNumeric uses a cmake/scikit-build-based build workflow. There are several
examples in the scripts directory, showing how to build different
configurations of cuPyNumeric. We walk through the steps in
build-with-legate-separately-no-install.sh here. We assume a pre-existing
Legate build.
First, the CMake build needs to be configured:
$ cmake -S . -B build -GNinja -D legate_ROOT:STRING=path/to/legate/build
We point cuPyNumeric to the Legate build tree, not an installation. This generates all build-dependent headers and Python files.
Once configured, we can build the C++ libraries:
$ cmake --build build
This will invoke Ninja (or make) to execute the build. Once the C++ libraries are available, we can do an editable (development) pip installation.
$ SKBUILD_BUILD_OPTIONS="-D FIND_CUPYNUMERIC_CPP=ON -D cupynumeric_ROOT=$(pwd)/build" \
  python3 -m pip install \
  --root / --no-deps --no-build-isolation
  --editable .
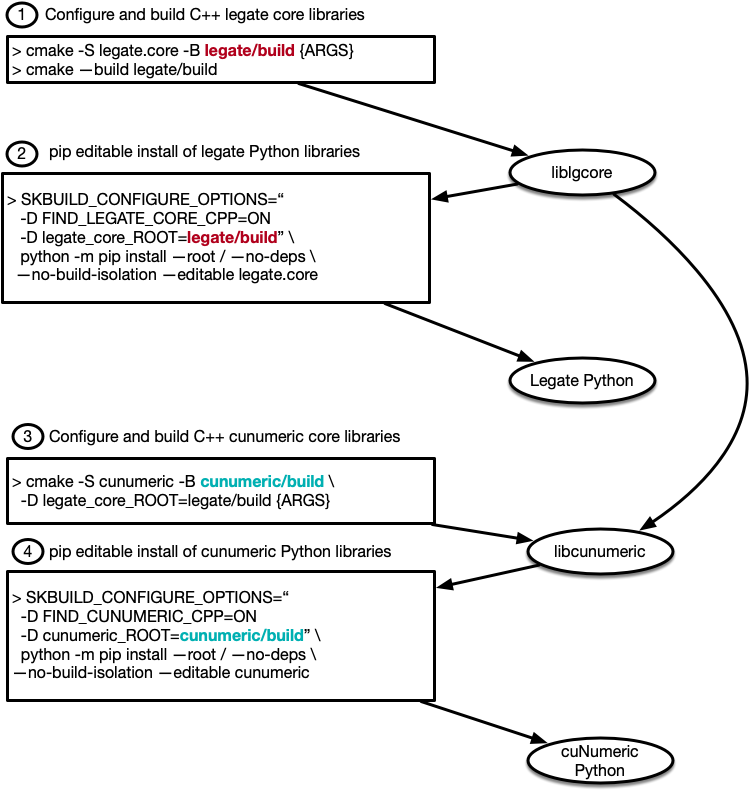
The Python source tree and CMake build tree are now available with the environment Python for running cuPyNumeric programs. The diagram below illustrates the complete workflow for building both Legate and cuPyNumeric.