ConnectX-5 Card Replacement
ConnectX-5 Card Replacement Overview
This is a high-level overview of the procedure to replace one or more Mellanox
ConnectX-5 cards on the DGX-2 System.
- Use the nvsm show commands to identify the failed ConnectX-5 card.
- Get a replacement ConnectX-5 card from NVIDIA Enterprise Support.
- Shut down the system.
- Label all I/O tray cables and unplug them.
- Remove the I/O tray and open the lid.
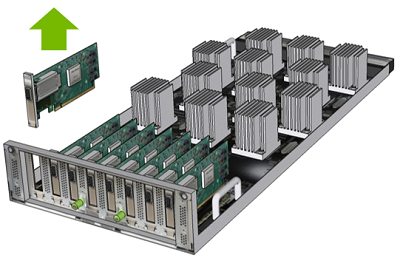
- Locate the failed ConnectX-5 card, then remove the screw that attaches the card and remove the card.
- Insert the new card into the slot and secure with the screw.
- Close the lid on the I/O tray, then insert the tray into the system.
- Plug in all cables using the labels as a reference.
- Power on the system.
- Verify that the ConnectX-5 card is healthy using nvsm.
Replacing the ConnectX-5 Card
Before attempting to replace any of the ConnectX-5 cards, be sure to have performed
the following:
- Determined the location ID of the faulty ConnectX-5 card needing
replacement.
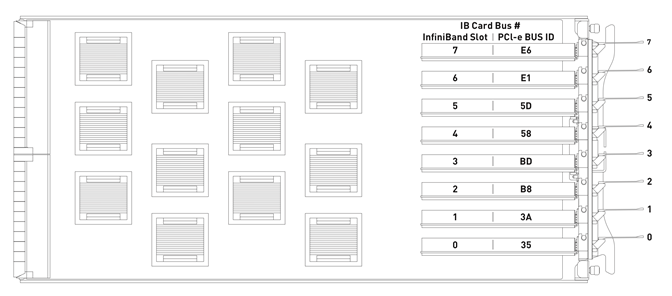
Run nvsm show health to identify the bad card. Note the PCIe bus ID and slot number.
- Obtained the replacement ConnectX-5 card have saved the packaging for use when returning the faulty component.

- Power down the system..
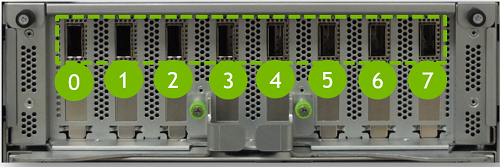
- Label all the network ports (0-7) connected to the I/O tray for easy identification when reconnecting.
- Remove the cables.
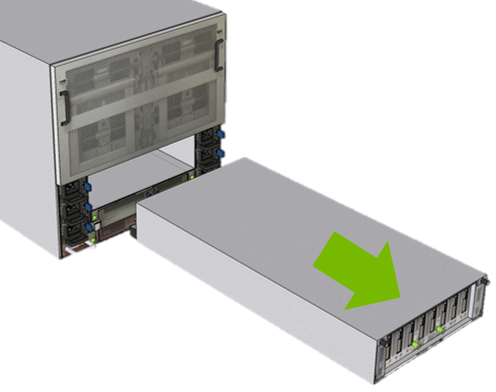
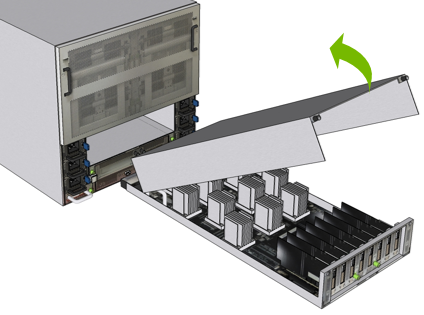
- Remove the I/O tray.
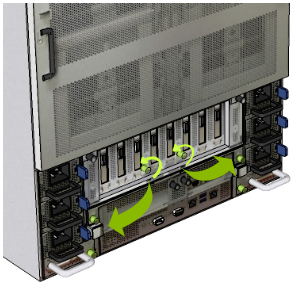
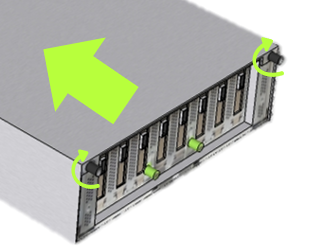
- Loosen the two green I/O tray screws with a Philips #2 screwdriver and pull the levers outward to release the tray.
- Pull the I/O tray out of the system and place it on a solid, flat work
surface.CAUTION:Exercise care when removing the tray as it is long and heavy, and do not handle the module from the rear connectors.
- Remove the I/O tray lid.
- Do the following for each card that needs to be replaced.
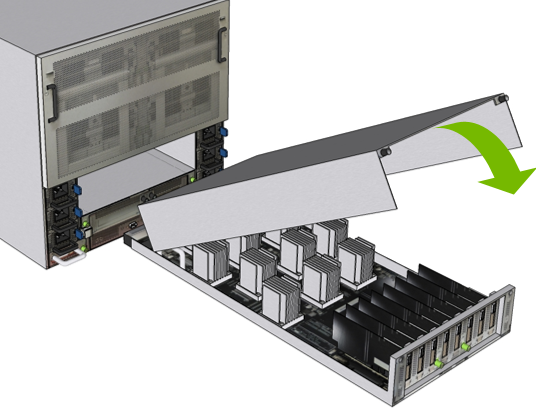
- Install the I/O tray.
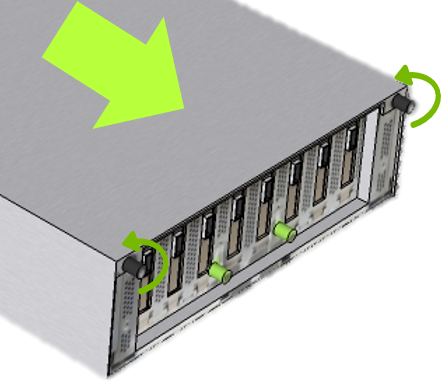
- Replace the I/O tray lid by placing it over the module using the guiding pins and grooves.
- Slide the lid back so that the black screws enage with the tray, then tighten the black screws to secure the lid.
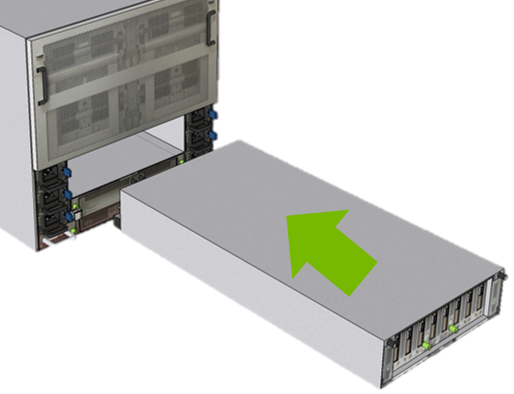
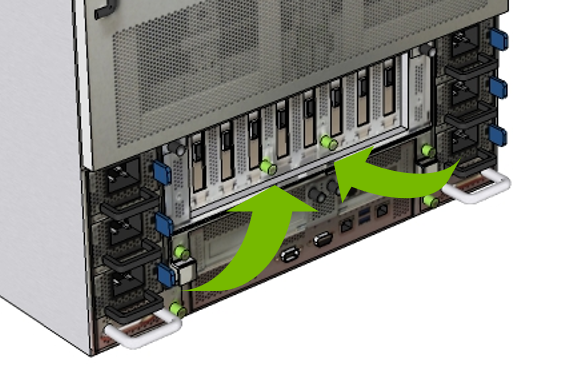
- Push the I/O tray back into the system.
- Close the levers toward the center, making sure the connectors engage with the midplane, then tighten the thumbscrews by hand or with a Phillips #2 screwdriver.
- Connect all cables back into the ConnectX-5 card ports.
- Power on the system and log in.
- Confirm that the system is healthy.
$ sudo nvsm show health
There should be no new alerts listed.
Verifying the ConnectX-5 Cards
This section describes the steps needed to verify that the ConnectX-5 cards has been replaced correctly.
- With the DGX-2 turned on, verify that the card was installed correctly and is
recognized by the system.
$ lspci | grep -i mellanox
The output should show all installed Mellanox cards, including the dual port (and optional dual port) cards.Example
 35:00.0 Infiniband controller: Mellanox Technologies MT27800 Family [ConnectX-5]
 3a:00.0 Infiniband controller: Mellanox Technologies MT27800 Family [ConnectX-5]
 58:00.0 Infiniband controller: Mellanox Technologies MT27800 Family [ConnectX-5]
 5d:00.0 Infiniband controller: Mellanox Technologies MT27800 Family [ConnectX-5]
 86:00.0 Ethernet controller: Mellanox Technologies MT27800 Family [ConnectX-5]
 86:00.1 Ethernet controller: Mellanox Technologies MT27800 Family [ConnectX-5]
 b8:00.0 Infiniband controller: Mellanox Technologies MT27800 Family [ConnectX-5]
 bd:00.0 Infiniband controller: Mellanox Technologies MT27800 Family [ConnectX-5]
 e1:00.0 Infiniband controller: Mellanox Technologies MT27800 Family [ConnectX-5]
 e6:00.0 Infiniband controller: Mellanox Technologies MT27800 Family [ConnectX-5]
The dual port cards are identified by bus ID 86. Look for all other cards. If eight cards (those other than bus ID 86) are not reported, then the card was not installed properly and should be reseated. If a card other than the officially supported Mellanox family of adapters appears, contact NVIDIA Enterprise Support. - Verify the firmware version.
$ cat /sys/class/infiniband/mlx5*/fw_ver
Example output:12.23.1020 12.23.1020 12.23.1020 12.23.1020 12.23.1020 12.23.1020 12.23.1020 12.23.1020
The latest InfiniBand firmware version supported for each DGX OS Server release is as follows:- Release 4.x: Firmware version 12.23.1020
- If you need to update the firmware, follow these steps:
- Initiate the firmware update.
$ sudo /opt/mellanox/mlnx-fw-updater/mlnx_fw_updater.pl
The script will check the firmware version of each card and update where needed. If the firmware is updated for any card, you will need to reboot the system for the changes to take effect. - Reboot the system if instructed.
- After rebooting the system, verify that all the Mellanox InfiniBand
cards are using the current firmware.
$ cat /sys/class/infiniband/mlx5*/fw_ver
 12.23.1020
 12.23.1020
 12.23.1020
 12.23.1020
 12.23.1020
 12.23.1020
 12.23.1020
 12.23.1020
- Initiate the firmware update.
- Verify the physical port state for the InfiniBand cards.
$ ibstat
In the output text, verify that the Physical State for each card with a cable connection is LinkUp and that the port for the card is configured with a GUID. The following example output shows one card in a non-connected state, and the remaining cards in a connected state. Relevant text is highlighted in bold.CA 'mlx5_0' CA type: MT4119 Number of ports: 1 Firmware version: 12.23.1020 Hardware version: 0 Node GUID: 0x248a0703000de288 System image GUID: 0x248a0703000de288 Port 1: State: Down Physical state: Polling Rate: 10 Base lid: 65535 LMC: 0 SM lid: 0 Capability mask: 0x2651e848 Port GUID: 0x248a0703000de288 Link layer: InfiniBand CA 'mlx5_1' CA type: MT4119 Number of ports: 1 Firmware version: 12.23.1020 Hardware version: 0 Node GUID: 0x248a0703000de26c System image GUID: 0x248a0703000de26c Port 1: State: Initializing Physical state: LinkUp Rate: 100 Base lid: 65535 LMC: 0 SM lid: 0 Capability mask: 0x2651e848 Port GUID: 0x248a0703000de26c Link layer: InfiniBand CA 'mlx5_2' CA type: MT4119 Number of ports: 1 Firmware version: 12.23.1020 Hardware version: 0 Node GUID: 0x248a0703001effde System image GUID: 0x248a0703001effde Port 1: State: Initializing Physical state: LinkUp Rate: 100 Base lid: 65535 LMC: 0 SM lid: 0 Capability mask: 0x2651e848 Port GUID: 0x248a0703001effde Link layer: InfiniBand CA 'mlx5_3' CA type: MT4119 Number of ports: 1 Firmware version: 12.23.1020 Hardware version: 0 Node GUID: 0x7cfe900300118f22 System image GUID: 0x7cfe900300118f22 Port 1: State: Initializing Physical state: LinkUp Rate: 100 Base lid: 65535 LMC: 0 SM lid: 0 Capability mask: 0x2651e848 Port GUID: 0x7cfe900300118f22 Link layer: InfiniBand CA 'mlx5_4' CA type: MT4119 Number of ports: 1 Firmware version: 12.23.1020 Hardware version: 0 Node GUID: 0x7cfe900300118f26 System image GUID: 0x7cfe900300118f26 Port 1: State: Initializing Physical state: LinkUp Rate: 100 Base lid: 65535 LMC: 0 SM lid: 0 Capability mask: 0x2651e848 Port GUID: 0x7cfe900300118f26 Link layer: InfiniBand CA 'mlx5_5' CA type: MT4119 Number of ports: 1 Firmware version: 12.23.1020 Hardware version: 0 Node GUID: 0x7cfe900300118f25 System image GUID: 0x7cfe900300118f25 Port 1: State: Initializing Physical state: LinkUp Rate: 100 Base lid: 65535 LMC: 0 SM lid: 0 Capability mask: 0x2651e848 Port GUID: 0x7cfe900300118f25 Link layer: InfiniBand CA 'mlx5_6' CA type: MT4119 Number of ports: 1 Firmware version: 12.23.1020 Hardware version: 0 Node GUID: 0x7cfe900300118f24 System image GUID: 0x7cfe900300118f24 Port 1: State: Initializing Physical state: LinkUp Rate: 100 Base lid: 65535 LMC: 0 SM lid: 0 Capability mask: 0x2651e848 Port GUID: 0x7cfe900300118f24 Link layer: InfiniBand CA 'mlx5_7' CA type: MT4119 Number of ports: 1 Firmware version: 12.23.1020 Hardware version: 0 Node GUID: 0x7cfe900300118f23 System image GUID: 0x7cfe900300118f23 Port 1: State: Initializing Physical state: LinkUp Rate: 100 Base lid: 65535 LMC: 0 SM lid: 0 Capability mask: 0x2651e848 Port GUID: 0x7cfe900300118f23 Link layer: InfiniBand
See the Switching Between InfiniBand and Ethernet
section of the NVIDIA DGX-2 User Guide for instructions on
switching the port to InfiniBand or Ethernet, if required.