U.2 NVMe Cache Drive Upgrade from 8 to 16
If you require more than 30 terabytes (useable 28 terabytes) for cache, you can increase the cache to 60 terabytes (useable 56 terabytes) by adding eight more NVMe drives to the DGX-2 System.
U.2 NVMe Cache Drive Upgrade Overview
This is a high-level overview of the steps needed to upgrade the DGX-2 System's
cache size.
- Identify the manufacturer and model of the of currently installed NVMe drives.
- Place an order for additional eight NVME drives.
- Power off the system.
- Install the NVMe drives in the DGX-2 System.
- Power on the system.
- Re-initialize the /raid filesystem to recognize all 16 drives.
Identifying the NVMe Drive Manufacturer
- Identify the drives in the RAID volume.
$ sudo nvsm show /systems/localhost/storage/volumes/md1 Properties ... Drives = [ nvme2n1, nvme3n1, nvme4n1, nvme5n1, nvme6n1, nvme7n1, nvme8n1, nvme9n1 } ... - Select one of the drives listed in the Drives= entry from the
previous command, and then enter the following command, where X corresponds to
the drive that you selected.
$ sudo nvsm show /systems/localhost/storage/drives/nvmeXn1
Example showing an excerpt of the output for nvme5n1./systems/localhost/storage/drives/nvme5n1 Properties: Capacity = 3840755982336 BlockSizeBytes = 7501476528 SerialNumber = 174719FCF9F1 PartNumber = N/A Model = Micron_9200_MTFDHAL3T8TCT Revision = 100007H0 Manufacturer = Micron Technology Inc Status_State = Enabled Status_Health = OK Name = Non-Volatile Memory Express MediaType = SSD IndicatorLED = N/A EncryptionStatus = N/A HotSpareType = N/A Protocol = NVMe NegotiatedSpeedsGbs = 0 Id = 5
- Determine the manufacturer (Samsung or Micron) and model from the Model= entry in the output, and then order the additional drives from NVIDIA Enterprise Support, specifying the manufacturer and model.
Installing the Optional NVMe Drives
- Be sure you have obtained the additional drives.
- Back up any critical data to a network shared volume or some other means of backup.
- Power off the system using the power button.
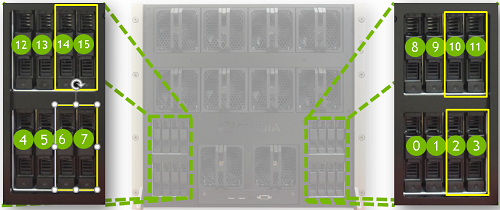
- Remove the blank filler disks from slots 2, 3, 6, 7, 10, 11, 14, and 15. Squeeze the levers on the handle and pull the blank filler disks out.
- Install the additional eight NVMe drives in slots 2, 3, 6, 7, 10, 11, 14, and 15.
- Power on the system.
Perform the tasks describes in the chapter U.2 NVMe Cache Drive Post-Installation
Tasks.