Front Fan Module Replacement
Front Fan Module Replacement Overview
This is a high-level overview of the steps needed to replace the front fan
modules.
- Identify the failed front fan module through the BMC and submit a service ticket to NVIDIA Enterprise Support.
- Get a replacement from NVIDIA Enterprise Support.
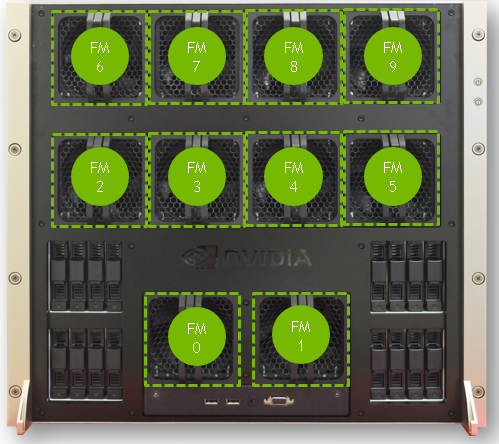
- Remove the failed fan module using the fan numbering diagram as a reference.
- Insert the new fan module.
- Confirm the new fan module is working correctly through the BMC or NVSM.nvsm show health
- Return the bad fan module using the packaging from the new fan module.
Identifying the Failed Fan Module
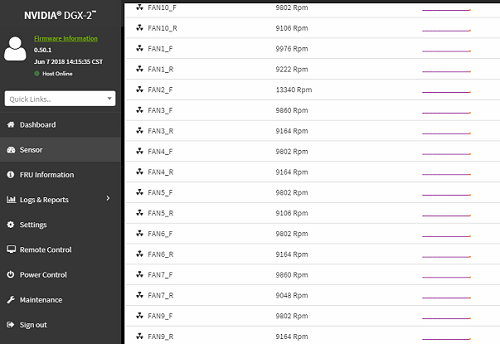
- Log on to the BMC.
- Click Sensor from the left navigation menu, then review the Normal Sensors section. There are two fans in the fan module, identified by FANn_F or FANn_R , wheren is the module ID. If either fan fails, then the entire module must be replaced.
- Use NVSM to confirm the fan issue.
$ sudo nvsm show health
In the output, look for the 'unhealthy' status for the same fan.
Replacing and Returning the Front Fan Module
- Remove the new fan module from its packaging and be ready to install it.
- Locate the failed fan module on the physical system using the following diagram.
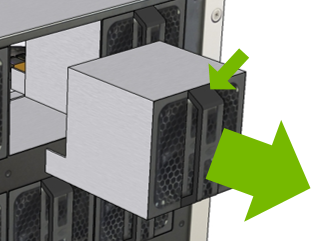
- Remove the failed front fan module by pressing on the tab and pulling on the handle.
- Quickly insert the new fan module, observing that the handle release mechanism
is facing up and the rear connector is facing down.CAUTION:Replace the fan module within 30 seconds to prevent overheating of the system components.
- Confirm that the fan module is working properly by verifying on the BMC and by using NVSM (nvsm show health) to confirm the replaced fan is healthy.
- Use packaging to pack up the bad fan and follow the shipping instructions to return the bad fan to NVIDIA Enterprise Support