M.2 Boot Drive Riser Assembly Replacement
This chapter applies when both M.2 OS drives need to be replaced. In that case, a replacement riser assembly (which includes both M.2 NVMe drives) should be ordered.
M.2 Boot Drive Riser Assembly Replacement Overview
This is a high-level overview of the procedure to replace the boot drive riser
assembly.
- Confirm that both M.2 drives cannot be reached and need to be replaced.
- Get replacement from NVIDIA Enterprise Support.
- Power down the system.
- Label all motherboard tray cables and unplug them.
- Remove the motherboard tray and place on a solid flat surface.
- Remove the motherboard tray lid.
- Pull out the M.2 riser assenbly with both M.2 disks attached.
- Install the new M.2 riser assenbly with both M.2 disks attached..
- Close the lid on the motherboard tray.
- Insert the motherboard tray into the system.
- Plug in all cables using the labels as a reference.
- Power on the system.
- Re-install the OS.
Replacing the M.2 NVMe Riser Assembly
Before attempting to replace the M.2 NVMe riser assembly, be sure you have obtained
the replacement assembly and have saved the packaging for use when returning the faulty
riser assembly.
- Power down the system. You will likely need to use the BMC console.
- Label all cables connected to the motherboard tray for easy identification when reconnecting.
- Remove the motherboard tray.
Refer to the instructions in the section Removing the Motherboard Tray.
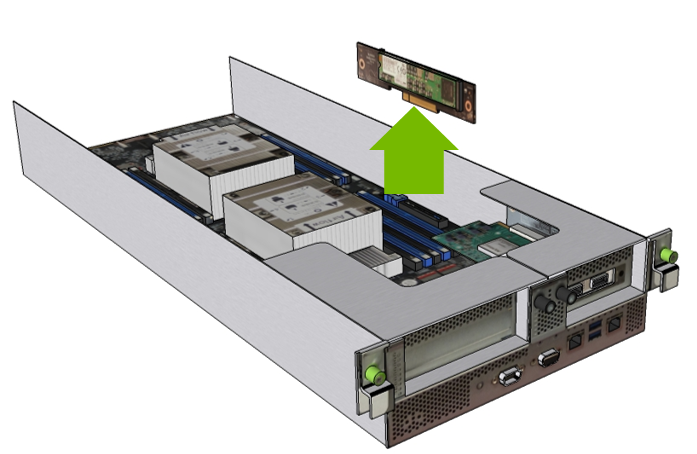
- Remove the M.2 modules and the riser card from the motherboard tray by pushing on the clip to release the riser.
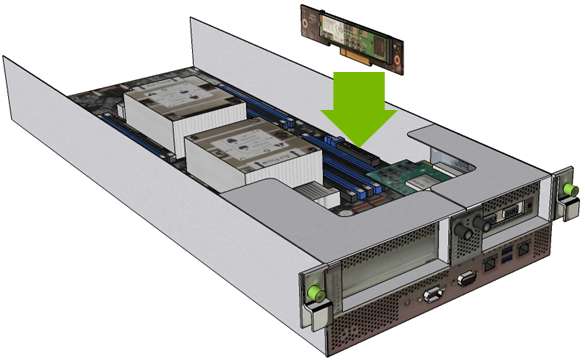
- Install the assembled module on the motherboard by inserting the the riser card in its slot.
- Install the motherboard tray lid and then install the motherboard tray.
Refer to the instructions in the section Installing the Motherboard Tray.
- Connect all the cables to the motherboard tray.
- Re-install the DGX OS server software. See the DGX-2 User Guide for detailed instructions.
Returning the NVMe Drive/Riser Assembly
Use the packaging from the new drive/riser assembly and follow the instructions
that came with the package to ship the old drive/riser assembly back to NVIDIA
Enterprise Support.
Note: If your organization has purchased a media retention policy,
you may be able to keep failed drives for destruction. Check with NVIDIA Enterprise
Support on the status of the policy for specifics.